Introduction
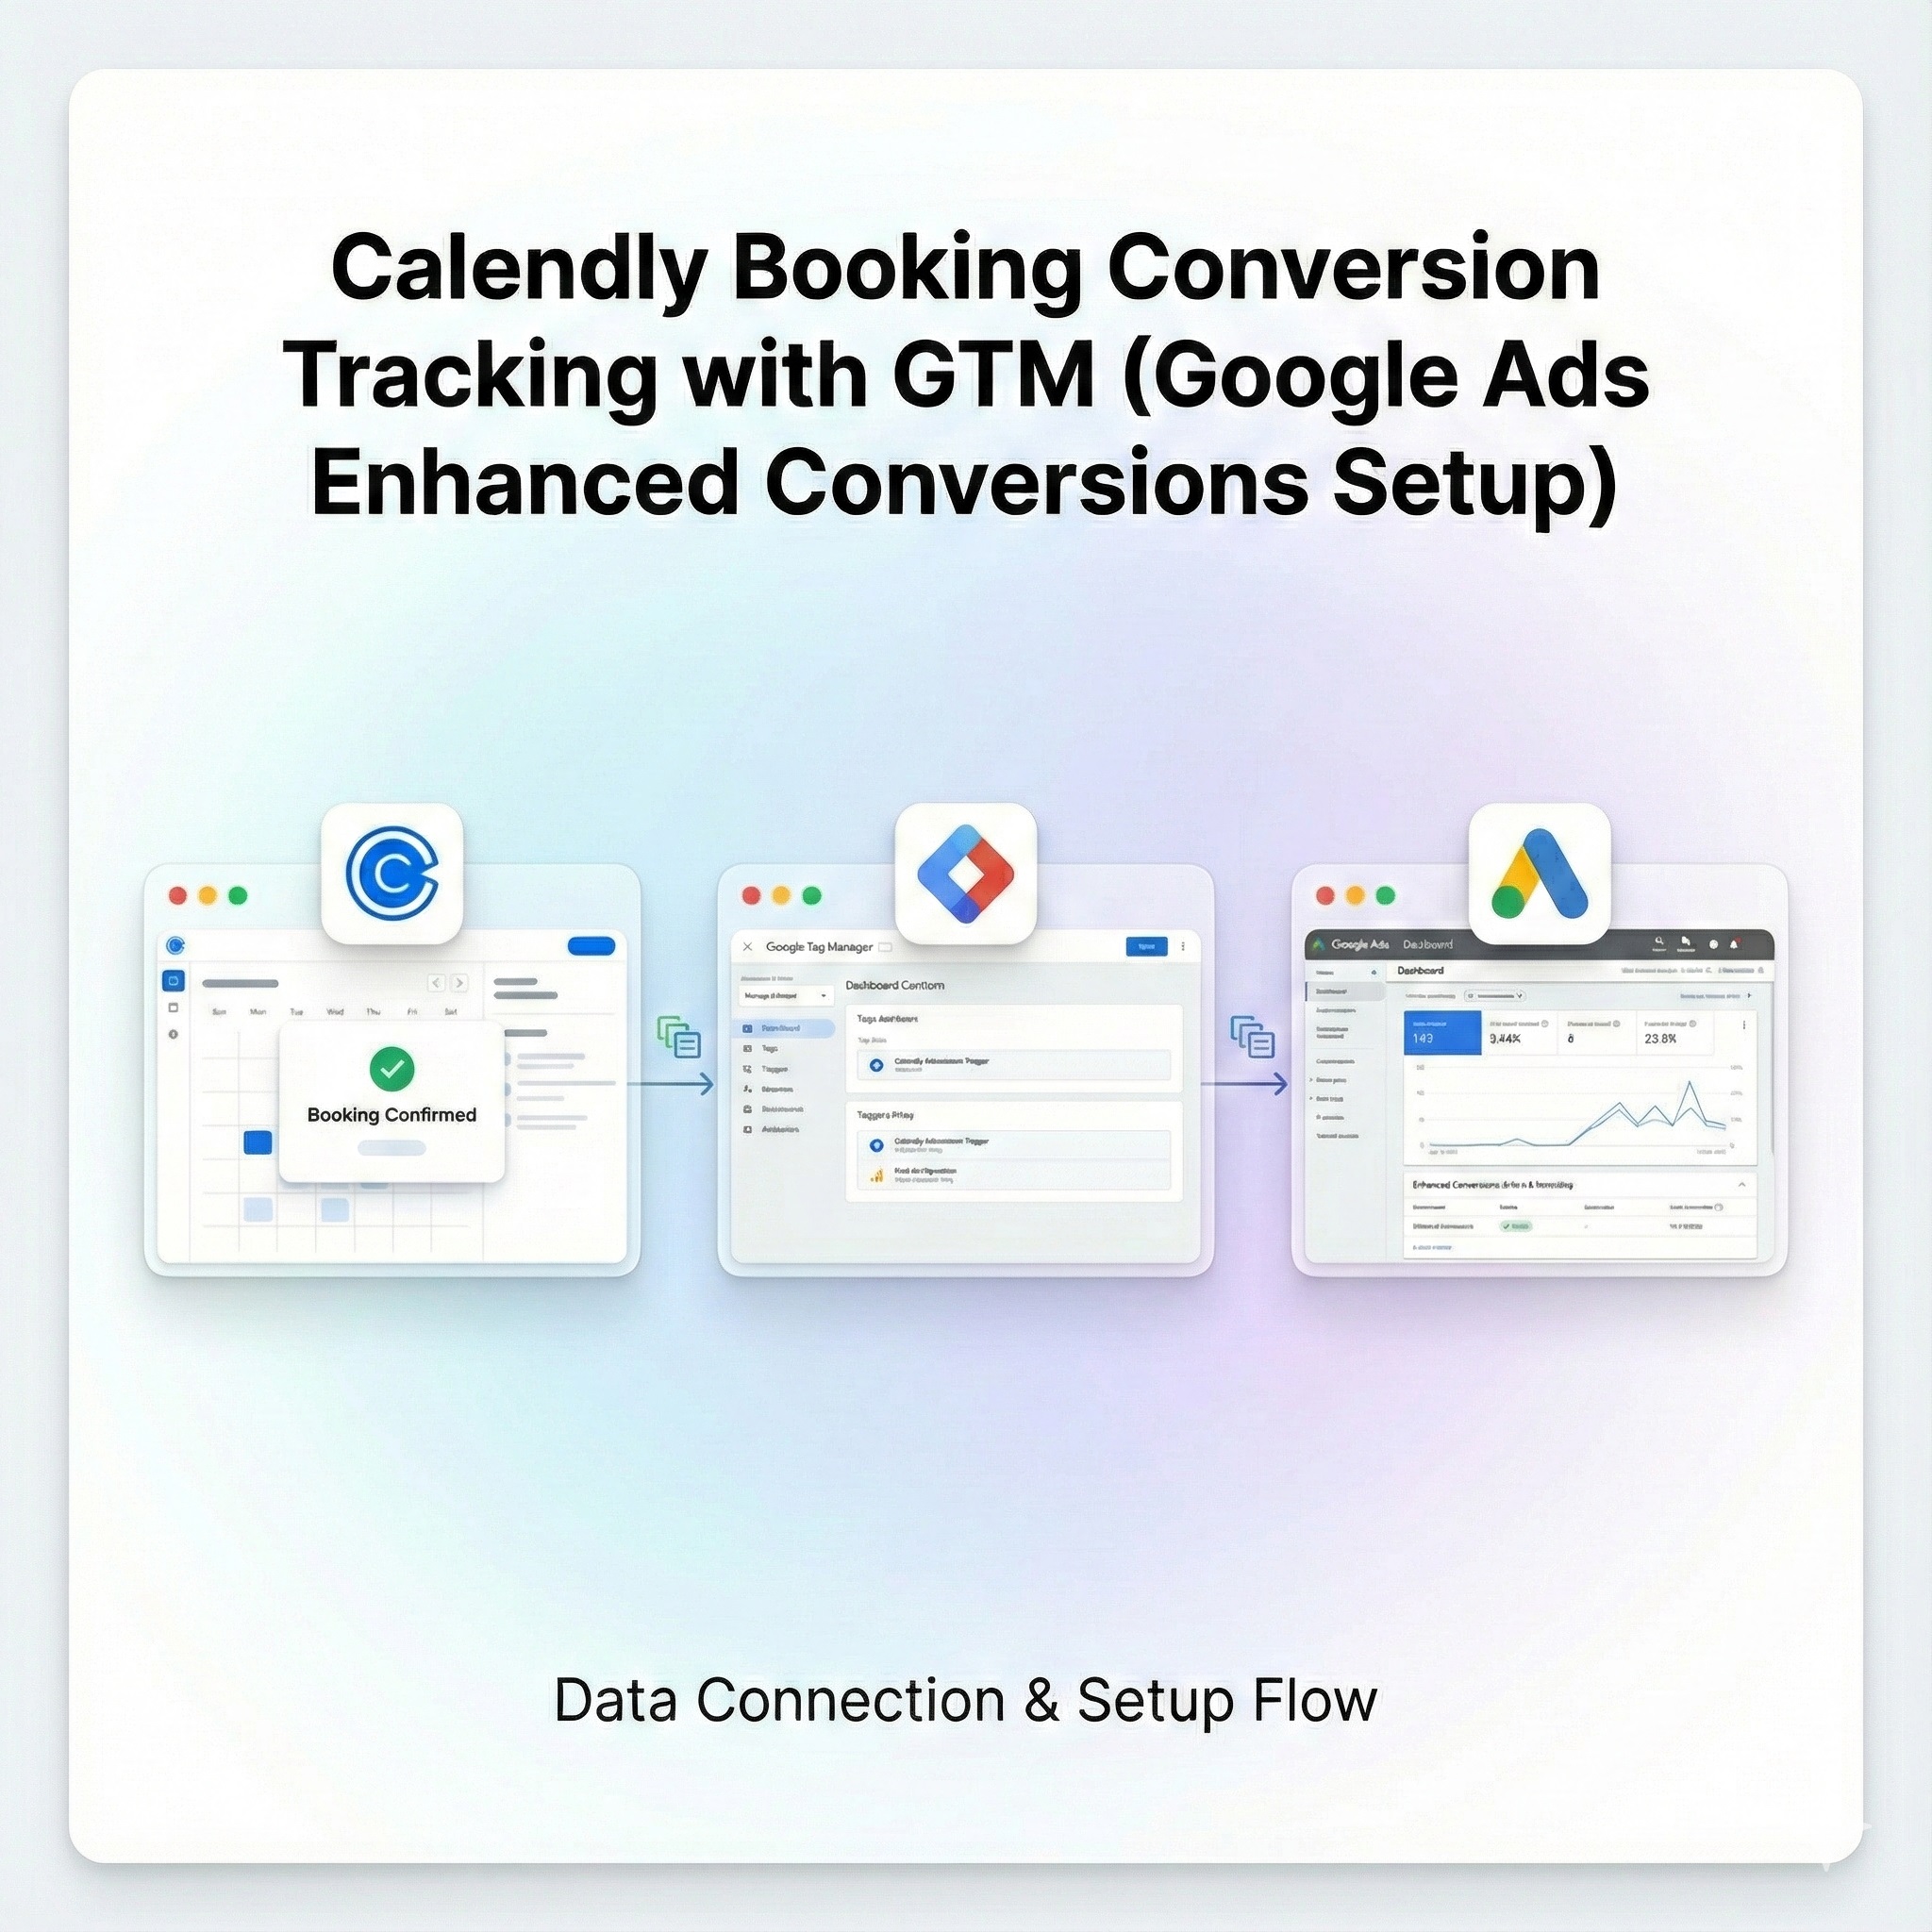
Calendly is a powerful scheduling tool. However, for marketers, simply scheduling meetings isn’t sufficient—accurate conversion tracking is also essential. By properly setting up Calendly booking conversion tracking using Google Tag Manager (GTM) and activating Google Ads Enhanced Conversions, you can effectively measure and optimize your advertising campaigns. This blog post details the precise steps outlined in the accompanying video tutorial.
Prerequisites
To follow this guide, you will need:
- A Google Tag Manager (GTM) account already installed on your website.
- A Google Ads account with a conversion action established.
- Access to your Calendly booking platform.
- Website access to implement the GTM container code.
Need Professional Help?
- Hire Me for Setup: WhatsApp Me
- Book a Consultation: Schedule a Call
Step-by-Step Setup Guide
Method 1: Google Ads Standard Conversion Tracking (Using Calendly Listener Code)
Step 1: Implement the Calendly Listener in GTM
- Create a Custom HTML Tag: Open Google Tag Manager (GTM) and create a new tag, selecting the “Custom HTML” option.
- Paste the Code: Insert your Calendly listener code into this Custom HTML tag.
- Save and Publish: Save the tag and then publish the GTM container to make the changes live.

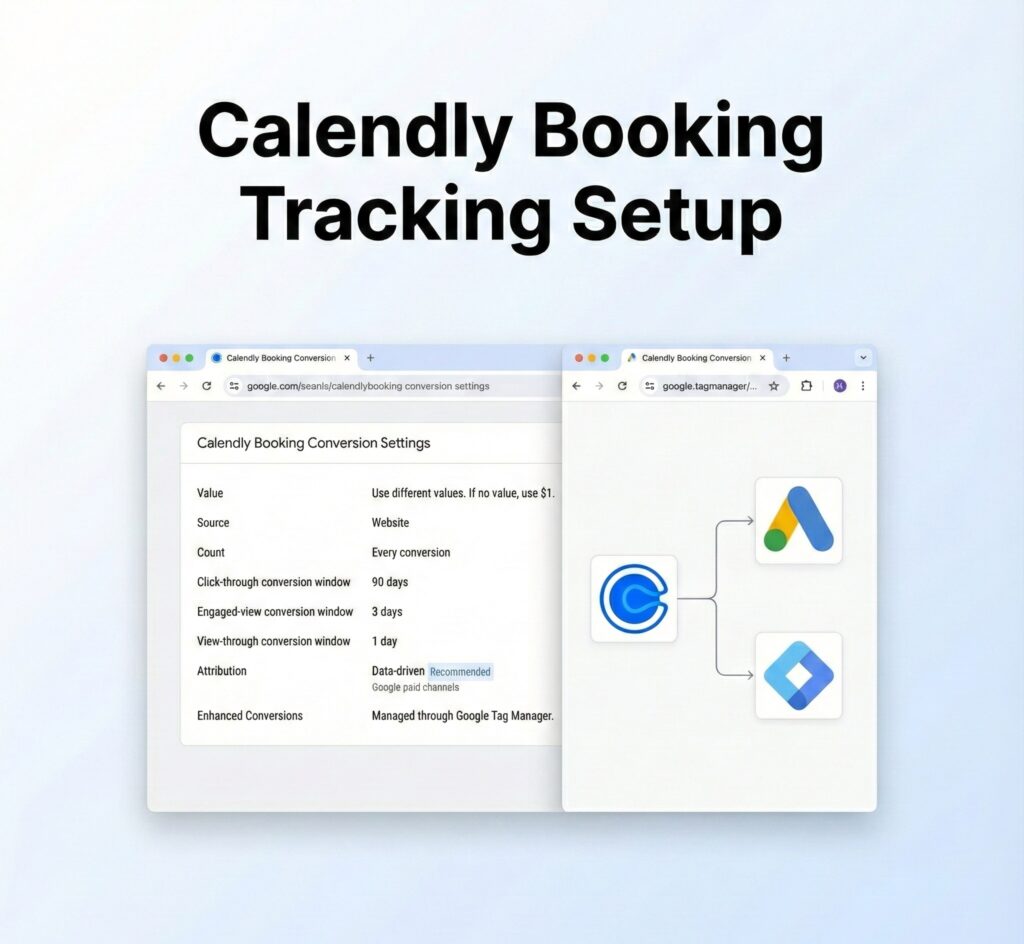
Step 2: Setting up the Calendly Booking Conversion Action in Google Ads
- Navigate to Google Ads → Tools & Settings → Goals → Conversions.
- Select + New Conversion Action and choose Website.
- Configure the conversion action:
- Click Done and then Save and Continue.
Step 3: Implement Tags in Google Tag Manager (GTM)
- Obtain the Conversion ID and Conversion Label from your Google Ads Conversion Action.
- Input these values into the relevant settings within the GTM tag configuration.
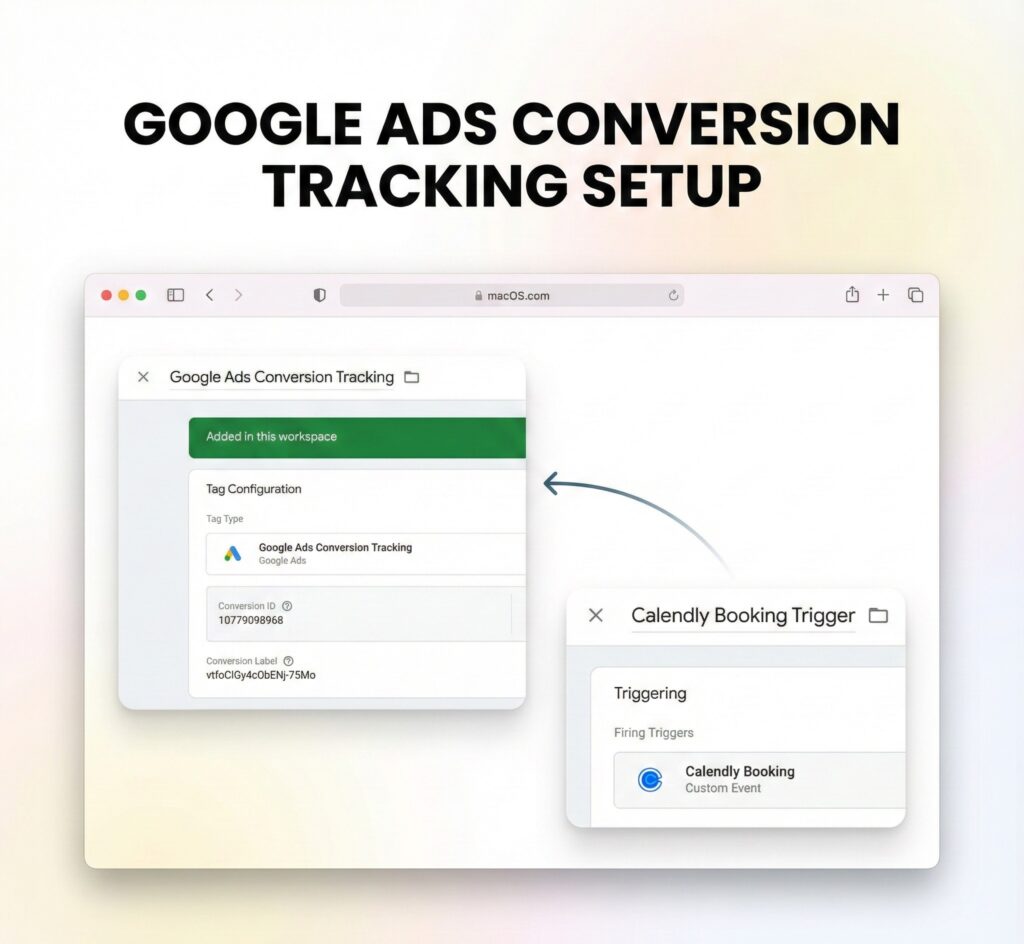
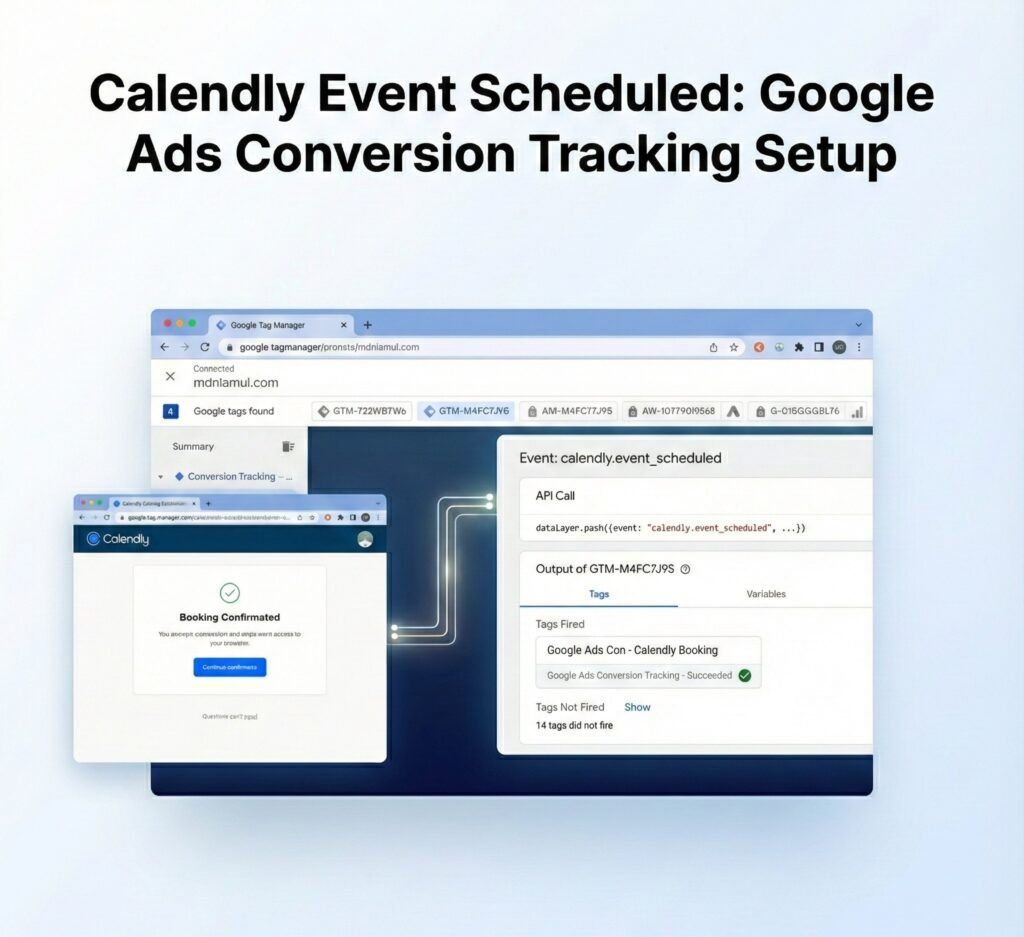
Step 4: Setting up a Trigger for Calendly Event Tracking
- Navigate to Triggers and click New.
- Select Custom Event as the Trigger Type.
- Set the Event Name to: calendly.event_scheduled.
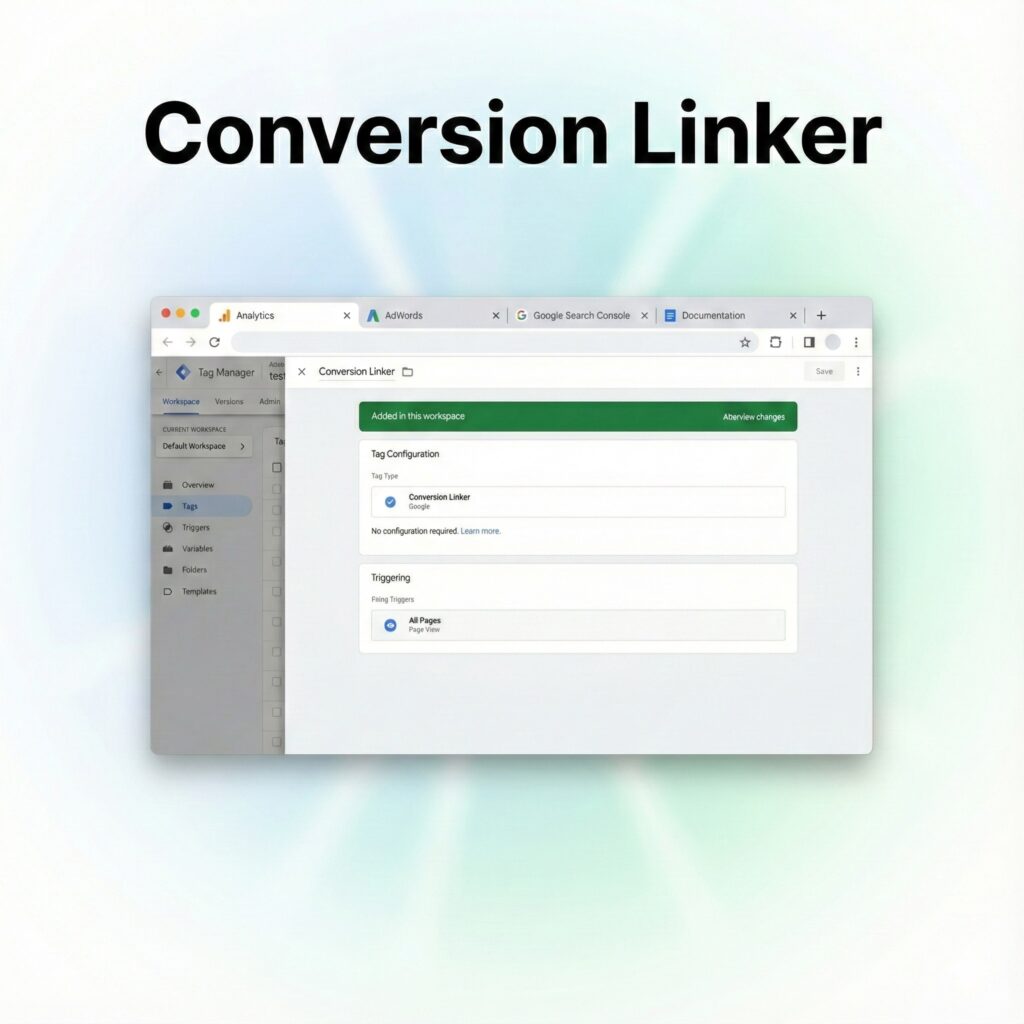
Step 5: Implementing the Google Ads Conversion Linker Tag
- In GTM, create a second New Tag.
- Choose the Tag Type as Google Ads Conversion Linker.
- Configure the Trigger for this tag to All Pages.
- Save the tag and then Publish the changes to the container.
Method 2: (Method 2, using Thank You Page Redirection), you need to set up the redirect within your Calendly booking event.
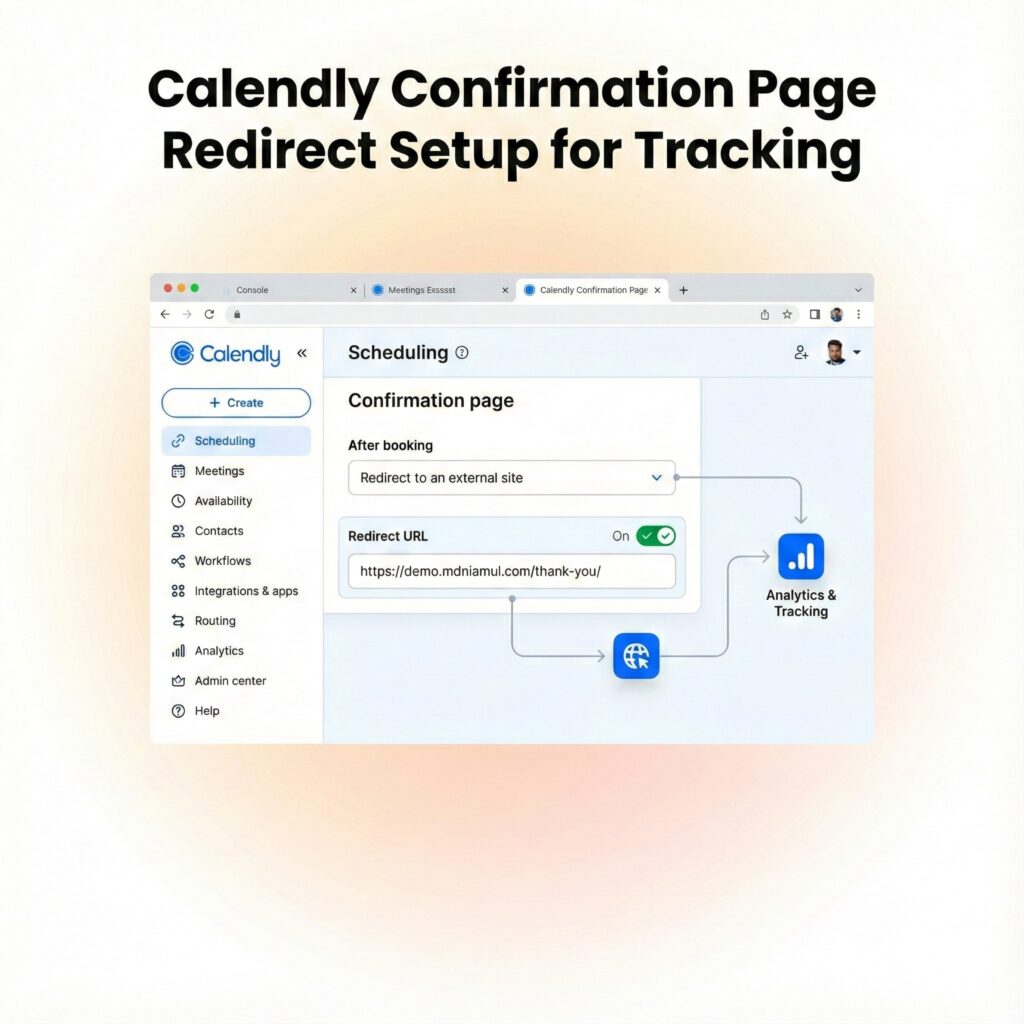
Step 6: Set Up Thank You Page Redirection in Calendly
- Go to the “Notifications and Cancellation Policy” section, then select “Confirmation Page.”
- Choose the option “Redirect to External Site.”
- Input the complete URL for your custom Thank You Page (e.g., [https://demo.mdniamul.com/thank-you]
- Important: Check the box to “Pass event details to your redirected page.”
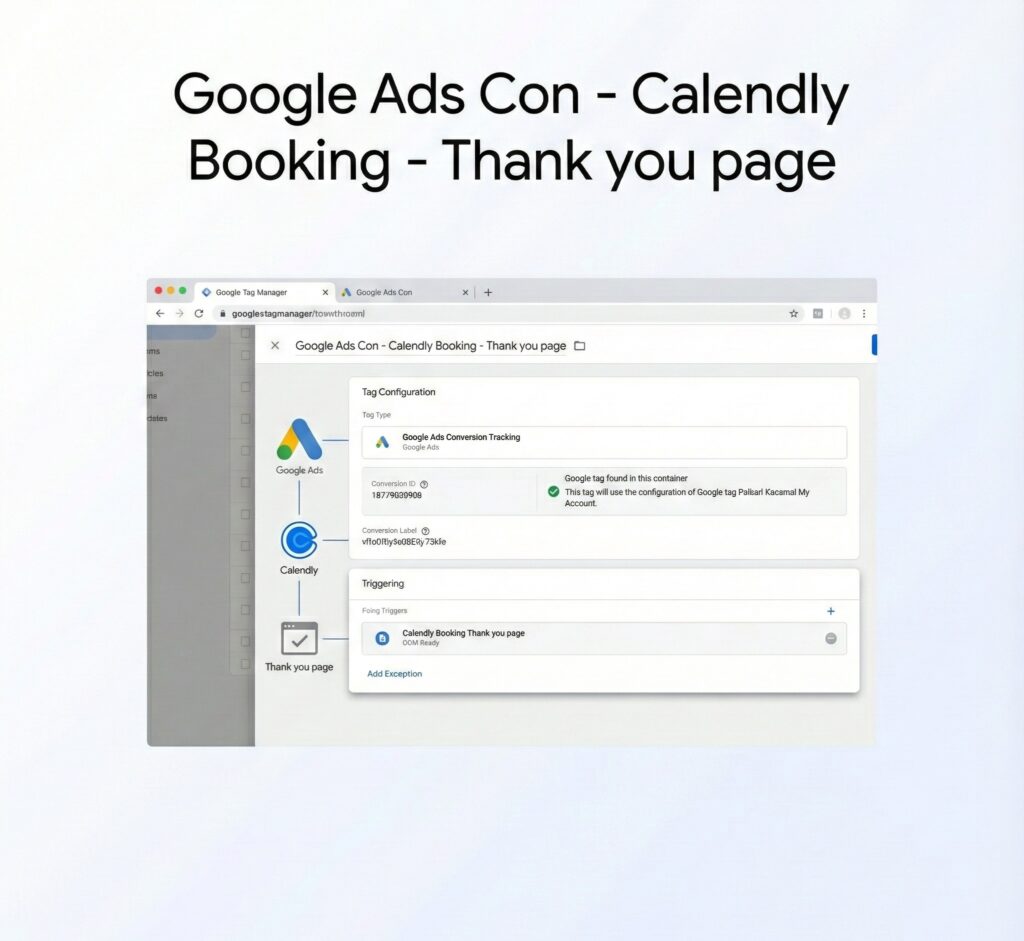
Step 7: Implement Conversion Tracking with Google Tag Manager (GTM)Navigate to Tags:
In your GTM workspace, go to “Tags” and click “New.”
- Select Tag Type: Choose the “Google Ads Conversion Tracking” tag.
- Configure Conversion Details: Input the required Conversion ID and Label, which you obtained from your Google Ads account.
- Set the Trigger:
-Select "Page View" as the trigger type.
-Define the Firing Rule: Set the condition to fire the tag when the Page URL contains /thank-you (or the exact URL of your Calendly or other confirmation page).
-Specify that the tag should fire on "Some Page Views."
5. Save: Save your new conversion tracking tag.
Step 8: Enhanced Conversions Setup
Activate Enhanced Conversions: Within the Google Ads Conversion Tag settings, scroll down and enable Enhanced Conversions.
- Select Manual Setup: Choose the option for Manual setup.
- Capture Data with GTM Variables: Utilize Google Tag Manager (GTM) variables to capture the following information from the Calendly form: (First Name, Last Name, Phone Number, Email)
- Variable Mapping: Ensure all GTM variables are correctly mapped to the corresponding enhanced conversion fields.
- Finalize: Save and close the configuration.

Step 9: Test Setup Verification
- Utilize GTM Tag Assistant for previewing.
- Schedule a Calendly appointment.
- Check for the successful redirect to the ‘Thank You’ page.
- Confirm that the Google Ads Conversion Tag has fired.
Step 10: Finalizing and Publishing in GTM
- Once verification is complete, click Submit and then Publish in Google Tag Manager (GTM).
- Your Calendly booking conversion tracking is now active and live.
Step 11: Confirmation in Google Ads
- Return to your Google Ads account and navigate to the Conversions section.
- Check the current status of your conversion action.
- Initially, the status may be displayed as Unverified. However, after conducting a few test bookings, the status will update to Recording Conversions.
Frequently Asked Questions (FAQ)
Q1. Do I need a paid Calendly plan for Google Ads conversion tracking?
No, you can track conversions with the free version by using GTM and Google Ads.
Q2. Can I set up tracking without a thank you page?
Yes, you can track using Calendly event completion triggers in GTM.
Q3. Why do I need the Conversion Linker tag in GTM?
It ensures proper tracking and attribution for Google Ads conversions.
Q4. How do I verify if the tracking works?
Use Google Tag Assistant and Google Ads Conversion Debugger to test.
Q5. Will enhanced conversions improve my tracking?
Yes, enhanced conversions increase accuracy by sending hashed customer data securely.
Conclusion
By following these steps, you’ve successfully implemented Calendly Booking Conversion Tracking using GTM and validated your data with Google Ads Enhanced Conversions. This accurate booking data now allows you to confidently optimize ad spend and gain better customer insights.
Q1. Enhanced Conversions required?
Yes. Enhanced Conversions significantly improve attribution accuracy by securely sending hashed first-party data. This allows Google Ads to recover conversions lost due to cookie restrictions and improve Smart Bidding performance.
Q2. Calendly redirect mandatory?
Yes. A redirect thank-you page is required for reliable conversion tracking. It ensures GTM can fire conversion tags consistently and capture enhanced conversion data accurately.
Q3. GCLID still needed?
Yes. GCLID remains the most reliable identifier for Google Ads attribution. Enhanced Conversions complement GCLID but do not fully replace it.
Q4. Works without GA4?
Yes. Google Ads Enhanced Conversions work independently of GA4. GA4 is optional but recommended for behavioral analysis.
Q5. Multiple event types?
Yes. You can track different Calendly event types using separate thank-you pages or event-based triggers in GTM.
Q6. Phone number required?
No. Email alone is sufficient for Enhanced Conversions. Adding phone increases match quality but is optional.
Q7. GDPR compliant setup?
Yes. When implemented with Consent Mode v2, Enhanced Conversions remain GDPR-compliant while respecting user consent.
Q8. Server-side supported?
Yes. Enhanced Conversions work even better with server-side GTM, improving data reliability and bypassing ad blockers.
Q9. iOS tracking supported?
Yes. Enhanced Conversions improve attribution on iOS by using hashed first-party data instead of third-party cookies.
Q10. Smart Bidding impact?
Enhanced Conversions feed higher-quality data into Smart Bidding, resulting in better optimization toward real bookings.
 Need Help Advanced Tracking Setup?
