Introduction
Imagine this scenario: You own a successful salon, a bustling gym, or a high-end wellness spa. You are investing thousands of dollars every month into Google Ads to attract new clients. You can see the traffic coming to your site. You can see your Vagaro calendar filling up with appointments.
But there is a massive, expensive disconnect.
When you look at your Google Ads dashboard, it shows zero conversions. Or perhaps it shows a handful of conversions, but the Cost Per Lead (CPL) is astronomically high, and the numbers don’t match your actual revenue. You have no idea which keyword brought in that client who spent $200 on a premium service, and which keyword just wasted your budget on window shoppers.
This is the “Black Box” problem, and it plagues almost every business using Vagaro.
Vagaro is an exceptional booking platform, but when you embed it on your website (usually via a widget or an “iframe”), it creates a technical wall. Standard Google Ads tracking tags placed on your main website cannot “see” through this wall. They don’t know when a user inside that Vagaro window clicks “Confirm Booking.” They don’t know the booking value. And they certainly don’t know who booked it.
Today, we are going to dismantle that wall.
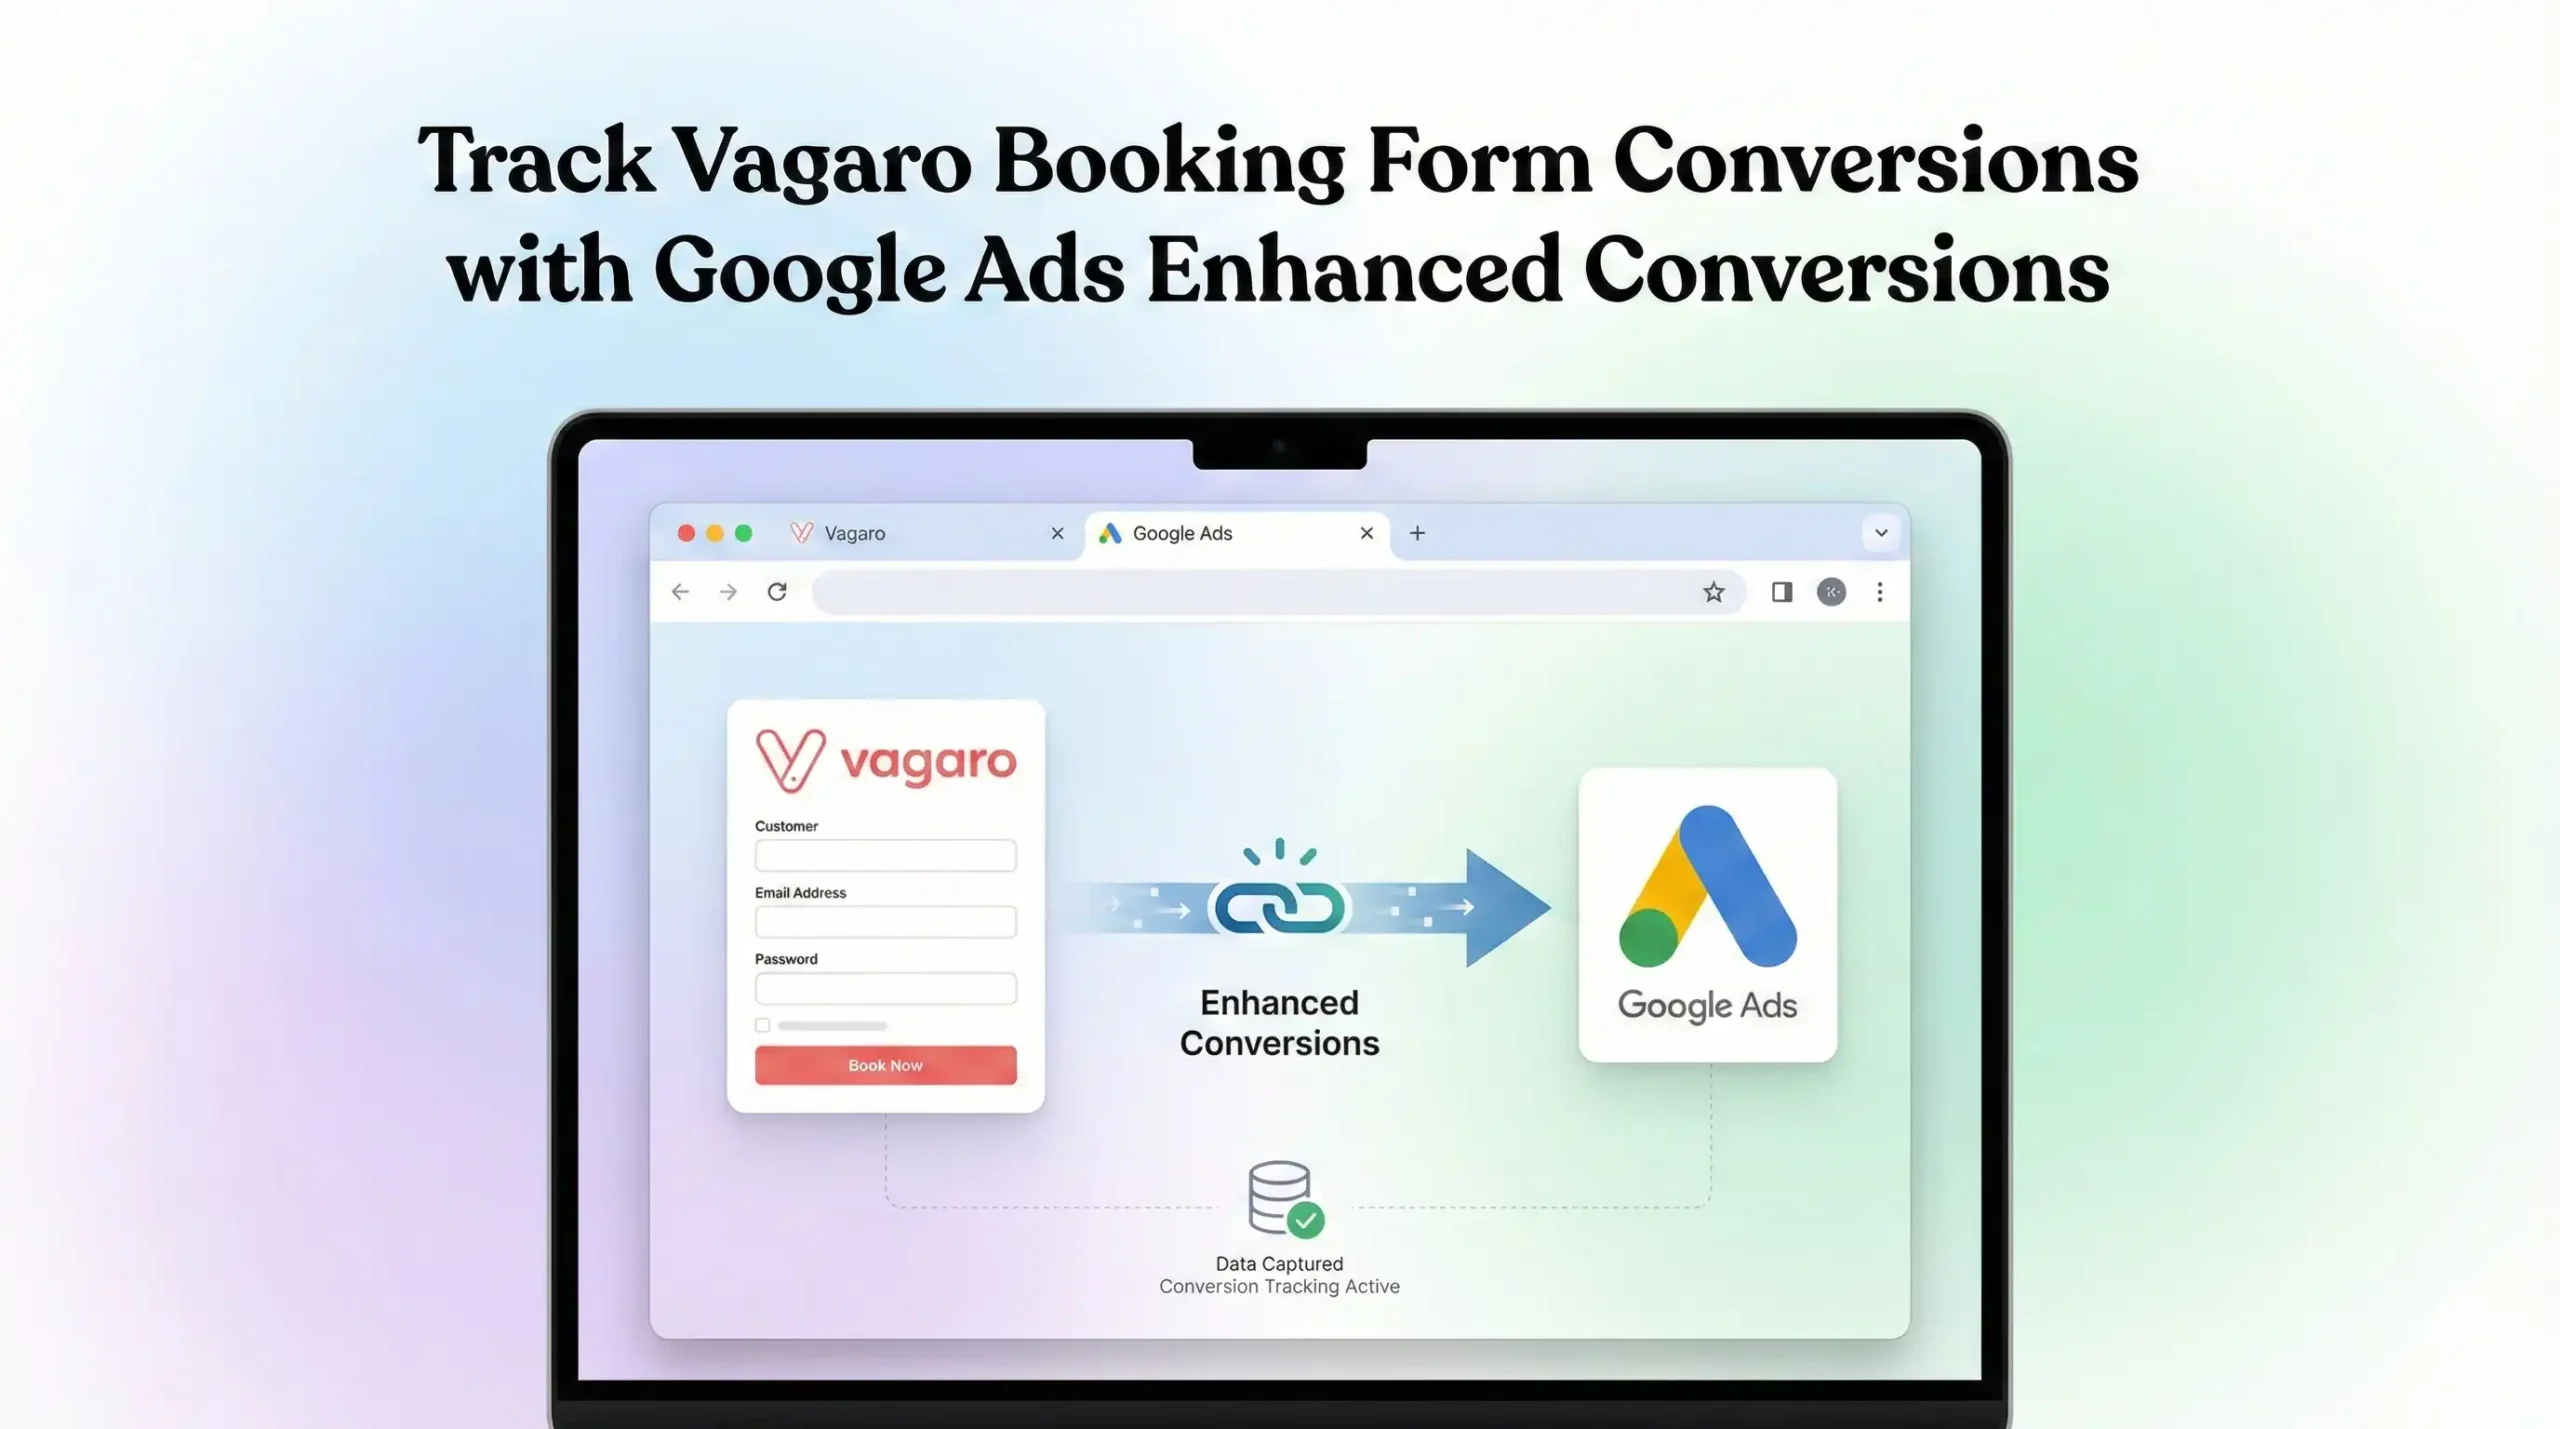
We will not just track a simple “page view”; we are going to implement Google Ads Enhanced Conversions. This means when a client books a service, we will securely capture their first-party data (like their email address) and send it back to Google Ads in a hashed, privacy-compliant format.
This guide is your roadmap. We will use Google Tag Manager (GTM) to build a sophisticated “listening” station that bridges the gap between your website, your Vagaro widget, and Google Ads.
he Strategic Importance: Why You Must Set This Up
If you ignore this setup, you are effectively flying a plane while blindfolded. You are making financial decisions based on guesses rather than hard data.
The Problem: The Silent Budget Killer
Without accurate conversion tracking, Google’s powerful artificial intelligence (AI) is operating in the dark. It doesn’t see your successes. When Google doesn’t see conversions, it assumes your ads are failing.
It stops showing your ads to your “ideal” customers because it doesn’t know who they are.It wastes your budget on low-quality clicks that never convert.It prevents you from using automated bidding strategies that could save you thousands of dollars.
The Solution: Data-Driven Dominance
By implementing the Vagaro listener and Enhanced Conversions, you feed the system the truth. You tell Google, “This specific ad click resulted in a verified booking worth $150.”
The 5 Key Benefits
1. Better Algorithm Training (Smart Bidding)
Google Ads uses advanced automated bidding strategies like “Maximize Conversions” or “Target ROAS” (Return on Ad Spend). These strategies rely 100% on conversion data. When you feed accurate booking data from Vagaro into Google Ads, the AI learns the digital profile of people who actually book appointments. It then scans the internet to find more people just like them.
2. Higher ROI and ROAS
When the algorithm works better, your money works harder. You stop wasting budget on clicks that never convert. Your Cost Per Acquisition (CPA) goes down, and your Return on Ad Spend (ROAS) skyrockets because every dollar is directed toward high-intent users who are ready to book.
3. Accurate Reporting and Attribution
Stop guessing. With this setup, you will see exactly which campaigns, ad groups, and keywords are driving revenue. Did that booking come from the “Generic Spa” keyword or the specific “Deep Tissue Massage Promo” ad? You will finally have the answer, allowing you to cut losing ads and double down on winners.
4. Enhanced Audience Building
Enhanced Conversions allows you to securely send hashed customer data (like email addresses) to Google. Google matches this data against its own vast user base of signed-in users. This allows you to build highly accurate “Customer Match” lists. You can then create “Similar Segments” (Lookalikes) to target new people who share the same traits as your best customers.
5. Future-Proofing Your Tracking
The digital world is moving away from third-party cookies due to privacy regulations and browser changes (like Safari’s ITP). Old methods of tracking are dying. Enhanced Conversions relies on first-party data—information the user gives you directly. This makes your tracking robust, resilient, and future-proof against browser restrictions.
Prerequisites & Checklist
Before we dive into the technical implementation, you must ensure you have the following tools and access levels ready. This is a complex setup, and preparation is key.
Required Access:
- Google Tag Manager (GTM): You need “Admin” or “Publish” access to the container installed on your website.
- Google Ads Account: You need “Admin” access to create conversion actions and accept the Terms of Service for customer data.
- Website Backend: Access to your website’s CMS (WordPress, Wix, Squarespace, etc.) to ensure the GTM container code is installed correctly on every page.
- Cookiebot Account: Access to your Cookiebot account to retrieve your Domain Group ID for the Consent Mode V2 setup.
- Vagaro Account: Access to your Vagaro settings to configure the widget or redirect URLs if necessary.
Required Tools:
- Google Chrome Browser: The standard browser for web development and debugging.
- Google Tag Assistant Extension: A free Chrome extension used to verify that your tags are firing correctly.
- GTM Preview Mode: The built-in debugging tool in Google Tag Manager.
Important Note on Vagaro: This guide assumes you are embedding the Vagaro booking widget directly onto a page on your website (e.g., yoursite.com/book-now). If you are sending users directly to your Vagaro profile page (e.g., vagaro.com/yourbusiness), you cannot track them using GTM because you cannot install your tracking code on Vagaro’s website. You must embed the form on your own site.
Solution (Step-by-Step) Implementation Guide
We are going to break this complex process down into logical, manageable phases. Do not skip any steps.
Step 1: Google Tag Manager Setup
First, we need to prepare the “plumbing” in Google Tag Manager. We need to set up the variables that will catch the data and the triggers that will fire our tags.
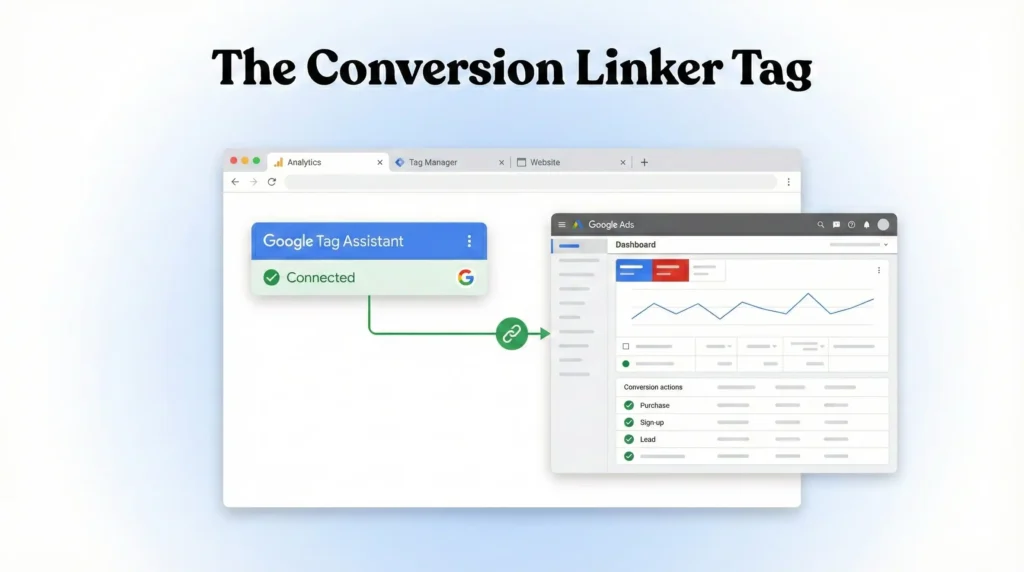
1.1 The Conversion Linker Tag
This tag is incredibly simple but absolutely vital. It helps store ad click information in first-party cookies on your own domain. Without this, Google Ads tracking can often fail, especially for users on iPhones (Safari) due to Intelligent Tracking Prevention.
- Open your Google Tag Manager Workspace.
- Click on Tags in the left-hand menu.
- Click the New button to create a new tag.
- Name: Google – Conversion Linker.
- Tag Configuration: Click the box and select Conversion Linker from the list (under Google).
- Leave the default settings as they are. You rarely need to change anything here.
- Triggering: Click the box and select the All Pages trigger. This is crucial. This tag must fire on every single page of your website to work correctly.
- Click Save.
1.2 Create Data Layer Variables
Later in this guide, our “Listener” code is going to “push” data into the Data Layer when a booking happens. We need to create “Variables” in GTM to “catch” this data so we can use it in our tags.
We need to capture the User’s Email for Enhanced Conversions and potentially the Value of the booking.
- Variable 1: Email Address
- Go to Variables in the left menu.
- Scroll down to the User-Defined Variables section and click New.
- Name: dlv – vagaro_user_email. (Using “dlv” is a standard naming convention for Data Layer Variables).
- Variable Configuration: Select Data Layer Variable.
- Data Layer Variable Name: Enter exactly: vagaro_user_email. This must match the code in Step 4 precisely. It is case-sensitive.
- Click Save.
- Variable 2: Booking Value (Optional but Recommended)
- Click New again.
- Name: dlv – vagaro_value.
- Variable Configuration: Select Data Layer Variable.
- Data Layer Variable Name: Enter exactly: vagaro_value.
- Click Save.
1.3 Create the Trigger
Now we need a trigger that tells GTM: “Hey! A booking just happened! Fire the Google Ads tag now!”
- Go to Triggers in the left menu and click New.
- Name: Custom Event – Vagaro Booking Success.
- Trigger Configuration: Select Custom Event.
- Event Name: Enter exactly: vagaro_booking_success. This must match the code in Step 4 precisely.
- This trigger fires on: Leave it set to All Custom Events.
- Click Save.
Step 2: The [Target Platform] Configuration (Google Ads)
Before we finish in GTM, we must configure Google Ads to accept this new conversion data.
2.1 Create a New Conversion Action
- Log into your Google Ads account.
- Click the Goals icon (trophy) in the top menu, then select Conversions, and click Summary.
- Click the blue + New conversion action button.
- Select Website from the list of conversion types.
- Enter your website domain URL to scan the site. Click Scan.
- Scroll down past the automatic suggestions and click + Add a conversion action manually.
2.2 Configure Conversion Details
- Goal and action optimization: Select Book appointment from the dropdown category.
- Conversion name: Give it a clear name, e.g., Vagaro Booking – Enhanced.
- Value: Select Use different values for each conversion. If you know a booking is worth an average amount (e.g., $50), enter it here as a default. If not, enter $0. (Our code will try to inject the real value later).
- Count: Select One. This is important. If a user accidentally double-clicks the booking button, you only want to count it as one lead, not two.
- Click-through conversion window: 90 days is standard.
- Engaged-view conversion window: 3 days is standard.
- View-through conversion window: 1 day is standard.
- Attribution: Stick with Data-driven.
- Click Done.
2.3 Enable Enhanced Conversions
This is the most critical step for this specific guide.
- You will now see your new conversion listed. Click on it to open its settings.
- Click on the section labeled Enhanced conversions.
- Check the box that says Turn on enhanced conversions.
- You will be asked to select a method. Choose Google Tag Manager.
- Click Save (or “Agree and Continue” if prompted with legal terms regarding customer data).
2.4 Get the Conversion ID and Label
- Go back to the Conversion Summary page.
- Click on your new Vagaro Booking – Enhanced conversion action.
- Click on the Tag setup section to expand it.
- Select the option Use Google Tag Manager.
- You will see two important numbers: Conversion ID and Conversion Label. Copy these numbers into a notepad or keep this tab open. You will need them in Step 4.
![The [Target Platform] Configuration (Google Ads)](https://mdniamul.com/wp-content/uploads/2026/01/2-1024x572.webp)
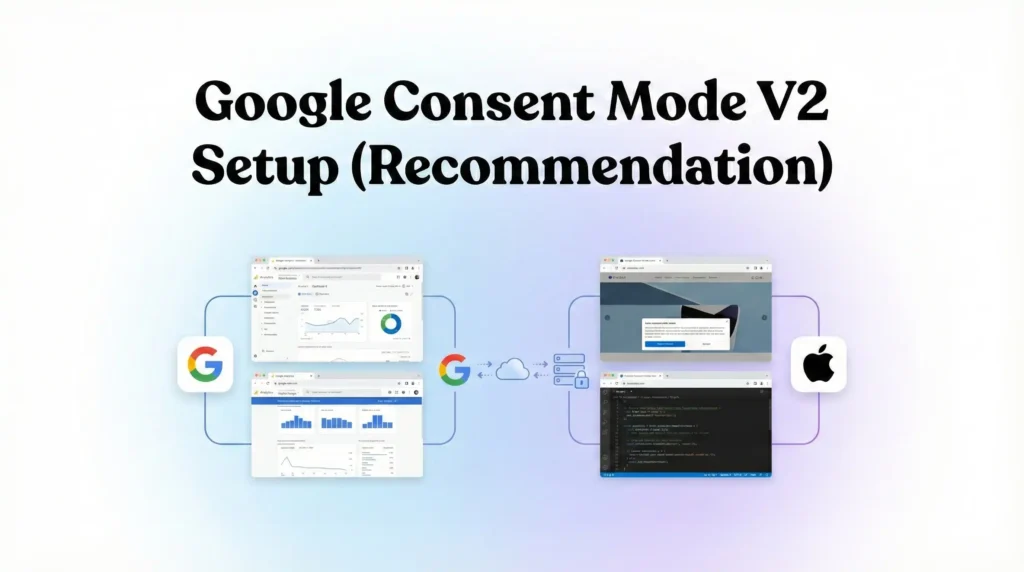
Step 3: Google Consent Mode V2 Setup (Recommendation)
In today’s digital landscape, complying with privacy laws like GDPR is mandatory. If you have traffic from Europe or the UK, you must use Google Consent Mode V2.
This framework allows your website to tell Google tags whether a user has given consent to be tracked. If they deny consent, the tags will run in a “restricted” mode (sending pings without cookies), keeping you compliant while preserving some data modeling.
We will use Cookiebot as our Consent Management Platform (CMP).
3.1 Add the Cookiebot Template
- In GTM, go to Templates on the left menu.
- Look in the Tag Templates section and click the Search Gallery button.
- In the search bar, type Cookiebot.
- Select the official template named Cookiebot CMP by Cookiebot.
- Click the blue Add to workspace button. Confirm the permissions by clicking Add.
3.2 Configure the Cookiebot Tag
- Go back to Tags and click New.
- Name: CMP – Cookiebot Consent Mode V2.
- Tag Configuration: Select the Cookiebot CMP template you just added.
- Cookiebot ID: You need to find this in your Cookiebot account dashboard under Settings > Your domain group. It is a long alphanumeric code. Copy it and paste it here.
- Crucially, ensure the checkbox labeled Enable Google Consent Mode is checked.
- Default Consent State: For strict compliance (GDPR), you generally want to set the defaults to Denied. This means no tracking happens until the user explicitly clicks “Accept” on your banner.
- Set ad_storage to Denied.
- Set analytics_storage to Denied.
- Set ad_user_data to Denied.
- Set ad_personalization to Denied.
- Triggering: Select the Consent Initialization – All Pages trigger. Do NOT select the standard “All Pages” trigger. This specific trigger ensures the consent settings are loaded before any other tags try to fire.
- Click Save.
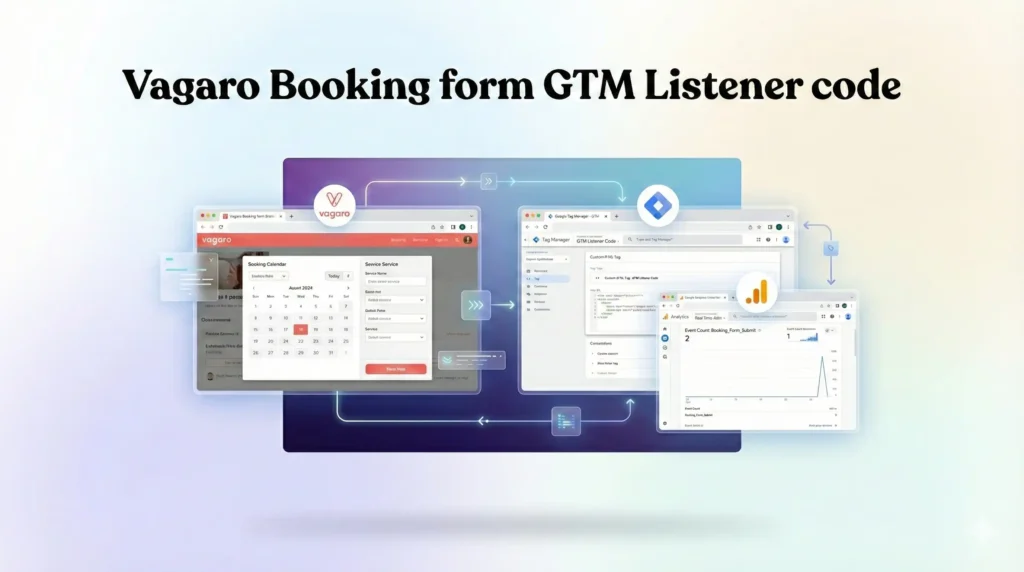
Step 4: The Code (The Vagaro Listener)
Now we face the challenge: The Iframe.
Vagaro runs inside a separate window on your page. Standard GTM triggers like “Form Submission” or “Click” simply do not work on iframes. We need a specific script—a Listener—that waits for Vagaro to send a “Success” message to the main page.
Disclaimer: Vagaro’s iframe security is strict. They do not always broadcast the user’s email address in the success message for privacy reasons. The code below is designed to listen for the booking event. If Vagaro does not pass the email, the “Enhanced” part of this setup will be limited, but the conversion tracking will still work.
4.1 Create the Listener Tag
- In GTM, go to Tags and click New.
- Name: cHTML – Vagaro Event Listener.
- Tag Configuration: Select Custom HTML.
- Paste the following code exactly:
If you need Vagaro Booking Form GTM Event Listener Code Please Submit Your Email —>
4.2 Apply the Trigger to the Listener
- This listener needs to run on the page where your Vagaro widget is located.
- Scroll down to Triggering.
- Select All Pages (or create a trigger specifically for your “Booking” page if you prefer).
- Click Save.
4.3 Connect GTM to Google Ads
Now we create the final tag that sends the data to Google.
- In GTM, go to Tags > New.
- Name: Google Ads – Conversion – Vagaro Booking.
- Tag Configuration: Select Google Ads Conversion Tracking.
- Conversion ID: Paste the ID you copied in Step 2.4.
- Conversion Label: Paste the Label you copied in Step 2.4.
- Conversion Value: Click the “brick” icon next to the field and select the variable dlv – vagaro_value.
- Enable Enhanced Conversions:
- Scroll down to the “Enhanced Conversions” section.
- Check the box Include user-provided data from your website.
- Click the dropdown for User-provided Data Variable and select New Variable….
- Name: UPD – Email Only.
- Type: User-provided Data.
- Configuration: Manual configuration.
- Email: Click the brick icon and select the variable dlv – vagaro_user_email.
- Click Save.
- Triggering: Select the trigger Custom Event – Vagaro Booking Success (from Step 1.3).
- Click Save.
Testing & Validation (Deep Dive)
You cannot simply assume this works. You must verify it with a real test.
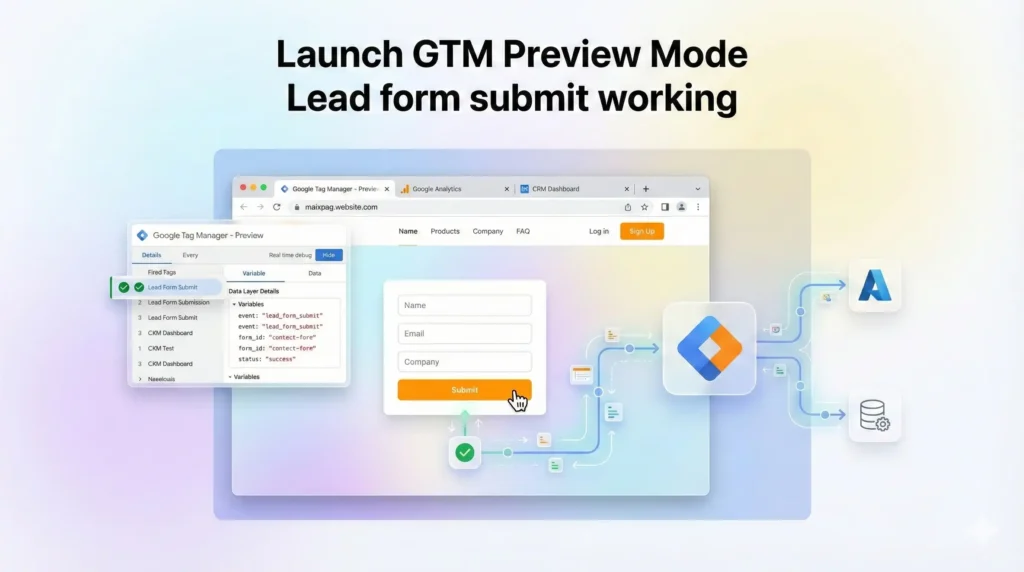
Step 1: Launch GTM Preview Mode
- In your GTM workspace, click the blue Preview button in the top right.
- Enter the URL of the page on your site where the Vagaro widget lives.
- Click Connect.
- Your website will open in a new window, and the GTM Tag Assistant debug pane will open in your original tab.
Step 2: Simulate a Booking
- Go to your website window.
- Actually book an appointment. (You can cancel it later). Do not just click around; you must reach the final “Thank You” or confirmation screen inside the widget.
- Pro Tip: Use a real email address (like your personal Gmail) for the test. Google often ignores “[email protected]” for Enhanced Conversions.
Step 3: Check the Debugger
- Go back to the Tag Assistant tab.
- Look at the “Summary” column on the left.
- The Golden Moment: You should see the event vagaro_booking_success appear in the list.
- If you see it: The Listener works!
- If you DON’T see it: The Listener failed. This usually means Vagaro did not send the specific message the code was looking for. See Troubleshooting.
- Click on the vagaro_booking_success event.
- Click on the Tags tab. You should see Google Ads – Conversion – Vagaro Booking in the “Tags Fired” section.
- Click on the Data Layer tab. Look for the vagaro_user_email.
- If it shows your email: Success! Enhanced Conversions will work perfectly.
- If it shows undefined: The Listener worked, but Vagaro blocked the email data. You will track the conversion count, but Enhanced Conversions won’t have user data to match.
Troubleshooting & Common Mistakes
1. The "Missing Email" Problem
Symptom: The tag fires, but the Data Layer shows vagaro_user_email: undefined. Cause: Vagaro’s iframe security is strict. They often strip PII (Personal Identifiable Information) from the messages they send to the parent page. The Fix (The “Redirect” Method): This is the Secret Weapon for Vagaro tracking.
- Log in to your Vagaro Account.
- Go to Settings > Booking Widget.
- Look for a setting called Redirect URL or Thank You Page URL.
- Create a page on your website (e.g., yoursite.com/thank-you).
- Paste this URL into Vagaro’s settings.
- Update GTM: Instead of using the complex Listener code, simply create a Page View Trigger that fires when Page URL contains /thank-you.
- For Enhanced Conversions: On this Thank You page, add a small form saying “Enter your email to receive your receipt.” When they submit that form, capture the email and fire the conversion tag then. This guarantees you get the data directly from the user.
2. Mobile Tracking Failures
Symptom: Tracking works on Desktop but fails on Mobile. Cause: On mobile devices, Vagaro often pops the widget out into a new tab or window to improve the user experience. When this happens, the user leaves your website and goes to vagaro.com. Your GTM container is no longer present, so tracking stops. The Fix: You must use the Redirect Method mentioned above. Even if Vagaro opens a new tab, if it redirects back to yoursite.com/thank-you at the end, your GTM on the Thank You page will catch them and record the conversion.
3. Enhanced Conversions "Pending"
Symptom: You set everything up, but Google Ads says “Status: Diagnostics Pending.” Cause: Google needs time. Enhanced Conversions data can take up to 75 days to fully train the model, although the diagnostic status usually updates within 48 hours. The Fix: Be patient. If your GTM Preview mode showed the email being sent, the system is working. Trust the data you saw in the debugger.
Conclusion
Tracking Vagaro booking forms is one of the more challenging setups in local business marketing due to the “iframe wall.” However, by using the methods in this guide—specifically the GTM Listener or the Redirect Strategy—you can gain visibility that 90% of your competitors lack.
By implementing Enhanced Conversions, you are transforming your ad account from a blunt instrument into a precision-guided system. You are training Google’s AI to find you high-value clients, lowering your ad costs, and finally proving the true ROI of your marketing spend.
1. Can I track Vagaro without a website embed?
No. If you send traffic directly to your vagaro.com profile link, you cannot install Google Tag Manager there. You have no control over Vagaro’s source code. You must embed the widget on your own website or use the Redirect Method to send users back to your site to track them effectively.
2. What if Vagaro doesn't send the email?
If Vagaro’s iframe blocks the email data, you will still track the conversion count (the fact that a booking happened). You just won’t get the “Enhanced” matching data. To fix this, use the Redirect Method and ask the user to re-enter their email on your Thank You page for a receipt or coupon.
3. Does this work for Vagaro products (eCommerce)?
Yes. The logic is identical. Whether a user books a massage or buys a shampoo bottle, the Vagaro widget sends a success signal. You may need to check your browser console to see if the success message for products is different (e.g., purchase_complete vs booking_complete) and update the listener code accordingly.
4. Is Google Tag Manager free?
Yes, completely. Google Tag Manager is a free, enterprise-grade tool provided by Google. There are no monthly fees. It is the industry standard for managing tracking pixels and ensures your website remains fast and organized.
5. Enhanced Conversions" status pending?
Google Ads is cautious with data. Even after a successful setup, the “Diagnostics” tab can show “Pending” or “Learning” for several days. As long as you verified in GTM Preview Mode that the UPD – Email variable was populated with a real email, the system is collecting data.
7. Will this slow down my website?
No. Google Tag Manager loads “asynchronously,” meaning it runs in the background without stopping your main website content from showing. The Listener script provided is extremely lightweight and has virtually zero impact on your site’s loading speed (Core Web Vitals).
8. How do I know if Cookiebot is working?
Use GTM Preview Mode. When you launch your site and the Cookiebot banner appears, click “Decline” or “Reject.” Then, look at the Consent tab in the GTM debugger. It should show “Denied” for Ad Storage. If your Google Ads tag fires anyway, your Consent Mode is not configured correctly.
9. Can I track phone calls from Vagaro?
Not with this method. This guide tracks web form bookings. To track phone calls, you should use Call Tracking software (like CallRail) that integrates with Google Ads. You would replace the static phone number on your site with a dynamic tracking number.
10. What is the "Conversion Linker" for?
The Conversion Linker prevents data loss. Browsers like Safari (Apple) delete tracking cookies after 24 hours or 7 days. The Conversion Linker moves that ad click data to a first-party cookie, which lasts much longer, ensuring you get credit for the conversion even if the user books a week later.
 Need Help Advanced Tracking Setup?