
Table of Contents
ToggleQuick Answer
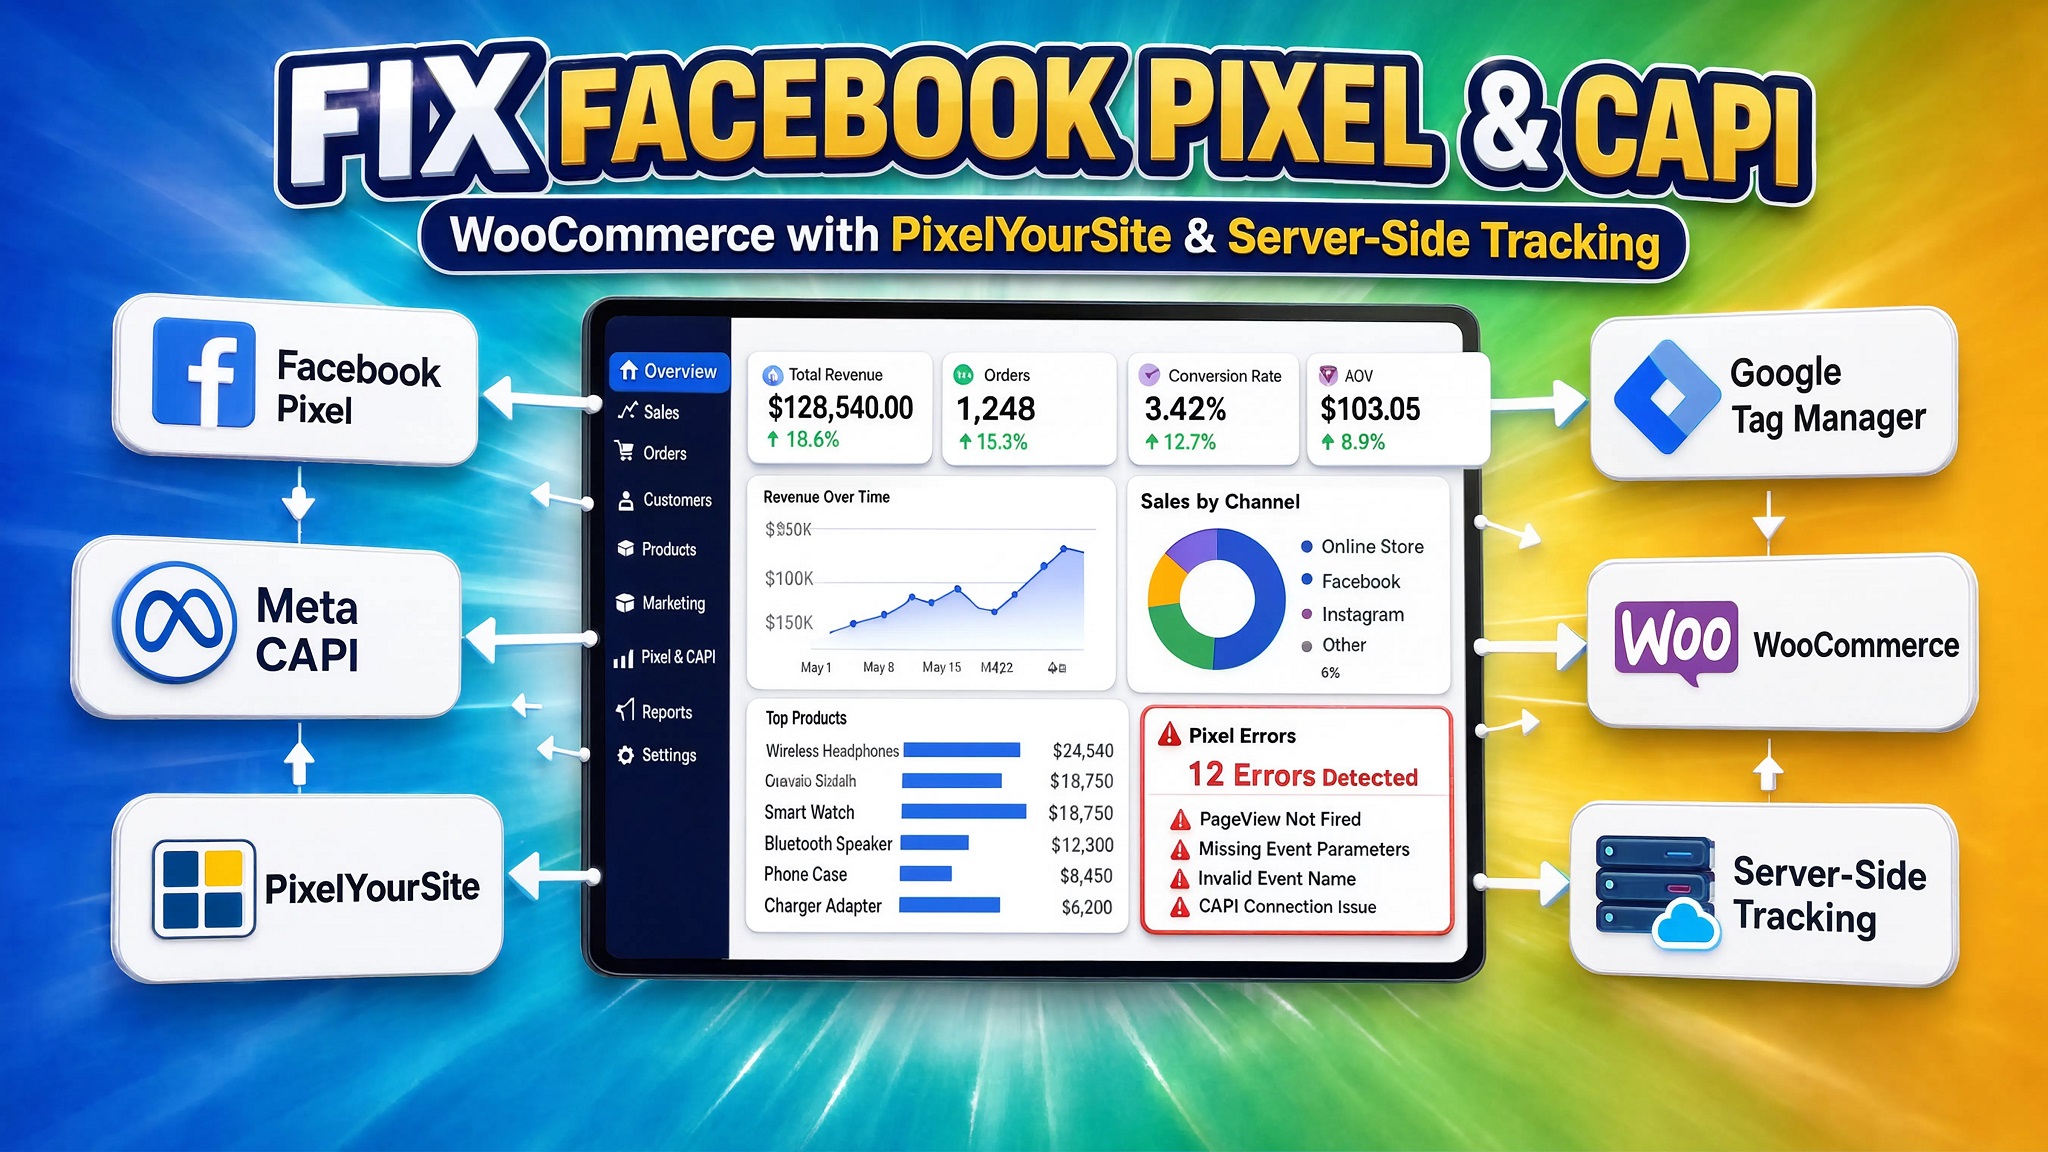
Fixing Facebook Pixel and Meta Conversion API (CAPI) errors on WooCommerce requires eliminating multi-plugin script conflicts, establishing persistent event_id parameters for deduplication, and routing server events through Server-Side Google Tag Manager (sGTM) hosted on Stape.io. By combining PixelYourSite or Web GTM with sGTM, configuring Cookiebot Consent Mode v2, and sending hashed customer parameters (em, ph, fn, ln), you eliminate duplicate purchase reporting, bypass ad blockers, and increase your Meta Event Match Quality (EMQ) score to 8.5+.
Key Takeaways
- Eliminate Double-Counted Conversions: Running Meta Pixel and CAPI without synchronized event_id strings forces Meta to log the same purchase twice, inflating reported ROAS and misguiding ad optimization.
- Audit Plugin Conflicts: Using PixelYourSite alongside the official Facebook for WooCommerce plugin or standard GTM web tags creates duplicate script firing and breaks tracking event logs.
- Bypass Ad Blockers via First-Party Server Subdomains: Forwarding browser data to a custom server subdomain (metrics.yourstore.com) on Stape.io bypasses Safari ITP restrictions and browser ad blockers.
- Maximize Event Match Quality (EMQ): Transmitting normalized, SHA-256 hashed customer identifiers (email, phone, billing address) raises your Meta match score from poor (3–4) to high (8–9.5+).
- Automate Privacy Compliance: Setting up Cookiebot Consent Mode v2 ensures WooCommerce fires client and server events lawfully based on visitor consent states.
Introduction: The $18,000 WooCommerce Conversion Discrepancy
A WooCommerce store owner selling premium athletic apparel came to me with an analytics nightmare. His Meta Ads Manager reported 410 completed purchases over a 30-day scaling campaign, but his WooCommerce backend confirmed only 260 actual customer orders. He was spending $18,000 a month on Meta ads, yet he could not trust his campaign data. Meta was over-reporting purchase events by nearly 60%, while simultaneously missing 35% of mobile Safari checkout conversions due to iOS tracking blocks.
					[ WooCommerce Customer Checkout ]
                |
     +----------+----------+
     |                     |
     v                     v
[ Browser Pixel ]    [ Server CAPI Tag ]
(Event: Purchase)    (Event: Purchase)
  No Event ID          No Event ID
     |                     |
     v                     v
[ Meta Ads Manager logs 2 SEPARATE Purchases! ] -> Over-reported ROAS
Upon auditing his site, I discovered two critical tracking failures:
- He was running both PixelYourSite and the legacy Facebook for WooCommerce plugin simultaneously, causing every browser action to fire twice.
- His Meta Conversion API (CAPI) integration sent server payloads without an event_id matching the browser pixel events.
Because Meta could not deduplicate the data, every checkout logged as two distinct conversions. Meanwhile, mobile ad clicks on Safari dropped tracking cookies entirely, resulting in missing data.
Resolving these issues on WooCommerce requires more than installing a WordPress plugin and toggling a switch. In this detailed guide, I will walk you through auditing your WooCommerce tracking setup, configuring PixelYourSite alongside Server-Side GTM, writing custom AJAX event listeners, implementing Cookiebot Consent Mode v2, and establishing guaranteed Meta CAPI deduplication.
Why Fixing WooCommerce Meta Pixel & CAPI Matters
WooCommerce powers millions of e-commerce stores, but its modular plugin ecosystem often leads to tracking code conflicts. Understanding where standard tracking setups fail helps clarify why a dual browser-and-server architecture is necessary.
The Vulnerabilities of Standard WooCommerce Tracking
- Multi-Plugin Script Overlap: Installing multiple plugins (e.g., PixelYourSite, Facebook for WooCommerce, WooCommerce Payments pixel integrations) causes duplicate pixel tags to execute on the same page view.
- Failed Event Deduplication: If your client-side browser pixel and server-side CAPI tags do not share an identical event_id, Meta treats incoming payloads as separate events, double-counting transactions.
- Cookie Degradation via Apple ITP: Safari’s Intelligent Tracking Prevention limits client-side _fbp and _fbc cookies to a 7-day or 24-hour lifespan, breaking long-term attribution for returning buyers.
- Ad-Blocker Data Loss: Up to 30% of desktop users run ad blockers that block browser-based connect.facebook.net scripts entirely, leading to missing AddToCart and Purchase events.
- Low Event Match Quality (EMQ): Sending standard pixel hits without hashed customer data (email, phone, name, address) drops match quality scores below 4.0/10, weakening Meta’s ad targeting algorithms.
The Strategic Benefits of sGTM + PixelYourSite Dual Tracking
- Guaranteed 99% Conversion Accuracy: Aligning browser and server signals ensures every transaction is accurately recorded once.
- Extended First-Party Cookie Lifetime: Routing data through a custom server subdomain (metrics.yourstore.com) preserves tracking cookies across multi-device customer journeys.
- Ad-Blocker Recovery: Server-to-server CAPI calls pass through sGTM container endpoints unimpeded by browser-level ad blockers.
- Higher EMQ Scores (8.5–10): Capturing WooCommerce checkout Data Layer values and hashing customer details before API transmission improves match quality scores.
					+-----------------------------------------------------------------------------------+
|               SINGLE-PIXEL VS. DUAL sGTM + CAPI TRACKING COMPARISON               |
+--------------------------+-------------------------+------------------------------+
| Tracking Capability      | Standard Plugin Setup   | Optimized sGTM + CAPI Setup  |
+--------------------------+-------------------------+------------------------------+
| Deduplication            | Often Broken / Missing  | Guaranteed via Event ID      |
| Ad Blocker Bypass        | No (Blocked by Browser) | Yes (Routed via Server API)  |
| Safari ITP Cookie Duration| 1 to 7 Days             | Up to 1 to 2 Years           |
| Match Quality (EMQ)      | Low (3.0 - 5.0)         | High (8.5 - 9.8)             |
| Script Interference      | High (Plugin Overlap)   | Cleared via Centralized GTM  |
| Privacy Compliance       | Basic / Manual          | Automated Consent Mode v2    |
+--------------------------+-------------------------+------------------------------+
Prerequisites & Setup Checklist
Before fixing your WooCommerce Meta tracking pipeline, ensure you have the required access permissions and infrastructure listed below:
					+-----------------------------------------------------------------------------------+
|                           PRE-IMPLEMENTATION CHECKLIST                            |
+-----------------------+----------------------------------+------------------------+
| Requirement           | Minimum Access Level Required    | Operational Purpose    |
+-----------------------+----------------------------------+------------------------+
| WordPress Admin       | Administrator Access             | Plugin Management      |
| Meta Business Suite   | Admin / Developer Access         | Pixel ID & CAPI Token  |
| Web GTM Container     | Admin Access                     | Front-end Tags & Listener|
| Server GTM Container  | Admin Access                     | Server-Side Routing    |
| Stape.io Account      | Global / EU Account Access       | sGTM Container Host    |
| DNS Manager           | CNAME Access                     | Custom Subdomain Setup |
| Cookiebot Account     | Domain Group Admin Access        | Consent Management     |
+-----------------------+----------------------------------+------------------------+
- WooCommerce Admin Access: Ability to install, deactivate, and configure plugins within your WordPress dashboard.
- Meta Business Manager: Administrator rights to access Meta Events Manager, copy your Pixel ID, and generate a permanent Conversions API Access Token.
- Google Tag Manager Workspaces: Admin access to both Web and Server GTM containers.
- Stape.io Cloud Hosting: Account set up on Stape Global Hosting or Stape European Hosting.
- DNS Host Access: Access to your domain registrar (Cloudflare, GoDaddy, Namecheap) to create custom CNAME records for server-side routing.
- Cookiebot CMP Account: Active setup on Cookiebot with Google Consent Mode v2 enabled.
Video Walkthrough Tutorial
If you prefer a visual, step-by-step demonstration of auditing and repairing Meta Pixel and CAPI errors on WooCommerce, watch the video tutorial below:
Step-by-Step Implementation Guide
Phase 1: Deploy Google Consent Mode V2 via Cookiebot on WooCommerce
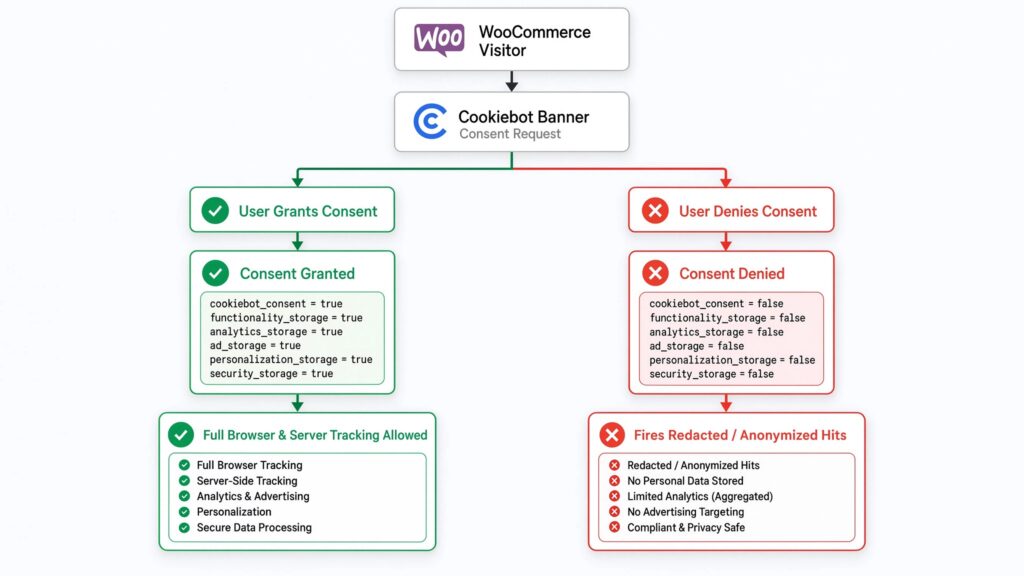
Before firing tracking tags, set up a privacy system to manage user preferences lawfully across your store.
[ WooCommerce Visitor ] ---> (Loads Page) ---> [ Cookiebot Banner ]
                                                        |
                     +----------------------------------+----------------------------------+
                     |                                                                     |
                     v                                                                     v
          (User Grants Consent)                                                 (User Denies Consent)
                     |                                                                     |
                     v                                                                     v
    `ad_storage`: granted                                                 `ad_storage`: denied
    `analytics_storage`: granted                                           `analytics_storage`: denied
    `ad_user_data`: granted                                               `ad_user_data`: denied
    `ad_personalization`: granted                                         `ad_personalization`: denied
                     |                                                                     |
                     v                                                                     v
    Full Browser & Server Tracking Allowed                                 Fires Redacted / Anonymized Hits
- Log into your Cookiebot Account and register your WooCommerce store domain.
- Open your Web GTM Container, navigate to the Community Template Gallery, and install the official Cookiebot CMP tag template.
- Set up a tag using the Cookiebot template and set the default consent states to denied for ad_storage, analytics_storage, ad_user_data, and ad_personalization.
- Attach this tag to the Consent Initialization – All Pages trigger so it executes before any tracking tags fire.
- In your Google Tag (GA4 / Web GTM settings) and Pixel tags, ensure Consent Settings respect ad_storage and ad_user_data.
Phase 2: Audit & Clean Up Conflicting WooCommerce Tracking Plugins
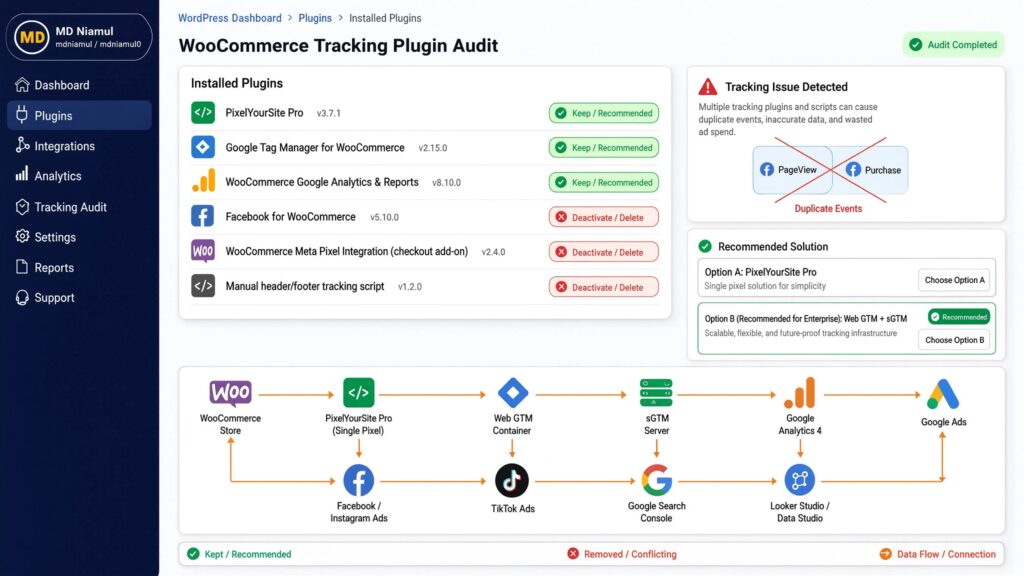
Having multiple tracking plugins installed is the primary cause of duplicate events and broken deduplication on WooCommerce.
- Navigate to WordPress Dashboard > Plugins > Installed Plugins.
- Deactivate and delete any redundant Meta tracking plugins:
- Facebook for WooCommerce (if using PixelYourSite or GTM for pixel injection).
- WooCommerce Meta Pixel Integrations built into checkout add-ons.
- Manual header/footer tracking code scripts added via theme options.
- Choose your primary client-side execution path:
- Option A: Use PixelYourSite Pro as the single plugin injecting client-side tags and generating server CAPI requests.
- Option B (Recommended for Enterprise): Use Web GTM + sGTM for custom tracking management, using PixelYourSite solely as a clean WooCommerce Data Layer generator.
Phase 3: Configure PixelYourSite Core & Meta CAPI Settings
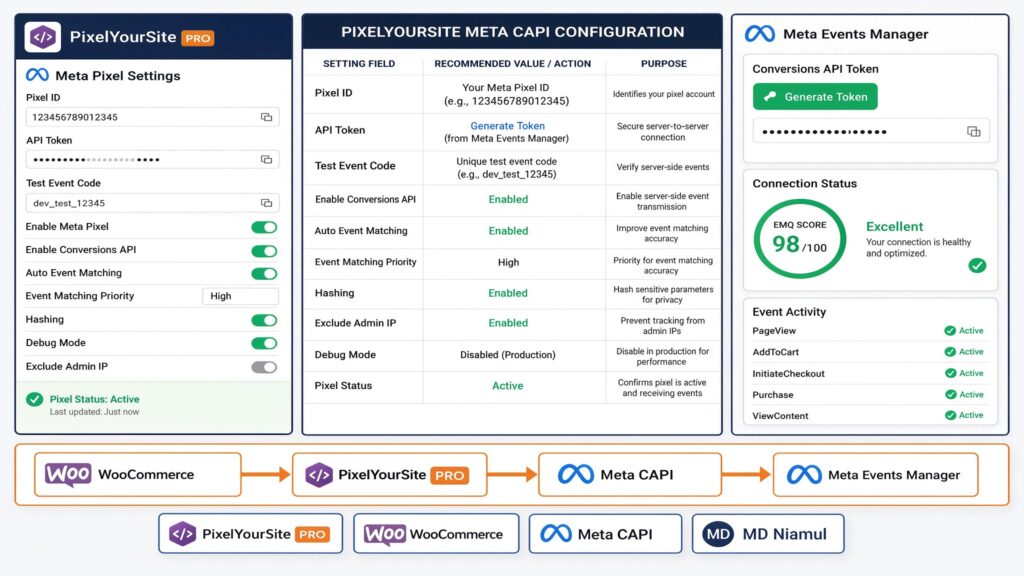
If you choose PixelYourSite to manage front-end pixel scripts, follow these steps to configure its CAPI settings correctly:
					+-----------------------------------------------------------------------------------+
|                     PIXELYOURSITE META CAPI CONFIGURATION TABLE                   |
+-----------------------+----------------------------------+------------------------+
| Setting Field         | Recommended Value / Action       | Purpose                |
+-----------------------+----------------------------------+------------------------+
| Pixel ID              | `123456789012345`                | Target Meta Pixel ID   |
| Conversions API Token | `EAAx...` (Permanent API Token)  | Direct Server Auth     |
| Server Access Point   | Custom Subdomain / sGTM Endpoint | Bypasses Ad Blockers   |
| Advanced Matching     | ENABLED (All User Fields)        | Improves EMQ Score     |
| Event ID Generator    | ENABLED (Standard Format)        | Enables Deduplication  |
| Test Event Code       | `TESTxxxxx` (During Testing Only)| Validates CAPI Payload |
+-----------------------+----------------------------------+------------------------+
- Open PixelYourSite > Dashboard > Meta Pixel Settings.
- Enable Enable Meta Pixel. Enter your 15-digit Pixel ID.
- Enable Send Events via Conversions API (CAPI).
- Generate a permanent API Access Token inside Meta Events Manager (Settings > Conversions API > Generate access token) and paste it into the API Token field in PixelYourSite.
- Enable Advanced Matching and select all available user fields (Email, Phone, First Name, Last Name, City, State, Zip, Country).
- Enable Track WooCommerce Automatic Events (ViewContent, AddToCart, InitiateCheckout, Purchase).
- Save settings and clear your WordPress cache (e.g., WP Rocket, LiteSpeed Cache).
Phase 4: Deploy WooCommerce AJAX Event Listener & Custom JS Setup
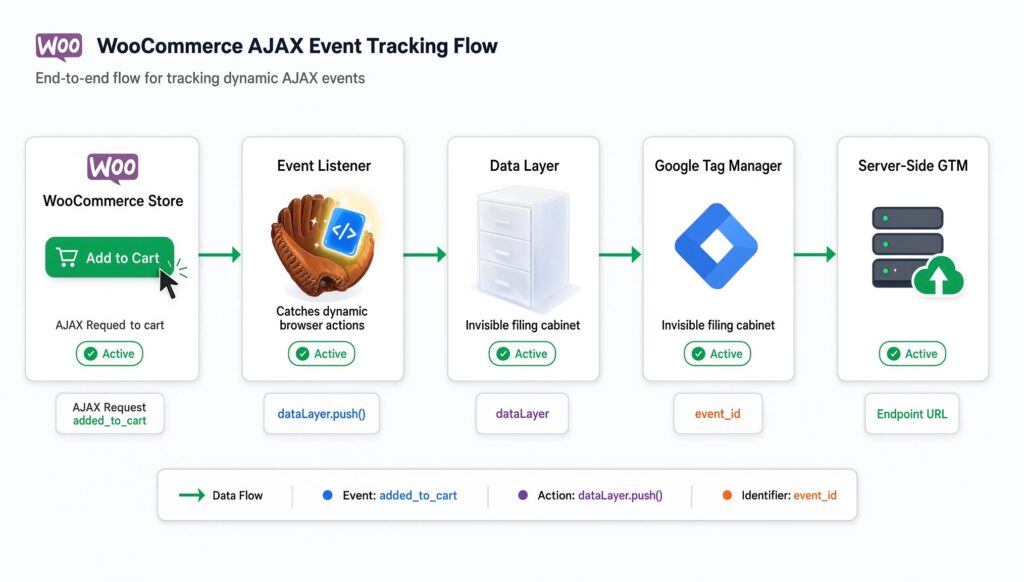
WooCommerce frequently uses AJAX for Add to Cart and dynamic single-page checkouts. Standard page-load triggers often miss these dynamic interactions.
Think of an event listener like a catcher’s mitt—it catches dynamic browser actions (like clicking an AJAX add-to-cart button) and pushes them into the Data Layer (which acts as an invisible filing cabinet for Tag Manager).
WooCommerce AJAX Add-to-Cart & Checkout Event Listener Code
Create a Custom HTML Tag in Web GTM named chtml – WooCommerce AJAX Listener, attached to the Initialization – All Pages trigger:
					<script>
(function($) {
  // Utility: Generate unique, persistent Event ID
  function generateEventID(eventName) {
    return 'pys_wc_' + eventName.toLowerCase() + '_' + Date.now() + '_' + Math.floor(Math.random() * 1000000);
  }

  // Utility: Retrieve Cookie by Name
  function getCookieValue(name) {
    var b = document.cookie.match('(^|;)\\s*' + name + '\\s*=\\s*([^;]+)');
    return b ? b.pop() : '';
  }

  // Listen for WooCommerce AJAX Add to Cart action
  $(document.body).on('added_to_cart', function(event, fragments, cart_hash, $button) {
    var eventId = generateEventID('AddToCart');
    var productId = $button.data('product_id') || '';
    var quantity = $button.data('quantity') || 1;
    var productName = $button.data('product_name') || 'WooCommerce Product';

    window.dataLayer = window.dataLayer || [];
    window.dataLayer.push({
      'event': 'wc_ajax_add_to_cart',
      'event_id': eventId,
      'ecommerce': {
        'currency': 'USD',
        'value': $button.data('price') ? parseFloat($button.data('price')) * quantity : 0,
        'items': [{
          'item_id': String(productId),
          'item_name': productName,
          'quantity': parseInt(quantity)
        }]
      },
      'user_data': {
        'fbp': getCookieValue('_fbp'),
        'fbc': getCookieValue('_fbc')
      }
    });
  });

  // Listen for WooCommerce Checkout Form Submission
  $(document).ready(function() {
    $('form.checkout').on('checkout_place_order', function() {
      var eventId = generateEventID('InitiateCheckout');
      window.dataLayer = window.dataLayer || [];
      window.dataLayer.push({
        'event': 'wc_custom_initiate_checkout',
        'event_id': eventId,
        'billing_email': $('#billing_email').val() || '',
        'billing_phone': $('#billing_phone').val() || '',
        'billing_first_name': $('#billing_first_name').val() || '',
        'billing_last_name': $('#billing_last_name').val() || ''
      });
    });
  });
})(jQuery);
</script>
Line-by-Line Code Explanation
- $(document.body).on(‘added_to_cart’, …): Listens for WooCommerce’s native jQuery event fired when a product is added to the cart via AJAX without a full page refresh.
- generateEventID(‘AddToCart’): Generates a shared timestamped string (e.g., pys_wc_addtocart_171500…) passed to both browser tags and sGTM.
- getCookieValue(‘_fbp’): Extracts Meta’s first-party browser cookie identifier to ensure payload continuity.
- window.dataLayer.push({…}): Formats and pushes the event data into the Data Layer for GTM to capture.
For additional e-commerce tracking architectures, see our specialized guides on e-commerce server-side tracking, Shopify server-side tracking, and third-party checkout conversion tracking.
Phase 5: Deploy sGTM Container on Stape.io with First-Party Routing
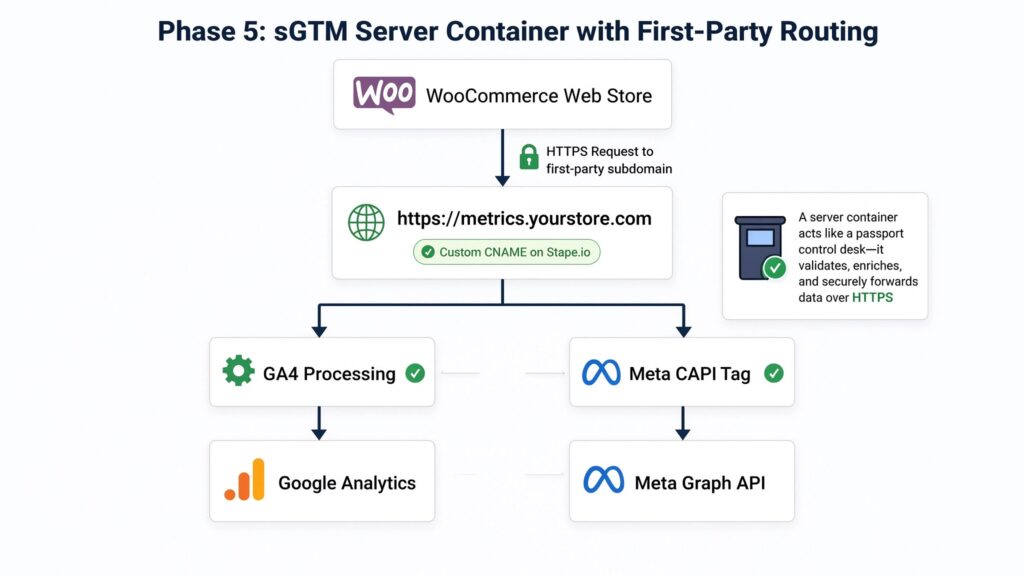
A server container acts like a passport control desk. Instead of letting browser scripts send data directly to ad networks, your store sends payloads to your sGTM container first. The server container validates, enriches, and forwards the data securely to Meta’s API endpoints over HTTPS.
					[ WooCommerce Web Store ]
            |
            v  (HTTPS Request to first-party subdomain)
[ https://metrics.yourstore.com ]  <--- Custom CNAME on Stape.io
            |
            +-------------------+-------------------+
            |                                       |
            v                                       v
   [ GA4 Processing ]                       [ Meta CAPI Tag ]
            |                                       |
            v                                       v
   [ Google Analytics ]                    [ Meta Graph API ]
Step 1: Provision sGTM Hosting on Stape.io
- Create an account on Stape Global Hosting or Stape European Hosting.
- Create a container, paste your sGTM Container Configuration Code, and select your hosting region.
Step 2: Configure Custom Subdomain Routing
- Access your domain DNS manager (e.g., Cloudflare) and add a CNAME record:
- Type: CNAME | Name: metrics | Target: [your-container-id].stape.io
- In Stape Settings > Domains, enter metrics.yourstore.com and verify that the SSL certificate status displays Active.
- In Web GTM, update your GA4 Configuration Tag parameter server_container_url to https://metrics.yourstore.com.
For more on server infrastructure options, read our dedicated guides on server-side tracking services and marketing automation services.
Phase 6: Fix Meta CAPI Deduplication & Event ID Alignment
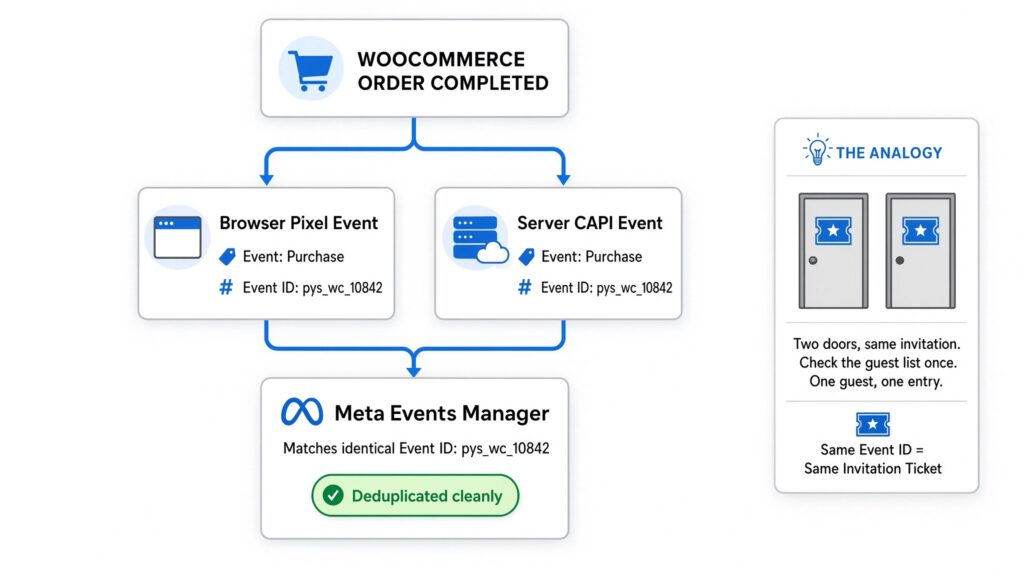
Deduplication works like checking a guest list at two doors. If two guests arrive with the exact same invitation ticket (event_id), the system admits the first guest (the browser pixel) and registers their rich details, while recognizing the second guest (the server API) as the same person rather than adding a new name to the list.
                                 [ WOOCOMMERCE ORDER COMPLETED ]
                                                 |
                   +-----------------------------+-----------------------------+
                   |                                                           |
                   v                                                           v
        [ Browser Pixel Event ]                                     [ Server CAPI Event ]
        - Event: Purchase                                           - Event: Purchase
        - Event ID: pys_wc_10842                                    - Event ID: pys_wc_10842
                   |                                                           |
                   +-----------------------------+-----------------------------+
                                                 |
                                                 v
                                    [ Meta Events Manager ]
                       Matches identical Event ID: pys_wc_10842
                       -> Deduplicates duplicate payload cleanly!
Configuring sGTM Meta CAPI Tag Deduplication
- In your sGTM Workspace, install the Meta Conversions API tag template from the Community Template Gallery.
- Create a tag named sGTM – Meta CAPI Purchase Tag:
- Pixel ID: {{Meta Pixel ID}}
- API Access Token: {{Meta CAPI Token}}
- Event Name: Purchase (or map dynamically from the Client payload)
- Event ID: {{Event ID}} (extracted from the incoming client stream)
- Set the trigger to fire on requests where Client Name equals GA4 and Event Name equals purchase.
Phase 7: Optimize Event Match Quality (EMQ) Across WooCommerce
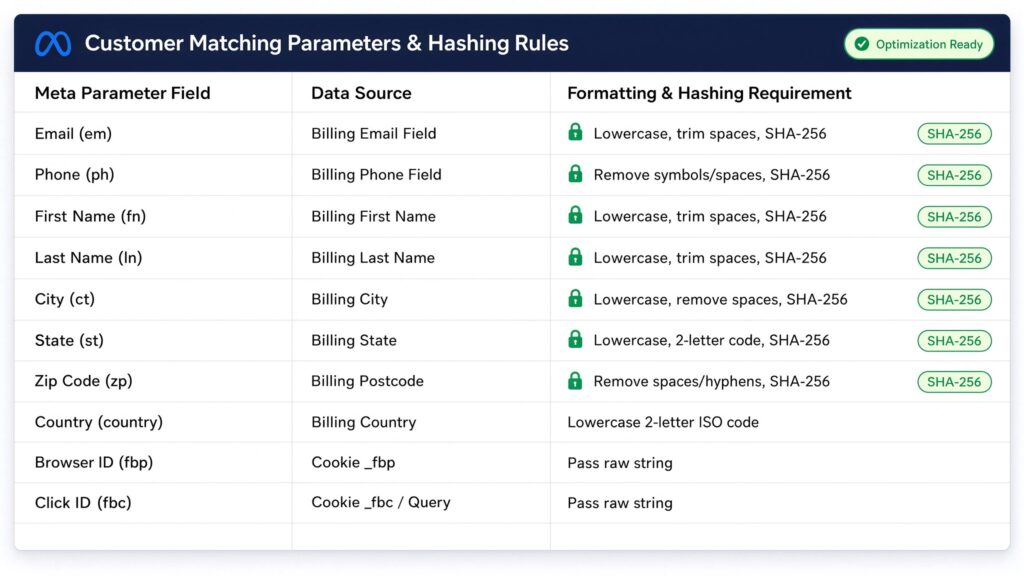
To maximize your Meta Event Match Quality (EMQ) score, configure sGTM to extract customer parameters from incoming web events, normalize them, hash them using SHA-256, and transmit them via CAPI:
					+-----------------------------------------------------------------------------------+
|                   CUSTOMER MATCHING PARAMETERS & HASHING RULES                    |
+----------------------+-------------------------+----------------------------------+
| Meta Parameter Field | Data Source             | Formatting & Hashing Requirement |
+----------------------+-------------------------+----------------------------------+
| Email (`em`)         | Billing Email Field     | Lowercase, trim spaces, SHA-256  |
| Phone (`ph`)         | Billing Phone Field     | Remove symbols/spaces, SHA-256   |
| First Name (`fn`)    | Billing First Name      | Lowercase, trim spaces, SHA-256  |
| Last Name (`ln`)     | Billing Last Name       | Lowercase, trim spaces, SHA-256  |
| City (`ct`)          | Billing City            | Lowercase, remove spaces, SHA-256|
| State (`st`)         | Billing State           | Lowercase, 2-letter code, SHA-256|
| Zip Code (`zp`)      | Billing Postcode        | Remove spaces/hyphens, SHA-256   |
| Country (`country`)  | Billing Country         | Lowercase 2-letter ISO code     |
| Browser ID (`fbp`)   | Cookie `_fbp`           | Pass raw string                  |
| Click ID (`fbc`)     | Cookie `_fbc` / Query   | Pass raw string                  |
+----------------------+-------------------------+----------------------------------+
For custom CRM or off-site workflows, check out our implementation guides for OpenAI ads conversion tracking, offline conversion tracking, HubSpot form tracking, Zoho form tracking, Salesforce conversion tracking, and GoHighLevel tracking.
Testing & Validation Framework
Verify your WooCommerce Meta tracking setup using this step-by-step diagnostic process:
					+-----------------------------------------------------------------------------------+
|                        SYSTEM TESTING & VALIDATION MATRIX                         |
+-----------------------+-------------------------+---------------------------------+
| Test Phase            | Diagnostic Tool         | Expected Passing Result         |
+-----------------------+-------------------------+---------------------------------+
| 1. Browser Pixel Fire | Meta Pixel Helper Ext.  | Green status, valid Event ID    |
| 2. Consent Enforcement| Cookiebot Developer Console | Tags pause when consent denied |
| 3. Listener Data Layer| Web GTM Preview Mode    | `wc_ajax_add_to_cart` fires     |
| 4. sGTM Server Stream | Stape sGTM Debugger     | HTTP 200 OK sent to Meta API    |
| 5. Meta Deduplication | Meta Test Events Tool   | Events marked "Deduplicated"    |
| 6. Event Match Quality| Meta Events Manager     | EMQ Score reads 8.5 or higher   |
+-----------------------+-------------------------+---------------------------------+
- Browser Pixel Firing Test:
- Open Chrome and install the Meta Pixel Helper extension.
- Visit a product page on your WooCommerce store. Confirm that PageView and ViewContent events fire with a single Pixel ID.
- Dynamic AJAX Add-to-Cart Test:
- Click an Add to Cart button.
- Verify via Meta Pixel Helper that the AddToCart event fires with a valid event_id.
- sGTM Server Traffic Inspection:
- Open your sGTM Container Preview Mode alongside your Stape Analytics Console.
- Execute a test purchase on WooCommerce.
- Confirm that your server container logs an incoming GA4 payload and sends an outgoing HTTP 200 POST request to Meta CAPI endpoints.
- Meta Deduplication Validation:
- Copy your Test Event Code from Meta Events Manager (Test Events tab).
- Enter the code into your sGTM Meta CAPI tag configuration.
- Complete a test purchase. Verify that Meta Events Manager lists paired Browser and Server events marked as Deduplicated.
Troubleshooting Common Tracking Errors
Problem 1: Duplicate Purchase Events Logged in Meta Ads Manager
- Cause: PixelYourSite and Web GTM are firing browser pixels simultaneously, or CAPI server tags are missing an event_id matching the client-side pixel.
- Solution: Audit installed plugins and remove duplicate tracking scripts. Ensure both browser pixel tags and sGTM server tags inherit the exact same event_id variable from the Data Layer.
Problem 2: Meta Event Match Quality (EMQ) Score Below 4.0
- Cause: PixelYourSite or sGTM server tags are sending basic event parameters without hashed customer details (email, phone, address).
- Solution: Enable Advanced Matching in PixelYourSite or pass hashed user_data fields (em, ph, fn, ln, zp) from your WooCommerce checkout Data Layer into your sGTM CAPI tag.
Problem 3: Missing Mobile Conversions on Safari & iOS Devices
- Cause: Safari ITP strips client-side tracking cookies after 7 days, and browser-based CAPI scripts fail to run due to network ad blockers.
- Solution: Route server payloads through a custom server subdomain (metrics.yourstore.com) hosted on Stape.io to maintain first-party cookie visibility.
Problem 4: Server Container Returning HTTP 400 Bad Request Errors
- Cause: Invalid Meta API Access Token, misformatted user parameters (e.g., unhashed email addresses), or an invalid Pixel ID.
- Solution: Verify your API Access Token in Meta Events Manager settings. Ensure all user parameters pass through SHA-256 hashing functions prior to API submission.
Problem 5: PixelYourSite CAPI Requests Failing During AJAX Checkout
- Cause: WooCommerce AJAX checkout scripts refresh fragments without updating the client-side event_id.
- Solution: Deploy our custom WooCommerce AJAX listener script to capture dynamic checkout events and update the Data Layer reliably.
Conclusion
Running un-audited Meta tracking plugins on WooCommerce leads to duplicate reporting, missed mobile conversions, and poor ad campaign performance. Relying solely on standard client-side pixels leaves your store vulnerable to browser ad blockers and Safari ITP cookie restrictions.
Implementing a dual-layer tracking system with PixelYourSite, Server-Side GTM, and Stape.io resolves these tracking issues. By deduplicating events using persistent event_id keys, routing data through first-party server subdomains, setting up Cookiebot Consent Mode v2, and transmitting hashed customer data, you restore conversion accuracy and equip Meta’s ad engine to deliver better campaign ROAS.
Summary by MD Niamul
This guide details how to audit and repair Facebook Pixel and Meta Conversion API (CAPI) setups on WooCommerce using PixelYourSite, Server-Side GTM, and Stape.io. By resolving plugin conflicts, aligning event_id parameters, routing traffic through first-party server subdomains, and configuring Cookiebot Consent Mode v2, you eliminate double-counted purchases, bypass ad blockers, and increase your Meta Event Match Quality score to 8.5+ for improved ad campaign optimization.
1.What causes duplicate Facebook Pixel events on WooCommerce?
Duplicate events usually occur when multiple tracking plugins—such as PixelYourSite running alongside Facebook for WooCommerce or custom GTM tags—fire pixel scripts for the same user action. They also occur when Meta CAPI server events fail to pass an event_id matching the browser pixel event, causing Meta to record two separate transactions.
2.How does Meta CAPI deduplication work on WooCommerce?
Meta deduplication pairs browser pixel events with server CAPI payloads using a shared, unique event_id and event name. When Meta receives both events with matching IDs within a short window, it retains the server payload (which contains richer customer data) and discards the duplicate browser event.
3.Do I need both PixelYourSite and Server-Side GTM?
While PixelYourSite can send basic CAPI payloads directly, combining it with Server-Side GTM (sGTM) hosted on Stape.io provides greater control. Using sGTM allows you to route data through custom first-party subdomains, bypass ad blockers, transform incoming payloads, and send clean data to multiple platforms (GA4, Meta, Google Ads) from a single server stream.
4.How do I improve my Meta Event Match Quality score on WooCommerce?
To boost your EMQ score, send normalized and SHA-256 hashed customer identifiers—such as email (em), phone number (ph), first/last name (fn/ln), city (ct), state (st), and postal code (zp)—along with first-party cookie values (_fbp and _fbc) inside your CAPI payloads.
5.Why are my mobile WooCommerce purchases missing in Meta Ads Manager?
Mobile browsers like Safari enforce Intelligent Tracking Prevention (ITP), which limits client-side cookies and strips URL tracking parameters. Additionally, mobile ad blockers block client-side scripts entirely. Implementing server-side tracking via a custom server subdomain preserves tracking data across mobile user journeys.
6.How does Google Consent Mode v2 work with Cookiebot on WooCommerce?
Cookiebot manages user privacy preferences via a banner on your site. Google Consent Mode v2 passes these choices (granted or denied) to your tracking tags. If a user denies tracking consent, Web and Server GTM automatically adjust their behavior to suppress or anonymize tracking hits in compliance with privacy regulations.
7.What is the difference between client-side CAPI and sGTM CAPI?
Client-side CAPI triggers server requests directly from your WordPress server using PHP scripts, which can increase server load and remain vulnerable to server timeouts. sGTM CAPI offloads processing to a cloud server container (like Stape.io), protecting your main store’s performance while providing advanced data transformation tools.
8.Should I deactivate the Facebook for WooCommerce plugin?
If you are using PixelYourSite or Google Tag Manager to manage your pixel and CAPI tags, you should deactivate the tracking features inside the Facebook for WooCommerce plugin. Running both tools simultaneously injects duplicate tracking scripts into your site header, causing double-counted events.
9.How do custom server subdomains help bypass ad blockers?
Ad blockers maintain blocklists of known third-party tracking URLs (like connect.facebook.net). By routing your tracking requests through a custom subdomain on your own domain (e.g., metrics.yourstore.com), requests look like first-party data traffic to ad blockers, allowing tracking payloads to reach your server container reliably.
10.How long does it take for Meta CAPI deduplication to take effect?
Once configured with matching event_id values, Meta Events Manager begins deduplicating incoming browser and server events within minutes. You can verify deduplication instantly by conducting a test transaction using the Meta Test Events tool.
 Need Help Advanced GHL Automation & Tracking Setup?