
Table of Contents
ToggleQuick Answer
Server-side tracking replaces traditional client-side browser pixels by routing user interaction data through a secure cloud server—such as Server-Side Google Tag Manager (sGTM)—before transmitting it to ad networks. Combining Meta Conversions API (CAPI) and Google Ads Enhanced Conversions restores up to 30% of conversion data lost to Safari ITP, iOS privacy updates, and ad blockers. This first-party tracking architecture feeds accurate signals back into ad platform algorithms, raising Meta Event Match Quality (EMQ) and optimizing automated bidding strategies to lower overall customer acquisition costs (CAC).
Key Takeaways
- Reclaim Lost Conversion Signals: Recover up to 30% of conversion events blocked by Safari Intelligent Tracking Prevention (ITP), ad-blocking extensions, and iOS privacy features.
- Master Event Deduplication: Fire browser pixels and server-side events simultaneously using a shared event_id to eliminate double-counting in ad platforms.
- Boost Meta Event Match Quality (EMQ): Pass SHA-256 hashed customer parameters (such as email, phone, and address) directly from your server container to achieve EMQ scores above 8.0/10.
- Extend First-Party Cookie Lifespans: Route tracking calls through a custom subdomain (such as metrics.yourdomain.com) to prevent browsers from stripping tracking cookies after 24 hours.
- Maintain Strict Privacy Compliance: Implement Google Consent Mode V2 using Cookiebot to dynamically parse consent flags (gcs and gcd) before forwarding conversion data.
Introduction: The Hidden Data Leak Draining Your Ad Budget
I recently audited an ad account for an e-commerce brand spending $40,000 per month across Meta and Google Ads. The business owner was convinced their campaigns had suddenly stopped working. Their store backend confirmed 650 completed orders for the month, but Meta Ads Manager logged only 440 purchases, and Google Ads reported just 465.
Over 30% of their conversion data had vanished into thin air. Because the automated bidding engines in Meta Performance Max and Google Smart Bidding thought conversion volume had dropped, they automatically shifted ad budget away from winning audiences toward cheaper, lower-quality traffic. The result was a sharp rise in customer acquisition costs.
					TRADITIONAL CLIENT-SIDE TRACKING (DATA LOSS)
[ User Browser ] ---> (Blocked by iOS, ITP & Ad Blockers) ---> [ Meta / Google Ads ]

SERVER-SIDE TRACKING REVOLUTION (RESILIENT DATA FLOW)
[ User Browser ] ---> [ Custom Subdomain (sGTM) ] ---> [ Meta CAPI & Google Ads ]
This performance drop was not caused by poor ad copy or bad targeting. It was the direct result of relying on outdated browser-based tracking scripts.
When a customer buys a product or submits a lead form on your website, standard browser pixels attempt to send data directly to ad networks. However, modern privacy shields like Apple’s iOS App Tracking Transparency (ATT), Safari ITP, and desktop ad blockers routinely intercept and destroy these client-side requests.
Client-side tracking is like sending an unsealed postcard through the mail—anyone along the path can mark it out or throw it away. Server-side tracking functions like a locked, encrypted courier box delivered directly from your private server to the ad platform’s data center.
In this comprehensive guide, I will walk you through establishing a resilient Server-Side Tracking framework using sGTM, Meta CAPI, Google Ads Enhanced Conversions, and Cookiebot Consent Mode V2.
Why Client-Side Tracking Fails (And Why Server-Side is Mandatory)
Modern paid advertising algorithms rely heavily on rapid, high-density feedback loops. When you launch a campaign, ad platforms analyze real-time conversion signals to build predictive profiles of your ideal buyers. If 30% of those conversion signals never reach the ad platform, the machine learning models operate on incomplete information.
The Three Core Factors Disrupting Browser Pixels
- Ad Blockers and Extension Shields: Over one-third of global internet users utilize desktop ad blockers or privacy-focused browsers like Brave. These tools block network requests bound for domains like [facebook.com/tr](https://facebook.com/tr) or [google-analytics.com/collect](https://google-analytics.com/collect).
- Apple ITP Cookie Restrictions: Safari’s Intelligent Tracking Prevention (ITP) automatically caps the lifespan of client-side JavaScript cookies to 7 days. If a user arrives via an ad link containing parameters like gclid or fbclid, Safari cuts that cookie’s lifespan down to 24 hours.
- Network-Level Signal Blocking: Mobile operating systems, private DNS resolvers, and network firewalls actively block third-party analytics scripts before the webpage fully loads.
5 Strategic Business Benefits of Server-Side Tracking
- Signal Recovery: Recover 15% to 30% of missing conversion data by routing signals through an encrypted server pipeline that ad blockers cannot detect.
- Elevated Meta Event Match Quality: Send normalized, SHA-256 hashed customer parameters directly to Meta CAPI, pushing your match quality scores above 8.0 for better campaign attribution.
- Durable First-Party Cookies: Issue tracking cookies directly from your primary web domain (such as metrics.yourdomain.com), extending cookie persistence up to 1 to 2 years.
- Faster Page Load Speeds: Remove heavy third-party marketing tags from the user’s browser and execute them inside your cloud server container, reducing site weight and layout shifts.
- Complete Data Ownership: Control every payload leaving your server. You can strip sensitive customer information or unapproved data parameters before passing signals to ad networks.
If you are running specialized website architectures, explore our dedicated guides for ecommerce server-side tracking services and Shopify server-side tracking setups.
Prerequisites & Infrastructure Checklist
Before building your server-side tracking pipeline, gather the following access credentials and platform tools:
- Google Tag Manager Web Container: Require Publish/Admin access to manage browser tags, custom triggers, and data layer variables.
- Google Tag Manager Server Container: Require Publish/Admin access to build client parsers, server tags, and variable transformers.
- Server Hosting Infrastructure: Provision a dedicated server container using Stape Global Hosting or Stape European Hosting for GDPR-compliant hosting.
- Custom Subdomain Access: Require access to your domain’s DNS manager (Cloudflare, GoDaddy, Namecheap) to map metrics.yourdomain.com.
- Meta Business Manager: Admin access to generate long-lived Meta CAPI Access Tokens and manage Pixel configurations.
- Google Ads Account: Admin or Edit access to manage Conversion Actions, retrieve Conversion IDs/Labels, and enable Enhanced Conversions.
- Consent Management Platform: An active account with Cookiebot CMP or CookieYes CMP to implement Consent Mode V2.
Step-by-Step Video Tutorial
Prefer following along visually while building your server-side tracking setup? Watch my step-by-step video tutorial covering sGTM, Meta CAPI, and Google Ads Enhanced Conversions:
Step-by-Step Implementation Guide
					                      SERVER-SIDE ARCHITECTURE DATA FLOW

[ User Browser ] ---> (Fires Event + Event ID) ---> [ Web GTM Container ]
                                                            |
                 +------------------------------------------+
                 | (Sends HTTP payload to custom subdomain)
                 v
[ Custom Subdomain: metrics.yourdomain.com ]
                 |
                 v
[ sGTM Cloud Container ] (Parses GA4 Client / Evaluates Consent Mode)
                 |
                 +---> (Server API Request) ---> [ Meta CAPI Endpoint ]
                 |
                 +---> (Server API Request) ---> [ Google Ads Endpoint ]
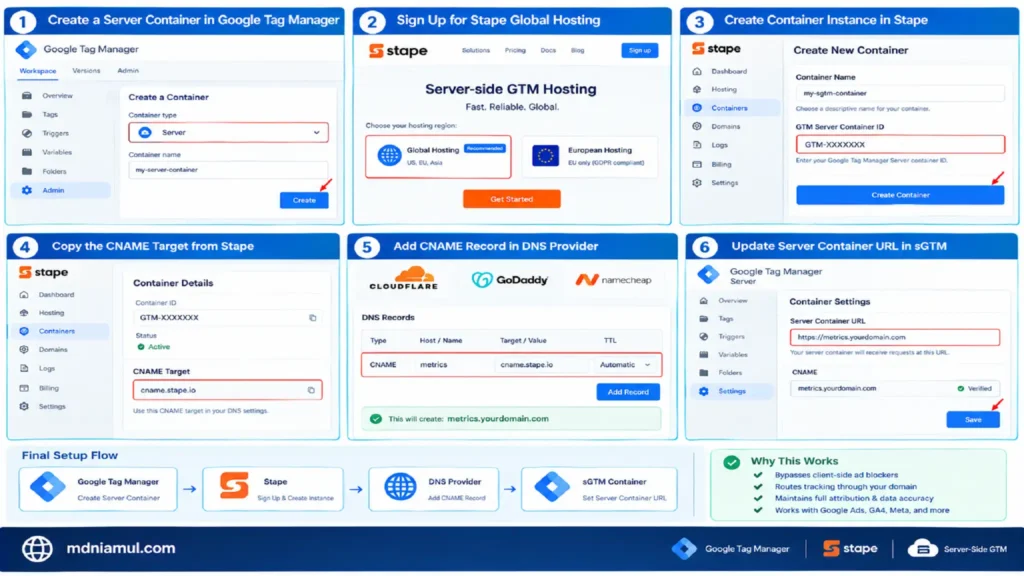
Phase 1: Provisioning sGTM & Setting Up First-Party Subdomains
To prevent ad blockers from intercepting tracking calls, your server container must operate on a custom subdomain under your main website domain.
- Open Google Tag Manager and select Create Container. Choose Server as the target platform.
- Sign up for a server hosting account on Stape Global Hosting (or Stape European Hosting for strict EU storage).
- In Stape, create a new container instance and paste your GTM Server Container ID.
- Copy the assigned CNAME target string provided by Stape (such as custom.stape.io).
- Open your DNS provider (Cloudflare, GoDaddy, Namecheap) and add a new CNAME Record:
- Host / Name: metrics (creates metrics.yourdomain.com)
- Target / Value: Your assigned Stape CNAME string
- TTL: Automatic or 300 seconds
- Inside your sGTM Container Settings, update the Server Container URL field to [https://metrics.yourdomain.com](https://metrics.yourdomain.com).
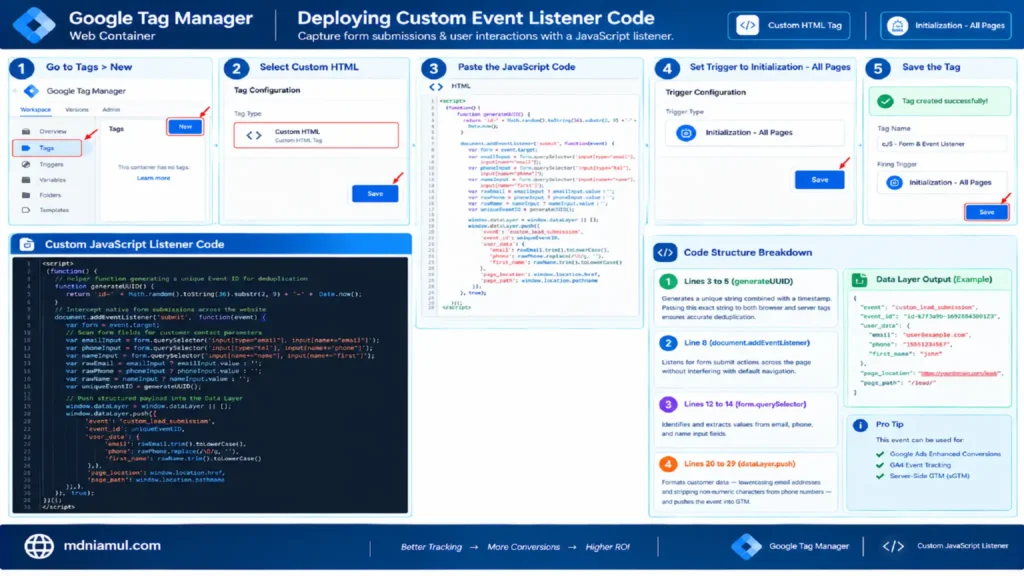
Phase 2: Deploying Custom Event Listener Code
When native web triggers fail to capture dynamic form interactions or single-page application events, a custom JavaScript listener acts like a catcher’s mitt. It catches user interaction signals directly from the document object model (DOM) and places them inside the Data Layer—an invisible filing cabinet that GTM can inspect.
Add the following JavaScript code inside a Custom HTML Tag in your Web GTM container. Set the firing trigger to Initialization – All Pages:
					<script>
(function() {
  // Helper function generating a unique Event ID for deduplication
  function generateUUID() {
    return 'id-' + Math.random().toString(36).substr(2, 9) + '-' + Date.now();
  }

  // Intercept native form submissions across the website
  document.addEventListener('submit', function(event) {
    var form = event.target;

    // Scan form fields for customer contact parameters
    var emailInput = form.querySelector('input[type="email"], input[name*="email"]');
    var phoneInput = form.querySelector('input[type="tel"], input[name*="phone"]');
    var nameInput  = form.querySelector('input[name*="name"], input[name*="first"]');

    var rawEmail = emailInput ? emailInput.value : '';
    var rawPhone = phoneInput ? phoneInput.value : '';
    var rawName  = nameInput ? nameInput.value : '';

    var uniqueEventID = generateUUID();

    // Push structured payload into the Data Layer
    window.dataLayer = window.dataLayer || [];
    window.dataLayer.push({
      'event': 'custom_lead_submission',
      'event_id': uniqueEventID,
      'user_data': {
        'email': rawEmail.trim().toLowerCase(),
        'phone': rawPhone.replace(/\D/g, ''),
        'first_name': rawName.trim().toLowerCase()
      },
      'page_location': window.location.href,
      'page_path': window.location.pathname
    });
  }, true);
})();
</script>
Code Structure Breakdown
- Lines 3 to 5 (generateUUID): Generates a unique string combined with a timestamp. Passing this exact string to both browser and server tags ensures accurate deduplication.
- Line 8 (document.addEventListener): Listens for form submit actions across the page without interfering with default navigation.
- Lines 12 to 14 (form.querySelector): Identifies and extracts values from email, phone, and name input fields.
- Lines 20 to 29 (dataLayer.push): Formats customer data—lowercasing email addresses and stripping non-numeric characters from phone numbers—and pushes the event into GTM.
If your site relies on custom CRM forms, review our integration tutorials for HubSpot Form Conversion Tracking Services and GoHighLevel Form Conversion Tracking Services.
Phase 3: Web GTM Transport Setup to sGTM Endpoint
To stream browser data to your server container:
- In Web GTM, create or edit your main Google Tag (GA4 Configuration Tag).
- Under Configuration Settings, add a parameter named server_container_url.
- Set its value to your custom domain: [https://metrics.yourdomain.com](https://metrics.yourdomain.com).
- Create a Data Layer Variable named DLV – event_id referencing event_id.
- Attach event_id to your Google Tag configuration settings so every event carries its unique deduplication key to the server container.
) while binding a unique event_id for deduplication.](https://mdniamul.com/wp-content/uploads/2026/09/3-2-1-1024x576.webp)
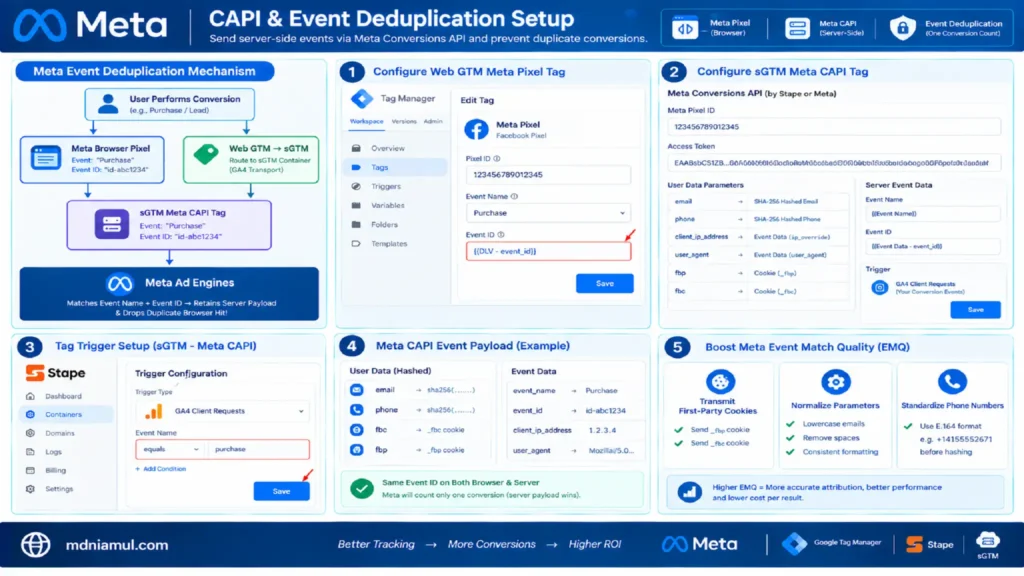
Phase 4: Setting Up Meta Conversions API (CAPI) & Event Deduplication
Deduplication ensures Meta does not double-count conversions when both the client-side browser pixel and the server-side CAPI tag fire for the same event.
                 META EVENT DEDUPLICATION MECHANISM

                     +--------------------------+
                     | User Performs Conversion |
                     +--------------------------+
                                  |
            +---------------------+---------------------+
            |                                           |
            v                                           v
+------------------------+                 +------------------------+
| Meta Browser Pixel     |                 | Web GTM GA4 Transport  |
| Event: "Purchase"      |                 | Route to sGTM Container|
| Event ID: "id-abc1234" |                 +------------------------+
+------------------------+                              |
            |                                           v
            |                      +--------------------------------+
            |                      | sGTM Meta CAPI Tag             |
            |                      | Event: "Purchase"              |
            |                      | Event ID: "id-abc1234"         |
            |                      +--------------------------------+
            |                                           |
            v                                           v
+-------------------------------------------------------------------+
|                        META AD ENGINES                            |
|  Matches Event Name + Event ID -> Retains Server Payload & Drops  |
|  Duplicate Browser Hit!                                           |
+-------------------------------------------------------------------+
1. Configuring Web GTM Meta Pixel Tag
- Open your Web GTM Container and select your Meta Pixel Event Tag.
- In the Event ID configuration field, assign the variable {{DLV – event_id}}.
2. Configuring sGTM Meta CAPI Tag
- In your sGTM container, create a new Tag using the Meta Conversions API template (by Stape or Meta).
- Input your Meta Pixel ID.
- Paste your long-lived CAPI Access Token generated from Meta Events Manager.
- Under User Data parameters, map incoming variables:
- email mapped to SHA-256 Hashed Email
- phone mapped to SHA-256 Hashed Phone
- client_ip_address mapped to Event Data ip_override
- user_agent mapped to Event Data user_agent
- fbp mapped to Cookie _fbp
- fbc mapped to Cookie _fbc
- Under Server Event Data, set Event Name to {{Event Name}} and Event ID to {{Event Data – event_id}}.
- Set the tag trigger to fire on all incoming GA4 client requests where the event name matches your conversion actions.
Strategies for Boosting Meta Event Match Quality (EMQ)
- Always Transmit First-Party Cookies: Ensure _fbp and _fbc cookies are extracted from browser requests and forwarded in the CAPI payload.
- Normalize Parameters: Convert email addresses to lowercase and remove spaces before generating SHA-256 hashes.
- Standardize Phone Numbers: Format phone numbers into international E.164 syntax (e.g., +14155552671) prior to hashing.
Phase 5: Google Ads Enhanced Conversions via sGTM
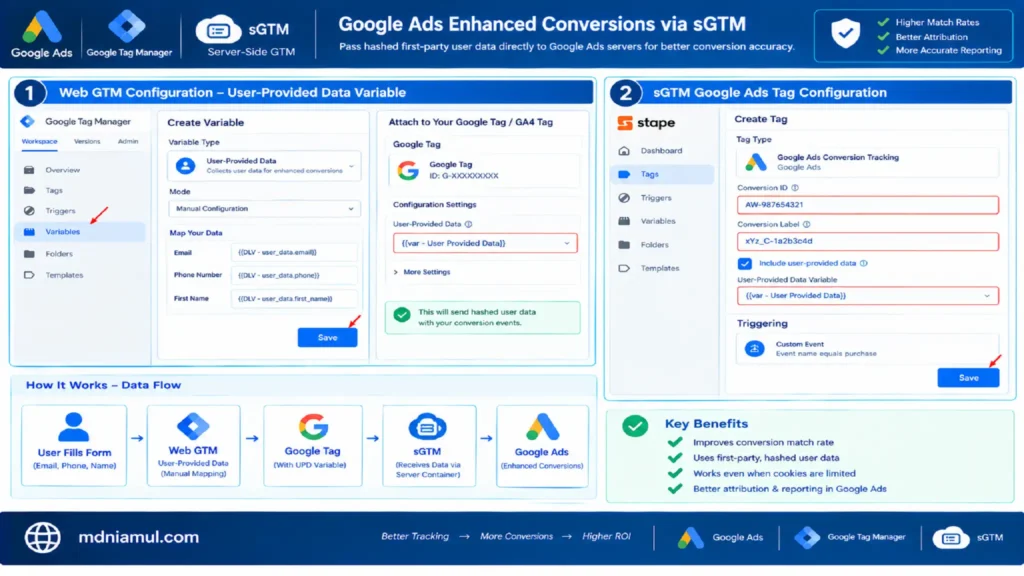
Google Ads Enhanced Conversions improves conversion accuracy by securely passing hashed first-party user data directly to Google Ads servers.
1. Web GTM Configuration
- Create a User-Provided Data Variable in Web GTM. Choose Manual Configuration.
- Map user fields to your Data Layer variables:
- Email mapped to {{DLV – user_data.email}}
- Phone mapped to {{DLV – user_data.phone}}
- First Name mapped to {{DLV – user_data.first_name}}
- Attach this User-Provided Data variable to your Web Google Tag or GA4 Event Tag.
2. sGTM Google Ads Tag Configuration
- In your sGTM container, create a new tag using the Google Ads Conversion Tracking template.
- Enter your Conversion ID (e.g., AW-987654321) and Conversion Label (e.g., xYz_C-1a2b3c4d).
- Enable the option Include User-Provided Data and select the User-Provided Data variable parsed from incoming client requests.
- Set the firing trigger to match your server conversion events (such as purchase or custom_lead_submission).
For advanced setups involving external portals, read our guide on Third-Party Checkout Conversion Tracking Services.
Phase 6: Google Consent Mode V2 Setup via Cookiebot
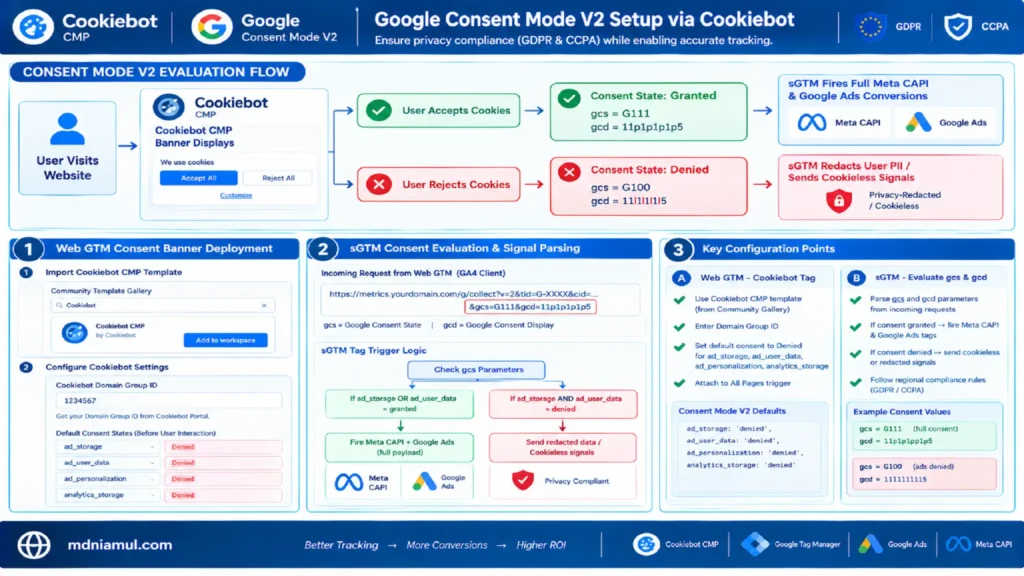
Deploying server-side tracking without respecting user privacy choices violates regulations such as GDPR and CCPA. We integrate Cookiebot CMP alongside Google Consent Mode V2 to manage privacy compliance.
					                 CONSENT MODE V2 EVALUATION FLOW

[ User Visits Website ] ---> [ Cookiebot CMP Banner Displays ]
                                           |
                 +-------------------------+-------------------------+
                 | (User Accepts Cookies)                            | (User Rejects Cookies)
                 v                                                   v
[ Consent State: Granted ]                          [ Consent State: Denied ]
  gcs = G111, gcd = 11p1p1p1p5                      gcs = G100, gcd = 11l1l1l1l5
                 |                                                   |
                 v                                                   v
[ sGTM Fires Full Meta CAPI                         [ sGTM Redacts User PII /
  & Google Ads Conversions ]                         Sends Cookieless Signals ]
1. Web GTM Consent Banner Deployment
- Import the Cookiebot CMP tag template from the GTM Community Template Gallery.
- Enter your Cookiebot Domain Group ID (retrieved from your Cookiebot Portal).
- Configure default consent states to Denied for ad_storage, ad_user_data, ad_personalization, and analytics_storage before user interaction.
2. sGTM Consent Evaluation & Signal Parsing
When GA4 client tags stream payloads to metrics.yourdomain.com, two critical URL parameters pass the user’s consent status:
- gcs (Google Consent State): Reports key consent choices (e.g., G111 indicates full approval for ads and analytics, while G100 indicates ads consent was denied).
- gcd (Google Consent Display): Passes granular internal status signals regarding default and updated consent choices.
Inside sGTM, configure tag triggers to evaluate incoming gcs parameters. If ad_storage or ad_user_data is marked as granted, fire Meta CAPI and Google Ads tags with full parameter payloads. If consent is denied, set tags to transmit privacy-redacted, cookieless signals or suppress execution based on regional compliance requirements.
Complete sGTM Tag, Trigger, and Variable Blueprint
Web GTM Container Settings
- Tag: Google Tag (GA4 Configuration)
- Type: Google Tag
- Configuration Parameter: server_container_url = https://metrics.yourdomain.com
- Trigger: Initialization – All Pages
- Tag: Custom Form Listener
- Type: Custom HTML
- Content: Custom JavaScript Listener Code
- Trigger: Initialization – All Pages
- Tag: Meta Browser Pixel – Lead
- Type: Custom HTML / Meta Pixel Template
- Parameters: Event = Lead, Event ID = {{DLV – event_id}}
- Trigger: Custom Event = custom_lead_submission
Server GTM Container Settings
- Client: GA4 Client
- Type: GA4
- Priority: 0
- Parameters: Listens on default paths (/g/collect)
- Tag: Meta CAPI – Lead Event
- Type: Meta Conversions API (by Stape)
- Parameters: Pixel ID, Access Token, Event Name = Lead, Event ID = {{Event Data – event_id}}
- Trigger: Event Name equals custom_lead_submission AND Client Name equals GA4
- Tag: Google Ads Server Conversion
- Type: Google Ads Conversion Tracking
- Parameters: Conversion ID, Conversion Label, User-Provided Data Variable enabled
- Trigger: Event Name equals custom_lead_submission AND Client Name equals GA4
Step-by-Step Testing & Diagnostics Workflow
- Step 1: Open GTM Web and Server Preview Modes Simultaneously.
- Ensure the sGTM debug view logs incoming HTTP requests sent to your subdomain (https://metrics.yourdomain.com/g/collect).
- Step 2: Trigger a Test Event on Your Website.
- Fill out a lead form or complete a test transaction.
- Step 3: Verify Event ID Alignment.
- In Web GTM Preview, inspect the event_id variable under the triggered event. Open sGTM Preview, select the corresponding incoming request, and verify that the event_id string matches perfectly.
- Step 4: Check Meta Test Events Tool.
- Navigate to Meta Events Manager -> Test Events. Enter your test code. Confirm that Meta receives two hits—one from the Browser pixel and one from Server CAPI—and marks the pair as Deduplicated.
- Step 5: Verify HTTP Status Codes.
- In sGTM Preview, verify that outbound requests to Meta CAPI and Google Ads endpoints return an HTTP status of 200 OK. Response codes like 400 or 403 indicate malformed parameters or invalid API access tokens.
For tracking offline transactions or call conversions, check our guide on Offline Conversion Tracking Services.
Troubleshooting Common Setup Errors
Issue 1: Meta CAPI Double-Counting Conversions
- Root Cause: Missing or mismatched event_id parameters between client-side browser tags and server-side CAPI tags.
- Solution: Verify that both your Web GTM Meta Pixel Tag and sGTM Meta CAPI Tag pull from the exact same Data Layer variable ({{DLV – event_id}}).
Issue 2: Low Meta Event Match Quality (EMQ Score Below 5.0)
- Root Cause: Customer contact parameters (email, phone number) are missing, unformatted, or stripped before reaching sGTM.
- Solution: Clean user inputs prior to hashing—ensure emails are lowercased and stripped of spaces, and convert phone numbers into standard E.164 formats before generating SHA-256 strings.
Issue 3: sGTM Server Container Returns 400 Bad Request
- Root Cause: Incoming GA4 protocol payloads contain invalid formatting or exceed character limits.
- Solution: Inspect sGTM debug console logs to locate malformed parameters. Ensure your GA4 Client parser is updated to handle v=2 protocol payloads correctly.
Issue 4: Google Ads Conversions Display “Unverified” Status
- Root Cause: No real conversion has fired within 24 hours, or sGTM requests are blocked by DNS misconfigurations.
- Solution: Perform a live test transaction using Google Tag Assistant and verify that your custom subdomain CNAME record has propagated globally.
Summary by MD Niamul
Transitioning from browser pixel tracking to a Server-Side Tracking architecture built on sGTM, Meta CAPI, Google Ads Enhanced Conversions, and Cookiebot Consent Mode V2 protects your marketing data against browser tracking restrictions. Routing signals through a custom subdomain (metrics.yourdomain.com), generating unique event_id keys for CAPI deduplication, and sending normalized SHA-256 user data allows you to recover up to 30% of missing conversion signals, raise Meta Event Match Quality, and provide ad algorithms with the rich first-party data needed to scale ROAS.
1.What is server-side tracking?
Server-side tracking routes website interaction data through a dedicated cloud server container—such as Server-Side Google Tag Manager—before forwarding it to ad networks. This approach replaces direct browser-to-ad-network tracking, bypassing browser restrictions and ad blockers while ensuring complete control over your first-party data.
2.How does Meta CAPI deduplication work?
Meta CAPI deduplication relies on a shared unique identifier called an event_id. When both your browser pixel and server CAPI fire for the exact same conversion using identical event_id strings, Meta matches the pair, retains the enriched server hit, and discards the duplicate browser signal.
3.Why is my Meta Event Match Quality low?
Low Meta Event Match Quality (EMQ) occurs when user parameters—such as email addresses, phone numbers, or zip codes—are missing or formatted incorrectly. Passing normalized, SHA-256 hashed customer parameters directly through your sGTM server container consistently elevates your EMQ scores above 8.0/10.
4.Does server-side tracking bypass ad blockers?
Yes. When your sGTM container runs under a custom first-party subdomain (such as metrics.yourdomain.com), incoming tracking calls match your primary domain. Ad blockers treat these calls as first-party web traffic, allowing conversion events to reach your sGTM container reliably.
5.How does Safari ITP impact campaign tracking?
Safari Intelligent Tracking Prevention (ITP) automatically caps client-side JavaScript cookies to 7 days, or just 24 hours when visitors arrive via ad links containing parameters like gclid or fbclid. Routing tracking through an sGTM custom subdomain sets true HTTP cookies that resist ITP deletion.
6.What are Google Ads Enhanced Conversions?
Google Ads Enhanced Conversions securely sends hashed first-party customer data (such as emails, names, and phone numbers) from your server container directly to Google. This improves conversion measurement accuracy, boosts smart bidding performance, and recovers data lost to browser restrictions.
7.Why is Google Consent Mode V2 required?
Google Consent Mode V2 is mandatory for advertisers targeting users in the EU and EEA. It ensures your tracking pipeline dynamically adjusts data collection based on user choices, keeping your advertising setups compliant with privacy regulations like GDPR.
8.Why choose Stape over standard Google Cloud setups?
Stape provides custom hosting built specifically for Server-Side Google Tag Manager containers. It offers simplified setup, automated custom domain routing, free SSL certificate management, and predictable monthly pricing compared to manual Google Cloud App Engine deployments.
9.How long does a full server-side setup take?
A complete server-side tracking implementation—including sGTM configuration, custom subdomain routing, Meta CAPI setup, Google Ads Enhanced Conversions, and Cookiebot Consent Mode V2—typically takes between 3 to 5 hours for standard websites, or up to 2 days for complex custom platforms.
10.Why do conversion counts differ between platforms?
Conversion discrepancies occur when client-side pixels are blocked on certain browsers while remaining active on others. Implementing a server-side tracking architecture establishes a single source of truth, aligning conversion data across Meta Ads, Google Ads, and your internal store backend.
 Need Help Advanced GHL Automation & Tracking Setup?