Quick Answer
To track ChatGPT (OpenAI) Ads conversions for an e-commerce store, build a hybrid setup in Google Tag Manager: install the OpenAI Ads Pixel in your web GTM container to fire browser events like contents_viewed and order_created, and add the OpenAI Conversions API tag in a server-side GTM container to send the purchase straight from your server. The step most stores miss is enabling a clean e-commerce data layer — if your store (custom build, page builder, or hosted checkout) doesn’t already push a GA4 purchase event, add a JavaScript listener that catches the order and pushes it. Then tie the browser and server events together with one shared Event ID (your order number) so OpenAI counts each sale exactly once. That is why your ChatGPT clicks show visitors but zero conversions: the sale is happening, but nothing is telling OpenAI about it.
Key Takeaways
- The problem: ChatGPT is sending you buyers, but your store isn’t reporting the sale to OpenAI — so your ChatGPT Ads Manager shows clicks and $0 in conversions.
- The root cause: either the OpenAI tracking isn’t installed, or your store never pushes a proper e-commerce data layer for the Pixel to read on the confirmation page.
- The fix: enable the e-commerce data layer (view, add-to-cart, checkout, purchase), add a listener where your platform doesn’t push it, then feed both the browser Pixel and the server-side Conversions API.
- Deduplicate on the order ID: send the same Event ID from the Pixel and the API so OpenAI merges them into one conversion.
- Get the value format right: OpenAI wants the amount as an integer in the lowest denomination — $129.99 is sent as 12999, always with a currency.
- Stay compliant without losing US sales: wire in Consent Mode v2 with Cookiebot, but scope “denied” to UK/EU only so US buyers keep tracking normally.
“The clicks are there. The sales are there. So where are my conversions?”
It’s Monday. You open your ChatGPT Ads Manager expecting your first real wins, because the traffic has been good — curious, high-intent people clicking your ad straight out of a conversation. The Clicks column looks healthy. Cost per click is cheap. Everything says the campaign is working.
Then your eyes drift to the Conversions column.
Zero.
You switch tabs to your store. Orders are landing. Stripe confirms the money arrived. So you have real sales from real ChatGPT visitors — and OpenAI thinks not a single one of them bought anything.
This is the exact situation I get hired to fix, and it is almost never a “campaign” problem. Your ChatGPT Ads campaign is fine. The break is in measurement: nothing on your store is telling OpenAI that the purchase happened. And because OpenAI’s system optimizes toward the conversions it can see, feeding it zeros teaches it to stop finding buyers — so your good early results quietly decay.
In this guide we are going to build ChatGPT conversion tracking the right way for an e-commerce website, inside Google Tag Manager. We’ll enable the full e-commerce data layer, install the browser Pixel, add a server-side Conversions API, and — the part most tutorials skip — solve the reason the sale never reaches OpenAI in the first place. By the end, every real sale reaches OpenAI once, with the correct value, and your ChatGPT Ads report finally agrees with your checkout.
First, how do I find the problem? (Diagnose before you build)
Before touching a single tag, prove where the tracking is failing. Guessing wastes days. Here is the 5-minute diagnosis I run on every “ChatGPT shows no conversions” account.
- Confirm the click is even arriving. Click your own ChatGPT ad (or open your landing page with the OpenAI click parameter in the URL). Open your browser’s DevTools → Application → Cookies. Look for a first-party cookie named __oppref. If it exists, the OpenAI Pixel captured the click identifier — good. If it’s missing, your Pixel isn’t installed or isn’t loading early enough (it must sit high in the <head>).
- Install the OpenAI Ads Pixel Helper. Add the free Pixel Helper for OpenAI Ads Chrome extension. Browse your store like a customer. It shows every OpenAI event firing on the page, the Pixel ID, and the parameters — so you see instantly which events fire and which don’t.
- Complete a test purchase and watch the confirmation page. This is where most stores fail. Buy something. When you land on the order-confirmation (“Thank You”) page, check the Pixel Helper. Nine times out of ten you’ll see page_viewed fire — but no order_created. That single gap is your whole problem: the purchase page loaded, but nothing pushed the sale data, so the Pixel had nothing to report.
- Compare the numbers side by side. Line up your store’s orders vs Stripe/PayPal payments vs OpenAI reported conversions for the same 7 days. Orders 14, payments 14, OpenAI 0 is a tracking failure (nothing is firing). Orders 14, OpenAI 6 is a coverage failure (browser-only, losing sales to ad blockers and cross-session buyers). Both are fixed by this guide; the first is more urgent.
- Check consent. If you serve the UK/EU and your cookie banner defaults to “denied,” a correctly configured tag will (rightly) hold the event until consent is granted. Test with consent accepted to rule this in or out.
Run those five checks and you’ll know exactly which layer to fix. In almost every “no conversions” case, the answer is the same: the order data never reaches the data layer. Let’s fix that permanently.
What “ChatGPT Ads tracking” actually is
OpenAI began testing ads inside ChatGPT in early 2026, opened a self-serve Ads Manager through the year, and — like every serious ad platform before it — shipped an official measurement stack so you can prove those ads produce sales. It has two parts.
- A JavaScript Pixel — a small browser script (oaiq) that loads from OpenAI and reports actions like viewing a product, adding to cart, or buying. Think of the Pixel as a security camera at your front door: quick to install and great in real time, but it only sees what walks past the lens. Ad blockers can cover the lens, and it can’t see a customer who returns three days later on a different device.
- A Conversions API (CAPI) — a server-to-server connection that sends the sale directly from your server to OpenAI, with no browser in the middle. Think of CAPI as the receipt printed by your cash register: it doesn’t care about ad blockers or cookies, because the payment already happened on your side.
OpenAI, exactly like Meta, recommends running both together — a hybrid setup. The Pixel gives you rich, real-time signals; the API guarantees the sale still counts even when the browser fails. Together they form one complete picture instead of two half-pictures.
Where GTM fits in: you could hand-code OpenAI’s oaiq snippet into every page and build a server integration yourself. But Google Tag Manager lets you deploy both without editing your theme code each time, and the Stape team publishes ready-made GTM templates — an OpenAI Ads Pixel tag for the web container and an OpenAI Ads Conversions API tag for the server container. That turns this into a configuration job instead of a development project. (As an official Stape partner, this is the exact stack I build for clients.)
The step everyone skips: enable a clean e-commerce data layer
Here is the single most important idea in this guide, and the reason “just install the pixel” fails on so many stores.
The data layer is an invisible filing cabinet on your page where your store writes structured information — the product being viewed, the cart contents, and, at checkout, the order value, currency, transaction ID, and items. The OpenAI Pixel tag has an “automatic mapping” option that reads that cabinet and fills in the conversion for you. But it can only read what your store actually writes.
Some platforms fill the cabinet automatically. A well-integrated Shopify or WooCommerce (with the right plugin) pushes a standard GA4 e-commerce data layer, so the Pixel just reads it. But custom-built stores, page builders, headless front-ends, and hosted/redirect checkouts (where payment finishes on a Stripe or PayPal page) often push nothing — or an incomplete data layer with no purchase value. When that happens, the Pixel’s automatic mapping finds an empty cabinet and fires nothing. That is why your store shows visitors but zero conversions.
The fix is to enable the e-commerce data layer yourself — for the whole funnel, not just the purchase. Map each shopping step to the matching OpenAI event:
Funnel step | GA4 data layer event | OpenAI event | Data type |
|---|---|---|---|
Landing / key page | page_view | page_viewed | contents |
Product view | view_item | contents_viewed | contents |
Add to cart | add_to_cart | items_added | contents |
Begin checkout | begin_checkout | checkout_started | contents |
Purchase | purchase | order_created | contents |
(OpenAI also supports lead_created, registration_completed, appointment_scheduled, subscription_created, and trial_started — useful if your funnel captures a lead or a subscription.)
Where your store already pushes these events, you’re set. Where it doesn’t — most commonly the purchase event on the confirmation page — you add a small JavaScript listener that catches the order and pushes it. That listener is the bridge that makes everything downstream (OpenAI, GA4, Google Ads, Meta) finally work.
Why you must set this up (before you scale spend)
The Problem: With no working conversion signal, you under-report — often to zero. Under-reporting isn’t just an ugly dashboard. It actively breaks the auction, because OpenAI optimizes toward the conversions it can see. Missing sales means missing signals, which means higher costs, weaker targeting, and a campaign that gets worse the longer it runs on bad data.
The Solution: A hybrid GTM build recovers the sales the browser loses and sends clean, deduplicated data to OpenAI. Here’s what you gain.
# | Benefit | What it means for your store |
|---|---|---|
1 | Smarter algorithm training | OpenAI optimizes on all your real buyers, not just the ones with tracking-friendly browsers. Lower cost per purchase over time. |
2 | Accurate ROAS & revenue | Your ChatGPT Ads report finally matches your store and payment processor, so you can trust the numbers and set budget with confidence. |
3 | Ad-blocker & cookie resilience | The server-side Conversions API keeps sending sales even when the browser Pixel is blocked or cookies are wiped. |
4 | Cross-session attribution | Shoppers research in one session and buy in another. Server data plus the __oppref identifier reconnects that journey. |
5 | Future-proof & privacy-ready | With Consent Mode v2 and server-side control, you’re built for a consent-first, cookieless web instead of scrambling later. |
The honest version: ChatGPT Ads are still young and the platform will keep changing. But the measurement pattern — hybrid tracking with deduplication — is the same one that survived Meta, TikTok, and Google. Build it once, correctly, and you’re ready as the channel matures.
A critical accuracy note on values
OpenAI expects monetary amounts as integers in the currency’s lowest denomination. That means $129.99 is sent as 12999 — not 129.99 — and whenever you send an amount, you must also send a currency (e.g., USD or GBP). Your data layer will usually store the value as 129.99, so this conversion is the number-one thing to verify in testing. Get it wrong and your ROAS will look 100× too high or too low.
Prerequisites & checklist
Before you build, make sure you have:
- Admin access to your store and the ability to add code to the confirmation/thank-you page (theme code, custom HTML, or your page builder’s script area).
- A web GTM container installed across the store.
- A ChatGPT / OpenAI Ads account with your OpenAI Pixel ID (in the Conversions tab of Ads Manager) and, for the API, an API Key (request this from your OpenAI account team — you generally can’t self-generate it).
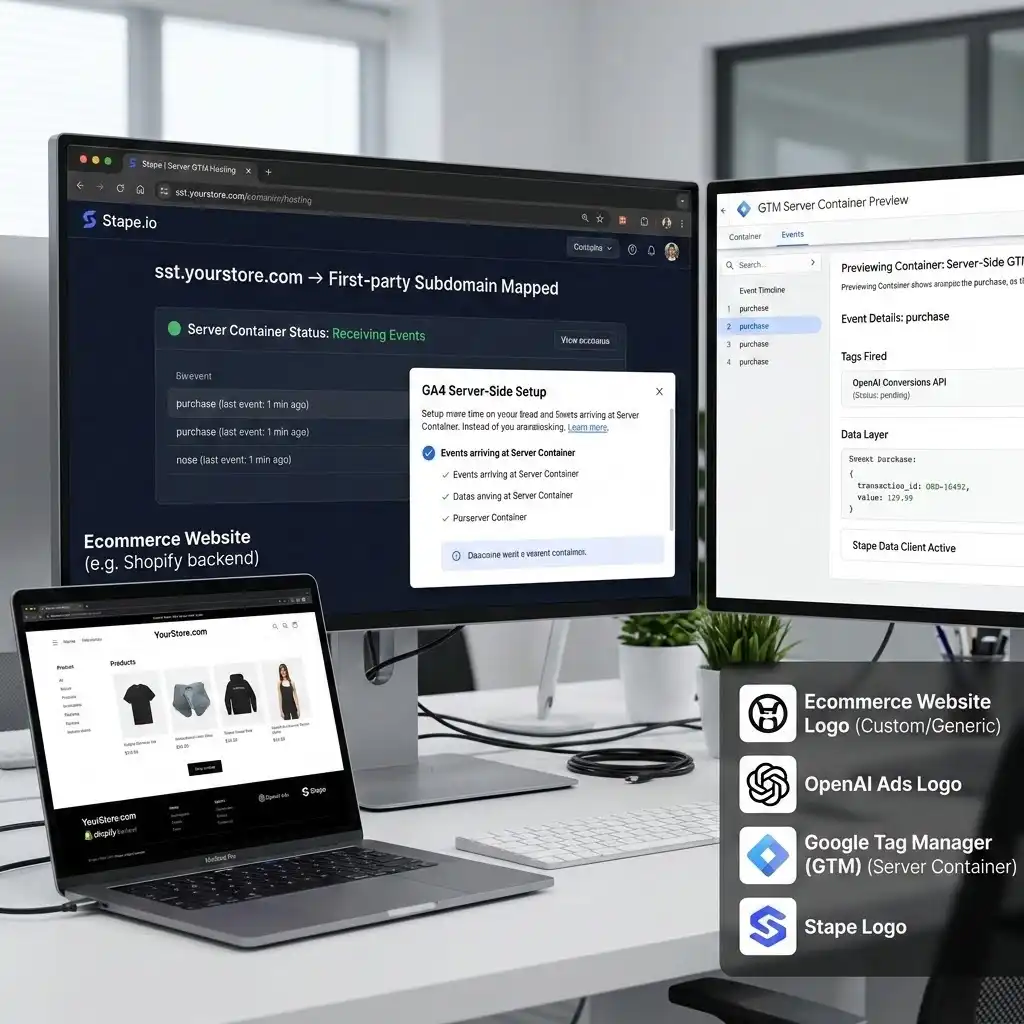
- A server-side GTM container for the hybrid build. The easiest route is Stape (hosted server GTM with a free tier for low-traffic stores), running on a first-party subdomain like sst.yourstore.com.
- Validation tools: GTM Preview Mode, the Stape GTM Helper and OpenAI Ads Pixel Helper Chrome extensions, and access to your OpenAI Ads reporting.
- Cookiebot account for Consent Mode v2 if you serve the UK/EU.
Video Tutorial
Prefer to watch it built click-by-click? Here’s the full walkthrough covering the complete e-commerce setup end to end.
Step-by-step: the complete e-commerce hybrid build
We’ll build this in five phases. Do them in order — each one depends on the last.
- Phase 1 — Web GTM: enable the e-commerce data layer + install the OpenAI Pixel
- Phase 2 — Server foundation: get a server-side GTM container receiving the purchase
- Phase 3 — Server GTM: send purchases via the OpenAI Conversions API
- Phase 4 — Deduplication: one shared Event ID (your order number) so no sale counts twice
- Phase 5 — Consent Mode v2 with Cookiebot: compliant and without losing US sales
Phase 1 — Enable the e-commerce data layer + install the OpenAI Pixel
This is the browser layer. First we make sure the store pushes clean purchase data, then we point the OpenAI Pixel at it.
1. Add the OpenAI Ads Pixel template
In your web GTM container, open Templates → Tag Templates → Search Gallery, search OpenAI Ads Pixel by Stape, and click Add to Workspace. Why? This installs OpenAI’s Pixel through a maintained template, so you never paste raw script into your theme and re-do it on every change.
2. Create the Base/Init Pixel tag
Go to Tags → New → Tag Configuration → OpenAI Ads Pixel by Stape.
- OpenAI Pixel ID: paste it from the Conversions tab of your OpenAI Ads account. (Only one Pixel ID is supported per page.)
- Set this base tag to fire on Initialization (or All Pages) so the SDK is ready before any event.
CRITICAL STEP — avoid the load race. On your event tags (like the purchase tag below), use GTM Tag Sequencing: set “Fire a tag before this tag fires” to your Init tag. This guarantees the SDK is queued before the event fires, so you never lose a conversion to a millisecond timing race.
3. Confirm — or build — the e-commerce data layer (Data Layer Code)
Open GTM Preview, browse a product, add to cart, and complete a test order. Watch the left timeline for view_item, add_to_cart, begin_checkout, and purchase. If they’re all there with real values, your store already pushes the data layer — skip to step 5.
If the purchase event is missing or has no value (common on custom stores, page builders, and hosted checkouts), you push it yourself. This is the standard GA4 e-commerce purchase push your confirmation page should make:
					// Fires on the order-confirmation ("Thank You") page, after payment is confirmed.

window.dataLayer = window.dataLayer || [];

window.dataLayer.push({

  event: "purchase",

  ecommerce: {

    transaction_id: "ORD-10492",   // unique per order — reused for deduplication

    value: 129.99,                 // final charged total, major units, as a NUMBER

    currency: "USD",

    items: [

      { item_id: "SKU-88", item_name: "Wireless Charger", quantity: 1, price: 129.99 }

    ]

  }

});
Line by line: event: “purchase” is what your Custom Event trigger will listen for. transaction_id is the single most important field — the unique fingerprint of the sale that lets the browser event and the server event recognize each other later (Phase 4). value and currency feed your conversion value (send the final total after discounts and tax, as a number, not a string). items gives OpenAI and GA4 the product detail. Replace the hard-coded values with your store’s real order variables (most platforms expose these on the confirmation template).
4. If the value isn’t available in the page: the Listener (Listener Code)
Some checkouts finish inside an embedded iframe or a redirect/hosted payment page, and the confirmation view doesn’t expose the order in normal page variables. In that case, listen for the “order complete” signal the checkout posts to the parent window, read the order, and push it. Add a Custom HTML tag named cHTML – Purchase Listener, firing on your checkout/confirmation pages:
					<script>

(function () {

  // Some hosted/iframe checkouts post a "message" to the parent window when

  // the order completes. We listen for it, read the order details, and push a

  // standard GA4 purchase event so GTM and the OpenAI Pixel can read it.

  window.addEventListener("message", function (e) {

    var data = e.data || {};

    // STEP 1: During setup, uncomment the next line, complete a REAL test order,

    // and watch DevTools → Console to see the exact message your checkout sends.

    // Then match on it below. (Payloads differ between platforms/gateways.)

    // console.log("checkout message:", data);

    // STEP 2: Detect the order-complete signal. Adjust to YOUR payload.

    var type = (typeof data === "string") ? data : (data.type || data.event || "");

    var isOrderComplete = /order.*(complete|success|paid|created)|payment.*success/i.test(type);

    if (!isOrderComplete) return;

    // STEP 3: Read order details from the payload (fallback to your own values).

    var p        = data.payload || data.data || data || {};

    var orderId  = p.orderId || p.transactionId || p.id || "";

    var amount   = parseFloat(p.amount || p.total || p.value || 0);

    var currency = p.currency || "USD";

    // STEP 4: Push a clean GA4 purchase event to the data layer.

    window.dataLayer = window.dataLayer || [];

    window.dataLayer.push({

      event: "purchase",

      ecommerce: {

        transaction_id: orderId,

        value: amount,

        currency: currency,

        items: p.items || []

      }

    });

  }, false);

})();

</script>
How it works: window.addEventListener(“message”, …) is the catcher’s mitt — it waits for the message the checkout sends the instant a payment succeeds. The commented console.log is your discovery tool: because payloads differ by gateway, you run one real test order, read the message shape in the Console, and tighten the isOrderComplete match to it. Once matched, we read the order ID, amount, and currency and dataLayer.push a standard purchase event. From this moment, even an iframe/redirect checkout has a working data layer.
5. Create the variables and the purchase trigger
Create these Data Layer Variables (DLVs):
Variable (naming convention) | Data Layer key | Holds |
|---|---|---|
DLV – ecommerce.value | ecommerce.value | Order total (major units) |
DLV – ecommerce.currency | ecommerce.currency | Currency code |
DLV – ecommerce.transaction_id | ecommerce.transaction_id | Unique order ID (reused in Phase 4) |
DLV – ecommerce.items | ecommerce.items | Line items |
Then create the trigger: Triggers → New → Custom Event, Event name purchase, name it Custom Event – purchase.
6. Create the purchase Pixel tag
Add another OpenAI Ads Pixel by Stape tag named OpenAI – Pixel – order_created:
- Event Name Setup Method: choose Override and select order_created (surgical and predictable), or Inherit from DataLayer to auto-map all your GA4 e-commerce events at once.
- Automatic Data Layer Mapping: leave checked so it reads your ecommerce object.
- Map amount and currency, and verify the amount is sent as an integer in the lowest denomination (12999 for 129.99). If the tag doesn’t convert automatically, add a small Custom JavaScript variable that returns Math.round(value * 100) and map that to amount.
- Trigger: Custom Event – purchase.
A bonus for your whole stack: this same e-commerce data layer also powers your GA4 purchase event and Google Ads conversion — so building it once fixes ChatGPT tracking and your GA4/Google Ads reporting at the same time.
Phase 1 GTM pieces at a glance:
Type | Name | Purpose |
|---|---|---|
Tag | OpenAI – Pixel – Base | Loads the OpenAI SDK / init |
Tag | cHTML – Purchase Listener | Builds the data layer where the store doesn’t |
Tag | OpenAI – Pixel – order_created | Sends the browser purchase to OpenAI |
Trigger | Custom Event – purchase | Fires when a sale completes |
Variables | DLV – ecommerce.* | Read value, currency, order ID, items |
Publish, and the browser layer is live. Now we make it accurate.

Phase 2 — Build the server-side foundation
The Conversions API sends data from your server, so first you need a server container that receives the purchase event.
- Create a server-side GTM container on Stape. Spin up a container; Stape hosts it. Low-traffic stores can start on the free tier.
- Map it to a first-party subdomain. Point a subdomain like sst.yourstore.com at the server container. Why? First-party hosting makes tracking requests look like they come from your own domain, which browsers and ad blockers treat far more kindly than a third-party Google domain. This is the mechanism that actually recovers lost data. (This is the same server-side tracking foundation I use for every platform.)
- Forward the purchase from web to server. Send your GA4 events (including purchase) to the server container using GA4 server-side, or Stape’s Data Tag / Data Client. Either way, the purchase event must arrive in the server container so a server tag can act on it.
- (Recommended) Enable the first-party cookie / Custom Loader power-up so your GTM and analytics scripts load through first-party paths and dodge ad-blocker interference.
Once the purchase event appears in the server container’s Preview, you’re ready for the API tag.
Phase 3 — Send purchases via the OpenAI Conversions API (server GTM)
This is the accuracy layer — the “cash register receipt” that reaches OpenAI no matter what the browser does.
- Add the template. In your server container, go to Templates → Search Gallery, find OpenAI Ads Conversions API by Stape, and Add to Workspace.
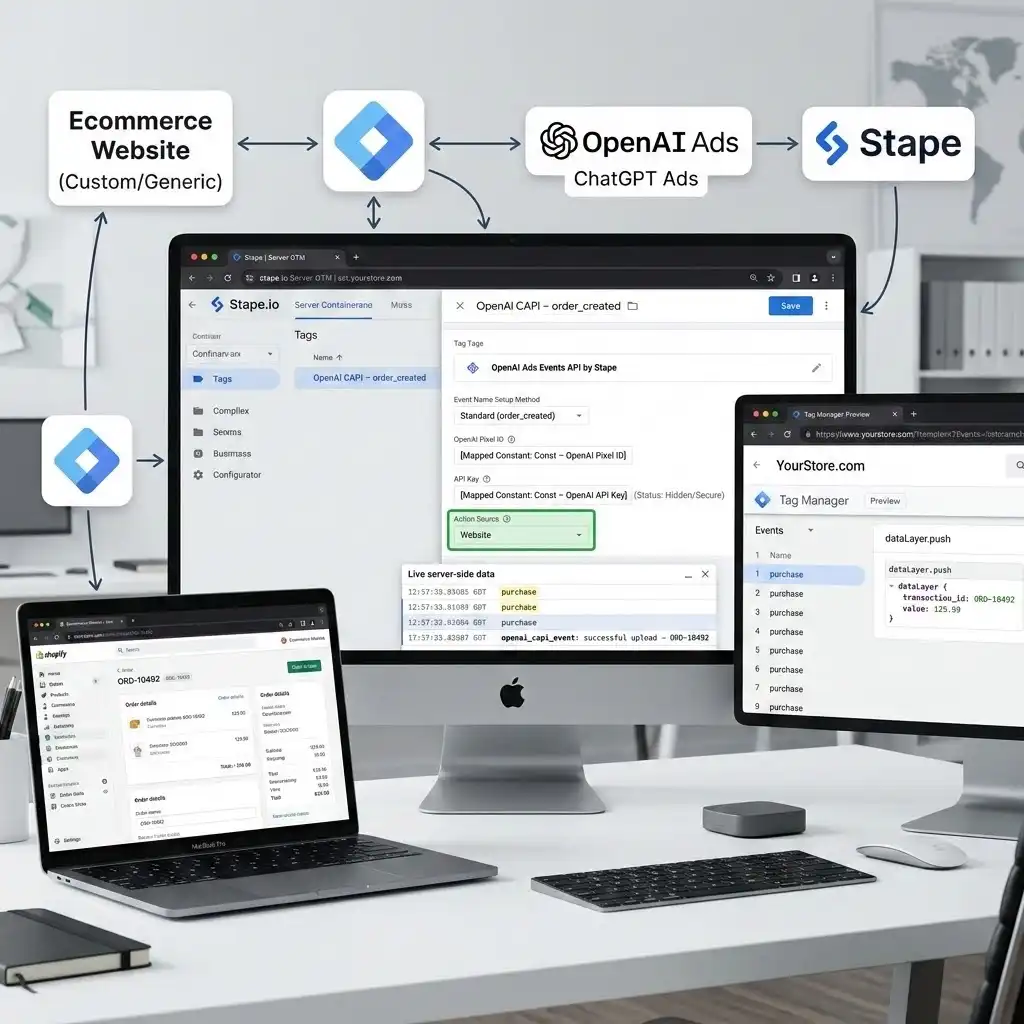
- Create the tag. Tags → New → Tag Configuration → OpenAI Ads Events API by Stape.
- Configure it:
- Event Name Setup Method: Standard (pick order_created), Inherit from the client (auto-map GA4 names), or Custom.
- OpenAI Pixel ID: the same ID from your ad account.
- API Key: the key from your OpenAI account team. Store it in a Constant variable (Const – OpenAI API Key). Warning: the API is server-only — never place the key in a web tag or client code, or you expose a secret.
- Action Source: your website.
- Set Click ID cookie: leave enabled. The server reads and stores OpenAI’s __oppref identifier so the sale ties back to the original ChatGPT click. (Note: unlike the Pixel, the API does not auto-capture oppref from the URL — this cookie handling is how the server leg gets it.)
- User Data: optionally enrich with hashed customer data (email as email_sha256, etc.) to improve match quality — lowercase, 64-character hex, and never raw values.
- Event Data: map value, currency, and items. Remember the format: amount as an integer in the lowest denomination (12999) with a matching currency.
- Add the trigger: a Custom Event trigger for the incoming purchase, firing on Some events, with a condition on your client name so it only fires for the right data client.
The most accurate value source (optional upgrade). For hosted/redirect checkouts, the cleanest value comes from your backend. If your payment processor (Stripe, PayPal, or your order system) can send a webhook on “payment succeeded,” post the real order data (amount, currency, order ID, hashed email, and the stored __oppref) to your Stape server container’s Data Client endpoint, and fire the Conversions API tag from that. This uses your true record of the sale instead of a number read from the browser — the gold standard for third-party checkout tracking.
Phase 3 GTM pieces:
Type | Name | Purpose |
|---|---|---|
Tag | OpenAI CAPI – order_created | Sends the server-side purchase to OpenAI |
Trigger | Custom Event – purchase (server) | Fires when the purchase reaches the server |
Variable (Constant) | Const – OpenAI API Key | Stores the API key securely |
Variable (Constant) | Const – OpenAI Pixel ID | Stores the Pixel ID |
Variable | Event Data – Event ID | Catches the shared Event ID (Phase 4) |
Now OpenAI gets the sale from two directions — browser and server. Which creates the next
problem: without a fix, it counts the same sale twice.
Phase 4 — Deduplication: count every sale exactly once
This is the phase most people skip — and the one that makes hybrid tracking trustworthy. If the same purchase arrives from the Pixel and the API with nothing tying them together, OpenAI records two conversions for one sale. ROAS inflates, and your optimization data lies.
OpenAI deduplicates by matching on three things: your Pixel ID, the event name, and a shared Event ID. So both legs must carry the same Event ID.
Use your order number (transaction_id) as the Event ID. An ID tied to the real order is far more stable than a random one — it survives page refreshes and matches perfectly across browser and server.
- Wire it into the web Pixel tag (Phase 1). In OpenAI – Pixel – order_created, set the Event ID field to DLV – ecommerce.transaction_id.
- Forward the ID to the server. In the Stape Pixel tag, enable DataLayer Push for the Event ID (or ensure your web→server forward carries transaction_id), so the server receives the identical value.
- Catch the ID in the server container. Create a variable that reads the incoming Event ID / transaction_id from the event data.
- Wire it into the server CAPI tag (Phase 3). In OpenAI CAPI – order_created, set the Event ID / id parameter to that variable.
Now the browser purchase and the server purchase share one fingerprint — your order number. OpenAI counts one sale. Done right.
If you used a backend webhook (Phase 3 upgrade): make the webhook send the same order ID as the Event ID, so the server-only leg still deduplicates against the browser Pixel.

Phase 5 — Consent Mode v2 with Cookiebot (compliant, without losing US sales)
This is the phase most guides get wrong, and it matters more than it looks. If you sell to the UK or EU, you legally cannot fire tracking before the shopper consents. But if you’re a US-first store and you blanket-block every visitor until they click a banner, you throw away conversions you’re perfectly allowed to collect — which defeats the entire build. The rule: privacy law applies based on where the visitor is, not where your business is. So we set consent by region, not globally.
The right default map for a US/UK store:
Visitor region | Legal requirement | Consent Mode default |
|---|---|---|
UK + EU/EEA | Opt-in (UK GDPR / PECR, GDPR) | Denied until the shopper accepts |
US + rest of world | Opt-out at most | Granted (track normally; offer opt-out) |
- Install Cookiebot. Add the Cookiebot CMP script to your site so it loads before GTM and can broadcast the shopper’s choice.
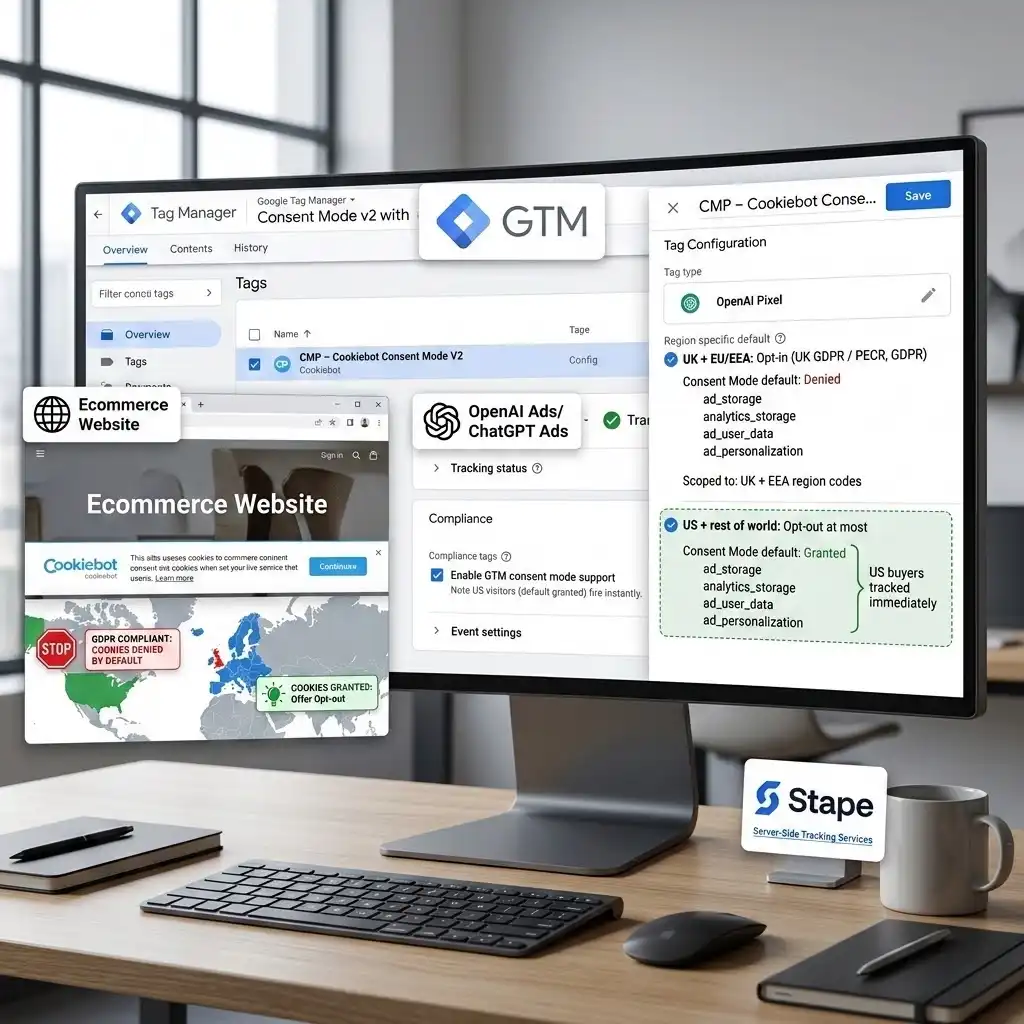
- Set region-specific defaults in GTM. Create a Consent Initialization trigger and a CMP – Cookiebot Consent Mode V2 tag that sets two default states before anything else runs:
- Denied for ad_storage, analytics_storage, ad_user_data, and ad_personalization, scoped to the UK + EEA region codes (e.g., GB plus the EU/EEA countries). The more specific regional default wins for those users.
- Granted as the global default for everyone else (US and rest of world), so US buyers are tracked immediately.
Then fire an update call when a UK/EU shopper accepts. Note: Cookiebot’s free tier is one global default only — region-specific banner display needs Cookiebot Premium. If the client is on the free tier, set the region-scoped defaults directly in the GTM consent tag (free) so US traffic still flows.
- Gate the OpenAI Pixel. In the OpenAI Pixel tag’s Compliance section, enable GTM consent mode support. When on, the tag checks the ad_storage signal; for a denied UK/EU visitor it queues the SDK load and events and dispatches them automatically once consent is granted — while US visitors (default granted) fire instantly.
Think of Consent Mode as a bouncer who only checks IDs at the doors that legally require it: UK/EU shoppers get asked first; US shoppers walk straight in. You stay compliant and keep full conversion coverage where the law allows it — which is the whole point of tracking accurately in the first place.
Testing & validation (don’t trust it until you’ve seen it fire)
Never assume it works. Prove it.
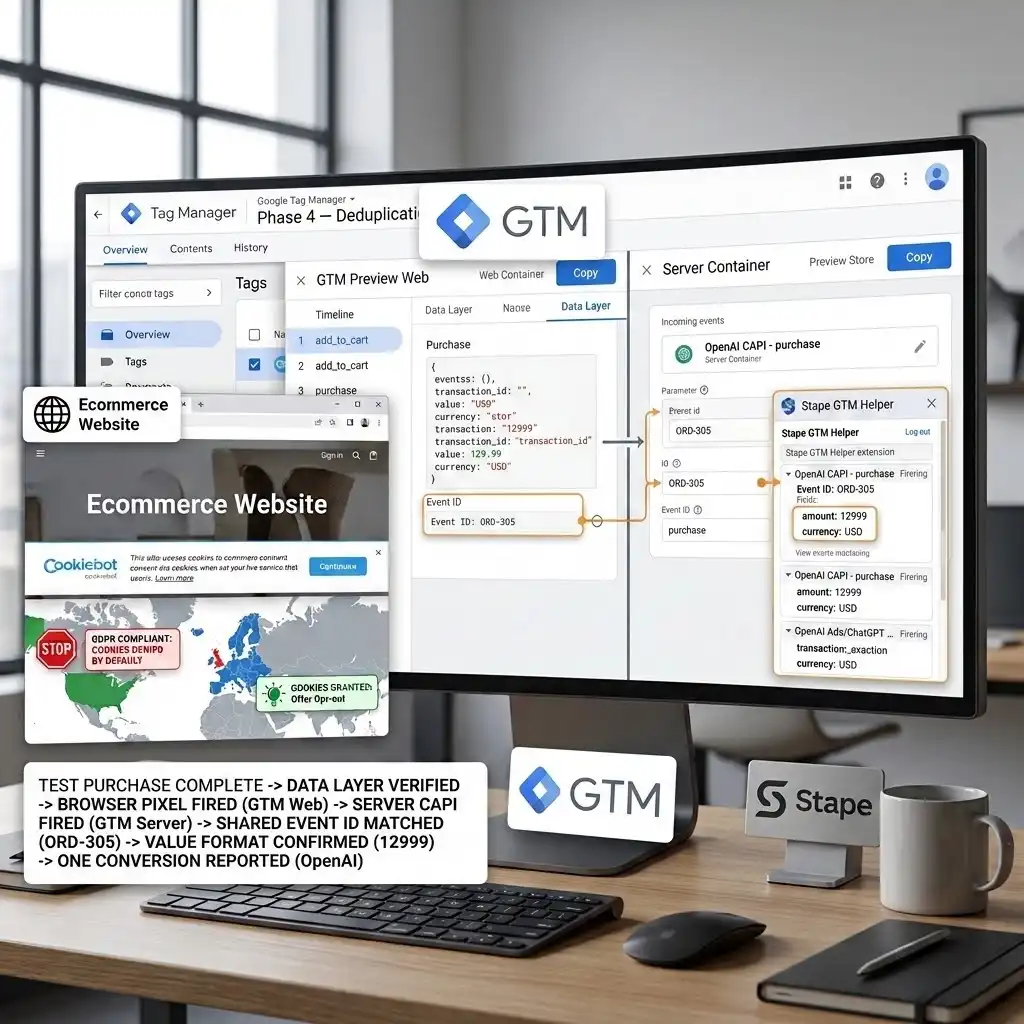
- Open GTM Preview in both containers. Click Preview in the web container and connect to your store; do the same for the server container. Install the Stape GTM Helper extension for readable server-side debugging.
- Run a real test purchase. Move through the store like a customer — view a product, add to cart, reach checkout, and complete a test order (use a test/sandbox payment if available).
- Confirm the data layer fired. In web Preview, verify your purchase Custom Event appears with the correct value, currency, and order ID — proof the data layer (or listener) works. If it doesn’t fire, revisit step 3/4 of Phase 1.
- Confirm the browser Pixel. Check the OpenAI Ads Pixel Helper and web Preview: OpenAI – Pixel – order_created fired with the correct value, currency, and Event ID (your order number).
- Confirm the server event. In server Preview, verify the same purchase arrived and OpenAI CAPI – order_created fired — carrying the identical Event ID as the browser event.
- Check the value format. Confirm OpenAI receives an integer in the lowest denomination (12999 for $129.99) with the right currency. This single check saves you from wildly wrong ROAS.
- Verify in OpenAI Ads reporting. Give it time, then confirm the conversion appears once, not twice. One test sale should equal one reported conversion.
Troubleshooting: the mistakes that trip everyone up
Mistake 1: The purchase event never fires (the classic failure)
- The Problem: GTM Preview shows page views, but no purchase event and no order_created.
- The Cause: your store doesn’t push an e-commerce data layer on the confirmation page, so the Pixel has nothing to read.
- The Solution: enable the data layer (Phase 1, step 3) or add the listener (step 4). Confirm the purchase event appears in Preview with a real value before moving on.
Mistake 2: The same sale is counted twice
- The Problem: OpenAI reports double your real purchases; ROAS looks unbelievable.
- The Cause: Pixel and API both send the sale with no shared Event ID.
- The Solution: complete Phase 4 — use the order number as the Event ID on both legs, and confirm in Preview that the web and server events carry the identical value.
Mistake 3: Conversion values are 100× off
- The Problem: a $129.99 order shows as $12,999 (or $1.29) in OpenAI.
- The Cause: the amount format — OpenAI expects an integer in the lowest denomination (12999), but your data layer sends 129.99, or the mapping multiplied incorrectly.
- The Solution: map a Custom JS variable returning Math.round(value * 100) to amount, always send currency, and verify with a real test order before trusting any report.
Mistake 4: Server events never arrive
- The Problem: the browser Pixel works, but the CAPI tag never fires.
- The Cause: the purchase isn’t reaching the server container — the web→server stream (GA4 server-side, Data Tag/Client, or your webhook) isn’t forwarding it.
- The Solution: revisit Phase 2. Confirm the purchase appears in the server container’s Preview before debugging the CAPI tag. No incoming event means no server conversion.
Mistake 5: Sales don’t tie back to ChatGPT clicks
- The Problem: conversions register, but few are attributed to ChatGPT Ads.
- The Cause: the __oppref click identifier isn’t captured or persisted — common when a shopper buys in a later session or the server leg never received oppref.
- The Solution: keep Set Click ID cookie enabled so the server stores __oppref, pass it through your web→server stream or webhook, and enrich events with hashed user data to improve cross-session match quality.

Conclusion: you now measure ChatGPT Ads like a pro
Take a breath — you built something most stores running ChatGPT Ads don’t have. You enabled a clean e-commerce data layer (with a listener where your platform fell short), installed the browser Pixel for real-time signals, added the server-side Conversions API for ad-blocker-proof accuracy, tied both together with a shared Event ID built from your order number, and wired in region-specific Consent Mode v2 so you stay compliant without throwing away US sales.
The payoff is simple and real: OpenAI now optimizes on all your true buyers, your ChatGPT Ads report matches your checkout, and your budget flows toward shoppers who actually convert. Give the platform 24–48 hours to settle after publishing, then start making decisions on numbers you can finally trust.
ChatGPT Ads are young and will keep evolving — but hybrid, deduplicated tracking is the pattern that has survived every platform before it. You’re not just tracking a new channel; you’re ready for it.
Summary
ChatGPT (OpenAI) Ads now ship a real measurement stack — a browser Pixel and a server-side Conversions API — but the sale only reaches OpenAI if your store pushes a clean e-commerce data layer. For an online store, the accurate setup is a hybrid Google Tag Manager build: enable the data layer for every funnel step (add a JavaScript listener where your platform doesn’t push it), install the OpenAI Ads Pixel in the web container, add the OpenAI Conversions API tag in a server-side (Stape) container, and deduplicate both legs with a shared Event ID based on your order number. Send values as integers in the lowest denomination, add region-specific Consent Mode v2 with Cookiebot (denied for UK/EU, granted for the US), and validate every step in GTM Preview. The result: OpenAI optimizes on all your real sales, and your ad report finally matches your checkout.
1. Why does ChatGPT show clicks but zero conversions?
Because the sale is happening but nothing tells OpenAI about it. Either the OpenAI tracking isn’t installed, or your store doesn’t push a proper e-commerce data layer on the confirmation page, so the Pixel has no purchase event to read. The fix is to enable the data layer (or add a JavaScript listener where your platform doesn’t), then add a server-side Conversions API for the sales the browser still misses. Once the purchase event exists, conversions start appearing in your reports.
2. What does "enable the e-commerce data layer" mean?
The data layer is a structured object on your page where your store writes shopping information — product views, cart adds, and the final order value, currency, transaction ID, and items. GTM and the OpenAI Pixel read from it. Well-integrated Shopify and WooCommerce stores push it automatically; custom builds, page builders, and hosted checkouts often don’t. “Enabling” it means making sure each funnel step pushes the right event with real values, so every tool downstream can read the sale.
3. Which events should an online store track?
Focus on page_viewed, contents_viewed (product views), items_added (add to cart), checkout_started, and order_created (the purchase). The purchase event matters most for optimization and ROAS, so make it perfectly accurate first. The upper-funnel events help OpenAI understand shopper behaviour and support future conversion-objective campaigns. OpenAI also supports lead, registration, and subscription events if your funnel needs them.
4. Do I really need the server-side Conversions API?
For a store spending real money, yes. The browser Pixel alone loses conversions to ad blockers, cookie limits, and cross-session journeys — often 10–30% or more. The Conversions API recovers those by sending the sale from your server, and OpenAI itself recommends the hybrid approach. For hosted or redirect checkouts, the server leg (fed by a payment webhook) is also the most accurate way to capture the true order value.
5. What is event deduplication?
It stops OpenAI counting one sale twice when it arrives from both the Pixel and the Conversions API. You attach the same unique Event ID — ideally your order number — to both events. OpenAI matches on your Pixel ID, event name, and Event ID, then merges the two into a single conversion. Without it, hybrid tracking inflates your numbers and corrupts optimization. It takes minutes to add and is the difference between trustworthy and misleading data.
6. How do I send the correct purchase value?
OpenAI wants the amount as an integer in the currency’s smallest unit — so $129.99 is sent as 12999, always with a currency like USD. Your data layer usually stores 129.99, so map a Custom JavaScript variable returning Math.round(value * 100) to the amount field. Always confirm with a real test order in GTM Preview, the OpenAI Pixel Helper, and OpenAI’s reporting before trusting any ROAS number.
7. Where do I get the Pixel ID and API Key?
Your OpenAI Pixel ID is in the Conversions tab of your ChatGPT/OpenAI Ads account. The API Key for the Conversions API is issued by OpenAI’s account team on request — you generally can’t self-generate it, so ask early. Store the API Key in a GTM Constant variable in your server container only, never in a web tag or public code, because the Conversions API is server-only and the key is a secret.
8. Does this work with Shopify, WooCommerce, and custom stores?
Yes. The method is platform-agnostic because it relies on the data layer and GTM, not a specific backend. If your platform already pushes a standard e-commerce data layer, the tags read from it directly. If your data layer is missing or incomplete — common with custom builds, page builders, and hosted checkouts — you enable it with a push or a listener first. Once that’s in place, the OpenAI Pixel and Conversions API behave the same everywhere.
9. Do I need Consent Mode v2, and will it hurt my US tracking?
If you sell to UK or EU shoppers, yes — you must not fire tracking before consent there. But set it up by region: default “denied” only for UK/EEA visitors and “granted” for the US and rest of world. That keeps you compliant where the law requires opt-in while tracking US buyers normally, so you don’t lose conversions you’re allowed to collect. Add Cookiebot, configure region-scoped defaults in GTM, and enable GTM consent mode support on the OpenAI Pixel.
10. Is it worth setting up while ChatGPT Ads are still new?
Yes — and precisely because they’re new. Early channels are where the cheapest, highest-intent traffic lives before everyone piles in. If you measure them accurately from day one, you can scale confidently while competitors guess. The build also future-proofs you: the same hybrid, deduplicated pattern carries forward as OpenAI adds conversion objectives and features. Set it up right once, and you stay ahead.
 Need Help Advanced Tracking Setup?