Quick Answer
To track GoHighLevel conversion tracking properly, install one Google Tag Manager (GTM) container on your GHL funnel, capture the Google Ads click ID (gclid) into a first-party cookie and onto the GHL contact, fire a clean generate_lead event into GA4, and import it to Google Ads with enhanced conversions. For WhatsApp API leads that convert off your website, carry the gclid into the WhatsApp chat and send it back to Google Ads as an offline conversion when the lead qualifies. Add Consent Mode v2 with Cookiebot to stay GDPR-compliant.
That one paragraph is the whole map. The rest of this guide is the click-by-click build.
Key Takeaways
- The Problem: GoHighLevel forms sit inside iframes, and WhatsApp leads convert off your site — so Google Ads optimizes on incomplete data and your real ROAS looks worse than it is.
- The Foundation: capture the gclid (the Google Ads click ID) the moment someone lands, and store it on the GHL contact. This single thread makes everything downstream possible.
- The On-Site Fix: a clean generate_lead Key Event in GA4 plus a single-source Google Ads conversion with enhanced conversions to recover attribution lost to ad blockers and iOS.
- The WhatsApp Fix: carry the gclid into the WhatsApp conversation, store it on the contact, and import the conversion offline to Google Ads when the lead actually qualifies.
- Stay Compliant: Consent Mode v2 with Cookiebot so EU traffic is tracked legally and your ad tags respect consent.
- The Result: Google’s Smart Bidding optimizes toward real, revenue-producing leads — not vanity clicks — lowering your cost per qualified lead.
The $4,000 Lead That Google Ads Never Saw
A marketing team came to me running Google Ads to GoHighLevel landing pages. Two smart media buyers, a healthy budget, and a CRM filling up with leads. On paper, everything looked fine.
Then they showed me their Google Ads dashboard. It reported 11 conversions for the month. Their GoHighLevel pipeline showed 47 real leads — and several of those had already become paying customers worth thousands.
So where were the other 36 conversions?
Most of them had come in through WhatsApp. A visitor clicked the ad, landed on the GHL page, tapped the “Chat on WhatsApp” button, and finished the entire conversation inside WhatsApp — where no browser tag can follow. As far as Google Ads was concerned, those leads vanished into thin air. The algorithm had been told those clicks were worthless. So it stopped showing the ads that actually produced the best customers.
That is the exact problem this guide fixes. If you run Google Ads to GoHighLevel pages — especially with WhatsApp in the funnel — your tracking almost certainly has the same holes. Today, we are going to close them permanently.
By the end, you will have a setup where every real lead is counted once, WhatsApp conversions become visible to Google Ads, and Smart Bidding finally optimizes on the truth.
Why GoHighLevel Conversion Tracking Is So Hard (Explained Simply)
Before we build, you need to understand why GoHighLevel is tricky. Once you see the two gaps, every step in this guide makes sense.
Gap 1: GoHighLevel forms live inside iframes
Most GoHighLevel forms, surveys, calendars, and pop-ups are loaded inside an iframe — think of an iframe as a glass window cut into the wall of your landing page. You can see through it, but you cannot reach through it.
Google Tag Manager runs on your page (the wall). The form runs inside the iframe (the room on the other side of the glass). Because of browser security rules, GTM on the parent page cannot see what happens inside that glass window. So a normal “form submit” trigger often catches nothing — or worse, fires on every click and double-counts.
Gap 2: WhatsApp leads convert where no tag can follow
This is the bigger problem, and it is the one almost every guide ignores.
When a visitor clicks your “Chat on WhatsApp” button, they leave your website entirely and finish the conversation inside the WhatsApp app. There is no page to load a pixel on. There is no form-submit event. The conversion happens in a place your browser tags simply cannot reach.
So the most valuable leads — the ones who wanted to talk to a human right now — are exactly the ones Google Ads never learns about.
What this costs you
When Google Ads can only see a fraction of your conversions, three bad things happen at once:
- Smart Bidding optimizes blind. Google’s automated bidding only gets smarter when it can see which clicks become leads. Feed it partial data and it bids toward the wrong clicks.
- Budget gets misallocated. Money flows toward keywords and audiences that look like they convert in the limited data, while your real winners get starved.
- Your ROAS is understated. You look less profitable than you actually are, which leads to cutting campaigns that were secretly working.
The big idea: the Google Ads click ID (gclid) is a thread. We grab it the moment someone lands, keep it attached to the person through the form and into WhatsApp, and hand it back to Google Ads when they become a real lead — even if that happens days later, off your website.
Hold that idea. Everything below is just one piece of that single thread.
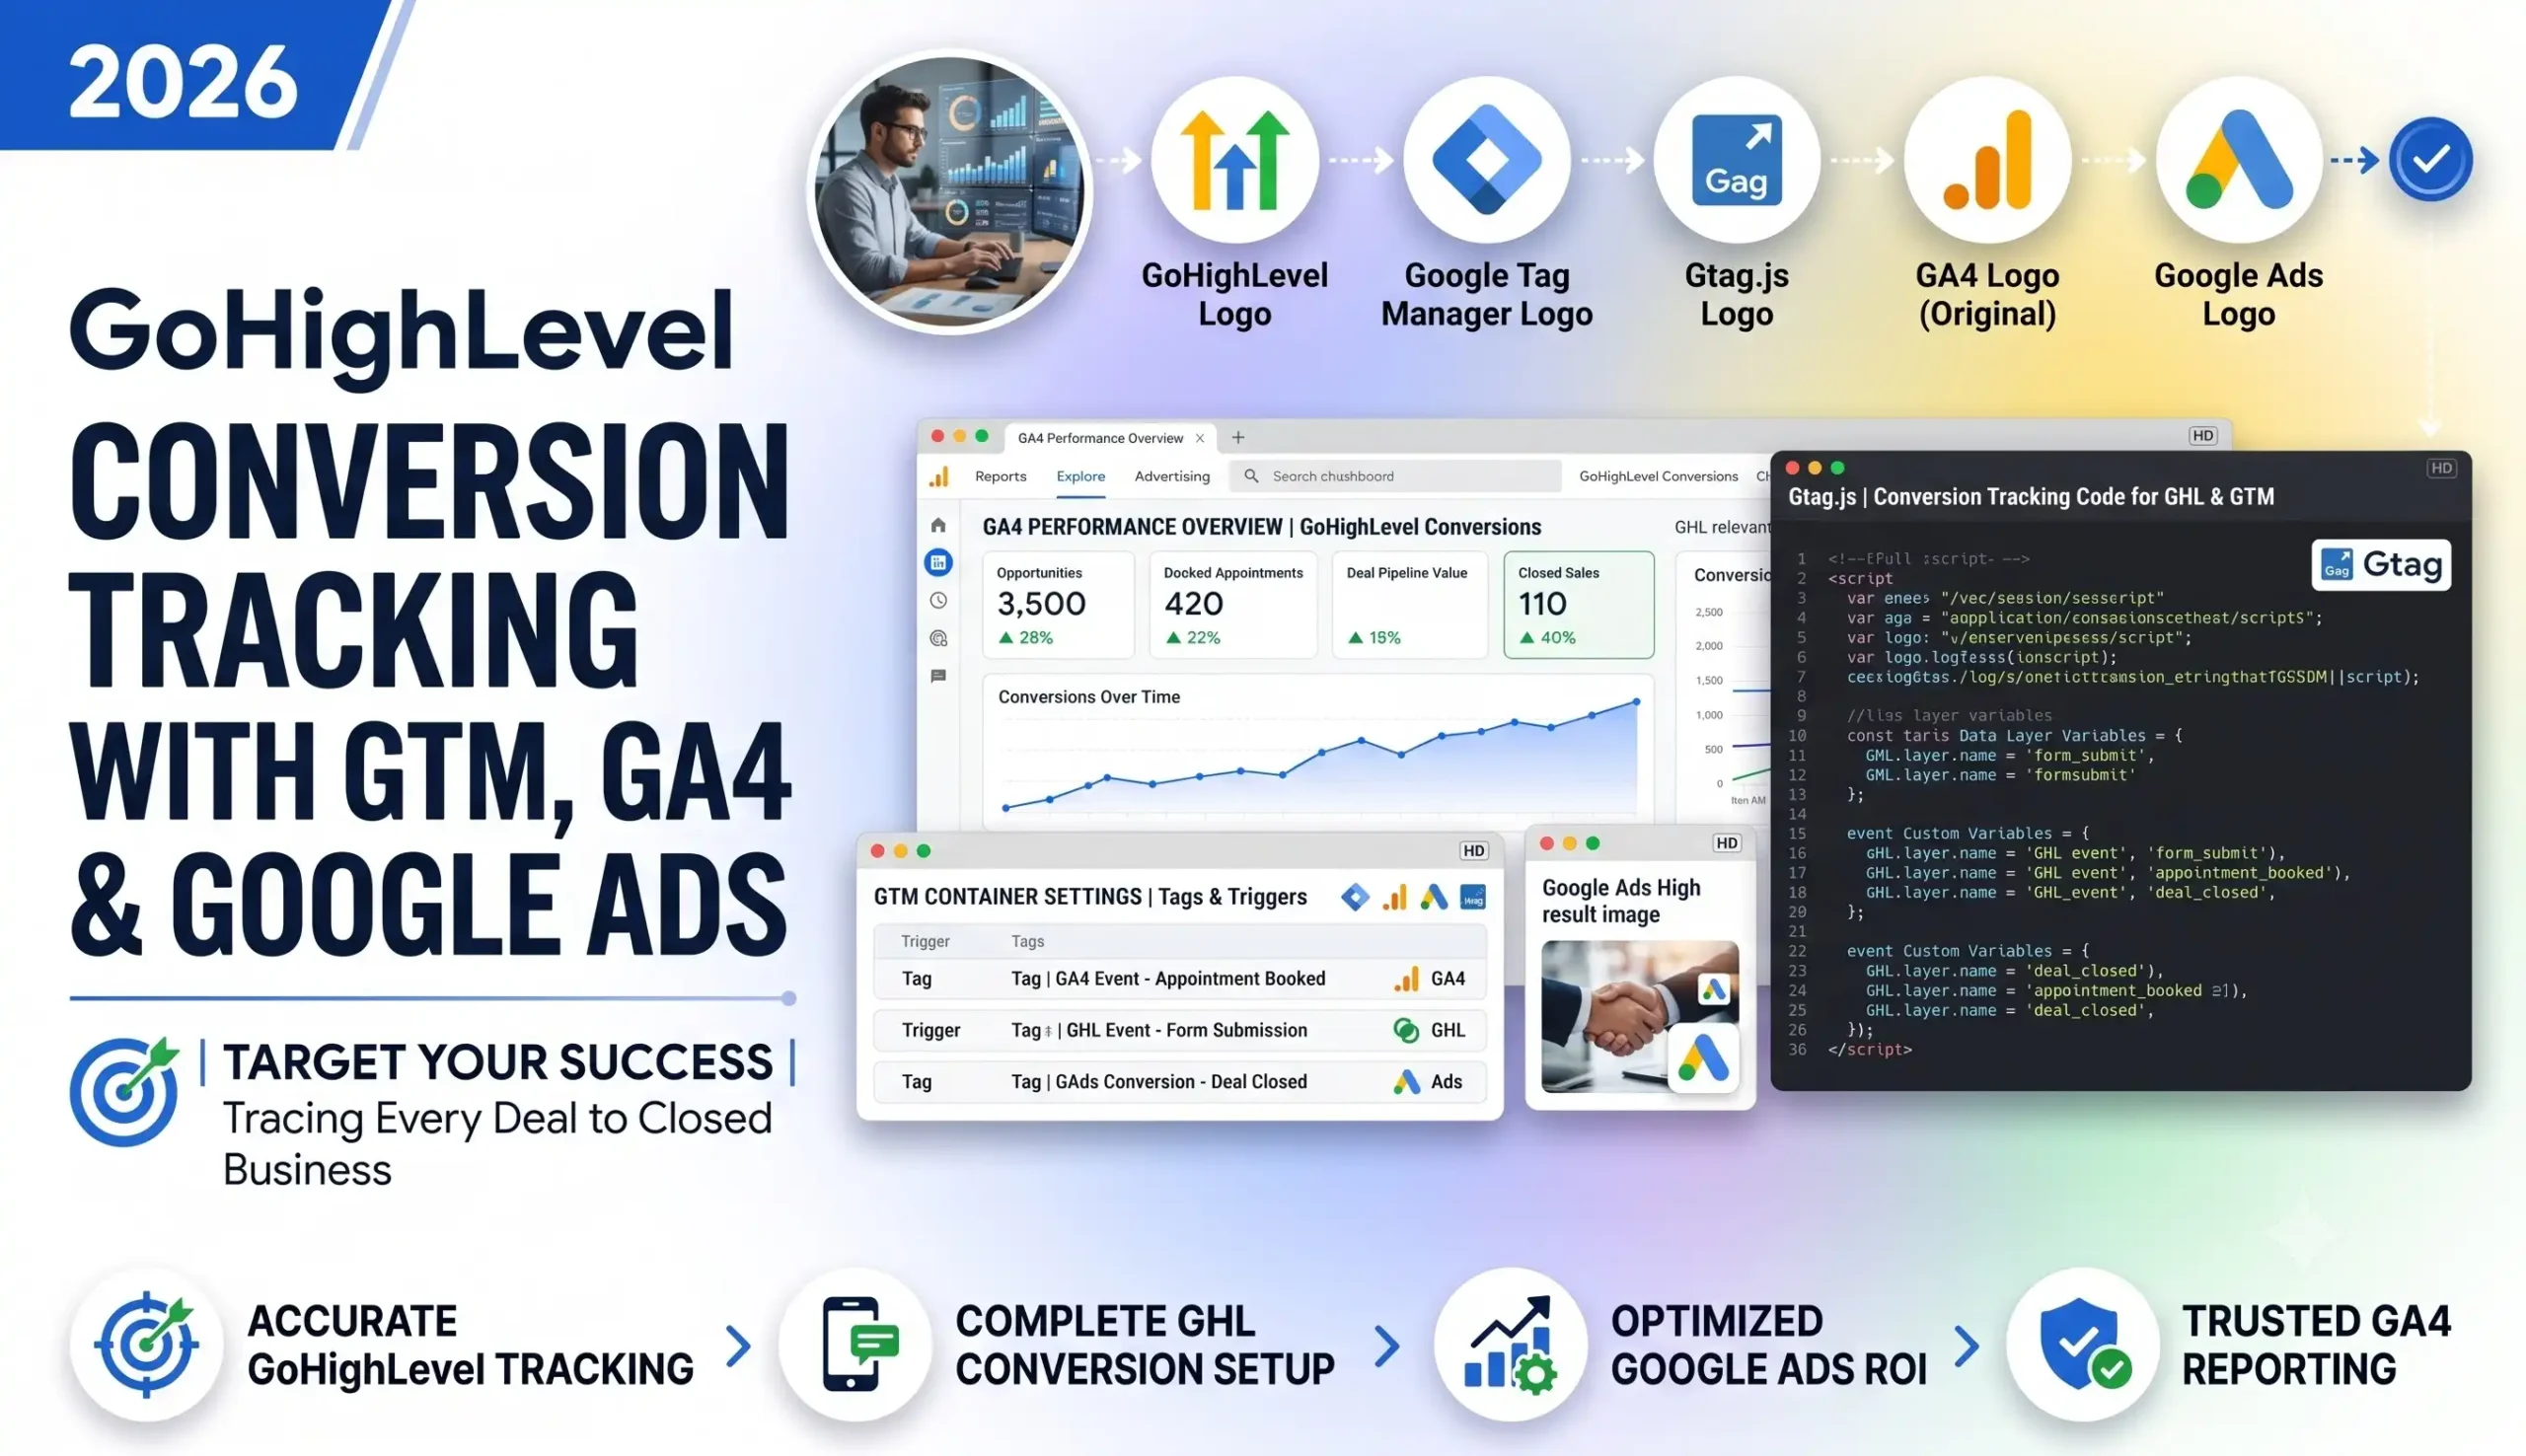
The Full Architecture at a Glance
Here is the entire path a lead travels, and where each piece plugs in. Read this once — every later phase is just one box in this picture.
Stage | What happens | Which phase builds it |
|---|---|---|
Google Ads click | Visitor clicks your ad, arriving with gclid + UTM tags | — |
GoHighLevel landing page | GTM loads on every funnel step | Phase 1 |
Capture | Click IDs + UTMs saved to a cookie, hidden fields, and the contact | Phase 2 |
Path A — On-site form/booking | Fires generate_lead → GA4 Key Event → Google Ads conversion | Phases 3–4 |
Path B — WhatsApp click | gclid carried into the WhatsApp chat and stored on the contact | Phase 5 |
WhatsApp lead qualifies | Offline conversion imported back to Google Ads | Phase 5 |
Consent layer | Consent Mode v2 with Cookiebot controls what fires | Phase 6 |
Accuracy layer (optional) | Server-side GTM with Stape recovers lost data | Phase 7 |
The two paths matter. Path A is the on-site lead — a form fill or a booking that finishes on a thank-you page. Path B is the WhatsApp lead that finishes off-site. Most setups only ever build Path A. The money is in building both.
Before You Begin — Your Prerequisites Checklist
A few things must be in place before the build. Lock these down first so no step gets redone.
You need | Why it matters |
|---|---|
Admin access to GTM, GA4, Google Ads, and your GoHighLevel account/location | You cannot install tags, mark Key Events, or create conversion actions without it. |
A decision on what counts as a conversion | Form submit? Booked call? Qualified WhatsApp lead? Closed sale? This sets what you mark as a Key Event and what value you send to Google Ads. |
Clarity on your WhatsApp flow | Click-to-chat link vs. WhatsApp Business API, and where the lead is qualified — this shapes Phase 5. |
GHL automation or a connector (Zapier, Make, or n8n) | Needed to push the offline conversion in Phase 5. |
Whether you have EU / GDPR traffic | If yes, Consent Mode v2 (Phase 6) is required, not optional. |
Tools for testing: GTM Preview, Tag Assistant, GA4 DebugView | You will verify every step before moving on. |
One golden rule before we start: if GoHighLevel is already firing GA4 or a Google Ads pixel through its built-in native integration, we will turn those off and route everything through GTM. Two installs of the same tag is the number-one cause of double-counted conversions in GHL. One source of truth, always.
Prefer to Watch? Video Walkthrough
Prefer to follow along on screen? My full GoHighLevel conversion tracking walkthrough on the Digital Soldier IT YouTube channel builds this exact setup click-by-click on a live account. [Embed: MD Niamul – GoHighLevel Conversion Tracking Walkthrough]
Now let’s build it.
Step-by-Step Implementation
Phase 1 — Install Google Tag Manager on GoHighLevel
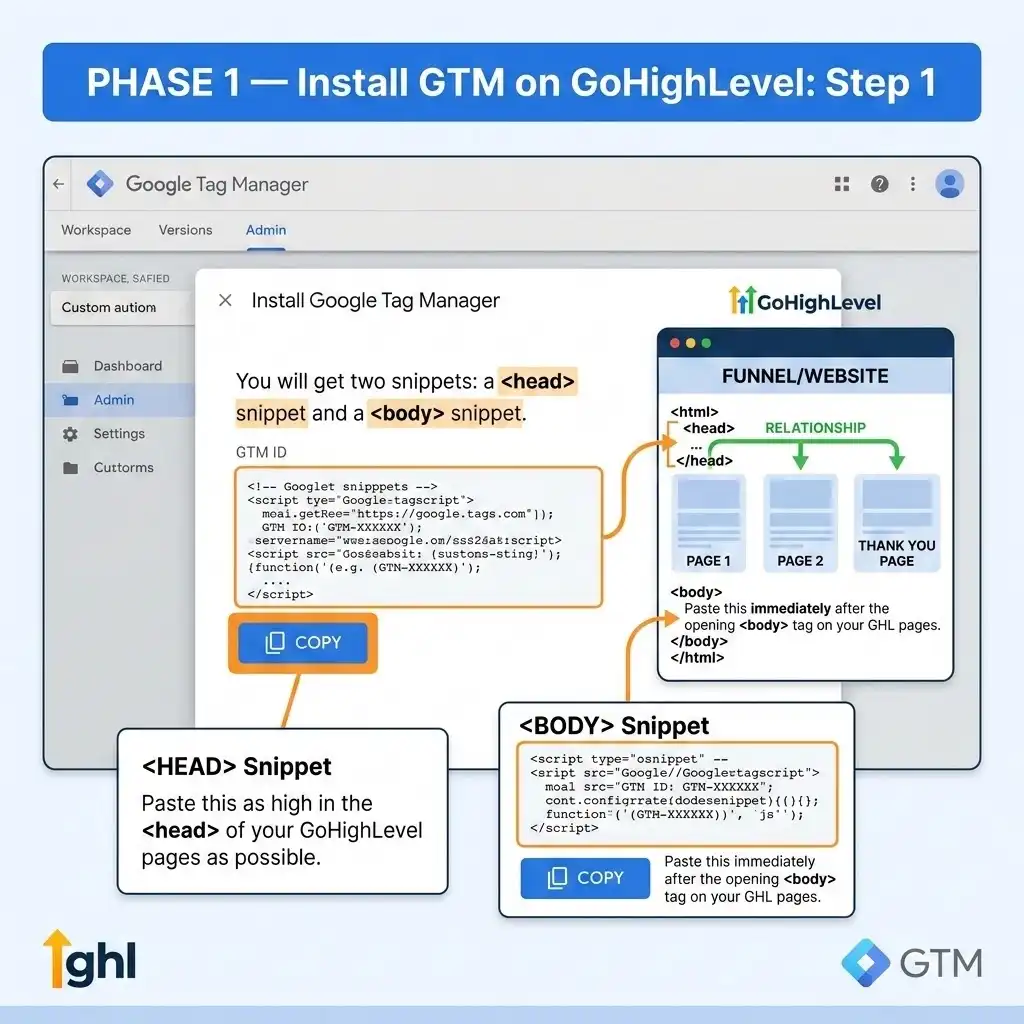
Goal: get one GTM container firing reliably on every GHL funnel and website page — including thank-you pages. Nothing else works until this is clean.
Step 1: Get your GTM snippet
In Google Tag Manager, go to Admin → Install Google Tag Manager. You will get two snippets: a <head> snippet and a <noscript> body snippet. Your container ID looks like GTM-XXXXXXX.
Why? The head snippet loads GTM as early as possible so tags can fire on time. The noscript snippet is a fallback for browsers that block JavaScript.
Step 2: Paste it into GoHighLevel the right way
Open your funnel or website, then go to Settings → Tracking Code.
- In the Head tab, paste the GTM head snippet.
- In the Body / Footer tab, paste the noscript snippet.
Where to find it: GHL relabels these menus occasionally, so verify the exact wording in your account. Installing at the funnel level is recommended — it applies to every step in that funnel automatically.
CRITICAL STEP: Do not also install GTM at the account/location level if you’ve already installed it per-funnel. If GTM loads twice, every tag fires twice, and every conversion doubles. Pick one level and stick to it.
Step 3: Handle the GoHighLevel gotchas now
GoHighLevel has a few quirks that break tracking later if you ignore them today:
- Thank-you pages are separate funnel steps. Confirm GTM loads on them too — that is where most of your conversion triggers will fire.
- Pop-ups and two-step forms are often iframes. GTM on the parent page can’t see inside them. Note any of these now; we handle their events with custom code in Phase 2.
- GHL can escape or strip pasted code. After saving, open the live page, right-click → View Page Source, and confirm your snippet is intact and not HTML-escaped.
- Don’t paste GTM inside a page-builder HTML element. It belongs in the funnel’s Tracking Code settings, or it may not load on every step.
How to verify it’s working
- Open GTM Preview (or Tag Assistant) on your live funnel URL — confirm it says “Tag Assistant Connected.”
- Click through every funnel step (landing → form → thank-you). The container should stay connected on each.
- Open browser DevTools → Console, type dataLayer, and press Enter. The array should exist.
- Check the Tags tab shows only your GTM container — no rogue duplicate GA4 or Ads tags from GHL’s native integrations.
✅ Done when: GTM loads on every step of every funnel including thank-you pages, no duplicate Google tags fire, and dataLayer exists in the console.
Phase 2 — Capture the Click ID (The Foundation of Everything)
Goal: produce clean lead signals and store the Google Ads click ID (gclid) on every contact. If the gclid doesn’t land on the GHL contact here, the WhatsApp offline import in Phase 5 has nothing to match on. This is the single most important step in the whole build.
What is a gclid, in plain English?
The gclid (Google Click Identifier) is a unique tag Google attaches to the URL when someone clicks your ad — something like ?gclid=Cj0KCQ…. It’s a fingerprint that says “this exact person came from this exact ad click.” If we keep that fingerprint attached to the lead, Google Ads can later match a conversion back to the click that earned it.
Step 1: Create the CRM fields where the click ID will live
In GoHighLevel, go to Settings → Custom Fields and, on the Contact object, create a field for each of these. The field key must match the URL parameter exactly:
gclid, gbraid, wbraid, fbclid, msclkid, utm_source, utm_medium, utm_campaign, utm_term, utm_content, landing_page
Why all of them? gclid is the standard Google Ads click ID. gbraid and wbraid are the newer iOS/privacy-safe click IDs Google uses when gclid isn’t available. Capturing all three means you never lose attribution because of the visitor’s device or browser.
Step 2: Add hidden fields to every GHL form
In each form or survey, add a Hidden field for each custom field above, map it to that custom field, and set the field’s Query Key to the parameter name (gclid, utm_source, and so on). GoHighLevel auto-fills a hidden field from a matching URL parameter.
Why? When the form submits, those hidden values travel with it onto the contact record — no code required for the simple case.
Step 3 (Listener Code): Capture + persist the click ID with a GTM Custom HTML tag
Hidden fields alone miss two common cases: a click ID lost when the visitor moves to a later funnel step, and a click ID from an earlier visit that you want to remember. This script — a listener that runs on every page and waits to catch and store the data — covers both.
Create a Custom HTML tag named cHTML – Attribution Capture, paste the script below, and fire it on All Pages.
<script>

(function () {

  var CLICK_IDS = ['gclid','gbraid','wbraid','fbclid','msclkid'];

  var UTMS = ['utm_source','utm_medium','utm_campaign','utm_term','utm_content'];

  var KEYS = CLICK_IDS.concat(UTMS);

  var COOKIE_DAYS = 90, PFX = 'ds_';

  function getParam(n){var m=new RegExp('[?&]'+n+'=([^&#]*)').exec(location.search);

    return m?decodeURIComponent(m[1].replace(/\+/g,' ')):'';}

  function setCookie(n,v,d){var t=new Date();t.setTime(t.getTime()+d*864e5);

    document.cookie=n+'='+encodeURIComponent(v)+';expires='+t.toUTCString()+';path=/;SameSite=Lax';}

  function getCookie(n){var m=document.cookie.match('(^|;)\\s*'+n+'=([^;]*)');

    return m?decodeURIComponent(m[2]):'';}

  function firstTouch(k,v){if(v&&!getCookie(PFX+k))setCookie(PFX+k,v,COOKIE_DAYS);} // store once

  function resolve(k){return getParam(k)||getCookie(PFX+k)||'';}  // live URL beats stored

  KEYS.forEach(function(k){firstTouch(k,getParam(k));});

  firstTouch('landing_page', location.href.split('#')[0]);

  var attr={}; KEYS.forEach(function(k){attr[k]=resolve(k);});

  attr.landing_page=resolve('landing_page'); attr.page_url=location.href;

  window.dsAttribution=attr;            // reused by the WhatsApp link in Phase 5

  window.dataLayer=window.dataLayer||[];

  window.dataLayer.push({event:'lead_attribution', attribution:attr});

  function fill(){    // back-fill GHL native hidden inputs by name

    Object.keys(attr).forEach(function(k){

      var ins=document.querySelectorAll('input[name="'+k+'"]');

      for(var i=0;i<ins.length;i++){ if(!ins[i].value) ins[i].value=attr[k]; }

    });

  }

  fill(); document.addEventListener('DOMContentLoaded',fill); setTimeout(fill,1500);

})();

</script>
What this script does, line by line in plain English:
- It defines the click IDs and UTMs we care about, then reads each one from the page URL.
- firstTouch saves each value into a 90-day first-party cookie the first time it sees it — so the click ID survives across funnel steps and even return visits. (First-party means the cookie belongs to your domain, which browsers trust far more than third-party cookies.)
- resolve always prefers a fresh value in the live URL over the stored one, so a new click overwrites an old one correctly.
- It pushes a lead_attribution event into the Data Layer — an invisible filing cabinet GTM reads information from.
- It exposes window.dsAttribution so the WhatsApp script in Phase 5 can reuse the same data.
- fill() back-fills GoHighLevel’s native hidden inputs by name, covering forms that loaded after the script ran.
Step 4 (Data Layer Code): What the Data Layer push looks like
The script above pushes this into the Data Layer. Here is the shape so you know what to expect:
					window.dataLayer.push({

  event: 'lead_attribution',

  attribution: {

    gclid: 'Cj0KCQ...',

    gbraid: '',

    wbraid: '',

    utm_source: 'google',

    utm_medium: 'cpc',

    utm_campaign: 'lead-gen-mx',

    landing_page: 'https://yourbrand.com/offer',

    page_url: 'https://yourbrand.com/offer?gclid=Cj0KCQ...'

  }

});
How to use it in GTM:
- Create a Custom Event trigger named CE – lead_attribution that fires when event equals lead_attribution.
- Create Data Layer Variables for each value you need — for example DLV – attribution.gclid, DLV – attribution.utm_source, DLV – attribution.utm_campaign. Set each one’s Data Layer Variable Name to attribution.gclid, attribution.utm_source, and so on.
- These variables become the building blocks your GA4 and Google Ads tags read in the next phases.
Step 5: Define the reliable lead signal
Pick the lead trigger that fires only on a real completed submission — never on a page load or a stray click.
- Primary (recommended): GoHighLevel redirects to a thank-you step on a successful submit. Create a trigger PV – lead_thankyou → Page Path contains your confirmation path (for example /thank-you or /gracias). This only fires on a genuinely completed submission.
- Advanced (inline iframe forms that don’t redirect): a message-listener tag. Open DevTools, submit a test form, read what the postMessage actually contains, then tighten the condition before going live.
Warning: Verify the message shape — don’t assume it. GoHighLevel’s iframe messages vary by form type, and guessing leads to a trigger that fires on the wrong thing.
Step 6: Add the micro-conversion triggers
So the top of your WhatsApp and call funnels are visible:
- Click – whatsapp: Click URL contains wa.me, api.whatsapp.com, or web.whatsapp.com.
- Click – call_button: Click URL starts with tel:.
Your Phase 2 GTM assets at a glance
Type | Name | Purpose |
|---|---|---|
Tag (Custom HTML) | cHTML – Attribution Capture | Capture + persist click IDs / UTMs |
Tag (Custom HTML) | cHTML – Form Submit Listener | Inline-form lead event (advanced case) |
Trigger | CE – lead_attribution | Attribution loaded |
Trigger | PV – lead_thankyou | Reliable lead (thank-you page) |
Trigger | Click – whatsapp / Click – call_button | Micro-conversions |
Variables | DLV – attribution.gclid, DLV – attribution.utm_source … | Read fields for GA4 / Ads tags |
How to verify it’s working
- Visit a page with ?gclid=test123&utm_source=test.
- In the Console, type document.cookie — you should see ds_gclid=test123. Type window.dsAttribution.gclid — it should return test123.
- Submit a real test form → open the contact in GHL → confirm gclid and the UTM fields are populated.
- In GTM Preview, confirm lead_attribution fires on load, the lead event fires on submit, and Click – whatsapp fires on the WhatsApp button.
✅ Done when: a test lead lands in GHL with gclid + UTMs on the contact record, and all signals fire in GTM Preview. That contact-record gclid is the thread we pull all the way to Google Ads in Phase 5.
Phase 3 — GA4 Events + Key Events
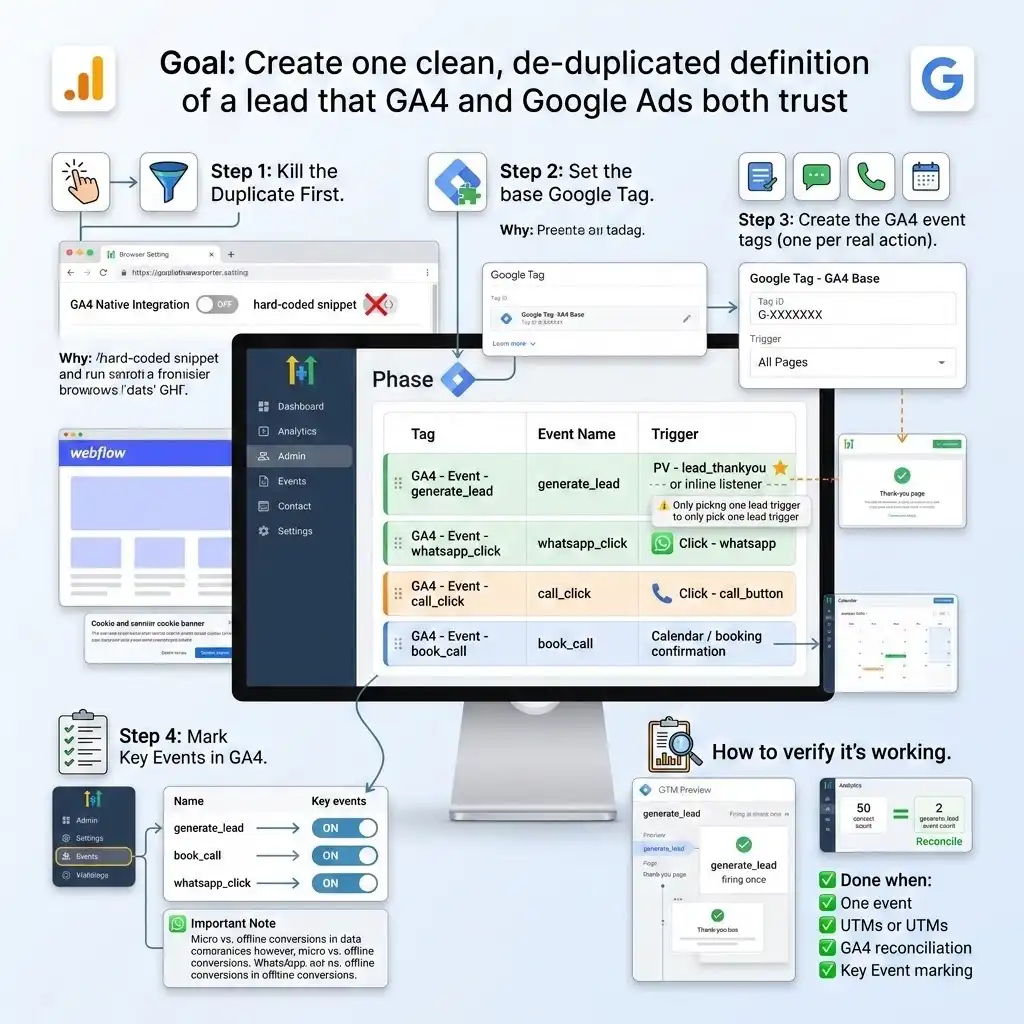
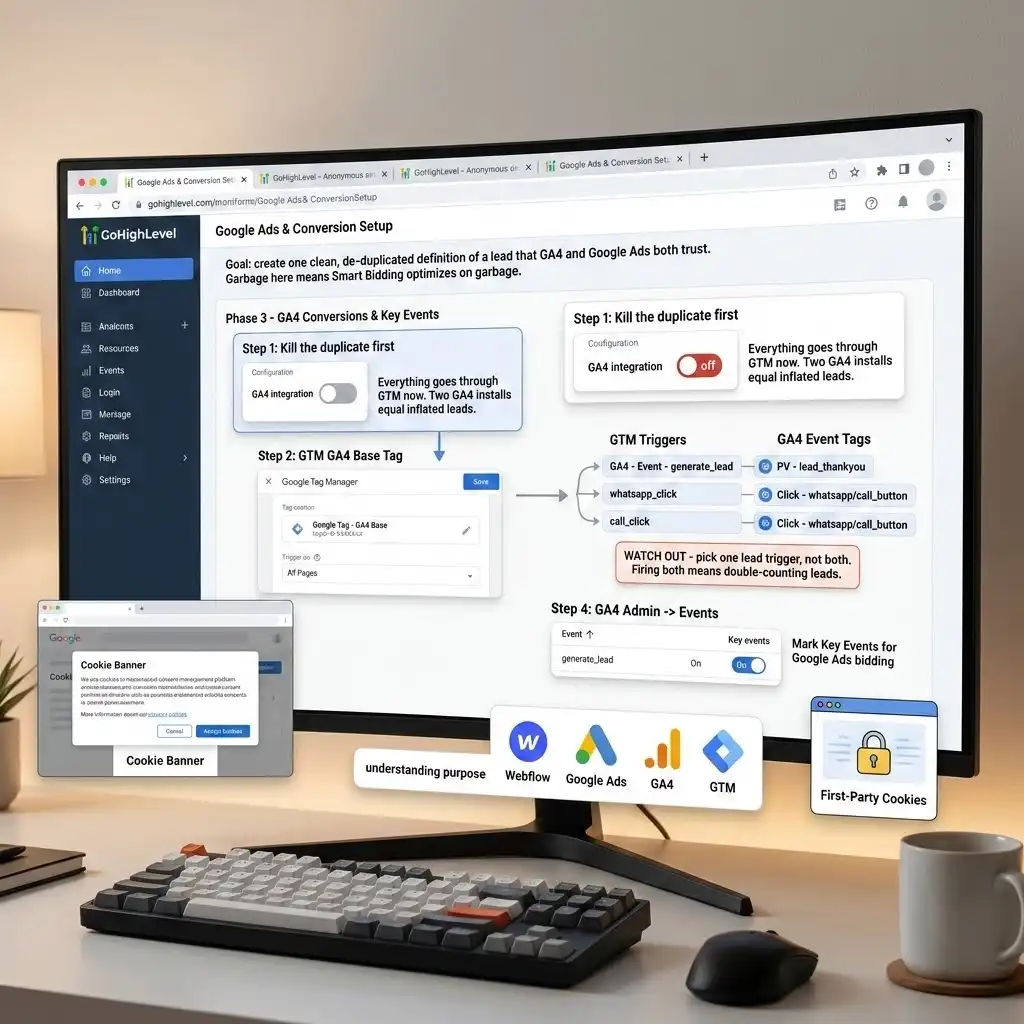
Goal: create one clean, de-duplicated definition of a lead that GA4 and Google Ads both trust. Garbage here means Smart Bidding optimizes on garbage.
Step 1: Kill the duplicate first
Turn OFF any native GA4 integration inside GoHighLevel and remove any hard-coded GA4 snippet on the funnel. Everything goes through GTM now.
Why? Two GA4 installs equal inflated, double-counted leads — the exact problem we’re here to fix.
Step 2: Set the base Google tag (GA4 configuration)
Create a tag named Google Tag – GA4 Base → type Google Tag → Tag ID = G-XXXXXXX → trigger All Pages.
Why? This is the foundation tag that initializes GA4 on every page. Every GA4 event tag depends on it loading first. (We’ll point its server URL at Stape in Phase 7 if you go server-side.)
Step 3: Create the GA4 event tags (one per real action)
Tag | Event name | Trigger (from Phase 2) |
|---|---|---|
GA4 – Event – generate_lead | generate_lead | PV – lead_thankyou (primary) or the inline listener |
GA4 – Event – whatsapp_click | whatsapp_click | Click – whatsapp |
GA4 – Event – call_click | call_click | Click – call_button |
GA4 – Event – book_call | book_call | Calendar / booking confirmation (if GHL calendars used) |
WATCH OUT: Pick one lead trigger, not both. If GoHighLevel reliably redirects to a thank-you page, use PV – lead_thankyou and leave the inline listener off — one clean fire per lead. Firing both means double-counted leads all over again.
Send your UTM parameters on the lead event using the DLV – attribution.* variables you built in Phase 2, so they’re usable as event-scoped parameters and survive GoHighLevel’s referrer quirks.
Step 4: Mark Key Events in GA4 (this is what Google Ads will read)
Go to GA4 → Admin → Events → Key events. After each event appears (fire it once in Preview, then check Admin → Events), toggle on:
- generate_lead — the macro conversion, your main outcome.
- book_call — if booking a call is a real outcome for you.
- whatsapp_click / call_click — mark these as Key Events only if you want top-of-funnel visibility now. They are micro-conversions: keep their Google Ads value low or zero in Phase 4 so they never out-compete real leads for bidding.
Important note: the qualified WhatsApp lead — the one actually worth money — is not measured here. That’s the offline import in Phase 5. GA4 at this stage only sees the WhatsApp click; Google Ads learns the real value later.
How to verify it’s working
- In GTM Preview, submit a test form → GA4 – Event – generate_lead fires once on the thank-you step (not twice, not on page load).
- In GA4 → Admin → DebugView, confirm generate_lead arrives with UTM params; click WhatsApp → whatsapp_click arrives.
- Reconcile: the number of generate_lead events over a test window matches the number of new GHL contacts in that window.
✅ Done when: one generate_lead per real submission shows in DebugView, UTMs attached, the GA4 count reconciles against the GHL contact count, and generate_lead is marked a Key Event.
Phase 4 — Google Ads Conversions + Enhanced Conversions for Leads
Goal: report on-site leads to Google Ads and recover the attribution that ad blockers and iOS (ITP) normally strip away — so Google sees more of the conversions you actually earned.
Step 1: Add the Conversion Linker (always)
Add a Conversion Linker tag firing on All Pages.
Why? It reads the gclid from the URL into first-party cookies so Google Ads can attribute the conversion correctly across GoHighLevel’s pages and redirects. On GHL, this is non-negotiable — skip it and your conversions won’t tie back to clicks.
Step 2: Create the conversion action in Google Ads
- Go to Google Ads → Goals → Conversions → New conversion action → Website (or Import) → category Submit lead form / Contact.
- Set a sensible value — even an estimated value per lead helps Smart Bidding bid toward quality. Note the Conversion ID and Label.
Step 3: Build the Google Ads conversion tag in GTM
Create a tag named Google Ads – Conversion – Lead → type Google Ads Conversion Tracking → enter the Conversion ID + Label → trigger PV – lead_thankyou (the same reliable lead trigger from Phase 2).
WATCH OUT — one source of truth. Track each on-site lead with EITHER this GTM conversion tag OR a GA4 Key Event imported into Google Ads — never both for the same action, or you double-count. My recommendation: use the GTM conversion tag for the immediate web lead, and keep the GA4 import off for that same action.
Step 4: Enhanced conversions — recover lost attribution
Enhanced conversions send a hashed (anonymized, scrambled) version of the lead’s email or phone to Google so conversions can still be matched even when cookies are blocked. The raw email never leaves the browser — Google hashes it in-browser first. Two flavours apply here:
- Enhanced conversions (web): hashed email/phone sent with the on-site lead conversion. Capture the email the lead typed (from the data layer or the form’s success state) and map it into the Google tag’s user-provided data.
- Enhanced conversions for leads (recommended for WhatsApp): enable “Enhanced conversions for leads” in Google Ads, capture the hashed email at lead time, and when the lead qualifies later (Phase 5) Google matches your offline upload to the original click by email. This is the cleanest path for off-site WhatsApp conversions, and it dovetails directly into the next phase.
How to verify it’s working
- In Tag Assistant, on the thank-you step, confirm Google Ads – Conversion – Lead and the Conversion Linker fire once.
- In Google Ads → Conversions, the action should move to “Recording conversions” within a day or two; the diagnostics panel should show no tag errors and “Enhanced conversions: recording.”
- Confirm only hashed user data leaves the browser — the Network tab should show hashed values, never a plain email.
✅ Done when: on-site leads record in Google Ads from a single source, the Conversion Linker fires on all pages, and enhanced conversions show “recording” with no diagnostics errors.

Phase 5 — The WhatsApp Solution (Offline Conversion Import)
This is the headline value of the whole project, and the part almost every other guide skips.
WhatsApp conversions happen inside WhatsApp, where no browser tag can follow. We solve it with a click → identity → offline-conversion chain: grab the click ID, carry it into the WhatsApp conversation, store it on the contact, and upload the conversion back to Google Ads when the lead actually qualifies.
The 5-link chain
- Capture click IDs (gclid / gbraid / wbraid) + UTMs on the landing page. ✅ Already done in Phase 2.
- Carry identity into the WhatsApp conversation — inject the click ID into the click-to-chat link’s pre-filled message.
- Store it on the GHL contact (the custom fields from Phase 2).
- When the lead qualifies, upload an Offline Conversion back to Google Ads, keyed on the stored gclid (or hashed email via enhanced conversions for leads).
- Track the WhatsApp click as a micro-conversion so the top of the funnel is visible. ✅ Already done in Phase 2/3.
Link 2 (Listener Code): Carry the gclid into WhatsApp
Create a Custom HTML tag named cHTML – WhatsApp gclid Injector, fire it on All Pages, and paste this script. It finds every WhatsApp link on the page and adds the click ID to the pre-filled message.
					<script>

(function(){

  function build(){

    var a = window.dsAttribution || {};

    var ref = a.gclid || a.gbraid || a.wbraid || '';

    if(!ref) return;

    var links = document.querySelectorAll(

      'a[href*="wa.me"], a[href*="api.whatsapp.com"]');

    for (var i=0;i<links.length;i++){

      var href = links[i].getAttribute('href');

      if (href.indexOf('text=') === -1){

        var sep = href.indexOf('?')>-1 ? '&' : '?';

        links[i].setAttribute('href', href + sep + 'text=' +

          encodeURIComponent('Hi, I am interested. [ref:'+ref+']'));

      } else {

        links[i].setAttribute('href', href.replace(/(text=[^&]*)/,

          '$1' + encodeURIComponent(' [ref:'+ref+']')));

      }

    }

  }

  build(); document.addEventListener('DOMContentLoaded', build); setTimeout(build,1500);

})();

</script>
How it works: it reads the gclid you already stored in window.dsAttribution (from Phase 2), finds every wa.me and api.whatsapp.com link, and appends a hidden marker to the pre-filled WhatsApp message. Now the lead’s first WhatsApp message arrives as:
“Hi, I am interested. [ref:Cj0KCQ…]”
That [ref:…] marker is the gclid, riding along inside the conversation. You’ve just carried the ad click ID into a place Google Ads normally can’t see.
Link 3: Store the gclid on the GHL contact
- Form-first leads: already stored in Phase 2 (hidden fields).
- WhatsApp-first leads (who never filled a form): a GoHighLevel workflow reads the inbound message, extracts the [ref:…] value with a regex / parser step, and writes it to the contact’s gclid custom field.
Link 4: Upload the conversion when the lead qualifies
Trigger: a GoHighLevel opportunity or pipeline stage change to your “Qualified” or “Won” stage. You have two build options depending on tech comfort:
Method | How it works | Best for |
|---|---|---|
Low-tech (Google Sheets) | GHL workflow → Zapier/Make → append a row to a Google Sheet → Google Ads imports the sheet on a schedule. | Simple, reliable, easy to hand off. |
Direct API (real-time) | GHL workflow webhook → Make / n8n → HTTP call to the Google Ads API (uploadClickConversions). | Best accuracy & match quality; near real-time. |
The conversion payload (field mapping):
Field | Value |
|---|---|
gclid | the stored click ID from the contact (the match key) |
conversion_action | the “Qualified WhatsApp Lead” conversion action in Google Ads |
conversion_time | the timestamp the stage changed (must be after the click) |
value / currency | value of a qualified lead (e.g. 25 / MXN) so bidding targets quality |
order_id (dedupe key) | the GHL opportunity / contact ID — upload once per record |
WATCH OUT — de-dupe and stay in window. Key every upload on the opportunity or contact ID so a conversion is sent only once, and upload within Google’s allowed click-to-conversion window (the click can’t be too old). Log every upload (a Sheet or database row) for reconciliation.
How to verify it’s working
- Click a WhatsApp button with a test gclid → the opened WhatsApp message contains [ref:test123].
- Move a test opportunity to “Qualified” → the automation runs and writes a row / makes the API call (check the log).
- In Google Ads → Conversions, the “Qualified WhatsApp Lead” action shows uploaded conversions (allow for processing time).
- Reconcile: qualified opportunities in GHL = conversions uploaded = conversions Google reports.
✅ Done when: a qualified WhatsApp lead in GHL results in one matched offline conversion in Google Ads, de-duplicated and reconciled against the CRM. Google Ads can now optimize toward real WhatsApp revenue — the whole point of this project.
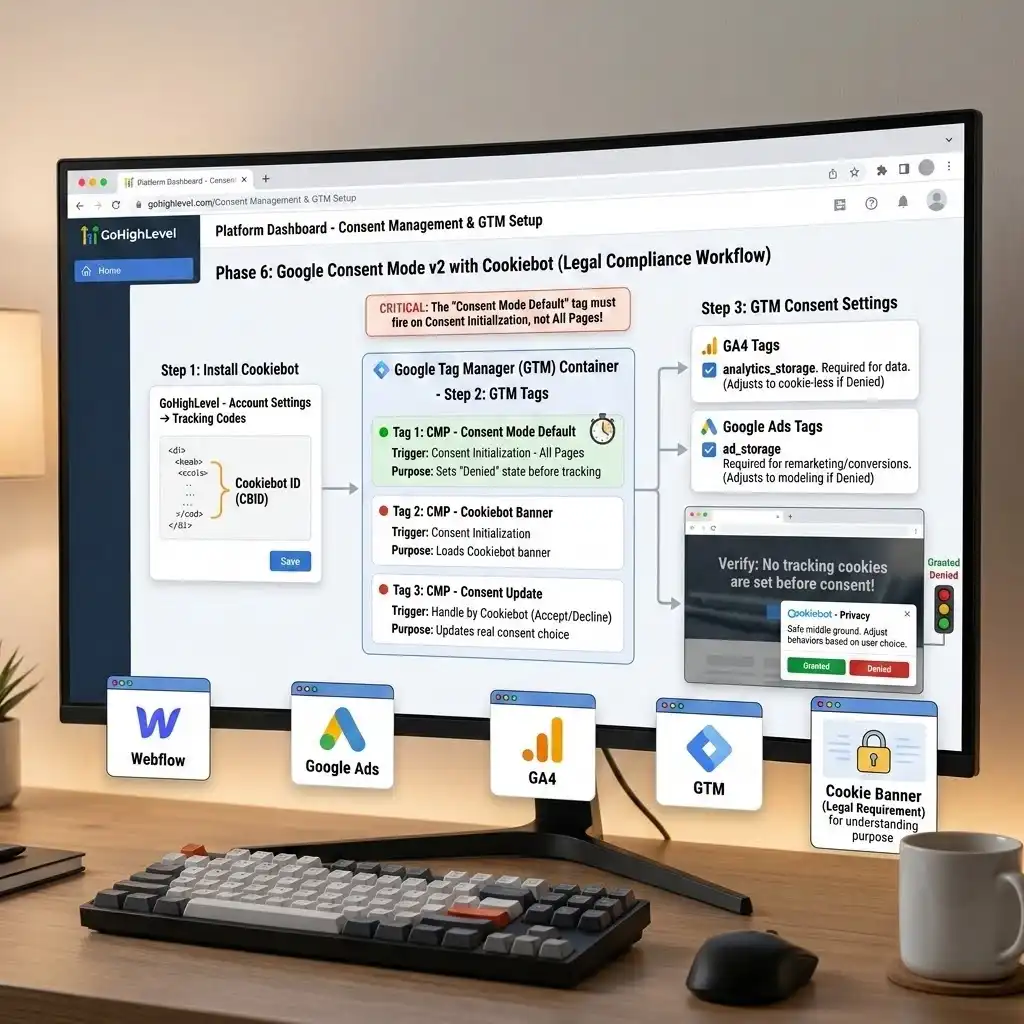
Phase 6 — Consent Mode v2 with Cookiebot (Stay Legal)
Goal: if you have any EU or UK traffic, you must respect user consent before tracking. Google Consent Mode v2 is the privacy-safe middle ground — it lets your tags adjust their behaviour based on what the visitor agreed to, instead of either tracking everyone (illegal) or no one (blind).
If you advertise on Google in the EU, Consent Mode v2 is required for your remarketing and conversion features to keep working. This isn’t optional any more.
How Consent Mode v2 works, simply
Think of it as a traffic light for your tags. When a visitor accepts cookies, the light is green and your tags fire fully. When they decline, the light is red — Google’s tags still send cookieless, anonymized signals (called conversion modeling) so you don’t lose all your data, but no personal identifiers are stored. You stay compliant and keep a usable picture of performance.
Step 1: Install Cookiebot
- Create a Cookiebot account and add your domain. You’ll get a Cookiebot ID (a CBID).
- In GoHighLevel, you’ll deploy Cookiebot through GTM (next step) rather than pasting it directly, so it sequences correctly with your other tags.
Step 2: Build the Consent Mode v2 tags in GTM
You need three pieces, in this order:
Tag | Type | Trigger | Purpose |
|---|---|---|---|
CMP – Consent Mode Default | Custom HTML (or the Cookiebot template) | Consent Initialization – All Pages | Sets the default consent state to “denied” before anything fires |
CMP – Cookiebot Banner | Cookiebot template / Custom HTML | Consent Initialization | Loads the consent banner the visitor sees |
CMP – Consent Update | Handled by Cookiebot | On accept/decline | Updates the consent state to the visitor’s real choice |
CRITICAL STEP: the default consent tag must fire on the Consent Initialization – All Pages trigger, not the normal All Pages trigger. Consent Initialization runs before every other trigger, so the “denied-by-default” state is set before any GA4 or Ads tag gets a chance to fire. Get this order wrong and you’ll fire tags before consent is known — exactly what the law prohibits.
Step 3: Make every GA4 and Ads tag respect consent
In GTM, open Container Settings and enable consent overview. Then on your GA4 and Google Ads tags, set the Additional Consent Checks so they require analytics_storage and ad_storage respectively. Google’s own tags are consent-aware by default, but turning on the checks makes the behaviour explicit and auditable.
How to verify it’s working
- Open your live page in an incognito window. The Cookiebot banner should appear before any GA4 or Ads cookies are set.
- In GTM Preview, check the Consent tab — before accepting, ad_storage and analytics_storage should read denied.
- Click Accept → the same values flip to granted, and your GA4/Ads tags now fire fully.
- Decline → confirm tags either don’t fire or fire in cookieless modeling mode only.
✅ Done when: no tracking cookies are set before consent, the banner controls the consent state, and your GA4/Ads tags fire only according to the visitor’s choice.
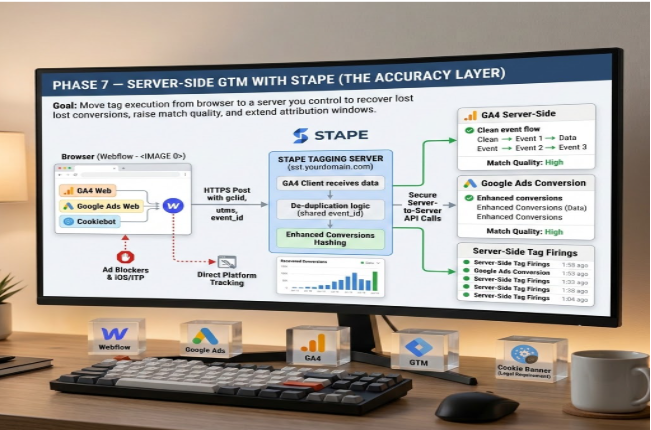
Phase 7 — Server-Side GTM with Stape (The Accuracy Layer)
Goal: move tag execution from the browser to a server you control — to recover conversions lost to iOS/ITP and ad blockers, raise match quality, extend attribution windows, and control exactly what data leaves to each vendor. This is the advanced add-on, and it’s where the biggest accuracy gains live.
Why it’s worth it
Browser-based tracking loses a real chunk of data to ad blockers, iOS tracking prevention, and short cookie lifetimes. Server-side tracking restores the true picture of performance and lowers your apparent cost per result — because you’re finally counting conversions you were always earning but couldn’t see. As an official Stape partner, I use Stape to simplify the hosting, the first-party domain, and the power-ups.
What we build
- Spin up a tagging server on Stape with a first-party subdomain (e.g. sst.yourdomain.com) and valid SSL.
- Point the Google tag’s server_container_url at the tagging server (one field added to Phase 3’s Google tag).
- Add a GA4 client in the server container to receive events.
- Add server-side tags: GA4 and Google Ads conversion + enhanced conversions — sending hashed first-party data server-to-server.
- Maintain de-duplication with the web pixel using a shared event_id, and honor the consent state passed from the browser.
How to verify it’s working
- The server container Preview shows events arriving from the browser.
- GA4 DebugView still shows clean events (now via the server).
- Google Ads diagnostics show enhanced conversions recording with improved match quality.
- De-dup check: web and server fire the same event with the same event_id — counted once.
✅ Done when: events flow through your first-party Stape server, conversions are de-duplicated, match quality improves, and reporting is more complete than browser-only tracking.
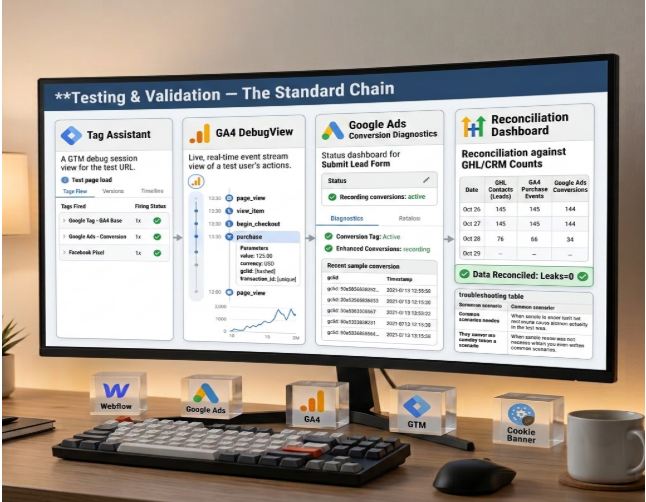
Testing & Validation — The Standard Chain
Run this exact chain whenever anything changes. It’s the routine that keeps your data honest and your team self-sufficient.
- Tag Assistant — confirm the right tags fire, once, on the right pages.
- GA4 DebugView — confirm events and parameters arrive correctly.
- Google Ads conversion diagnostics — confirm conversions and enhanced conversions are recording with no errors.
- Reconcile against GHL/CRM counts — the final truth test: leads in = events in GA4 = conversions in Google Ads.
If those three numbers don’t line up, something is leaking, and the troubleshooting table below tells you where to look.
Troubleshooting & Common GoHighLevel Mistakes
These are the errors I see most often on GoHighLevel accounts, each with the cause and the exact fix.
Mistake 1: Leads are double-counted
- The Problem: Google Ads or GA4 reports more conversions than you actually have leads in the CRM.
- The Cause: GHL’s native GA4/Ads integration is firing and your GTM tags are firing — two installs for one lead.
- The Solution: disable the native integration (Phase 3, Step 1) and route everything through GTM. One source of truth per conversion.
Mistake 2: No WhatsApp conversions ever upload
- The Problem: the offline import runs but Google Ads shows zero matched WhatsApp conversions.
- The Cause: the gclid was never captured, so there’s nothing to match on.
- The Solution: fix the hidden-field and script capture in Phase 2; confirm the gclid is actually on the contact record before you blame the upload.
Mistake 3: Conversions upload but won’t match
- The Problem: the upload succeeds, but Google Ads doesn’t credit the campaign.
- The Cause: the gclid has expired or is outside Google’s click-to-conversion window, or you’re pointing at the wrong conversion action.
- The Solution: upload sooner after qualification, and verify the conversion action and the correct Google Ads account.
Mistake 4: The tag is missing on some funnel steps
- The Problem: tracking works on the landing page but not the thank-you page.
- The Cause: the GTM snippet was installed on only one funnel step, not the whole funnel.
- The Solution: install at the funnel level (Phase 1) and confirm on thank-you pages specifically.
Mistake 5: The form submit event never fires
- The Problem: you submit a test form and nothing happens in GTM.
- The Cause: the form is an iframe and there’s no redirect for GTM to catch.
- The Solution: use the thank-you-page trigger, or build the verified message listener (Phase 2, Step 5).
Mistake 6: The numbers just don’t reconcile
- The Problem: GHL, GA4, and Google Ads all show different totals.
- The Cause: leads missing click IDs, or silent offline-upload failures nobody noticed.
- The Solution: add an upload log with an alert, and compare CRM closes vs. uploads vs. Google Ads weekly.

You Just Built a Tracking System Most Agencies Can’t
Take a second to appreciate what you now have. Every real lead from a GoHighLevel page is counted once, in GA4 and Google Ads. Your WhatsApp leads — the ones that used to vanish — now flow back to Google Ads as real, optimizable conversions. Your campaigns respect consent, and your data survives ad blockers and iOS.
Most importantly, Google’s Smart Bidding now optimizes on the truth. It bids toward the leads that actually become customers, not the vanity clicks that just look busy. That’s how cost per qualified lead goes down while quality goes up.
Give the new conversions 24–48 hours to start flowing, watch the reconciliation line up across GHL, GA4, and Google Ads, and then start making decisions on real numbers. From here, you’re optimizing on facts — not guesses.
If you want a deeper look at the offline side of this, my guide on Google Ads offline conversion tracking using GoHighLevel CRM walks through the import in even more detail, and you can see my done-for-you GoHighLevel form conversion tracking service if you’d rather have it built for you.
Summary
This guide fixes the two biggest holes in GoHighLevel conversion tracking. First, it gets one clean GTM install firing on every funnel step, captures the Google Ads gclid into a cookie and onto the contact, and sends a single, de-duplicated generate_lead event into GA4 and Google Ads with enhanced conversions. Second — and this is the part most guides miss — it solves the WhatsApp problem by carrying the gclid into the chat and importing the conversion offline when the lead qualifies. Add Consent Mode v2 with Cookiebot for compliance and optional server-side GTM with Stape for accuracy, and Google’s Smart Bidding finally optimizes on real, revenue-producing leads instead of blind clicks.
1. How do I find my tracking problem?
Start by comparing three numbers: the leads in your GoHighLevel CRM, the generate_lead events in GA4, and the conversions in Google Ads over the same window. If the CRM shows more leads than Google Ads, you have a leak — usually the WhatsApp gap or a missing gclid. If Google Ads shows more than the CRM, you’re double-counting (a native integration firing alongside GTM). This reconciliation check is the fastest way to locate the problem before you change a single tag.
2. Have you done this kind of project before?
Yes — this exact GoHighLevel-to-Google-Ads build, including the WhatsApp offline conversion piece, is core to what I do. Since 2022 I’ve delivered 850+ tracking projects for 600+ businesses and 15+ agencies, helping clients generate $11M+ in tracked revenue. The WhatsApp offline solution in Phase 5 is the part most freelancers skip, and it’s usually the single biggest accuracy win on a GHL account.
3. Why can't I track WhatsApp leads normally?
Because the conversion happens inside the WhatsApp app, not on your website. There’s no page for a pixel to load on and no form-submit event to catch. Browser-based tags simply can’t follow a user into WhatsApp. The only reliable solution is the offline conversion chain: capture the gclid on your landing page, carry it into the WhatsApp message, store it on the contact, and upload the conversion back to Google Ads when the lead qualifies — which is exactly what Phase 5 builds.
4. What is a gclid and why does it matter?
The gclid (Google Click Identifier) is a unique code Google attaches to a URL when someone clicks your ad. It’s the fingerprint that lets Google match a later conversion back to the specific click that earned it. In a GoHighLevel + WhatsApp funnel, the gclid is the thread that connects an ad click to a sale that happens days later, off your website. Lose the gclid and the offline conversion has nothing to match on — which is why capturing it (Phase 2) is the most important step.
5. Will this cause double-counted conversions?
Not if you follow the one-source-of-truth rule. Double-counting happens when GoHighLevel’s native GA4/Ads integration fires at the same time as your GTM tags, or when you import the same lead through both a GTM conversion tag and a GA4 Key Event. The fix is to disable the native integrations, route everything through GTM, and track each action from a single source. The reconciliation check in the FAQ above will catch any double-counting immediately.
6. Do I need server-side tracking for this?
Not to get started — Phases 1 through 5 work entirely client-side and will fix the core problem. Server-side GTM with Stape (Phase 7) is the accuracy upgrade: it recovers conversions lost to ad blockers and iOS, raises match quality, and extends attribution. If your account spends meaningfully and you’re losing data to tracking prevention, server-side pays for itself. If you’re just starting, build the client-side foundation first, then add the server layer.
7. Is Consent Mode v2 really required?
If you have EU or UK visitors and run Google Ads, yes. Consent Mode v2 is now required for Google’s remarketing and conversion features to function for European users. Beyond compliance, it protects your data: when a visitor declines cookies, Google still receives anonymized, cookieless signals (conversion modeling) so you don’t go completely blind. With Cookiebot deployed through GTM (Phase 6), you stay legal and keep usable performance data.
8. Why are GoHighLevel forms hard to track?
Because most GHL forms, surveys, and calendars are embedded as iframes — sealed boxes that GTM on the parent page can’t see inside, due to browser security rules. A normal form-submit trigger often catches nothing. The reliable workaround is to track the thank-you page redirect that fires only on a completed submission, or, for inline forms that don’t redirect, a verified message listener that reads the iframe’s postMessage signal. Both approaches are covered in Phase 2.
9. How long until I see conversions in Google Ads?
On-site conversions usually start recording within a day or two of going live — the conversion action moves from “no recent conversions” to “recording conversions.” Offline WhatsApp conversions take a little longer because they depend on the lead qualifying and the scheduled or API upload running. Allow processing time, then reconcile: qualified opportunities in GHL should match conversions uploaded should match conversions Google reports. If they don’t, check your upload log.
10. Can I do this myself or should I hire help?
If you’re comfortable in GTM and willing to test carefully, the steps here are complete enough to build it yourself — that’s the point of this guide. The two places people get stuck are the gclid capture (Phase 2) and the WhatsApp offline import (Phase 5), because a small mistake there silently breaks everything downstream. If you’d rather have it built, validated, and documented for your team — including the offline and server-side pieces — that’s exactly the kind of project I handle.
 Need Help Advanced Tracking Setup?