Quick Answer
Google Ads Call Conversion Tracking for a multi-location local-services business works like this: you put a CallRail visitor-level website pool on the site so each visitor sees a unique tracking number, CallRail captures that visitor’s Google click ID (gclid), and when they call, CallRail sends the call back to Google Ads as a “Phone Call” conversion. Around that, you stand up a clean Google Tag Manager (GTM) container, GA4 with a single lead event, client-side UTM capture (critical on WP Engine, which strips URL parameters), and Google Consent Mode v2 driven from one consent banner that also feeds Microsoft UET and Microsoft Clarity. Done right, every form and every phone call becomes a trackable, consent-compliant conversion — and your ad money finally maps to real leads.
Key Takeaways
- The Problem: A rebuilt multi-location site launches with calls and forms that no platform can see. WP Engine strips UTMs server-side, so attribution dies before it starts.
- The Fix: Capture attribution client-side, route every lead and call through one clean GTM container, and let CallRail match each call to its Google click ID.
- Call Conversions: CallRail’s Google Ads integration posts calls as conversions using the gclid — no Google forwarding number needed, so it never fights your CallRail swap.
- One Banner, Three Systems: Google Consent Mode v2 only governs Google tags. You must also wire Microsoft UET and Microsoft Clarity consent from the same banner.
- Built but Dormant: Phase 2 ad-platform tags (Google, Microsoft, Meta, LinkedIn, StackAdapt) are built, paused, and documented so paid can switch on in minutes later.
- Result: Accurate GA4 key events, clean Google Ads call conversions, first- and last-touch attribution on every form, and a launch-day stack your developers can install from a clear spec.
Introduction: The Coffee-Chat Version
Imagine we are sitting down for a coffee, and you slide your laptop across the table. You are about to launch a beautifully rebuilt website for a local-services business — several locations, several brands, a slick WordPress and Divi 5 build hosted on WP Engine. The phones are about to ring. The forms are about to fill. You are excited.
Then you ask the quiet question every marketer eventually asks: “When the calls and forms start coming in, will we actually know where they came from?”
And the honest answer, on launch day with no measurement work done, is no.
Here is the painful twist. On a multi-location site like this, most of your valuable leads are phone calls, not form fills. Google Ads can tell you it sent 500 clicks. It cannot tell you that click number 213 picked up the phone, called your Denver location, and booked a $4,000 job. That connection — click to call to revenue — is invisible unless you build the bridge.
It gets harder. Your site is on WP Engine. WP Engine is fast because it caches aggressively, but that same caching strips UTM and click-ID parameters server-side. So even your form submissions can arrive with “source: unknown.” You spend real money sending traffic to a site that quietly forgets where every visitor came from.
Today, we are going to fix this permanently.
This guide is a complete, plain-English blueprint for standing up marketing analytics and call tracking end to end — the exact configuration role this kind of launch needs. We will restructure CallRail into a clean, multi-location account. We will build a single GTM container with one lead event and proper call events. We will capture UTMs client-side so WP Engine cannot eat them. We will set up Google Ads Call Conversion Tracking so every qualified call becomes a conversion. And we will make the whole thing consent-compliant with Google Consent Mode v2 — plus the two systems people always forget, Microsoft UET and Microsoft Clarity.
This is a configuration and implementation job, not a web-development job. Your developers own the site and the theme code. Our job is to own the measurement architecture: configure the platforms, hand the developers exact snippets and head-placement specs, and QA the result so launch day fires clean.
Let’s build it.
Why You Must Set This Up (Before Launch, Not After)
Let me be blunt, because this matters more than any single setting below.
The Problem: If you launch without measurement, you create a data gap that you can never fully fill later. Conversions that happen in the first weeks are gone. Attribution for those early callers is lost. And when paid campaigns eventually switch on, the algorithm has nothing real to learn from. You end up “optimizing” on guesswork — moving budget based on which campaign feels like it works, not which one actually drives booked jobs.
The Solution: A measurement-first launch. Every lead — form or call — flows through one clean event structure. Every call is matched to its source. Consent is respected from the first pageview. The result is a system that tells you the truth: which campaign, which keyword, which location, which channel actually produced revenue.
Here are the five concrete benefits of doing this properly.
1. Real Lead Visibility (Calls Included)
For a local-services business, the phone is the cash register. A form is a maybe; a call is a buyer. Without call tracking, you are blind to your most valuable conversions. With a CallRail website pool feeding Google Ads, you finally see which ad, campaign, and keyword drove each phone call — and you can drill into individual callers. This is the difference between “we got 34 calls” and “we got 34 calls, and 21 of them came from one Google Ads campaign in Phoenix.”
2. Smarter Ad Optimization and Higher ROI
When Google Ads receives accurate call and form conversions, its automated bidding gets real signal to learn from. It bids harder where calls happen and pulls back where they don’t. You stop paying for clicks that never call. Marketers who fix attribution typically redirect a meaningful slice of budget away from channels that looked good in clicks but were quietly burning cash. Clean data is not a reporting nicety — it is a direct lever on ROI and ROAS.
3. Accurate, Trustworthy Reporting
When the CMO asks “where are our leads coming from?”, you want one answer, not five conflicting dashboards. A single lead event in GA4, one source of truth in CallRail, and first/last-touch attribution on every form means your reports finally agree with each other. Decisions made on accurate data are decisions you can defend.
4. Multi-Location and Multi-Brand Clarity
A shared CallRail account where every brand’s numbers live in one bucket is a reporting nightmare. Restructuring into one company per brand or client gives each location clean call logs, clean routing, and clean conversion reporting — without changing where the phones actually ring. Each location’s marketing can be measured on its own merits.
5. Future-Proofing for Privacy
Privacy law is not optional, and enforcement is tightening. The EEA, UK, and Switzerland now require explicit consent before non-essential cookies fire — and that applies to Google, Microsoft, and Clarity. Building Consent Mode v2 and a properly wired consent banner from day one means you collect data legally, keep conversion modeling intact where consent is denied, and never have to bolt compliance on after a complaint. You launch clean.
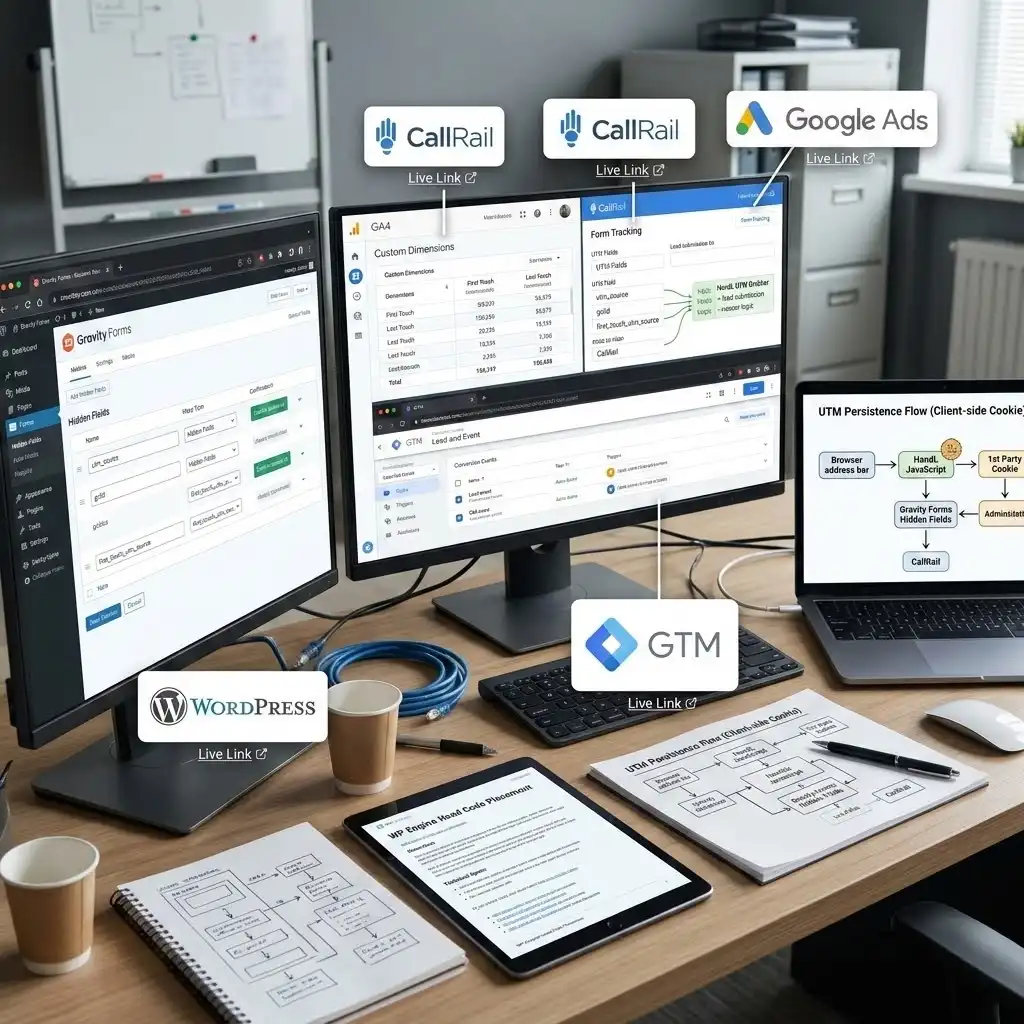
Understanding Your Stack (And the One Trap Inside It)
Before we touch a single setting, let’s understand the moving parts. Each tool has a job, and one of them hides a trap that breaks attribution if you don’t plan for it.
WordPress + Divi 5 on WP Engine. This is the site and where it lives. WP Engine is a managed, heavily-cached WordPress host — think of it as a very fast librarian who keeps pre-printed copies of every page ready to hand out instantly. That speed is great for visitors. But to serve those pre-printed copies efficiently, WP Engine strips many URL parameters server-side, including UTMs and click IDs. This is the trap. If your attribution depends on the server reading ?utm_source=google&gclid=…, it will fail. The fix, which the whole build is designed around, is to capture attribution client-side — in the visitor’s browser — before caching can interfere.
Gravity Forms (with Cloudflare Turnstile). This is your lead form engine. Turnstile is a privacy-friendly bot check — a bouncer at the door that blocks spam without annoying real people. We will write captured attribution into hidden fields on these forms so every submission carries its source.
HandL UTM Grabber V3. This is the client-side capture tool that beats the WP Engine trap. It reads UTMs and click IDs from the browser the moment someone lands, and saves them in a first-party cookie — a small note the browser keeps. Because HandL captures in JavaScript and stores in a cookie, it survives WP Engine’s server-side stripping. (HandL’s own changelog even references a specific WP Engine and Varnish-cache workaround using a JavaScript-based cookie save — this is a known, solved problem.)
Google Tag Manager (GTM). This is the hub. Think of GTM as a switchboard operator: instead of pasting ten different tracking scripts into your theme, you install GTM once and manage every tag, trigger, and rule from one dashboard. We will keep this container clean — single container, no duplicate tags, consent properly configured.
GA4 (Google Analytics 4). Your analytics brain. GA4 records events, and the important ones — like a lead — get marked as key events (GA4’s current name for what used to be called “conversions”). GA4 will hold our single lead event and our call events.
CallRail. Your call tracking platform. CallRail’s superpower is the website pool: a set of phone numbers it rotates so each visitor sees their own unique number. When that visitor calls, CallRail knows exactly who they were and where they came from. This is what makes call attribution — and Google Ads call conversions — possible.
CookieYes / Cookiebot (CMP). Your consent management platform — the cookie banner and the brain behind it. A CMP asks visitors what tracking they allow, then tells every tool whether it’s allowed to set cookies. We will use it to drive three consent systems from one banner, not just Google’s.
Microsoft Clarity. Heatmaps and session replay — like a security camera for your website that shows you where people click, scroll, and rage-quit. Powerful, but it must be consent-gated and must mask form fields so it never records sensitive data.
Google Search Console (GSC). Google’s free tool that shows how your site appears in organic search. We verify the domain, submit the sitemap, and link it to GA4 so organic search data flows into your analytics.
Now that we know the players, here is the order we will build in.
Prerequisites & Access Checklist
Good measurement work is 50% access. Before configuration begins, line up the following so the build is not blocked halfway through. In his client process, MD Niamul always confirms access first, then plans, then implements — because nothing kills a launch timeline like waiting three days for an admin invite.
Access you need (granted on engagement):
- CallRail — admin access. Restructuring companies, building pools, and enabling Local Swap and multiple swap targets all require account-admin rights, not just a user seat.
- Google Tag Manager — publish access to the site’s container (or permission to create a fresh one).
- GA4 — Editor or Admin on the property, so we can create key events, custom dimensions, and the internal-IP filter.
- CookieYes (or Cookiebot) — admin to the CMP project, to configure categories and consent signals.
- Google Ads — standard or admin access (or via the manager/MCC account) to build conversion actions and confirm auto-tagging.
- Microsoft Advertising (UET) — access to the relevant UET tag, for the dormant Phase 2 build.
- Coordination with the dev team for the actual head-code installation (consent, CallRail, and HandL load in the document head; we supply the spec, they install it).
Tools you’ll use to build and verify:
- GTM Preview Mode (Tag Assistant) — to watch tags fire in real time before publishing.
- GA4 DebugView — to confirm events and key events arrive correctly.
- Google Ads conversion diagnostics and the UET Tag Helper browser extension — to confirm conversion and consent signals.
- CallRail’s number-assignment table and call log — to verify the pool is swapping and calls are attributed.
- A staging environment that is fully isolated from production — so test fires never pollute live data.
One non-negotiable rule before we start: decide your single source of truth for each conversion type. Calls = CallRail. Form leads = one GA4 lead event. When you skip this step, you end up double-counting, and every report disagrees with every other report. We define it once, up front.
Video tutorial – Google Ads Conversion Tracking for Roofing Companies
Step-by-step video guide to Google Ads Conversion Tracking for Roofing Companies for accurate reporting.
Step-by-Step Implementation
Phase 1 — Restructure CallRail (One Company Per Brand)
We start here because CallRail is the foundation of call attribution, and the existing account is a single shared bucket that needs to be split before anything else makes sense.
The goal of Phase 1: turn one messy shared account into a clean, multi-location structure where each brand or client has its own company, its own numbers, and its own conversion reporting — without changing where any phone actually rings.
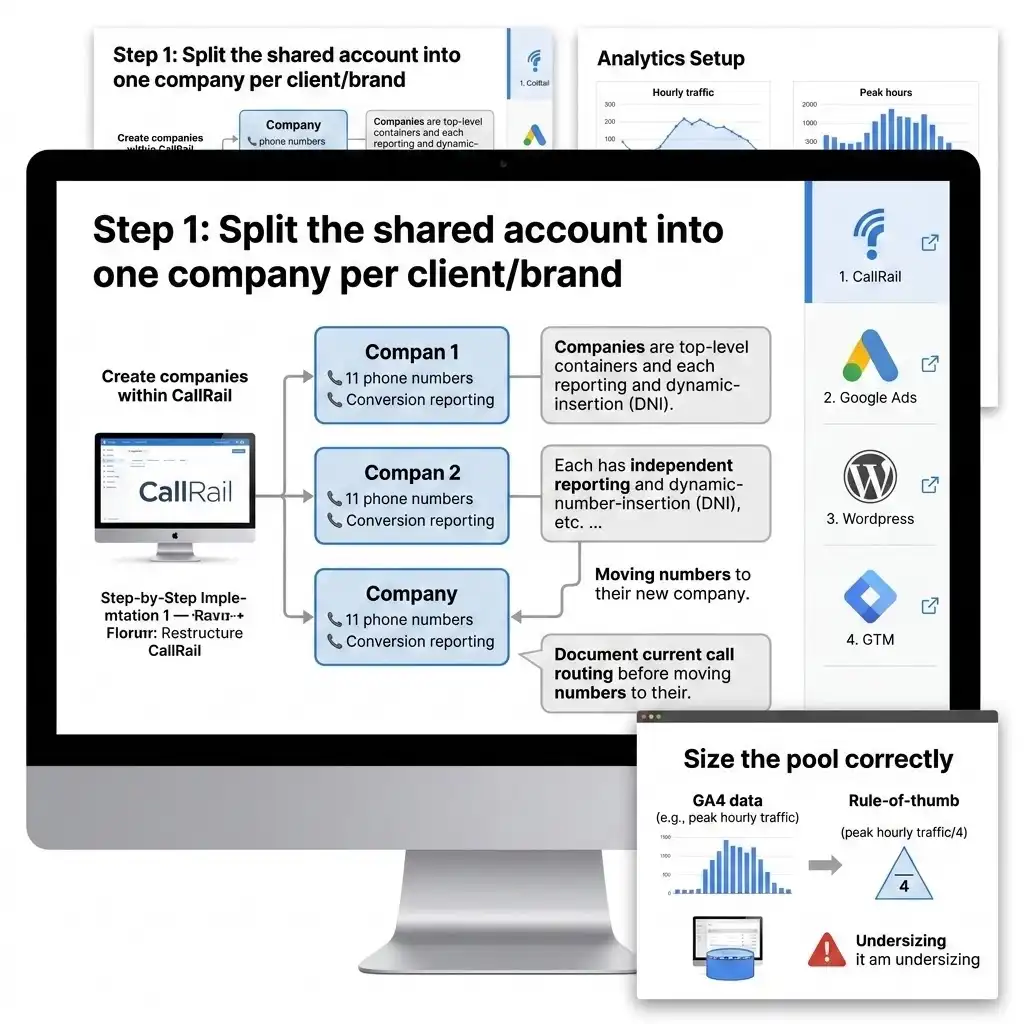
Step 1: Split the shared account into one company per client/brand
Where to find it: In CallRail, companies are the top-level container. Each company has its own numbers, integrations, and reports.
Using the number-to-brand and location mapping you provide, create a separate company for each brand or client. Move (or recreate) each brand’s numbers into its own company.
Why? Reporting, integrations, and the dynamic-number-insertion (DNI) script are all company-dependent in CallRail. If brands share one company, their call data, their Google Ads conversions, and their routing all blur together. Splitting them gives each location clean, independent measurement — and lets you connect each company to the right Google Ads account later.
CRITICAL STEP: Before moving numbers, document the current call routing for every number (which phone each one rings to). We are restructuring measurement, not operations. The phones must keep ringing exactly where they ring today.
Step 2: Enable multiple website pools and swap targets
Where to find it: Settings → your account settings → check “Allow the creation of multiple website pools” and “Enable multiple swap targets.” You must be an account administrator to do this.
Why? A multi-location business often needs more than one pool per company, or one tracking number that can swap to more than one destination. These features are off by default, so we turn them on before building.
Step 3: Build the visitor-level website pool with Local Swap
This is the heart of call attribution.
A website pool is a set of phone numbers CallRail rotates so that each active visitor sees a unique number for the whole time they’re on your site. When a call comes in on that number, CallRail knows exactly which visitor it was — and which source, campaign, and keyword brought them.
Local Swap layers location on top of this: it reads the visitor’s IP to find their area code, then shows them a local number that matches their region. A visitor in Denver sees a Denver number; a visitor in Phoenix sees a Phoenix number. Local numbers convert better than out-of-area ones because callers trust a number that looks local.
Where to find it: Create a number → choose website pool → add area codes for each metro you serve → activate Local Swap.
The toll-free fallback (do not skip this). If a visitor’s area code doesn’t match any local area code in your pool, CallRail will, by default, show them the next closest area code — which can be wildly wrong (a New York visitor seeing an Arizona number). The fix, straight from CallRail’s own guidance, is to include toll-free numbers in your Local Swap pool. Then any visitor without a local match sees a clean, neutral toll-free number instead of a confusing out-of-state one. For a business appearing across many metros, a toll-free fallback pool is the recommended setup.
One more detail: once a visitor is assigned an area code on their first visit, they keep seeing that same number for consistency, even if they move around. This is by design and keeps the caller experience clean.
Step 4: Size the pool correctly
This is the question that separates amateurs from pros, and it’s one of the screening questions for this kind of role. Here is the proven method, straight from CallRail.
You do not need thousands of numbers. Because CallRail assigns a number to one active visitor at a time and frees it when they leave, you only need enough numbers to cover concurrent visitors.
CallRail’s rule of thumb: pool size = one-quarter of your peak hourly traffic, with a minimum of four numbers.
- Example: if your busiest hour sees 100 visitors, a 25-number pool is sufficient.
- The minimum is four numbers — fewer than that, and CallRail warns that attribution quality drops because two visitors may see the same number.
How to find your number: open GA4, filter to the traffic you actually want to track (for example, only paid visitors if the pool is for Google Ads), and chart hourly visitors over the last two weeks to find your peak hour. Take a quarter of that. For a seasonal business, chart your peak season instead so you don’t undersize for your busy months.
The cost of getting it wrong: if the pool is too small, two visitors see the same number at the same time, and CallRail misattributes the call — applying one visitor’s source and keyword to another’s call. If you ever listen to a recording and the keyword data doesn’t match the conversation, your pool is too small. You can always check the number-assignment table to see how often numbers are being reused, and increase the pool if reuse is high. (Pools above 50 numbers are handled by CallRail support.)
Step 5: Set up per-location tracking numbers and preserve routing
For locations that need their own dedicated tracking number (not just pool numbers), create those per-location numbers and route them to the exact destinations you specified. Configure whisper messages and call recording per the business’s preferences.
Why? Per-location numbers give clean, location-level reporting for offline placements (signage, Google Business Profile, directories) while the website pool handles dynamic web attribution.
Step 6: Clean up legacy source numbers and swap-precedence conflicts
The hidden danger: CallRail follows swap precedence rules. If old “source” tracking numbers are still set to swap on the website, they can override your new website pool — meaning your pool never shows, and your Google Ads conversions silently stop working.
Where to find it: review every active number’s number insertion options and swap settings. Deactivate or reconfigure legacy source numbers that conflict with the pool. Confirm the website pool wins precedence on the site.
Step 7: Connect CallRail → GA4
Link CallRail to GA4 so call events flow into your analytics alongside web behavior. This gives you calls and web activity in one place, and sets up the call events we’ll mark as key events in the next phase.
Why this order matters: with Phase 1 complete, every visitor now sees an attributed number, every call ties back to a source, and your account is structured per brand. We have not touched a single ad platform yet — and we don’t need to, because the measurement layer comes first.
Phase 2 — Build the Launch Analytics Stack (Live on Day One)
With CallRail structured, we build the analytics that must be live the moment the site goes public.
Step 1: Install GTM with single-container hygiene
Install one GTM container, and only one. Verify there is no second container, no hard-coded GA4 snippet, and no leftover tags from the old site fighting your new ones.
Why? Duplicate containers and stray hard-coded tags are the number-one cause of double-counted conversions and inflated numbers. One clean container is the whole game. Think of it as making sure there is only one switchboard operator in the building — two operators means every call gets logged twice.
Step 2: Define one clean lead event and your call events
Here we make a deliberate architecture choice: a single lead-conversion event for form submissions, plus call events from CallRail. Not five form events. Not a different event per page. One.
When a Gravity Form is submitted, GTM should recognize that as your single lead event and pass it to GA4. Calls flow in from the CallRail–GA4 connection as their own events.
Why one event? Because every downstream system — GA4 key events, Google Ads conversions, your Phase 2 ad tags — can read from one clean, shared signal. Build ten different form events and you’ll be reconciling ten different numbers forever. One lead event keeps the entire stack honest.
A note on the data layer (your invisible filing cabinet). GTM reads information from a structure called the data layer — an invisible filing cabinet where the website files away facts (like “a form was submitted” or “the lead source was Google”) so GTM can pick them up. In this build, attribution facts captured client-side are made available for GTM and the forms to read, and the form submission is the trigger for your single lead event. (Per this project’s scope, we are not hand-coding custom data-layer or listener scripts — we are configuring the platforms and using the tools’ native capture. The developers receive exact specs for any head code.)
Step 3: Add qualified-call logic
Not every call is a real lead. A 12-second hang-up or a wrong number is not a conversion. Qualified-call logic filters those out so only meaningful calls count.
CallRail handles this with Integration Triggers — rules like “only send calls longer than 30 seconds” or “only first-time callers” to your connected platforms. We configure these so your conversions represent qualified calls, not noise.
Why? If junk calls count as conversions, Google Ads learns from junk and your reporting overstates performance. Qualified-call logic is what turns “phone rang” into “real lead.”
Step 4: Configure GA4 properly
In GA4 (Admin → property settings), do the following:
- Set up the lead event as a key event. Mark your single form-submission event and your qualified-call event as key events (GA4’s current term for conversions). Where to find it: Admin → Events / Key events.
- Register first- and last-touch attribution as custom dimensions / user properties. So you can report on where leads originally came from (first touch) and what finally drove them to convert (last touch). Where to find it: Admin → Custom definitions → create custom dimensions mapped to the attribution values you capture. We’ll feed these from the UTM capture in Phase 3.
- Add an internal-IP filter. So your own team’s visits and test traffic don’t pollute the data. Where to find it: Admin → Data Streams → your stream → Configure tag settings → Define internal traffic, then Admin → Data Filters to activate it. CRITICAL STEP: set the filter to Active (not just “Testing”) before launch, or internal traffic still counts.
Why register attribution as custom definitions? Because GA4’s standard reports won’t show your first/last-touch values unless you register the parameters. Skip this and the data is collected but invisible in reports.

Phase 3 — Capture UTMs Client-Side and Get First/Last Touch onto Every Form
This phase solves the WP Engine trap and answers two of the toughest screening questions for this kind of role: how do you capture UTMs on a host that strips them, and how do you get first- and last-touch attribution onto a Gravity Forms submission?
The WP Engine problem, stated plainly
WP Engine caches pages for speed, and in doing so it strips UTM and click-ID parameters server-side. If your attribution logic runs on the server, it sees a stripped URL and records “unknown.” This is not a bug you can file — it’s how the cache works. The only reliable answer is to capture attribution in the browser, before the cache matters.
Step 1: Let HandL UTM Grabber capture client-side
HandL UTM Grabber V3 runs in the visitor’s browser. The instant someone lands on any page, it reads the UTMs and click IDs (utm_source, utm_medium, utm_campaign, utm_term, utm_content, plus gclid, gbraid, wbraid, fbclid, msclkid, and more) from the address bar and saves them in a first-party cookie.
Why this works on WP Engine: the browser still receives the full URL in the address bar even when the server cache ignores the parameters. HandL grabs them in JavaScript at that moment and stores them in a cookie, so the data survives across pages and the server-side stripping never gets a chance to lose it. HandL’s own release history even calls out a WP Engine and Varnish-cache workaround built on a JavaScript-based cookie save — proof this is a known, solved scenario, not an experiment.
CRITICAL STEP: HandL (and CallRail’s swap, and the consent default) must load in the document head, before GTM. Load order is everything here. We provide the developers an exact head-placement spec; they install it via WPCode or the child theme — not through GTM, because these need to run before GTM initializes.
Step 2: Capture both first touch and last touch
Attribution has two honest questions:
- First touch: what originally brought this person to you weeks ago? (The campaign that created awareness.)
- Last touch: what finally drove them to convert today? (The campaign that closed them.)
HandL V3 supports both first-touch and last-touch attribution. It stores the original values from the visitor’s first visit and the most recent values, persisting them in cookies across sessions and pages.
Why both? Last touch over-credits bottom-funnel campaigns (brand, retargeting); first touch over-credits top-funnel discovery. Capturing both lets you see the full journey — “Google Ads brought them in, organic search brought them back to convert” — instead of crediting only the last click.
Step 3: Write the values into Gravity Forms hidden fields
Now we get the captured values onto the form.
- In each Gravity Form, add a Hidden field for every value you want to capture — one set for last touch (utm_source, utm_medium, utm_campaign, utm_term, utm_content, gclid) and a second set for first touch (the original-visit values).
- Map each hidden field to its HandL value. HandL fills fields automatically when the field’s name, id, or CSS class matches its variable name — so you don’t even need shortcodes in most cases. Where you prefer explicit control, HandL also exposes shortcodes/merge tags (for example, [utm_campaign]) you can set as the field’s value. Use HandL’s documented parameter list for the exact first-touch and last-touch variable names so the mapping is precise.
- Enable Gravity Forms’ own dynamic population as a fallback. On each hidden field’s Advanced tab, check “Allow field to be populated dynamically” and set the parameter name (e.g., utm_source). This covers visitors who land directly on the form page with parameters in the URL.
Why a fallback? Belt and suspenders. HandL handles cross-page, cross-session persistence; Gravity’s native population handles the direct-landing case. Together they make sure the field is never empty when data exists.
The result: every Gravity Forms entry now carries both first-touch and last-touch source data. That same data feeds your GA4 custom dimensions from Phase 2, and it’s ready to push into a CRM or offline-conversion workflow later.
Step 4: Show the captured UTMs in CallRail Form Tracking
Configure CallRail Form Tracking to display the captured UTM fields alongside form activity, so calls and forms share a consistent attribution picture inside CallRail. Now your call platform and your form data speak the same language.
Phase 4 — Google Consent Mode v2 (And Why It Isn’t Enough on Its Own)
This phase makes the launch compliant — and it answers one of the sharpest screening questions for this role: how do you wire consent for GA4, Microsoft UET, and Microsoft Clarity from one banner, and why isn’t Google Consent Mode v2 enough by itself?
What Consent Mode v2 actually is
Consent Mode is a privacy-safe middle ground — a way for your cookie banner to tell Google’s tags whether the visitor agreed to tracking, before those tags decide what to do. Instead of “track everything” or “track nothing,” tags adjust their behavior based on the visitor’s choice.
Consent Mode v2 uses four signals:
- ad_storage — cookies for advertising.
- analytics_storage — cookies for analytics.
- ad_user_data — whether user data may be sent to Google for ads.
- ad_personalization — whether data may be used for personalized/remarketing ads.
In the EEA, UK, and Switzerland these default to denied until the visitor accepts. When they accept, the CMP updates the signals to granted, and Google’s tags begin full measurement.
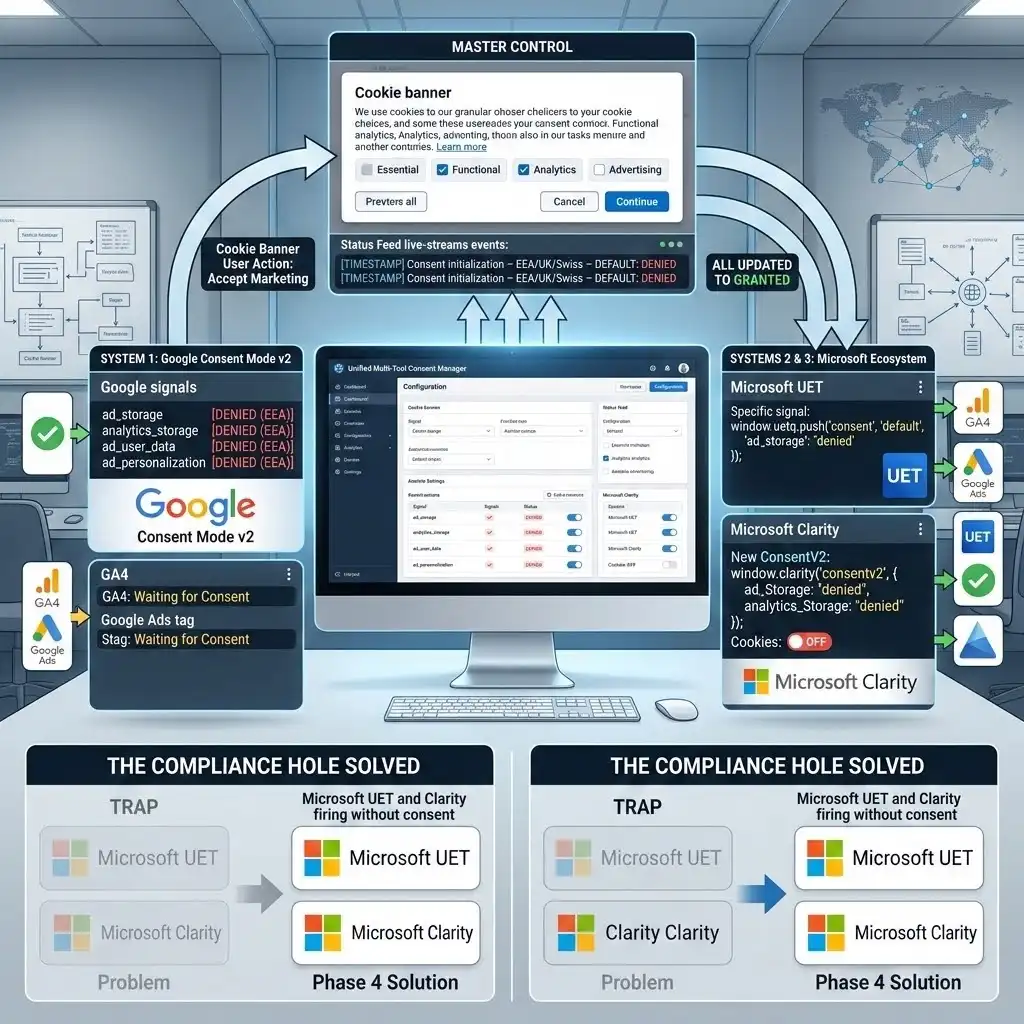
The trap: Consent Mode v2 only governs Google tags
Here is the part most setups get wrong. Google Consent Mode v2 only controls Google tags — GA4, Google Ads, Floodlight. It does nothing for Microsoft UET or Microsoft Clarity. Those are separate companies with their own consent APIs.
So if you wire only Google Consent Mode v2 and call it done, you have a compliance hole: Microsoft Ads tracking and Clarity session recordings may fire without consent for EEA/UK/Swiss visitors — exactly what the law forbids, and exactly what now triggers conversion loss and feature shutoffs from Microsoft and Clarity in those regions.
That’s why the job is to drive three consent systems from one banner.
Step 1: Wire Google Consent Mode v2 in GTM
Where to find it: In GTM, your CMP (CookieYes or Cookiebot) provides a consent template/tag.
- Set default consent to denied for EEA/UK/Switzerland, firing on the Consent Initialization – All Pages trigger. Why this trigger? It runs before everything else, so no tag fires before consent is known.
- When the visitor accepts, the CMP fires a consent update to granted.
- Confirm your Google tags (GA4 config, Google Ads) respect these states. Modern Google tags read Consent Mode automatically.
Name it in the house convention: CMP – Consent Mode V2 – Default and CMP – Consent Mode V2 – Update.
Step 2: Wire Microsoft UET consent
Microsoft UET has its own consent mode, controlled by a single ad_storage property. Your CMP must pass it denied by default and granted when the user accepts marketing cookies.
CMPs like CookieYes and Cookiebot both have built-in UET support — once UET is recognized, they pass the consent signal automatically to the global window.uetq object. The official, minimal snippet Microsoft documents looks like this (a consent default, then an update on acceptance):
					window.uetq = window.uetq || [];
window.uetq.push('consent', 'default', { 'ad_storage': 'denied' });
// On consent acceptance, the CMP pushes:
window.uetq.push('consent', 'update', { 'ad_storage': 'granted' });
Where it goes: in the head before the UET tag, or in a Custom HTML tag on the Consent Initialization – All Pages trigger if managed through GTM. Why it matters: in the EEA, UK, and Switzerland, Microsoft is enforcing consent — if the granted signal never arrives when a user accepts, you lose Microsoft Ads conversions. Verify with the UET Tag Helper extension: the asc parameter shows whether consent registered.
Step 3: Wire Microsoft Clarity consent (ConsentV2)
Clarity needs its own signal too. The current, recommended method is ConsentV2 (the older clarity(‘consent’, true) is deprecated). ConsentV2 passes ad and analytics states separately:
					window.clarity('consentv2', {
  ad_Storage: "granted",        // or "denied"
  analytics_Storage: "granted"  // or "denied"
});
Why it matters: since 31 October 2025, Clarity enforces consent in the EEA, UK, and Switzerland. Without the signal, session recordings, heatmaps, and funnels are disabled for those visitors — you lose the very insights you installed Clarity to get.
Step 4: Configure all three from the one banner, then prove it
In your CMP (CookieYes/Cookiebot), map each tool to the right cookie category (analytics vs. marketing), enable the Google Consent Mode v2, Microsoft UET, and Clarity Consent API integrations, and publish.
The takeaway to remember: Google Consent Mode v2 is necessary but not sufficient. A compliant multi-tool site needs the banner to speak to Google, Microsoft UET, and Clarity — three systems, one source of truth. That single point is what separates a real consent implementation from a checkbox one.
Phase 5 — Google Ads Call Conversion Tracking (The Core)
Now we connect the calls to the money. This is the focus of the whole build: Google Ads Call Conversion Tracking, done the right way for a CallRail-powered multi-location site.
Video Tutorial
Step-by-step video walkthrough: setting up Google Ads Call Conversion Tracking with CallRail and GA4 for a multi-location local-services business — building the website pool, connecting the Google Ads integration, and verifying calls report as conversions. (Embed the Digital Soldier IT YouTube walkthrough here.)
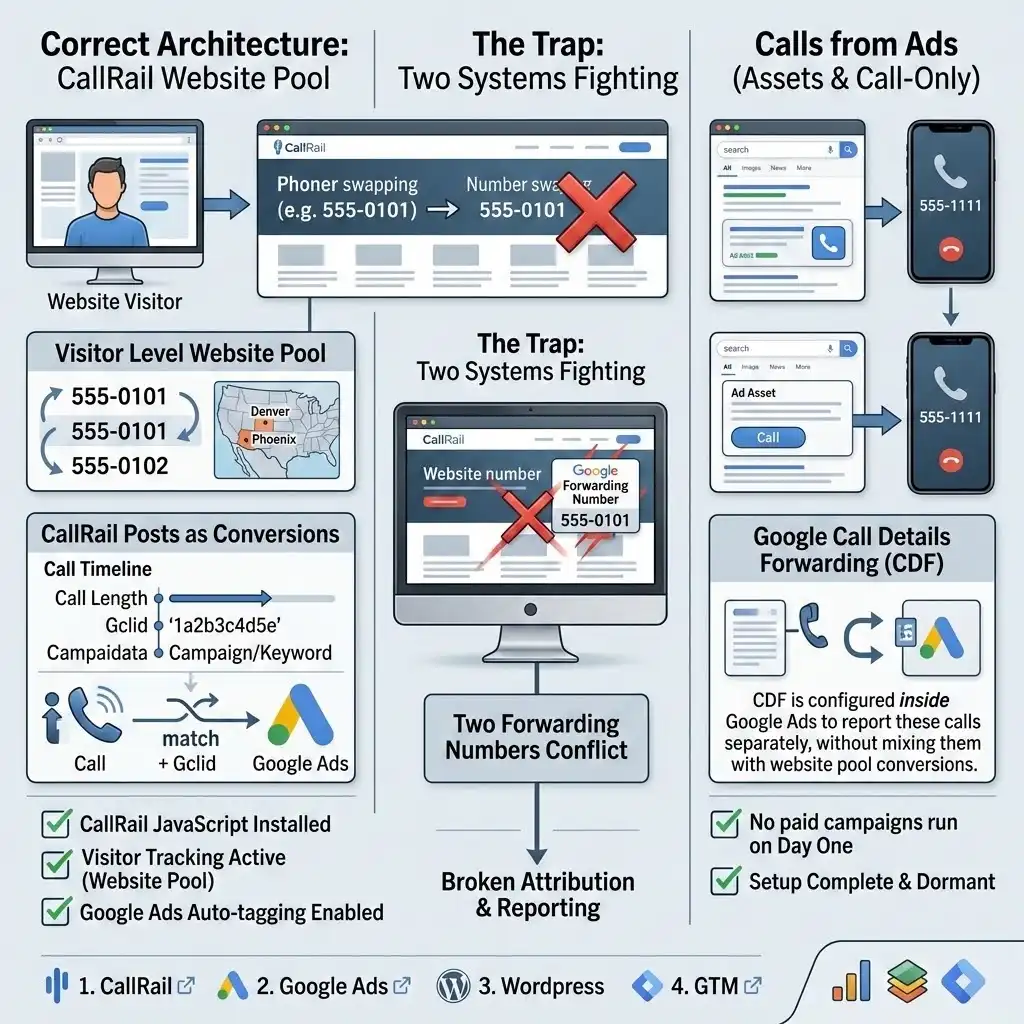
The right architecture (and the trap to avoid)
There are two ways Google tracks calls, and mixing them up breaks everything.
- Calls from your website (someone browses, then calls the number on the page). This is where CallRail’s website pool lives.
- Calls directly from ads (call-only ads and call assets/extensions). These are tracked separately in Google Ads.
The trap: Google offers its own “website call conversion” using a Google forwarding number that swaps the number on your page. But you already have CallRail swapping that number. Two systems fighting to swap the same number = broken tracking. So we do not use Google’s forwarding number for website calls. Instead, we let CallRail own the website-call attribution and post conversions to Google Ads. This is the clean, proven approach.
How CallRail posts calls as Google Ads conversions
The mechanism is elegant. CallRail’s website pool captures each visitor’s Google click ID (gclid) (and gbraid/wbraid for privacy-restricted clicks). When that visitor calls a pool number, CallRail matches the call to the stored click ID and sends it to Google Ads. Google recognizes the click ID and creates the call as a conversion automatically.
Notice what this means: CallRail uses the gclid, so you do not need Enhanced Conversions for these calls. (CallRail doesn’t use Enhanced Conversions for its integration — it posts on the click ID directly.)
Step 1: Meet the three requirements
CallRail’s Google Ads integration requires all three of these, or it silently fails:
- The CallRail JavaScript snippet installed on the site (the DNI/swap script — company-dependent).
- Visitor tracking active (your website pool from Phase 1).
- Auto-tagging enabled in Google Ads. Why? Auto-tagging is what appends the gclid to your landing-page URL. No gclid, no match, no conversion. Where to find it: Google Ads → Settings → Account settings → Auto-tagging → on.
Step 2: Connect CallRail to the right Google Ads account
In CallRail, for each company, open Integrations → Google Ads → authorize the matching Google Ads account.
Why per company? Because you split brands into companies in Phase 1, each connects to its own (or the correct) Google Ads account. If you use a manager (MCC) account, note that conversion actions can be created at the manager level and shared.
Heads-up on ad blockers: if the authorization window won’t open, a browser ad blocker is usually the cause — disable it and retry.
Step 3: Let CallRail create the conversion actions — then leave them alone
When you activate the integration, CallRail creates conversion actions in Google Ads:
- A “Phone Call” action with source “Import from clicks.”
- (Optional) If you choose to separate them, “First-Time Phone Call” and “Repeat Phone Call.”
- A “Form Capture” action if you enable form conversions too.
CRITICAL STEP — do not rename these or change their source. Warning: Changing the conversion name from “Phone Call,” or changing the source from “Import from Clicks,” will stop CallRail from sending conversion data. You can edit other fields, but leave the name and source exactly as CallRail set them. This single mistake is one of the most common reasons call conversions quietly disappear.
Note: Google also auto-creates a “Calls from Ads” conversion when you enable Google’s own call reporting. That one is separate and tracks call-asset/call-only ad calls — not your CallRail website-pool calls. Don’t confuse the two.
Step 4: Apply qualified-call logic with Integration Triggers
Remember Phase 2’s qualified-call logic? This is where it pays off. In CallRail’s Integration Triggers, set the rules for which calls post to Google Ads — for example, only calls longer than 30 seconds, so 5-second hang-ups never count as conversions.
Match this to your Google Ads conversion settings. If CallRail only sends qualified calls but Google Ads is set to count differently, your numbers won’t reconcile. Decide the qualified-call definition once and apply it on both sides.
Step 5: Get keyword data flowing
Add ?keyword={keyword} to your tracking template in Google Ads. Why? This passes the search keyword into CallRail, so your call log and caller timelines show which keyword drove each call — the insight that lets you cut wasted keywords and double down on winners.
Step 6: Mind the privacy and counting settings
A few proven gotchas to configure correctly:
- Conversion window: set between 1 and 90 days. If a lead clicks today but doesn’t call for weeks, the click must still be inside your window to count. For considered local-services purchases, a longer window (e.g., 30–60 days) captures more real conversions.
- Counting setting for gbraid/wbraid: for privacy-protected clicks (gbraid/wbraid), set conversion counting to “every conversion” rather than “one conversion.” Why? These IDs are shared across grouped users, so “one conversion” counting drops them — and you under-report.
- Don’t lowercase the gclid: click IDs are case-sensitive. If a site setting forces URLs to lowercase, the gclid breaks and conversions won’t upload. Verify the site isn’t lower-casing parameters.
- Data Manager consent settings: in Google Ads → Tools → Data manager → Consent settings → imported and uploaded data, confirm services are set to All Google Services so Google can process the imported conversions.
Step 7: Handle call-asset (extension) calls separately, if used
If the campaigns use call assets/extensions or call-only ads, those calls don’t go through the website pool — they use Call Details Forwarding (CDF), configured inside Google Ads, with the relevant CallRail numbers set as Google Ad Assets in their number-insertion options. CDF lets Google report those calls (and pass keyword/campaign data once the Google Ads integration is live). Keep this lane separate from your website-pool conversions so nothing double-counts.
Building it dormant for launch (Phase 2 readiness)
For this launch, no paid campaigns run on day one — so these call conversions are built, verified with a test, and then left ready. The website pool is live and attributing. The integration is wired. The conversion actions exist. The moment paid switches on, calls start posting as conversions with zero additional setup. If any early data was missed, CallRail’s manual conversion import can backfill calls and forms with a gclid from the past 90 days — a safety net worth knowing about.
Phase 6 — Clarity, Search Console, and the Rest of the Launch Stack
A few more pieces complete the day-one stack.
Microsoft Clarity via GTM (consent-gated, fields masked)
Deploy Clarity through GTM, gated by consent (see Phase 4), with form-field masking turned on. Why masking? Clarity records sessions, and you never want it capturing what people type into a form — names, emails, phone numbers. Masking replaces those keystrokes so recordings stay privacy-safe. Confirm the Clarity tag only fires after the analytics consent signal is granted.
Google Search Console
Set up GSC properly so organic search data is part of your picture:
- Verify the domain (DNS verification is cleanest and covers all subdomains).
- Submit the XML sitemap so Google can crawl and index the new site efficiently — important right after a rebuild.
- Link GSC to GA4 so organic search queries and landing-page performance appear inside GA4 reports.
Why at launch? A rebuilt site needs Google to re-crawl and re-index. Submitting the sitemap and verifying the domain on day one speeds that up and protects organic visibility through the transition.
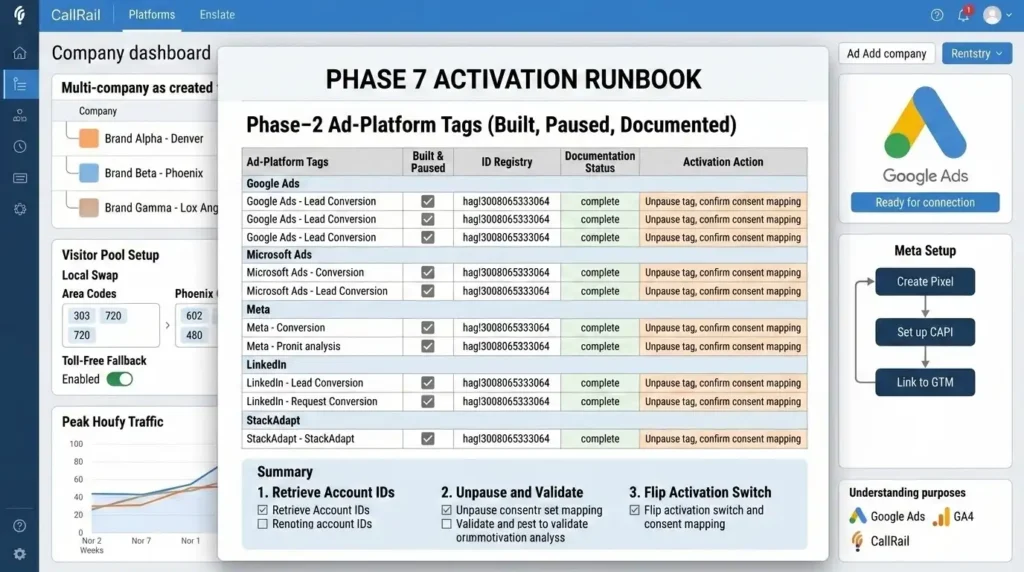
Phase 7 — Phase-2 Ad-Platform Tags (Built, Paused, Documented)
The brief is clear: build the ad-platform conversion tags now, but keep them dormant — no paid is running at launch. The point is that when paid resumes, someone flips a switch instead of starting a project.
For each platform — Google Ads, Microsoft Ads, Meta, LinkedIn, and StackAdapt — build conversion tags that read from your shared lead and call events (the single lead event and qualified-call event from Phase 2), then pause them.
Why build off the shared events? Because you already did the hard part. Every platform tag listens to the same clean signal, so they all agree and there’s nothing new to wire later.
Then document exactly what activation requires for each:
- Reuse existing tag/conversion IDs from the existing accounts (Google Ads, Microsoft UET, LinkedIn Insight Tag, StackAdapt pixel) — note each ID and where it lives.
- Meta needs a Pixel created (and ideally Conversions API later) — flag it as the one that needs setup, not just reactivation.
- For each tag: which trigger fires it, which event it reads, and the one action needed to go live (unpause + confirm consent mapping).
The deliverable is a short activation runbook: “To turn on paid for Brand X, do these three things.” That’s what makes Phase 2 a five-minute job instead of a re-build.
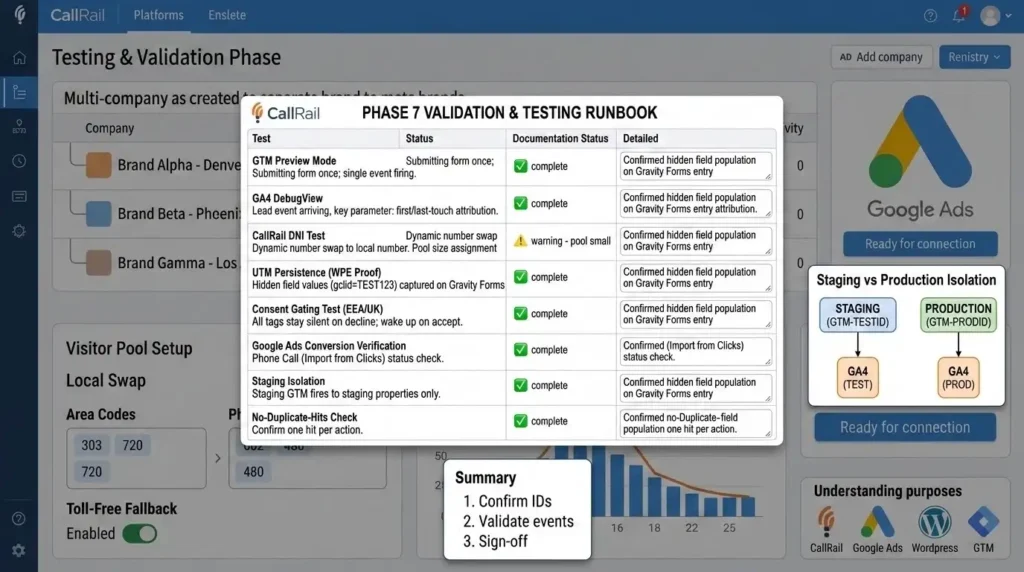
Testing & Validation (Where Good Setups Are Proven)
A setup you haven’t tested is a guess. Here’s the proven QA pass before sign-off.
GTM Preview Mode
- In GTM, click Preview (top right) and connect to the live (or staging) site.
- Confirm base tags fire on Consent Initialization and Container Loaded — and that nothing tracking-related fires before consent for an EEA/UK test profile.
- Run a real test action: submit a Gravity Form, and confirm your single lead event fires once (not twice).
- Watch the consent state change when you accept the banner, and confirm tags that were held now fire.
GA4 DebugView
Open Admin → DebugView and confirm your lead event and qualified-call event arrive, marked as key events, with the right parameters (including your first/last-touch attribution values). Why DebugView? It shows events in real time, so you catch a misfire in seconds instead of waiting a day for reports.
CallRail dynamic-number-insertion test
Visit the site and confirm the pool number swaps correctly (and that Local Swap shows a local number for your area, or the toll-free fallback otherwise). Check the number-assignment table to confirm numbers aren’t being reused too quickly (a sign the pool is too small). Place a test call and confirm it appears, correctly attributed, in the call log.
UTM persistence test (the WP Engine proof)
Land on a page with test parameters — e.g., yoursite.com/?utm_source=test&utm_campaign=qa_test&gclid=TEST123 — then click through to the form page without refreshing. Submit the form. Open the Gravity Forms entry and confirm the hidden fields read test, qa_test, and TEST123. This is the single most important test on WP Engine. If those fields populate, you’ve beaten the cache.
Consent gating test
With an EEA/UK test profile: load the site, decline cookies, and confirm GA4, Google Ads, UET, and Clarity all stay silent (no cookies set, no network hits). Then accept, and confirm all four wake up. Use the UET Tag Helper (check the asc parameter) and Clarity’s console consentStatus object to confirm Microsoft’s two systems respect the choice.
Google Ads conversion verification
Confirm the “Phone Call” conversion action exists with source “Import from clicks” and shows recording status. Since paid is dormant, you’re verifying the plumbing, not live volume — a test call with a gclid in the visit is the way to confirm the path end to end.
Staging isolation
CRITICAL STEP: confirm staging fires nothing to production — no GA4 hits, no real conversions, no Clarity recordings landing in the live property. The cleanest approach is environment-specific GTM settings so staging uses test/blank IDs. Verify by watching the live property’s real-time view while you test on staging: it should stay empty.
No-duplicate-hits check
Across every test, confirm one hit per action. Two GA4 events per form submit, or two conversions per call, means a duplicate tag or container — fix it before launch.
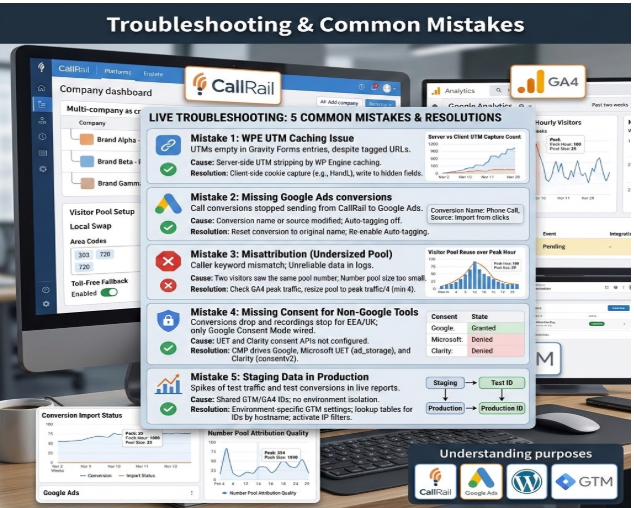
Troubleshooting & Common Mistakes
Five real-world mistakes that break setups like this, each with the fix.
Mistake 1: UTMs are empty on a WP Engine site
- The Problem: Form entries arrive with blank source fields even though the visitor clearly came from a tagged ad URL.
- The Cause: WP Engine strips UTM/click-ID parameters server-side, and the setup relied on server-side capture.
- The Solution: Capture client-side with HandL UTM Grabber loaded in the head before GTM, store in a first-party cookie, and write to Gravity Forms hidden fields. Confirm with the UTM persistence test above.
Mistake 2: Call conversions stopped sending to Google Ads
- The Problem: Calls happen, but Google Ads shows zero (or far fewer) call conversions than CallRail.
- The Cause: Someone renamed the “Phone Call” conversion action or changed its source from “Import from Clicks” — or auto-tagging got switched off, so there’s no gclid to match.
- The Solution: Restore the conversion name and source exactly as CallRail created them, re-enable auto-tagging, and confirm visitor tracking is active. Allow up to 24 hours for changes to register.
Mistake 3: The number pool is too small (misattribution)
- The Problem: A caller’s recorded keyword doesn’t match the actual conversation, or a lead’s visitor timeline makes no sense.
- The Cause: Two visitors saw the same pool number at once because the pool is undersized.
- The Solution: Resize to one-quarter of peak hourly traffic (minimum four), using GA4 to find the true peak hour. Check the number-assignment table and increase the pool if reuse is high.
Mistake 4: Consent wired for Google only
- The Problem: Microsoft Ads conversions drop and Clarity recordings stop for EEA/UK visitors, even though “consent is set up.”
- The Cause: Only Google Consent Mode v2 was configured. UET and Clarity have their own consent APIs and were never wired.
- The Solution: Drive all three from the one CMP — Google Consent Mode v2, Microsoft UET (ad_storage), and Clarity (consentv2). Verify each with its own tool.
Mistake 5: Staging is polluting production data
- The Problem: GA4 shows weird spikes of test traffic, or test conversions appear in live reports.
- The Cause: Staging uses the same GTM/GA4 IDs as production with no environment separation.
- The Solution: Use environment-specific GTM settings (or a lookup table that swaps IDs by hostname) so staging fires to test/blank destinations. Add the internal-IP filter and set it to Active.
Handoff & QA Sign-Off
A clean handoff is what separates a finished job from a “mostly working” one. In MD Niamul’s process, the build is not done until the documentation is done and the client can read their own data.
Snippets and head-placement spec for the developers. Provide exact, paste-ready instructions: the consent default, the CallRail swap script, and HandL must load in the head, before GTM, installed via WPCode or the child theme (not GTM, since they must run before GTM initializes). Specify the precise order and location, so the dev team installs once and correctly.
Post-install QA sign-off. After the developers install, run the full QA pass again on the real site: UTMs persist and populate, consent gating works across all four tools, GA4/Clarity/CallRail fire correctly, no duplicate hits, and staging fires nothing to production.
A short configuration document. A brief, plain-English handoff covering: what’s configured, where it lives, your single source of truth for each conversion, the qualified-call definition, and the three-step runbook to activate each Phase 2 ad platform. Short enough to read, complete enough to act on.
Conclusion
Take a breath — you just built something most multi-location businesses never get right.
You restructured CallRail into clean, per-brand companies with a properly sized website pool and Local Swap, so every visitor sees a local number and every call ties back to its source. You stood up one clean GTM container, a single lead event, and proper call events in GA4 — with first- and last-touch attribution on every form. You beat the WP Engine trap by capturing UTMs client-side, so attribution survives the cache. You made the whole thing compliant with Google Consent Mode v2 and the two systems everyone forgets, Microsoft UET and Clarity. And you wired Google Ads Call Conversion Tracking the right way, so the moment paid switches on, every qualified call posts as a conversion.
Most importantly, you launched measurement-first. No data gap. No “we’ll fix tracking later.” When the phones ring and the forms fill on day one, you’ll know exactly where every lead came from.
Give the live data 24 to 48 hours to settle after launch, confirm the conversions are flowing, then start optimizing on facts instead of guesses. That’s the whole point of doing this properly — decisions you can trust, and ad money that maps to real revenue.
Summary
This guide walks through a complete, consent-compliant marketing analytics and call tracking implementation for a multi-location local-services site on WordPress, Divi 5, and WP Engine. It covers restructuring CallRail into per-brand companies with a properly sized website pool and Local Swap, building one clean GTM container with a single lead event and qualified-call logic in GA4, capturing UTMs client-side to beat WP Engine’s parameter stripping, wiring Google Consent Mode v2 plus Microsoft UET and Clarity from one banner, and setting up Google Ads Call Conversion Tracking via CallRail’s gclid-based integration — all built, tested, and handed off launch-ready.
1. Why capture UTMs client-side on WP Engine?
WP Engine caches pages aggressively for speed, and that caching strips UTM and click-ID parameters server-side. Any attribution logic that runs on the server sees a stripped URL and records “unknown.” Capturing in the browser with a tool like HandL UTM Grabber reads the parameters from the address bar the instant a visitor lands, before caching matters, and stores them in a first-party cookie. That cookie survives across pages and sessions, so the data reaches your forms intact. It is the only reliable approach on a heavily-cached host.
2. How big should my CallRail pool be?
CallRail’s proven rule is one-quarter of your peak hourly traffic, with a minimum of four numbers. If your busiest hour sees 100 visitors, a 25-number pool is enough, because CallRail assigns one number per concurrent visitor and frees it when they leave. Find your peak by charting hourly visitors over the last two weeks in GA4, filtered to the traffic you’re tracking. Undersize the pool and two visitors share a number, which causes misattribution. Seasonal businesses should size to their peak season instead of an average week.
3. Do I need a Google forwarding number for call conversions?
No — and you should not use one here. Google’s forwarding number swaps the number on your page, but CallRail already swaps it with the website pool. Two systems swapping the same number breaks tracking. Instead, let CallRail own website-call attribution: it captures each visitor’s gclid and posts the call to Google Ads as a conversion. Google’s forwarding numbers and Call Details Forwarding are only for call assets and call-only ads, which are a separate lane from website-pool calls.
4. Why isn't Google Consent Mode v2 enough?
Google Consent Mode v2 only governs Google tags — GA4, Google Ads, and Floodlight. It does nothing for Microsoft UET or Microsoft Clarity, which are separate products with their own consent APIs. If you wire only Google’s consent and stop, Microsoft Ads tracking and Clarity recordings can fire without consent for EEA, UK, and Swiss visitors, which violates privacy law and triggers conversion loss. A compliant multi-tool site drives all three consent systems from one banner: Google Consent Mode v2, Microsoft UET, and Clarity ConsentV2.
5. How do I get first and last touch on a form?
Use a client-side capture tool that stores both the original-visit values (first touch) and the most recent values (last touch) in cookies, then write each set into its own group of Gravity Forms hidden fields. HandL UTM Grabber V3 supports both and auto-fills fields whose name, id, or CSS class matches its variables. Add a second set of hidden fields for the first-touch values, and enable Gravity Forms’ native dynamic population as a fallback for direct-landing visitors. Now every entry carries the full journey.
6. Does CallRail need Enhanced Conversions?
No. CallRail’s Google Ads integration posts conversions using the Google click ID (gclid), plus gbraid and wbraid for privacy-restricted clicks. Because it matches on the click ID directly, Enhanced Conversions are not required for CallRail’s calls. Enhanced Conversions are an alternative method using hashed first-party data, and you can run them for other web conversions if you like, but for the CallRail call conversions, the click ID is what does the work. Keep separate goals if you mix both.
7. What is qualified-call logic?
Qualified-call logic filters out junk calls so only real leads count as conversions. A 10-second hang-up or a wrong number should not train your bidding or inflate your reports. In CallRail, you set this with Integration Triggers — rules like “only send calls longer than 30 seconds” or “only first-time callers” to Google Ads. Define the qualified-call standard once, and apply the same definition on both the CallRail side and your Google Ads conversion settings so the numbers reconcile.
8. Why must staging stay isolated from production?
If staging uses the same GTM and GA4 IDs as your live site, every test pageview, form submission, and event lands in your real reports — corrupting your data with traffic that isn’t real. Worse, test conversions can fire to ad platforms. Use environment-specific GTM settings (or a hostname lookup) so staging points to test or blank IDs, add an internal-IP filter set to Active, and verify by watching the live property’s real-time view while testing on staging — it should stay empty.
9. Can missed conversions be backfilled?
Yes, within limits. CallRail offers a Google Ads manual conversion import that reports calls and form submissions that included a gclid within the past 90 days. This is useful if the integration was inactive for a stretch and you need to recover that data. The import skips any conversion already posted with the same click ID, timestamp, and action name, so you won’t create duplicates. It’s a helpful safety net, but the real fix is to have the integration live and verified before traffic starts.
10. What does the developer team need from me?
A precise, paste-ready spec: the consent default snippet, the CallRail swap script, and HandL must load in the document head, before GTM, installed via WPCode or the child theme rather than through GTM, because they must run before GTM initializes. Specify the exact order and placement. After they install, you run a full QA pass on the live site and sign off. This split — you own the measurement architecture and the spec, they own the code installation — is exactly how a configuration role coordinates cleanly with a dev team.
 Need Help Advanced Tracking Setup?