Table of Contents
ToggleQuick Answer
Google Ads conversion tracking for electricians means measuring four things, not one: phone calls from ads, phone calls to the number on your website, lead forms and online bookings, and — most importantly — the closed deal when that lead actually pays you. You set up call reporting and phone call conversion actions inside Google Ads, deploy a Google tag and Conversion Linker through Google Tag Manager (GTM) for form and click tracking, capture the GCLID (Google Click ID — a unique tag Google sticks on every ad click) in your CRM, and use Enhanced Conversions for Leads to import the “closed deal” back into Google Ads. Add Google Consent Mode v2 with Cookiebot so you stay compliant in the EU/UK while still feeding the algorithm clean data. Done right, you stop optimizing for cheap clicks and start optimizing for booked jobs.
Key Takeaways
- The Problem: Most electricians count “form submitted” or “called” as the win. But a phone call is not a booked job, and a booked job is not a paid invoice. Google’s AI then optimizes for the wrong thing.
- Track Four Events: Calls from ads, calls to your website number, online lead forms/bookings, and the closed deal (the real money).
- Calls Are King for Electricians: Use Google call reporting + Google forwarding numbers so every qualifying call is counted as a conversion, with a minimum call length to filter out wrong numbers.
- Close the Loop with the GCLID: Capture the Google Click ID in a hidden field, store it in your CRM, and push it back when the job closes using Enhanced Conversions for Leads.
- Feed the Algorithm Money, Not Clicks: Send a real dollar value with each closed job so Smart Bidding chases revenue, not the cheapest lead.
- Stay Compliant: Consent Mode v2 with Cookiebot keeps EU/UK/EEA traffic legal and recovers lost data through conversion modeling.
Introduction: The $3,000 Question Every Electrician Is Afraid to Ask
Imagine we are sitting down for a coffee, and you slide your phone across the table to show me your Google Ads dashboard. You are proud of it. The numbers look healthy. “Look,” you say, “47 conversions last month. Cost per conversion is only $18. This is working.”
So I ask you one simple question:
“How many of those 47 turned into a job you actually got paid for?”
And the table goes quiet.
This is the moment I have lived through with hundreds of service businesses. The dashboard says you are winning. The bank account is not so sure. The gap between those two things is almost always a conversion tracking problem — and for electricians it is the single most expensive mistake in the entire account.
Here is the painful truth in one line.
Your “conversions” are counting button clicks, not booked jobs.
For a plumber, a roofer, an HVAC tech, or an electrician, the customer journey is messy and offline. Someone in the EEA searches “emergency electrician near me” at 9 PM because half their house just lost power. They click your ad. They do not fill out a tidy form. They call you. You answer, you quote, maybe you book them for the morning, maybe they ghost you. Two days later you show up, do the work, and send a $1,400 invoice. None of that journey shows up in a default Google Ads setup unless you build it on purpose.
In this guide, we are going to fix that permanently. Not with theory — with the exact tracking architecture I deploy for service-business clients. We will set up call tracking the way Google actually supports it in 2026, capture web leads, and then do the part 95% of electricians skip: import the closed deal back into Google Ads so the algorithm finally learns the difference between a tire-kicker and a $1,400 customer. We will also wire up Google Consent Mode v2 with Cookiebot so the whole thing is privacy-compliant for your EU, UK, and EEA traffic.
Grab the coffee. This is the difference between spending on Google Ads and investing in it.
Why You Must Set This Up (Or Keep Burning Money)
Let me be blunt, because your ad budget deserves it.
The Problem: Google’s AI Is Only As Smart As The Data You Feed It
Modern Google Ads runs on Smart Bidding — Google’s machine-learning system that decides how much to bid for each auction. Think of Smart Bidding as a bloodhound. It is incredibly good at finding more of whatever you train it to find. But it has no nose of its own. It learns from the “conversions” you report back.
So if you tell Google that a form fill is a conversion, the bloodhound goes and finds you the cheapest possible form fills. It will happily bring back 100 leads a month — tire-kickers, price-shoppers, people in the wrong city, and the occasional spam bot — because technically those are “conversions” and they are cheap.
You might spend $500 chasing keywords that generate clicks and form fills but zero paying customers. Meanwhile the keyword that brought you three $1,500 panel-upgrade jobs gets less budget, because those jobs never got reported back as conversions worth more.
The Solution: Track The Whole Journey, Value The Real Outcome
Proper conversion tracking does two things. First, it captures every real lead event — calls, forms, bookings — so nothing is invisible. Second, it reports the true value of the ones that close, so Smart Bidding chases revenue instead of cheap noise. When you feed the bloodhound the scent of paying customers, it goes and finds you more paying customers. That is the entire game.
The 5 Benefits of Doing This Right
- Smarter Bidding (Better Algorithm Training). When you import closed deals with real dollar values, Smart Bidding stops optimizing for cheap leads and starts optimizing for revenue and profit. This is the single biggest performance lever in a service-business account. One client moved from a flat “lead” goal to a “deal closed” value goal and watched their cost-per-acquired-customer drop while job size went up — because the system finally understood which clicks were worth paying more for.
- Honest ROI and ROAS (Accurate Reporting). You will finally be able to answer the only question that matters: for every dollar I put into Google Ads, how many dollars come back? When tracking is tied to closed-job value, your ROAS (Return On Ad Spend) is real, not a vanity number based on form fills. You can sit in a meeting and say “this campaign returns 6x” and mean it.
- Know Which Keywords Make You Money. Default tracking tells you which keyword got the click. Full tracking tells you which keyword got the paid invoice. “Emergency electrician” and “electrician cost” might look identical on clicks, but one closes at 40% and the other at 4%. You cannot see that without closing the loop — and once you can, you reallocate budget with confidence.
- Build Better Audiences (Retargeting and Lookalikes). Clean conversion data feeds Google’s audience systems. When Google knows who your real customers are, it can find more people like them. Your remarketing and broad-match campaigns get sharper because the signal underneath them is accurate, not polluted with junk leads.
- Future-Proofing (Privacy and Compliance). Cookies are dying and privacy laws are tightening. By 2026, EU, UK, and EEA traffic legally requires consent before tracking, and Google enforces it. Setting up Consent Mode v2 with Cookiebot plus server-friendly, first-party tracking means your measurement survives browser restrictions and regulations — and Google’s conversion modeling recovers a large chunk of the data you would otherwise lose from users who decline cookies.
The Four Conversions Every Electrician Must Track
Before we touch a single setting, you need the mental model. An electrician’s marketing does not have one conversion. It has four, and they sit at different depths of the funnel. Here is the framework I use on every service account.
Conversion 1: Calls From Ads (Top Of Funnel, Highest Volume)
This is a customer tapping the phone number directly in your ad on their mobile — from a call asset (the clickable phone number Google adds to your search ad) or a call ad. For electricians this is huge, because emergencies happen on phones. This is the easiest to set up and usually your highest-volume conversion.
Conversion 2: Calls To Your Website Number (Middle Of Funnel)
This is a customer who clicked your ad, landed on your website, read a bit, then called the number shown on the site. These callers are often more qualified because they did a little research first. Google tracks these with a dynamic forwarding number that temporarily replaces your real number for ad visitors.
Conversion 3: Web Leads — Forms and Online Bookings (Middle Of Funnel)
Not everyone calls. Some people fill out a “Request a Quote” form, book a slot through a scheduling tool, or start a chat. These are real leads and must be tracked as conversions — but they are also where the GCLID capture happens, which is the seed we plant now to harvest the closed-deal conversion later.
Conversion 4: The Closed Deal (Bottom Of Funnel, The Only One That Pays Rent)
This is the conversion almost nobody tracks, and it is the one that changes everything. The lead became a booked, completed, paid job. This event lives in your CRM or job-management software (Jobber, ServiceTitan, HubSpot, a spreadsheet — whatever you use), not on your website. We import it back into Google Ads as an offline conversion using Enhanced Conversions for Leads, tied to the GCLID we captured in Conversion 3.
This is the “service call to closed deal” promise in the title. Conversions 1–3 are the service calls. Conversion 4 is the closed deal. The magic is connecting them.
Prerequisites & Checklist (Gather These Before You Start)
Do not start clicking until you have these in hand. Half of all “tracking is broken” tickets I get are really “we skipped a prerequisite” tickets.
Accounts and access you need:
- A Google Ads account with admin / edit access. You cannot create conversion actions as a standard user.
- A Google Tag Manager (GTM) account and container installed on your website. GTM is the control panel that lets you add tracking tags without editing site code every time. If it is not installed yet, install it first.
- Access to edit your website (or a developer who can), so the GTM container snippet and a hidden form field can be added.
- Your CRM or job-management software (Jobber, ServiceTitan, Housecall Pro, HubSpot, Salesforce, Zoho, GoHighLevel, or even a Google Sheet) where you track jobs from lead to paid.
- A Cookiebot account (the consent banner tool) if you serve EU, UK, or EEA visitors. A 14-day trial is enough to set it up.
Settings to confirm first:
- Auto-tagging is ON in Google Ads. Where to find it: Google Ads → Admin → Account settings → Auto-tagging. This is non-negotiable — auto-tagging is what creates the GCLID on every click. Without it, offline conversion import is impossible.
- Your business is in an eligible country for Google forwarding numbers (the US, Canada, UK, Australia, and many others qualify). Call tracking depends on this.
Tools you will use to test:
- GTM Preview Mode (built into GTM) — to watch tags fire in real time.
- Google Tag Assistant — to confirm the Google tag is live and healthy.
- Google Ads conversion diagnostics and the Enhanced Conversions diagnostics report — to confirm data is flowing.
Got all that? Good. Let’s build.
Video tutorial – Google Ads Conversion Tracking for Electricians
Step-by-step video guide to Google Ads Conversion Tracking for Electricians for accurate reporting.
The Step-By-Step Implementation Guide
We will build this in five phases. Do them in order — each one depends on the last. I will tell you exactly which tags, triggers, and settings to use, in plain English.
Phase 1: Lay The Foundation (Google Tag + Conversion Linker)
Before any individual conversion works, your site needs two foundational pieces of plumbing. Skip these and everything downstream breaks intermittently — the worst kind of bug.
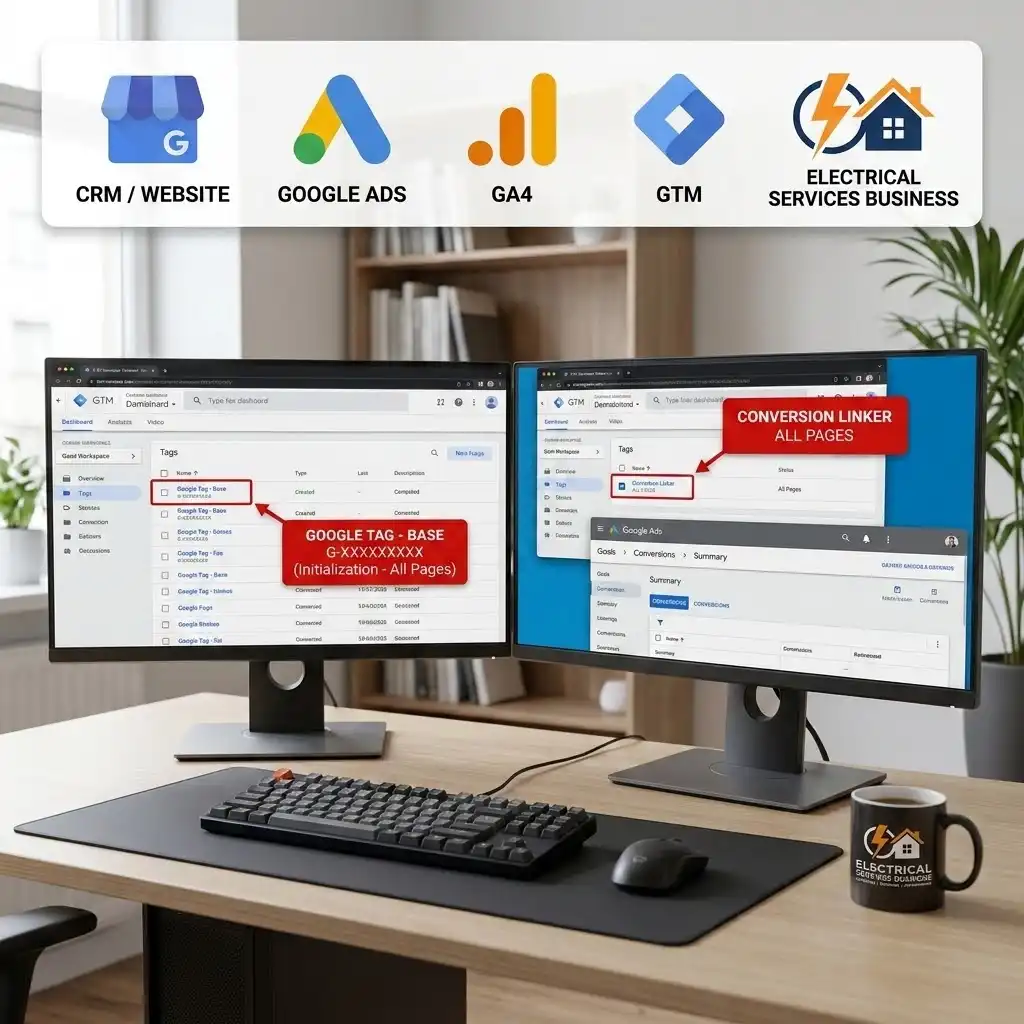
Step 1 — Confirm your Google Tag Manager container is live. Open your website and use Tag Assistant to confirm the GTM container fires on every page. Why? GTM is the single container that will hold all your tracking tags. If it is not firing site-wide, nothing else will.
Step 2 — Create the base Google Tag in GTM. In GTM, go to the left menu and click Tags, then the blue New button. Choose Google Tag as the tag type. Enter your Google Tag ID (it looks like AW-XXXXXXXXX for Google Ads or G-XXXXXXXXX for GA4). Set the trigger to Initialization – All Pages.
- Name it: Google Tag – Base (Ads + GA4)
- Why? This is the foundation tag that loads Google’s tracking library and enables Enhanced Conversions later.
Step 3 — Add the Conversion Linker tag. Click New again, choose Conversion Linker as the tag type, and set its trigger to All Pages.
- Name it: Conversion Linker – All Pages
- CRITICAL STEP. The Conversion Linker is the tag that reads the GCLID from the ad-click URL and stores it in a first-party cookie so it survives across pages. What happens if you skip it? Your conversions get attributed poorly or not at all, because the click identifier gets lost the moment the visitor navigates to a second page. The good news: the Conversion Linker has built-in consent checks, so it plays nicely with Consent Mode v2.
Step 4 — Publish the container. In the top right of GTM, click the blue Submit button, name the version (e.g., “Foundation: Google Tag + Conversion Linker”), and publish. Why? Changes in GTM are invisible to your live site until you publish.
Foundation done. Now the fun part.
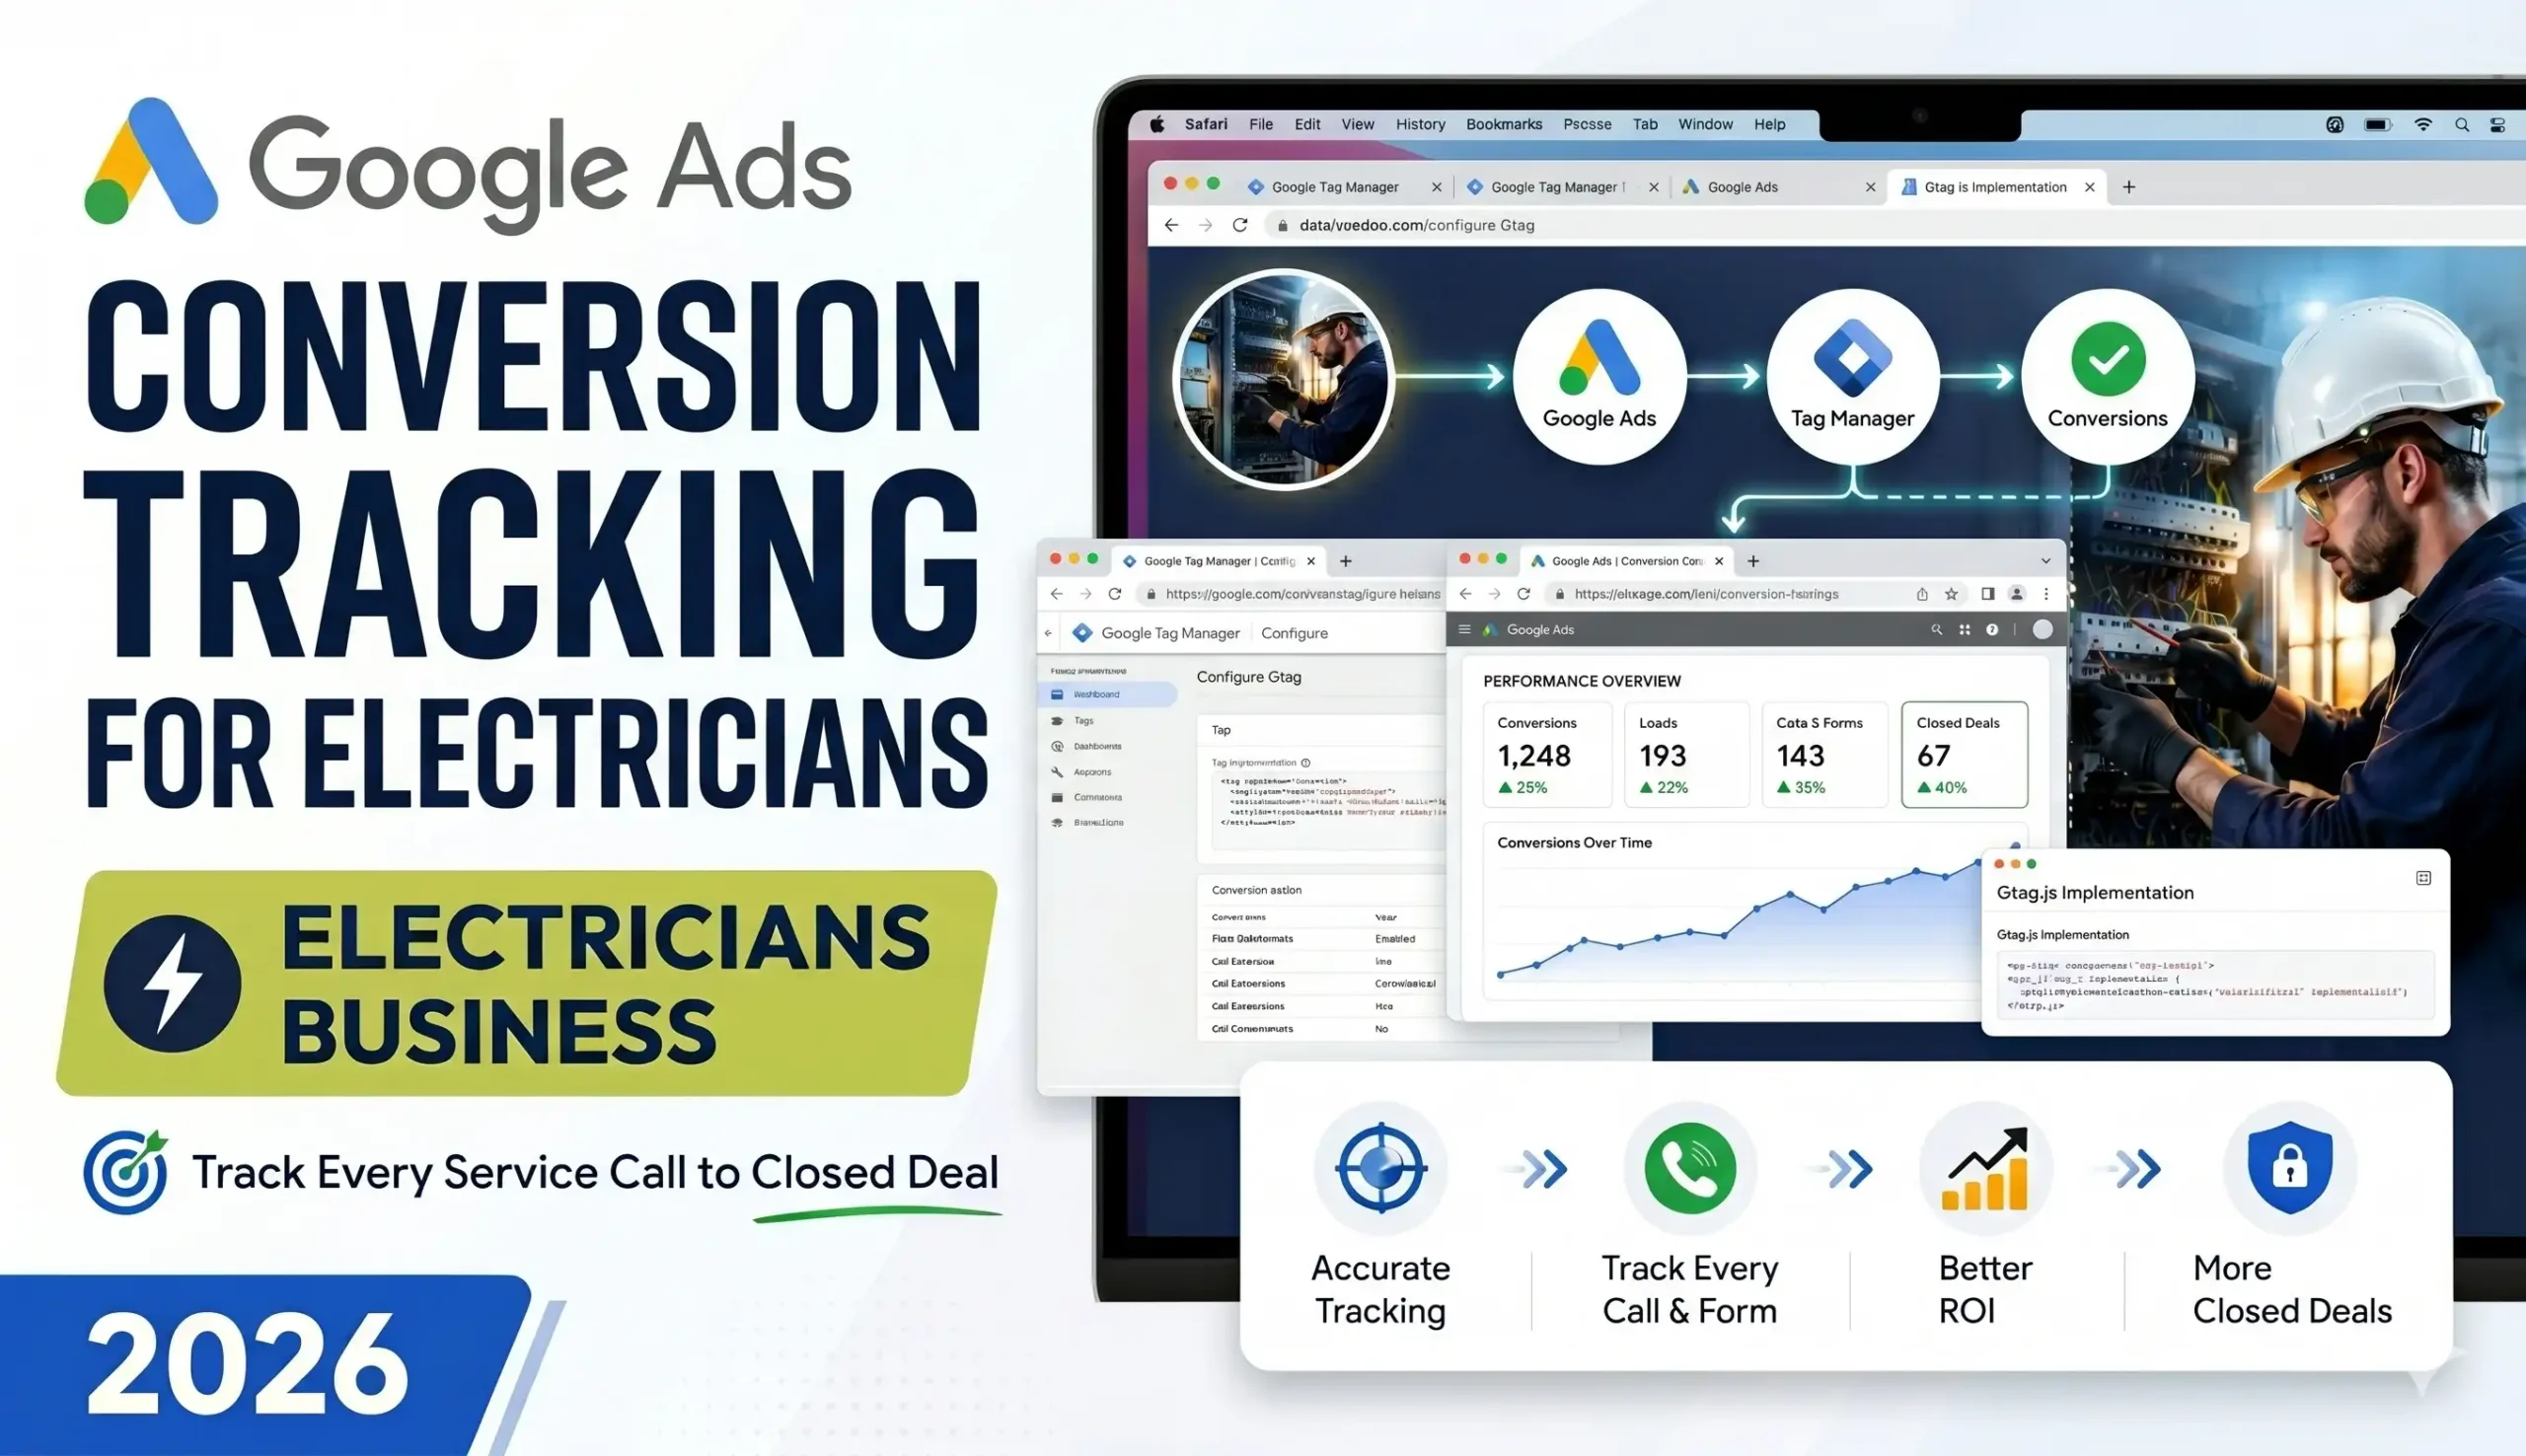
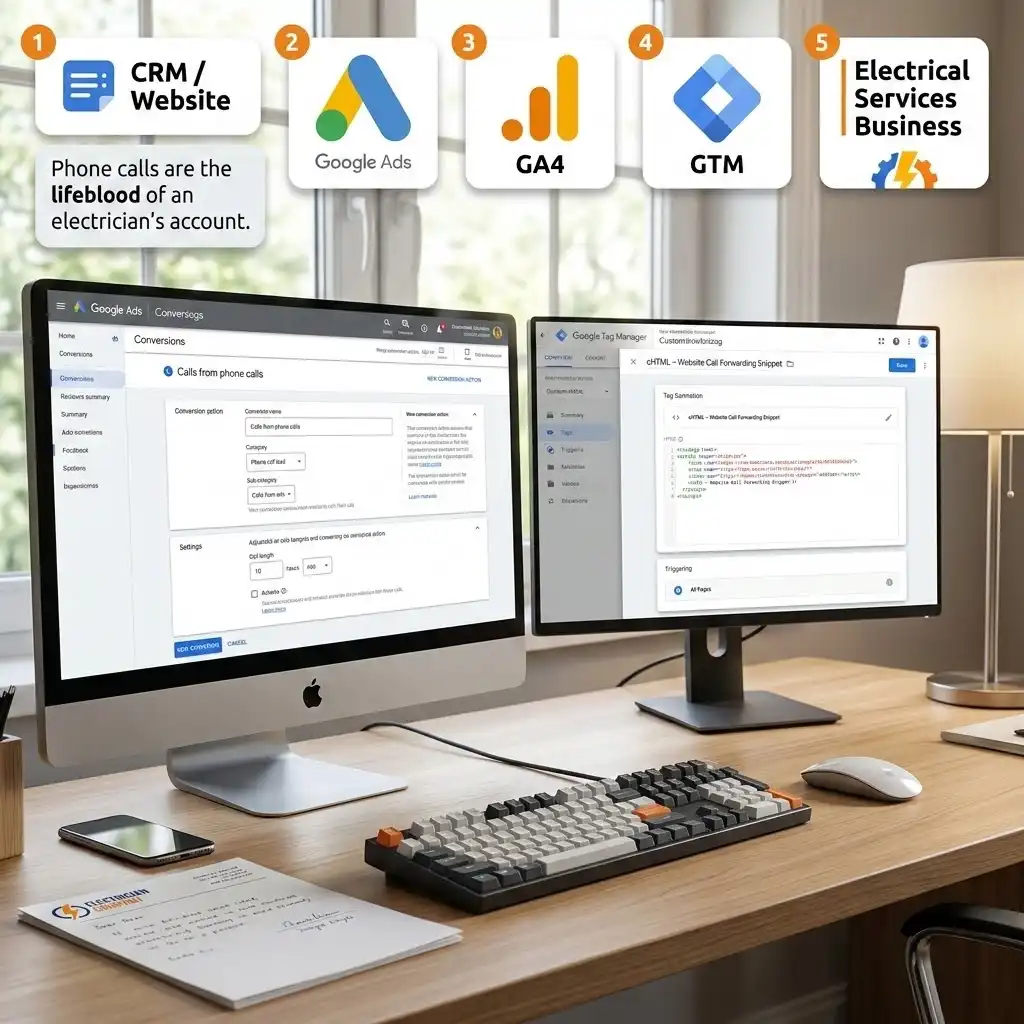
Phase 2: Track Phone Calls (The Lifeblood Of An Electrician’s Account)
Calls are where electricians live. We will set up two call conversion actions: calls from ads, and calls to your website number. Both rely on call reporting and Google forwarding numbers.
A Google forwarding number is a temporary phone number Google shows to ad visitors instead of your real one. When someone calls it, Google logs the call (duration, time, which campaign) and instantly routes it to your real line — the customer never notices. Think of it as a call-tracking middleman that takes notes and then connects the call.
Step 1 — Turn on call reporting. In Google Ads, go to Admin → Account settings, find the Call reporting section, and switch it On. Why? This single switch enables Google forwarding numbers across your call assets and website call tracking. Without it, native call tracking cannot work. If you operate in the US or Canada, also consider enabling call recording, because Google can use AI to evaluate call quality and count only high-intent calls as conversions.
Step 2 — Create the “Calls from ads” conversion action. Go to Goals → Conversions → Summary, click + Create conversion action, and choose Conversions from phone calls. Select Phone call lead as the category, then choose Calls from ads.
- Set a minimum call length — I usually start electricians at 30–60 seconds. Why? A real “can you come fix my outlet” call lasts longer than a misdial. This filter screens out accidental taps and 5-second hang-ups so your conversion data stays clean.
- Note: Once call reporting is on, Google may auto-create a “Calls from ads” action and add it to your Conversions column automatically.
Step 3 — Add a call asset to your ads. Heads up for 2026: classic call-only ads are being retired, and Google now wants the phone number added as a call asset on your Responsive Search Ads (RSAs). In Google Ads, go to your campaign → Assets → + → Call asset, add your business phone number, and set it at the account, campaign, or ad group level depending on your routing.
- CRITICAL STEP. Use call scheduling so your number only shows during hours you can actually answer. Why? A missed emergency call is a lost job and a wasted ad click. Do not advertise a call you cannot take.
Step 4 — Create the “Calls from website visits” conversion action. Back in + Create conversion action → Conversions from phone calls, choose Calls from website visits. Define the event as Someone calls a number shown on my website and enter your phone number. Google will give you a phone snippet that swaps your displayed number for a dynamic forwarding number for ad visitors.
- Add that snippet through GTM as a Custom HTML tag named cHTML – Website Call Forwarding Snippet, triggered on All Pages (after your base Google Tag).
- Why? This is how a visitor who browses your site and then calls gets correctly attributed to the ad and keyword that brought them. These are often your most qualified callers.
Step 5 — Set your call values. For both call actions, assign a value. If you do not yet know your closed-call value, start with a conservative estimate of an average job’s profit, or use a “same value for each conversion” placeholder. Why? Even a rough value helps Smart Bidding weigh calls against form leads sensibly. You will refine this once closed-deal data flows in Phase 4.
Phase 3: Track Web Leads And Capture The GCLID (The Seed For Closed Deals)
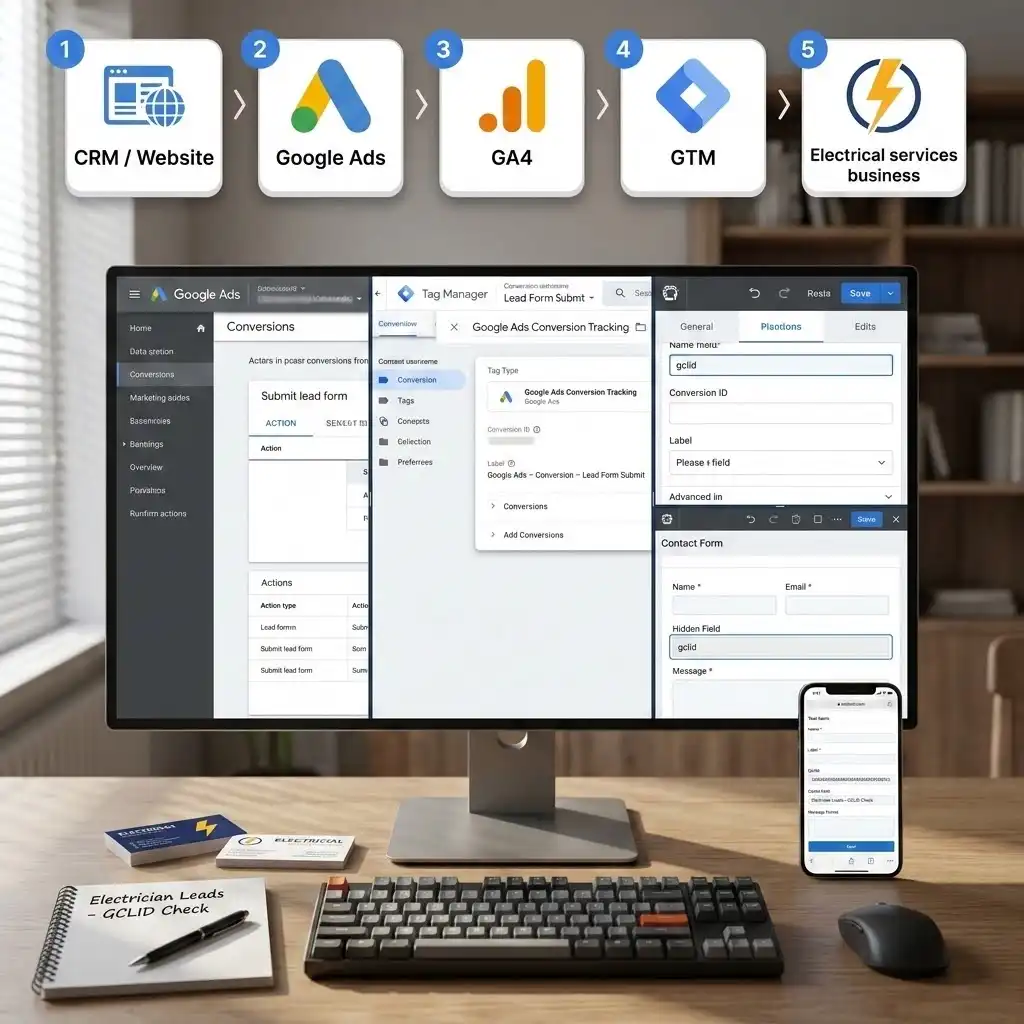
Now we handle the people who do not call — they fill out a form or book online. We do two jobs at once here: count the lead as a conversion, and capture the GCLID so we can close the loop later.
Step 1 — Create a “Submit lead form” conversion action. In Goals → Conversions → + Create conversion action, choose Website, then the category Submit lead form (or Book appointment if that fits better). Google gives you a conversion ID and conversion label — note them, you will need them in GTM.
Step 2 — Build the GTM tag for the form submission. In GTM, click Tags → New → Google Ads Conversion Tracking. Enter the Conversion ID and Conversion Label from Step 1.
- Name it: Google Ads – Conversion – Lead Form Submit
- For the trigger, use a Form Submission trigger, or — more reliably for modern sites — a Custom Event trigger that fires on your form tool’s “success” or “thank you” event. Many form builders and booking tools redirect to a thank-you page; in that case, use a Page View trigger that fires only on that thank-you URL.
- Why the thank-you-page method is safest: it only fires when the lead truly completed, so you do not count abandoned forms.
Step 3 — Capture the GCLID into a hidden form field. This is the quiet hero of the whole system. When someone clicks your ad, Google appends a GCLID (Google Click ID) to your landing-page URL — a long parameter like gclid=Cj0KCQ…. We need to grab that value and store it with the lead so it travels into your CRM.
- Add a hidden field named gclid to your lead form. Most form builders (Gravity Forms, WPForms, HubSpot, Webflow, Jotform, native CRM forms) support a hidden field that auto-populates from the URL query string. Map it to the URL parameter gclid.
- CRITICAL STEP. Confirm the hidden field actually fills on mobile. Some form builders strip query parameters during mobile redirects — and most electrician leads are on mobile. Test on a real phone by clicking a test URL with ?gclid=test123 and checking the submitted record.
- What happens if you skip this? No GCLID means no offline conversion import. The “closed deal” loop is dead before it starts.
Step 4 — Store the GCLID in your CRM. Make sure your form passes the gclid value into a dedicated field on the contact/lead record in your CRM. Every job that originated from Google Ads should now carry its GCLID like a tracking barcode through your whole sales process. Why? When the job closes weeks later, that stored GCLID is how Google knows which ad click earned the money.
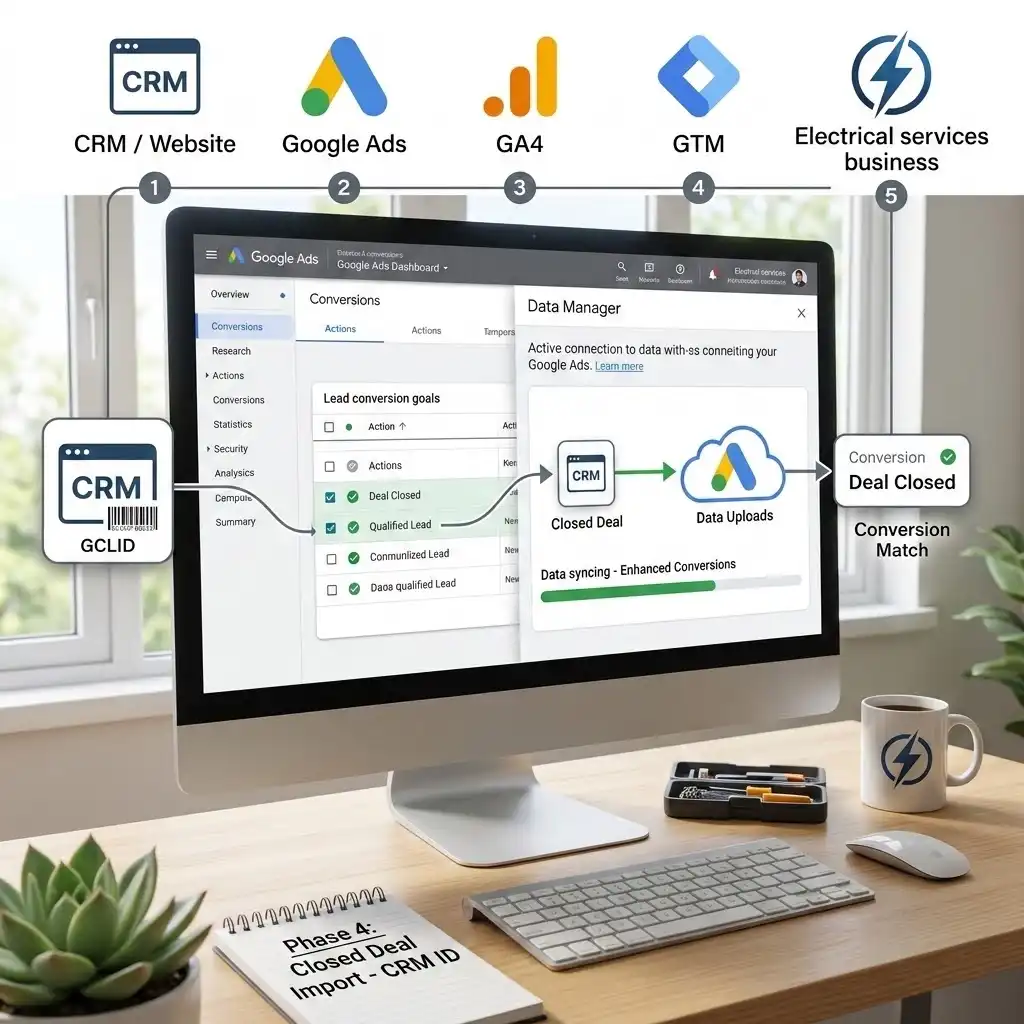
Phase 4: Import The Closed Deal (Enhanced Conversions For Leads)
This is the phase that separates a hobbyist from a pro. We take the paid job sitting in your CRM and send it back to Google Ads, tied to the original click. This is Enhanced Conversions for Leads — Google’s upgraded version of offline conversion import that uses both the GCLID and hashed first-party data (email, phone) to match the conversion back to the ad.
Step 1 — Create the offline conversion actions. In Goals → Conversions → + Create conversion action, create the lead-stage actions you want to optimize toward. For most electricians I create two:
- Qualified Lead — the lead is real and in your service area (small value).
- Deal Closed — the job is booked, completed, and paid (the real dollar value).
- For the conversion goal, use the Qualified or Converted lead goal types, which exist specifically for offline lead-gen measurement.
- CRITICAL STEP. The conversion action name is case-sensitive and must match exactly what you upload later. Deal Closed and deal closed are two different things to Google. Pick a convention and never deviate.
Step 2 — Turn on Enhanced Conversions for Leads. In Goals → Settings, find the Enhanced conversions for leads section, check the box to turn it on, accept the customer-data terms, and choose your method. The two practical routes in 2026 are:
- Google Ads Data Manager (the recommended, easiest path) — connect a data source and let it pull conversions automatically.
- Google Tag Manager — configure your Google tag to capture hashed user-provided data (like the email or phone from your lead form) on the website.
Step 3 — Connect your CRM for automatic uploads. The cleanest setups push closed deals to Google automatically. In Google Ads Data Manager, you can connect sources like HubSpot, Salesforce, BigQuery, Snowflake, Google Sheets, SFTP, or Zapier. When a job is marked “paid” in your CRM, an automation (Zapier, Make, or a native connector) sends Google the GCLID, the conversion action name, the conversion time, the value, and the hashed email/phone.
- Important 2026 change: Google is migrating offline and Enhanced Conversions for Leads uploads to the Data Manager API, and legacy Google Ads API uploads are being blocked from June 15, 2026. If you are setting this up new, start with Data Manager so you are on the current rails, not the deprecated ones.
- If you prefer manual control or have low volume, you can still export a spreadsheet of closed jobs (GCLID + conversion name + time + value) and upload it. It works, but it does not scale much past a few dozen a month.
Step 4 — Send a real value, and mind the time window. Always send the actual job value (or your average closed-job profit) with each upload. Why? This is what flips Smart Bidding from “find cheap leads” to “find profitable jobs.” Also remember the attribution window: conversions tied to a click older than the window (commonly around 63–90 days for these imports) will not be accepted. Most electrical jobs close fast, so this is rarely a problem — but a slow-quoting customer can fall outside it, so upload promptly.
Step 5 — Use an order ID to prevent duplicates. When you upload, include a unique order ID (your invoice or job number). Why? Google uses it to avoid double-counting the same closed deal if your automation runs twice. Clean data in, clean optimization out.
Phase 5: Stay Legal With Consent Mode v2 And Cookiebot
If any of your visitors are in the EU, UK, or EEA, you are legally required to get consent before tracking — and since 2025 Google actively enforces this. If you ignore it, Google can throttle your remarketing, conversion tracking, and personalized ads. The fix is Google Consent Mode v2 paired with Cookiebot, a Google-certified consent banner.
What Consent Mode v2 actually does (in plain English): it is a privacy-safe middle ground. Instead of “track everything” or “track nothing,” Consent Mode lets Google’s tags adjust their behavior based on the visitor’s choice. If a visitor declines cookies, your tags do not store identifiers — but Google can still use anonymous, cookieless signals to model the conversions you would have otherwise lost. You stay compliant and keep most of your data.
Consent Mode v2 controls four signals:
- ad_storage — can Google store advertising cookies?
- analytics_storage — can Google store analytics cookies?
- ad_user_data — can the user’s data be sent to Google for advertising?
- ad_personalization — can the data be used for personalized ads / remarketing?
Cookiebot maps your banner’s “Marketing” category to ad_storage, ad_user_data, and ad_personalization, and the “Statistics” category to analytics_storage. You do not have to hand-code any of this — the Cookiebot template handles it.
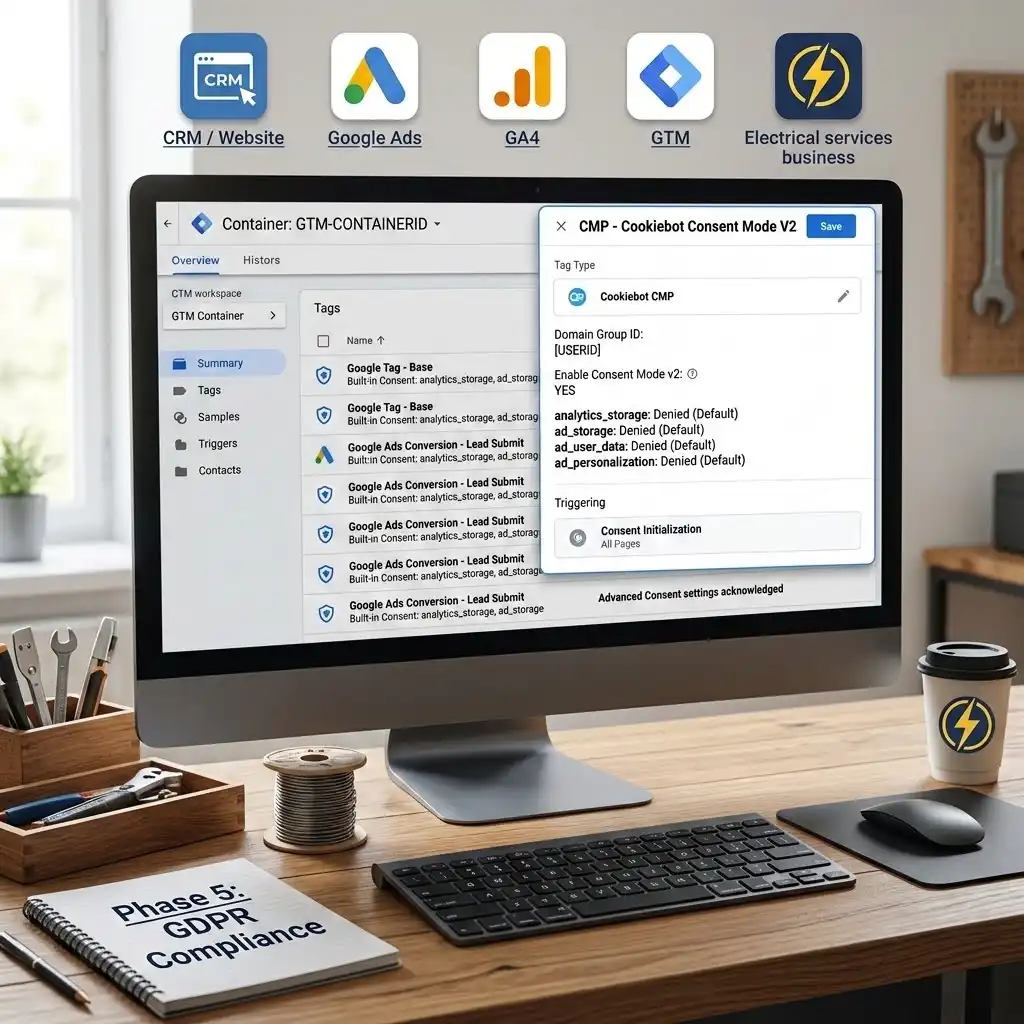
Step 1 — Create your Cookiebot account and add your domain. Sign up at Cookiebot, add your website domain, let it scan and categorize your cookies, and customize the banner to match your brand. Copy your Domain Group ID — you will need it in GTM.
Step 2 — Add the Cookiebot CMP tag in GTM. In GTM, go to Templates → Search Gallery, search Cookiebot, and add the Cookiebot CMP template to your workspace. Then click Tags → New → Cookiebot CMP, paste your Domain Group ID, and — CRITICAL STEP — set the trigger to Consent Initialization – All Pages.
- Name it: CMP – Cookiebot Consent Mode V2
- Why the Consent Initialization trigger? This special trigger fires before every other trigger, including All Pages. It guarantees your default “denied” consent state is set before any Google tag has a chance to fire. What happens if you skip it? You get a race condition — tags fire before consent is read, you leak data without permission, and Tag Assistant flags “a tag read consent before a default was set.” That is the most common Consent Mode bug there is.
Step 3 — Set regional defaults to “denied” for the EEA/UK. Inside the Cookiebot template, configure the default consent state as denied for EEA, UK, and Switzerland country codes, and set your other regions as your legal counsel advises. Why? EU/UK law requires opt-in; the default before a choice must be “denied.” Google’s compliance bots crawl your site, and if they see a “granted” default for an EEA IP, they flag your account as non-compliant.
Step 4 — Enable Consent Overview and acknowledge your Google tags. In GTM, go to Admin → Container Settings and tick Enable consent overview. Then open the Tags section and click the consent (shield) icon. Google’s own tags — Google tag, Google Ads conversion, and Conversion Linker — have built-in consent checks, so you simply acknowledge them. For any third-party tag without built-in checks (a chat widget, a Meta pixel), add an additional consent check so it only fires when Marketing consent is granted.
Step 5 — Keep the GCLID/closed-deal loop compliant. Because your offline conversions rely on first-party data the customer gave you (their email, phone, and the GCLID from their own click), this loop stays compliant as long as your banner discloses it and the user consented. Why mention it? Consent is not only a website-tag issue — it covers the data you later upload too. Disclose it in your privacy policy and you are clean.
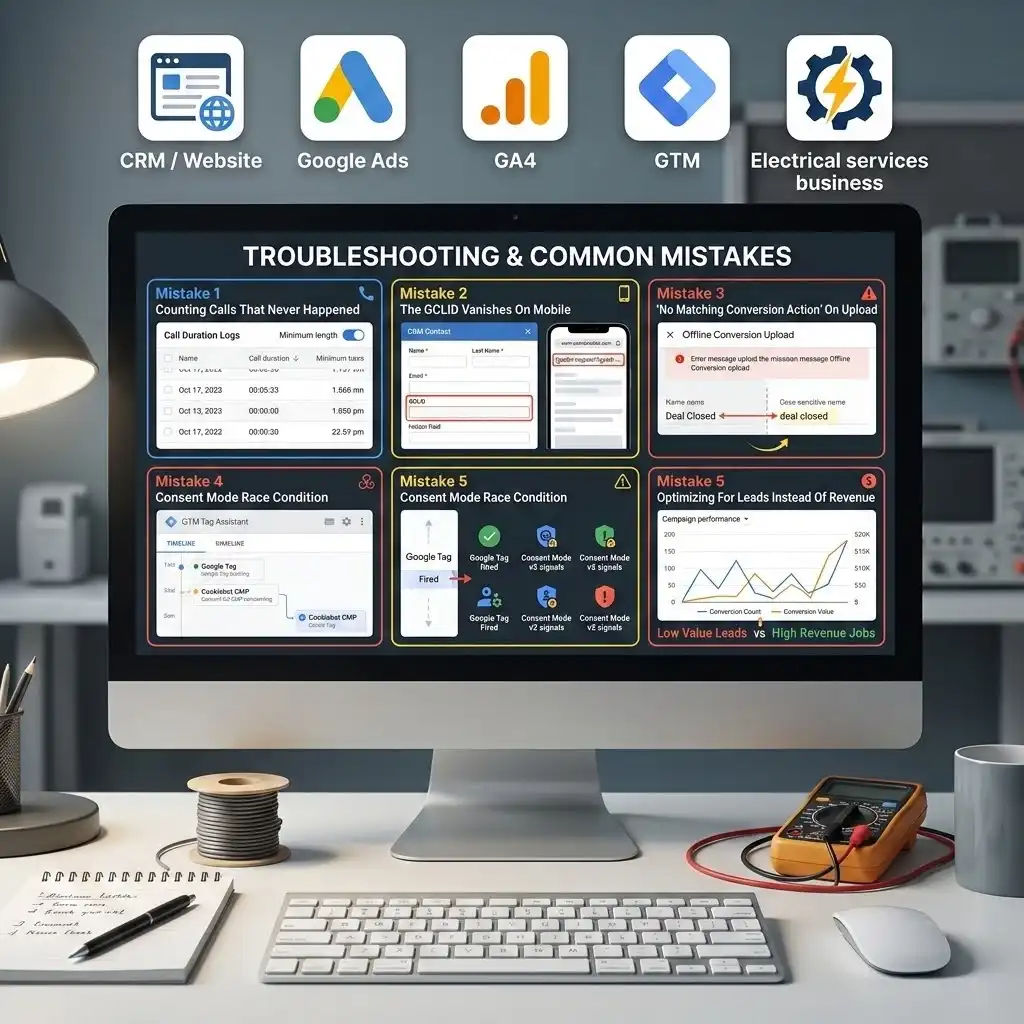
Testing & Validation (Trust Nothing Until You See It Fire)
A tracking setup you have not tested is a tracking setup that is broken. I have never once deployed an account where every tag worked perfectly on the first try. Here is exactly how to verify each piece.
Test 1: Verify The Foundation In GTM Preview Mode
In GTM, click the Preview button (top right). Enter your website URL and connect. Your site opens with the Tag Assistant debug panel attached.
- On the very first event (Consent Initialization), confirm your Cookiebot CMP tag fired and that the consent state shows your defaults.
- On Container Loaded / Page View, confirm Google Tag – Base and Conversion Linker – All Pages fired.
- Why this order matters: consent first, then the base tags. If your base tags fire before Consent Initialization, go back to Phase 5 — your trigger is wrong.
Test 2: Verify The Lead Form Conversion
Still in Preview Mode, fill out and submit a test lead form (use a fake but realistic email). Watch the debug panel:
- Confirm Google Ads – Conversion – Lead Form Submit fired on submission (or on the thank-you page).
- Check the network/tag detail to confirm the Conversion ID and Label are correct.
- Open the submitted record in your CRM and confirm the hidden gclid field captured a value when you visit with a ?gclid=test123 test URL. No GCLID in the record = the closed-deal loop will fail. Fix this now.
Test 3: Verify Call Tracking
Call tracking cannot be fully tested in Preview Mode because it depends on live forwarding numbers. Instead:
- After your ads are live, search for your own ad (or use the Ad Preview tool to avoid skewing data), and confirm a Google forwarding number is displayed on your ad and on your website for ad visitors.
- Make a real test call that lasts longer than your minimum call length, then check Google Ads → Goals → Conversions (allow a few hours) and the Call details report under Reports → Predefined reports → Call details to confirm the call was logged with duration.
Test 4: Verify Enhanced Conversions For Leads
- Go to Goals → Conversions, open your Deal Closed action, and check the Enhanced conversions diagnostics / status. It should show your method (Data Manager or GTM) as active and report a match rate once data flows.
- Run a small test upload (one closed deal with a real GCLID) and confirm it appears in the upload history / diagnostics with no errors. A healthy match rate is typically above 50–70%; consistently low rates point to lost GCLIDs or formatting issues.
Test 5: Verify Consent Behavior (Both Paths)
Test both journeys, because they behave differently:
- Accept cookies: confirm tags fire normally and consent shows granted in Tag Assistant.
- Reject cookies: confirm advertising tags respect the denied state and that Google still receives the cookieless modeling pings. Both paths must be clean before you publish.
Conclusion: You Just Built A Money Machine, Not A Click Counter
Take a breath and look at what you have built. You are no longer counting button clicks and calling it success. You are tracking every call from your ads, every call to your website, every web lead, and — the part almost nobody does — every closed, paid job, fed back to Google so the algorithm finally optimizes for revenue. On top of that, your whole setup is privacy-compliant with Consent Mode v2 and Cookiebot, so your EU and UK traffic is legal and your data survives the cookieless future.
This is the difference between an electrician who spends on Google Ads and one who invests in it. The first one hopes. The second one knows their ROAS to the dollar and scales with confidence.
Give the system 24 to 72 hours to start populating, confirm your match rates look healthy, and then do the most satisfying thing in all of paid advertising: stop guessing and start optimizing on facts. Your budget will thank you, and so will your bank account.
Summary
This guide shows electricians how to set up complete Google Ads conversion tracking in 2026 — beyond simple clicks and form fills. You learn to track four events: calls from ads, calls to your website number, web leads, and the closed, paid job. Using Google Tag Manager, a Conversion Linker, GCLID capture in your CRM, and Enhanced Conversions for Leads, you feed Google real revenue so Smart Bidding chases profitable jobs, not cheap leads. Consent Mode v2 with Cookiebot keeps it all privacy-compliant.
1. What is the GCLID?
The GCLID (Google Click ID) is a unique tag Google automatically adds to your landing-page URL every time someone clicks your ad — but only if auto-tagging is turned on. It looks like gclid=Cj0KCQ…. Think of it as a barcode stuck on each ad click. When you store that barcode with the lead in your CRM and later send it back to Google with the closed-deal value, Google can match the paid job to the exact click, ad, and keyword that earned it. Without the GCLID, offline conversion import is impossible.
2. Do I need GA4 for this?
Not strictly for Google Ads conversion tracking — the call actions, web lead actions, and offline imports all live inside Google Ads. But GA4 (Google Analytics 4) is strongly recommended alongside it. GA4 shows you the full picture of user behavior on your site, lets you build richer audiences, and can receive call-outcome events from a call-tracking platform. For most electricians, running both Google Ads conversion tracking and GA4 together gives the cleanest measurement and the best optimization signals.
3. How do I track phone calls specifically?
You enable call reporting in your Google Ads account settings, which lets Google show a forwarding number that records call data before connecting the caller to you. Then you create two conversion actions: Calls from ads (number tapped directly in the ad) and Calls from website visits (number called after landing on your site). Set a minimum call length of 30–60 seconds so misdials and hang-ups do not count. Calls longer than that threshold are counted as conversions automatically.
4. What is Enhanced Conversions for Leads?
It is Google’s upgraded version of offline conversion import. Standard offline import matches a closed deal back to an ad using only the GCLID. Enhanced Conversions for Leads adds hashed first-party data — the customer’s email and phone, scrambled for privacy — as extra match keys. This recovers conversions where the GCLID was lost and improves match rates. For electricians, it means more of your truly-closed jobs get correctly attributed, which makes Smart Bidding smarter and your reporting more accurate.
5. Is Consent Mode v2 mandatory for me?
If you have any visitors from the EU, UK, or EEA, then yes — it is effectively mandatory, and Google enforces it. Consent Mode v2 lets your Google tags adjust to each visitor’s cookie choice, and pairing it with a certified banner like Cookiebot keeps you legal under GDPR and the Digital Markets Act. If you serve only US/Canada/Australia traffic, the legal pressure is lighter, but setting it up is still smart future-proofing as privacy laws spread. There is no downside to being compliant.
6. How long until I see data?
Foundation tags (Google tag, Conversion Linker, form conversions) start logging within minutes once published and tested. Call conversions usually appear within a few hours of a qualifying call. Offline closed-deal imports appear after your first upload runs — manual uploads are near-immediate; automated CRM connectors typically sync on a schedule. Give the whole system 24 to 72 hours to populate before you judge performance, and remember Smart Bidding needs a couple of weeks of conversion data to fully retrain.
7. Will tracking slow down my website?
No, not meaningfully. Google Tag Manager loads asynchronously, meaning it runs in the background without blocking your page from displaying. The tags themselves are lightweight. The only thing to watch is too many third-party tags piling up in one container over time. Keep your container tidy, remove tags you no longer use, and your site speed will be fine. Clean tracking and fast pages are not in conflict.
8. Can I track jobs from my CRM automatically?
Yes, and you should. Using Google Ads Data Manager, you can connect sources like HubSpot, Salesforce, BigQuery, Google Sheets, SFTP, or pipe data through Zapier or Make. When a job is marked “paid” in your CRM, the automation sends Google the GCLID, conversion name, time, value, and hashed email/phone — no manual spreadsheet work. This is the scalable way to run closed-deal tracking once your volume grows past a few dozen jobs a month.
9. What value should I assign to a call?
Start with your average closed-job profit multiplied by your call-to-close rate. For example, if an average job nets you $300 profit and roughly one in three qualifying calls closes, a reasonable starting call value is around $100. It does not need to be perfect on day one — a rough, consistent value still helps Smart Bidding weigh calls against form leads. Once your Deal Closed offline conversions flow in, you can rely on real job values and lean less on estimates.
10. Why are my conversions and my actual jobs different numbers?
This is normal and expected. Google Ads conversions count reported events within an attribution window and model some of them; your CRM counts completed jobs. Differences come from attribution windows, modeled conversions from consent-declining users, calls that did not meet the minimum length, leads still in your pipeline, and view-through conversions. The goal is not for the two numbers to match exactly — it is for the trend to be reliable so you can make confident budget decisions. If the gap is wildly large, revisit your GCLID capture and match rates.
 Need Help Advanced Tracking Setup?