Quick Answer
Google Ads conversion tracking for roofing companies means measuring the full path from ad click to signed roof — not just form fills. You do it in four layers: (1) track website leads (form submissions and click-to-call) with Google Ads conversion actions and a Conversion Linker, (2) track phone leads with call reporting and call conversion actions, (3) capture the GCLID (the Google Click ID — the fingerprint that ties a lead back to the exact ad click) and store it in your CRM, and (4) upload your real offline outcomes — Qualified Lead, Estimate Booked, Signed Contract — back into Google Ads using Enhanced Conversions for Leads through Google Ads Data Manager. Add Google Consent Mode V2 with Cookiebot so it all stays privacy-compliant. The result: Google learns to find more homeowners who actually buy roofs, not just people who click.
Key Takeaways
- The Problem: Most roofers track clicks or, at best, a “thank you” page — so Google optimizes for cheap leads, not paid jobs. A $40 lead that never signs looks “good” in the dashboard while a $120 lead that becomes a $14,000 roof looks “expensive.”
- The Bridge: The GCLID is the single thread that connects a website lead to the exact ad, keyword, and click that produced it. Capture it, store it in your CRM, and you can prove which clicks turn into roofs.
- Track Calls, Not Just Forms: Roofing runs on the phone. Call reporting plus phone call conversion actions (and optional call-tracking software) make sure your best leads — calls — are not invisible.
- Close the Loop: Enhanced Conversions for Leads uploaded through Google Ads Data Manager feeds your real sales outcomes and dollar values back to Google so Smart Bidding chases revenue, not noise.
- Stay Compliant: Google Consent Mode V2 with Cookiebot keeps your tracking legal and recovers modeled conversions even when visitors decline cookies.
- The Result: Accurate cost-per-real-job, a true ROAS for roofing, and a Google Ads account that learns to spend your budget on homeowners who sign.
Introduction
Imagine we are sitting down for a coffee, and you slide your laptop across the table to show me your roofing company’s Google Ads account. The numbers look great. “Look,” you say, “we got 80 conversions last month at $38 each. That’s amazing for roofing.”
So I ask one simple question: “How many roofs did you actually sign from those 80 conversions?”
And the table goes quiet.
You check your CRM. You count the signed contracts. The answer is… seven. Seven real jobs out of eighty “conversions.” The other seventy-three were tire-kickers, wrong numbers, people pricing out an insurance claim with no intent, and a few competitors snooping on your pricing.
This is the most expensive gap in roofing marketing. Google Ads is optimizing for the wrong thing because you are measuring the wrong thing.
Here is the core problem in plain English. Google Ads can only see what happens on the screen — the click, the form, the button. It cannot see what happens in your truck, on the roof, or at the kitchen table when the homeowner signs. A roofing sale takes days or weeks: the click comes today, the inspection is next Tuesday, the estimate goes out Thursday, and the contract is signed two weeks later. By default, Google never finds out that any of that happened. So it keeps optimizing toward the cheapest form fill, not the most valuable signed roof.
Today, we are going to fix this permanently.
In this guide, I will walk you through a complete, layered tracking system built for the way roofing companies actually sell. We will track every website lead, every phone call, and — most importantly — we will build the bridge that carries your real sales results from your CRM back into Google Ads. Think of it like installing gutters on a roof: any single piece is useless on its own, but together they carry every drop of water exactly where it needs to go. We are going to make sure every lead drains straight back to the campaign, keyword, and click that produced it — all the way to the closed deal.
This is written for roofing business owners and their marketers. I will keep the language simple, explain every technical term the moment it appears, and tell you exactly where to click. Let’s build it.
Why Roofing Companies Must Set Up Proper Conversion Tracking
Let me be direct about what is at stake, because this is not a “nice to have.” For a roofing company spending real money on Google Ads, broken tracking quietly burns your budget every single day.
The Problem: You Are Training Google to Find Cheap Clicks, Not Roofs
Google Ads uses Smart Bidding — automated bidding strategies (like Maximize Conversions or Target ROAS) that use machine learning to decide how much to bid for each auction. Smart Bidding is only as smart as the data you feed it. If you feed it “form submitted,” it will hunt down the cheapest possible form submissions across the entire internet. It will happily find you a hundred $30 leads from price-shoppers and renters who will never pay for a roof, because that is the goal you handed it.
Roofing has a brutal economic reality: a single job is worth thousands of dollars, but a huge share of inquiries are junk — storm-chasers, insurance-only tire-kickers, wrong service areas, and people who wanted a $200 patch on a $15,000 problem. If Google cannot tell the difference between a junk lead and a signed roof, it cannot help you find more signed roofs.
The Solution: Feed Google Your Real Outcomes
The fix is to measure the entire journey and send the meaningful outcomes back to Google. When you tell Google “this specific click became a $14,000 signed contract,” its machine learning finally has the right target. It starts recognizing the patterns — the keywords, the times of day, the neighborhoods, the device types, the audiences — that lead to real roofing revenue, and it shifts your budget toward them automatically.
5 Key Benefits of Getting This Right
- Smarter algorithm training (better leads on autopilot). Once Google sees which clicks become roofs, Smart Bidding optimizes toward homeowners who buy, not browsers who click. Your lead quality climbs without you touching a single bid.
- Higher ROI and a true cost-per-job. Instead of a vanity “cost per conversion,” you finally see your real cost per signed roof and your true ROAS (Return on Ad Spend — revenue divided by ad spend). You can confidently raise budget on what prints money and cut what does not.
- Honest, trustworthy reporting. No more arguing with your gut. You will know that the “Roof Replacement” campaign produced four jobs at $9,200 average, while the “Roof Repair” campaign produced twelve small jobs. That is the raw truth — exactly the kind of data integrity that lets you make confident decisions.
- Better budget allocation across services and areas. Roofing margins vary wildly: a full replacement is gold, a minor repair is thin. With outcome tracking, you can steer spend toward high-value services and high-converting ZIP codes instead of spreading it evenly and hoping.
- Future-proofing for a privacy-first web. Browsers block cookies, users decline tracking, and privacy laws keep tightening. A modern setup with server-aware first-party data, Enhanced Conversions, and Consent Mode V2 keeps your measurement accurate while staying compliant — so your reporting does not collapse the next time a browser changes the rules.
The Roofing Lead Journey (What We Are Actually Tracking)
Before we touch any settings, let’s map the real journey, because every part of our setup mirrors a step in it. A roofing customer almost never clicks an ad and buys on the spot. Instead, the path looks like this:
- The Click. A homeowner searches “roof replacement near me” or “storm damage roof repair,” sees your ad, and clicks. Google attaches a GCLID to that click — a unique Google Click ID that acts like a tracking number on a package. This GCLID is the most important thing in this entire guide. It is the only reliable thread tying everything downstream back to the exact ad and keyword.
- The Lead. On your website, the homeowner either fills out a “Get a Free Inspection” form or taps your phone number to call. This is your first measurable conversion — a website lead.
- The Qualification. Your office calls back, confirms the homeowner is in your service area, owns the home, and has a real roofing need. Now it is a Qualified Lead.
- The Estimate. You inspect the roof and send a quote. This is a strong mid-funnel signal — an Estimate Booked / Sent.
- The Closed Deal. The homeowner signs. This is the only outcome that pays your bills — the Signed Contract, with a real dollar value.
Our job is to measure steps 2 through 5 and connect them all back to step 1. Steps 2 is on-site (we track it directly). Steps 3, 4, and 5 happen offline, days later, in your CRM — so we will carry them back to Google using the GCLID and Enhanced Conversions for Leads. Keep this five-step picture in your head; every phase below plugs into it.
Prerequisites & Checklist (Before You Build)
Let’s gather your tools first, the same way you would not climb onto a roof without your harness and ladder. Make sure you have access to all of the following before you start. Skipping any one of these will stall you halfway through the build.
Accounts and access you need:
- A Google Ads account with admin (or at least standard) access. You will create conversion actions and change account settings.
- Google Tag Manager (GTM) installed on your website with publish rights. GTM is a free “control panel” that lets you add and manage tracking tags without editing your site’s code every time. If it is not installed yet, install the GTM container snippet sitewide first.
- A Google tag (gtag) / GA4 property (recommended). Google Analytics 4 gives you full-funnel reporting and is the cleanest place to build your audiences.
- Admin access to your website’s CMS (WordPress, Webflow, or whatever you use) so you can place GTM and your lead form.
- Your CRM (HubSpot, Salesforce, GoHighLevel, Zoho, Pipedrive, or even a well-organized Google Sheet) where leads land and where deals are marked won. This is where the GCLID will live.
- A Cookiebot account for Consent Mode V2 (free tier works for a single small domain; paid for larger sites).
Tools you’ll use to test:
- GTM Preview Mode — GTM’s built-in debugger that shows you live, on your own site, which tags fired and why.
- Google Tag Assistant — confirms your Google tags are installed and firing correctly.
- GA4 DebugView — shows events arriving in GA4 in real time.
- Google Ads conversion diagnostics and the Enhanced conversions diagnostics report — Google’s own health checks for your conversion actions.
One critical setting to confirm right now: Auto-tagging. In Google Ads, go to Admin → Account settings and make sure Auto-tagging is ON. Why? Auto-tagging is what appends the GCLID to your ad clicks in the first place. Without it, there is no GCLID, and the entire offline-to-Google bridge falls apart. This is a CRITICAL STEP — do not skip it.
Video tutorial – Google Ads Conversion Tracking for Roofing Companies
Step-by-step video guide to Google Ads Conversion Tracking for Roofing Companies for accurate reporting.
Step-by-Step Implementation Guide
This is the heart of the build. We will go phase by phase. Do them in order — each phase depends on the one before it.
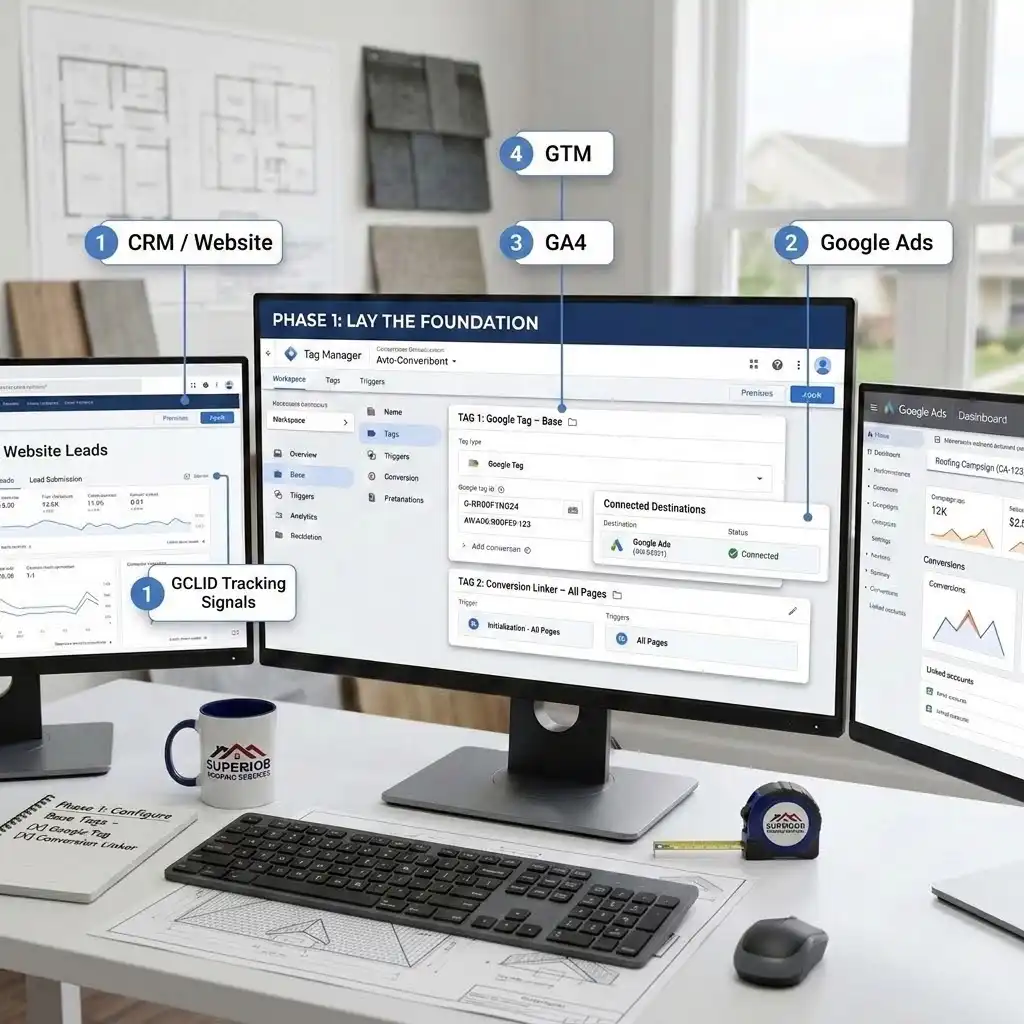
Phase 1: Lay the Foundation (Google Tag + Conversion Linker in GTM)
Before any conversion can be measured, your site needs the base Google tag and a Conversion Linker. Think of this as pouring the foundation before you frame the house.
Step 1 — Add the Google tag. In GTM, look at the left-hand menu and click Tags, then the blue New button in the top right. Click Tag Configuration and choose Google Tag. Enter your Google tag ID (it starts with G- for GA4 or AW- for Google Ads — you can use your GA4 ID and connect Google Ads as a destination). Set the trigger to Initialization – All Pages. Why? This tag loads Google’s tracking framework on every page. Everything else relies on it being present. Name it in a clean convention: Google Tag – Base.
Step 2 — Add the Conversion Linker. Create another new tag. Choose tag type Conversion Linker. Set its trigger to All Pages. What is it? The Conversion Linker is a small but essential tag that reads the GCLID from the ad-click URL and stores it in a first-party cookie on your site. Why it matters for roofing: When a homeowner clicks your ad and lands on your page, the GCLID is sitting in the URL. The Conversion Linker grabs it and saves it so that minutes later, when they submit your form, that click can still be credited. Without the Conversion Linker, GCLIDs get lost and conversions go uncredited. Name it: Conversion Linker – All Pages.
Step 3 — Connect Google Ads as a destination. In Google Ads, your conversion actions will generate either a tag to add in GTM or an automatic linkage through the Google tag. We will create those conversion actions in Phase 3. For now, your foundation is set: the Google tag loads, and the Conversion Linker is catching GCLIDs.
Do not publish yet. We will set up consent first (Phase 2) so that nothing fires before we have the legal guardrails in place.
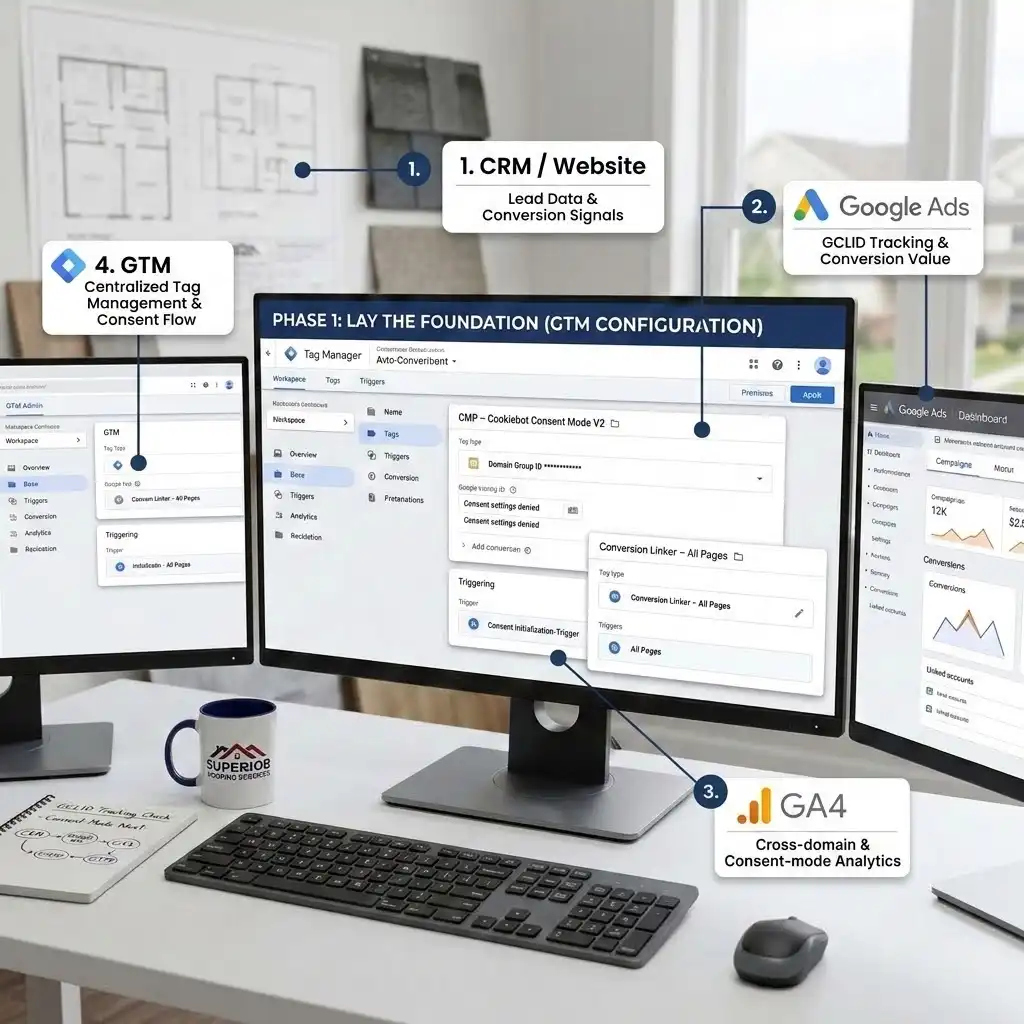
Phase 2: Google Consent Mode V2 with Cookiebot (Stay Compliant)
We set this up early on purpose. Consent Mode V2 is Google’s framework that tells your Google tags how to behave based on whether a visitor agreed to cookies. Think of it as a privacy-safe traffic controller: when someone accepts cookies, full tracking flows; when they decline, Google switches to sending anonymous, cookieless signals so you still recover modeled conversions instead of losing them entirely.
Consent Mode V2 controls four signals: ad_storage (cookies for advertising), analytics_storage (cookies for analytics), ad_user_data (whether ad-related data can be sent to Google), and ad_personalization (whether data can be used for personalized ads / remarketing).
Is this legally required for a US roofer? If you serve any visitors in the EU, EEA, or UK, Consent Mode V2 is effectively required for Google advertising features there. For purely US-and-Canada local roofers it is not mandated the same way, but US state privacy laws keep tightening, and setting it up now is smart future-proofing — plus, in Advanced Consent Mode, it actually recovers conversions you would otherwise lose. So we build it either way.
Here is the click-by-click setup using Cookiebot.
Step 1 — Turn on Consent Overview in GTM. Go to Admin → Container Settings, and under Additional Settings, check Enable consent overview. Save. Why? This adds a small shield icon in your Tags list so you can see, at a glance, which tags respect which consent signals. It is your compliance dashboard.
Step 2 — Add the Cookiebot CMP template. In GTM, go to Templates, click Search Gallery under Tag Templates, search for Cookiebot, select Cookiebot CMP (published by Usercentrics), and click Add to workspace.
Step 3 — Create the Cookiebot tag. Click Tags → New → Tag Configuration, and choose the Cookiebot CMP type you just added. Paste your Cookiebot ID (this is your Domain Group ID — a long GUID like 00000000-0000-0000-0000-000000000000, found in your Cookiebot account under Settings/Implementation). Check the box to Enable Google Consent Mode. Where to find the trigger: Set this tag’s trigger to Consent Initialization – All Pages. CRITICAL STEP: The Cookiebot tag must fire on Consent Initialization, not on All Pages. Why? Consent Initialization runs before everything else, so the default “denied” state is set before any Google tag has a chance to fire. Firing on the wrong trigger creates a race condition where tags can leak data before consent is read. Name it: CMP – Cookiebot Consent Mode V2.
Step 4 — Set your default consent states and regions. In the Cookiebot tag, set the default consent state to denied for all four signals. Then, if you want region-specific behavior, click Add region and configure denied-by-default for EEA/UK country codes (use ISO-3166-1 alpha-2 codes). A global denied default is the safest starting point. Why? Until a visitor clicks “Accept,” nothing advertising-related should set cookies. This is the legal core of consent.
Step 5 — Confirm your Google tags respect consent (Advanced Consent Mode). Good news: Google’s own tags — the Google tag, Google Ads conversion tags, Conversion Linker, and GA4 — have built-in consent checks. Google calls this Advanced Consent Mode. They automatically adjust their behavior based on the consent state and, when consent is denied, send cookieless “pings” that fuel conversion modeling — Google’s way of statistically estimating the conversions you lost. You do not need to manually gate them; just verify in the Consent Overview that they show the built-in consent settings. For any non-Google tags (a chat widget, a third-party pixel), you must add additional consent checks in each tag’s Advanced Settings → Consent Settings → Require additional consent. These are Basic Consent Mode tags that will not fire at all until consent is granted.
Step 6 — Verify. In GTM Preview Mode, load your site, click your consent banner, and confirm the consent state updates. Cookiebot fires a cookie_consent_update event when a visitor makes a choice; you should see your Google tags respond accordingly. We will test this fully in the Testing section.
Now your tracking is wrapped in a compliant, future-proof consent layer. On to the leads.
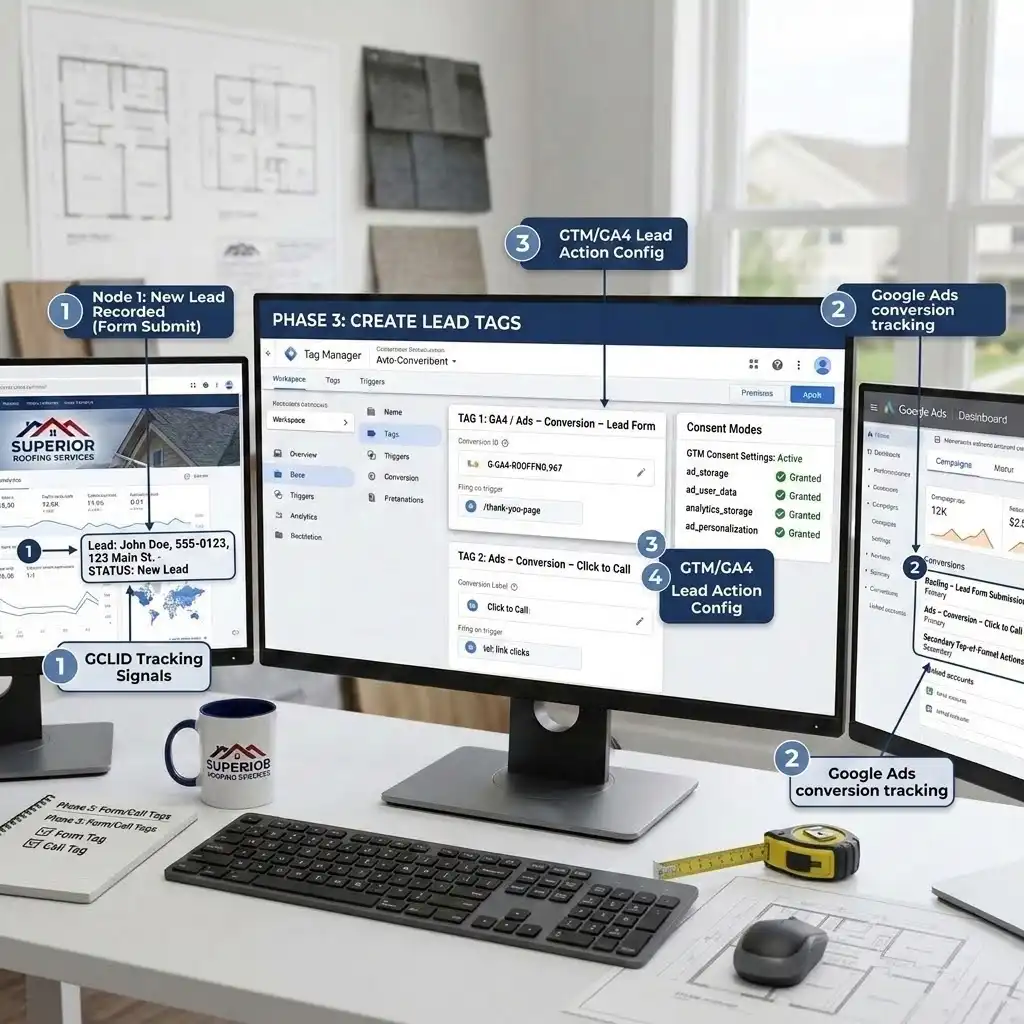
Phase 3: Track Website Leads (Form Submissions + Click-to-Call)
Roofing websites generate two kinds of on-site leads: form submissions (“Request a Free Inspection”) and click-to-call taps (the phone number a mobile visitor taps to call you). We will create conversion actions for both.
Step 1 — Create the lead form conversion action. In Google Ads, click the Goals icon → Conversions → Summary, then + Create conversion action. Choose Website. Enter your website and let Google scan it, or set it up manually. For the conversion, choose category Submit lead form, name it clearly (e.g., Roofing – Lead Form Submission), and set how to count it (One per click is right for lead gen, since one homeowner equals one lead). Why “Submit lead form” category? It tells Google this is a lead, which unlocks Enhanced Conversions for Leads later — the exact feature we need for the closed-deal upload.
Step 2 — Deploy the conversion tag via GTM. Google will give you a Conversion ID and Conversion Label. In GTM, create a new tag: Tag Configuration → Google Ads Conversion Tracking, paste the Conversion ID and Label. Fire it on a trigger that matches a real form success — ideally a thank-you page view (trigger type Page View, with the URL containing your /thank-you path) or a confirmed form-submission event. Why a thank-you page is best: It only fires when the form genuinely succeeded, which keeps your data clean. A generic “any form submit” trigger can fire on failed or spam submissions. Name it: GA4 / Ads – Conversion – Lead Form (and mirror it as a GA4 generate_lead event tag if you also want it in GA4).
Step 3 — Track click-to-call on your website. Mobile homeowners often tap your number instead of filling a form. Create a second conversion action — again under Goals → Conversions, category Phone calls, then Clicks on a number on your website. In GTM, set up a Click trigger that fires when someone clicks a link starting with tel:. Attach a Google Ads conversion tag to it. Why? On mobile, the tap-to-call button is one of the highest-intent actions a roofing visitor can take. If you only track forms, you are blind to a huge slice of your best leads. Name it: Ads – Conversion – Click to Call.
Step 4 — Set these as Primary or Secondary deliberately. Mark your strongest lead actions as Primary (counted in the Conversions column and used for bidding). You can keep weaker, top-of-funnel actions as Secondary (observed but not used for bidding) so you do not pollute Smart Bidding with low-value signals.
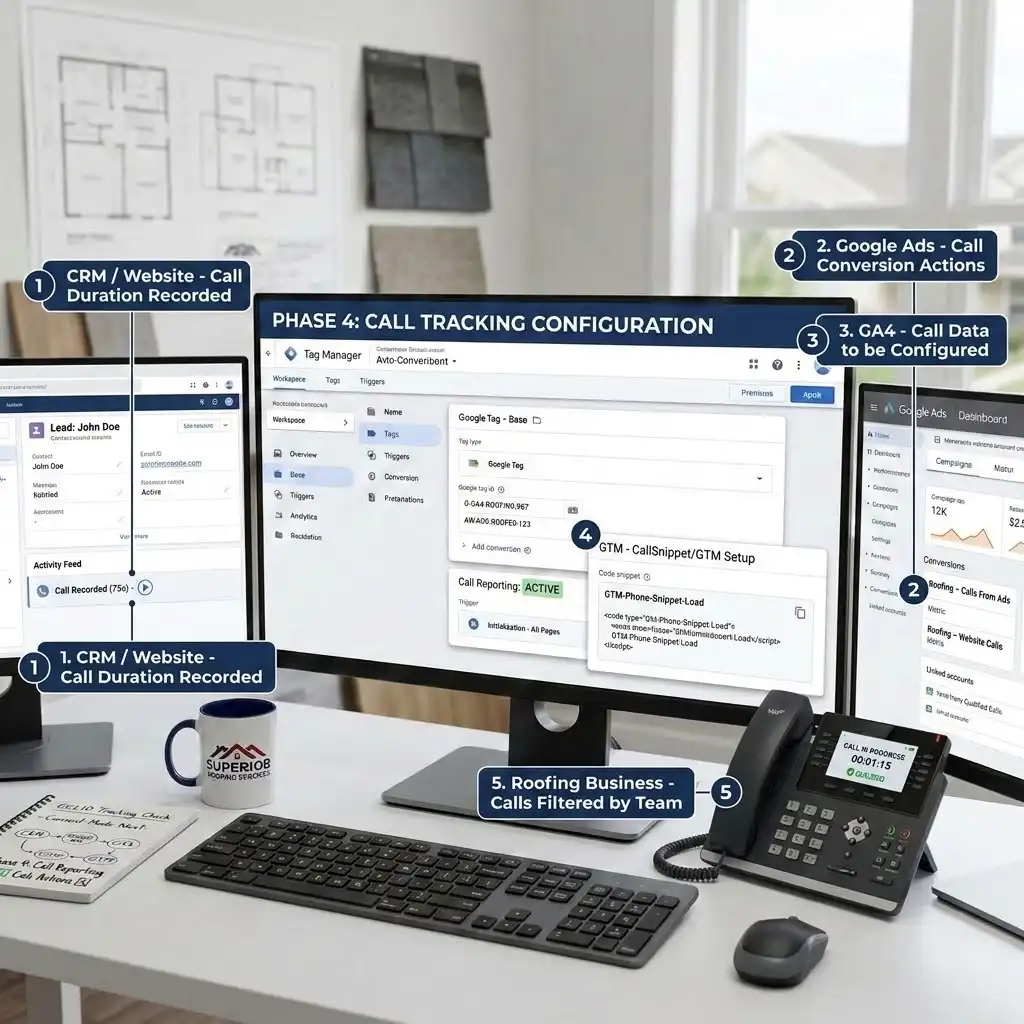
Phase 4: Track Phone Calls (Roofing Runs on the Phone)
Here is a truth every roofer knows: most serious roofing leads call. Storm hit, ceiling leaking, homeowner panicking — they do not fill out a form, they grab the phone. If your tracking ignores calls, it ignores your best business.
There are two layers here: native Google call tracking, and (optionally) third-party call-tracking software for deeper insight.
Step 1 — Turn on Call Reporting. In Google Ads, go to Admin → Account settings → Call reporting and switch it ON. What it does: Google assigns a Google forwarding number — a temporary tracking number that displays in your ad (and optionally on your website) and forwards to your real line. This lets Google measure call duration, start time, and whether the call connected, and attribute the call back to the ad click. Why duration matters: You can count only calls over a minimum length (say 60 seconds) as conversions, which automatically filters out wrong numbers and 8-second hang-ups.
Step 2 — Create call conversion actions. Under Goals → Conversions → + Create conversion action → Phone calls, you will see options:
- Calls from ads — calls placed directly from call assets or call-only ads. Set a minimum duration (e.g., 60 seconds) so only meaningful calls count.
- Calls to a phone number on your website — when a visitor clicks your ad, lands on your site, and calls the forwarding number shown there. This requires a phone snippet (deployable via GTM) that swaps your number for the forwarding number for ad visitors. Choose category Phone call lead, name them clearly (Roofing – Calls From Ads, Roofing – Website Calls), and set your minimum duration.
Step 3 — Decide if you need third-party call tracking. Google’s native call tracking is free and a great start, but it has real limits: you cannot hear the call, score lead quality, or reliably separate a $20,000-replacement caller from a “do you do gutters?” caller. Google forwarding numbers can also occasionally be reused across advertisers (“dirty numbers”). For serious roofing spenders, a dedicated call-tracking platform (CallRail, WhatConverts, Nimbata, and similar) adds dynamic number insertion (a unique tracking number per visitor source), call recording, lead scoring / outcome tagging, and GCLID capture on calls. Crucially, these tools can send only qualified calls back to Google Ads as conversions — so you train the algorithm on good calls, not every call. Why this is powerful for roofing: You can configure the tool to count a call as a conversion only after your team tags it “qualified,” meaning Smart Bidding learns from real opportunities, not noise.
Step 4 — Connect the tool (if used). In Google Ads Admin → Account settings → Call reporting, you can route call data to a supported provider. The tool captures the GCLID for each visitor and reports qualified calls back as conversions, automatically attributed to the right click. Enable Auto-tagging (you already did this in prerequisites) so GCLIDs flow through.
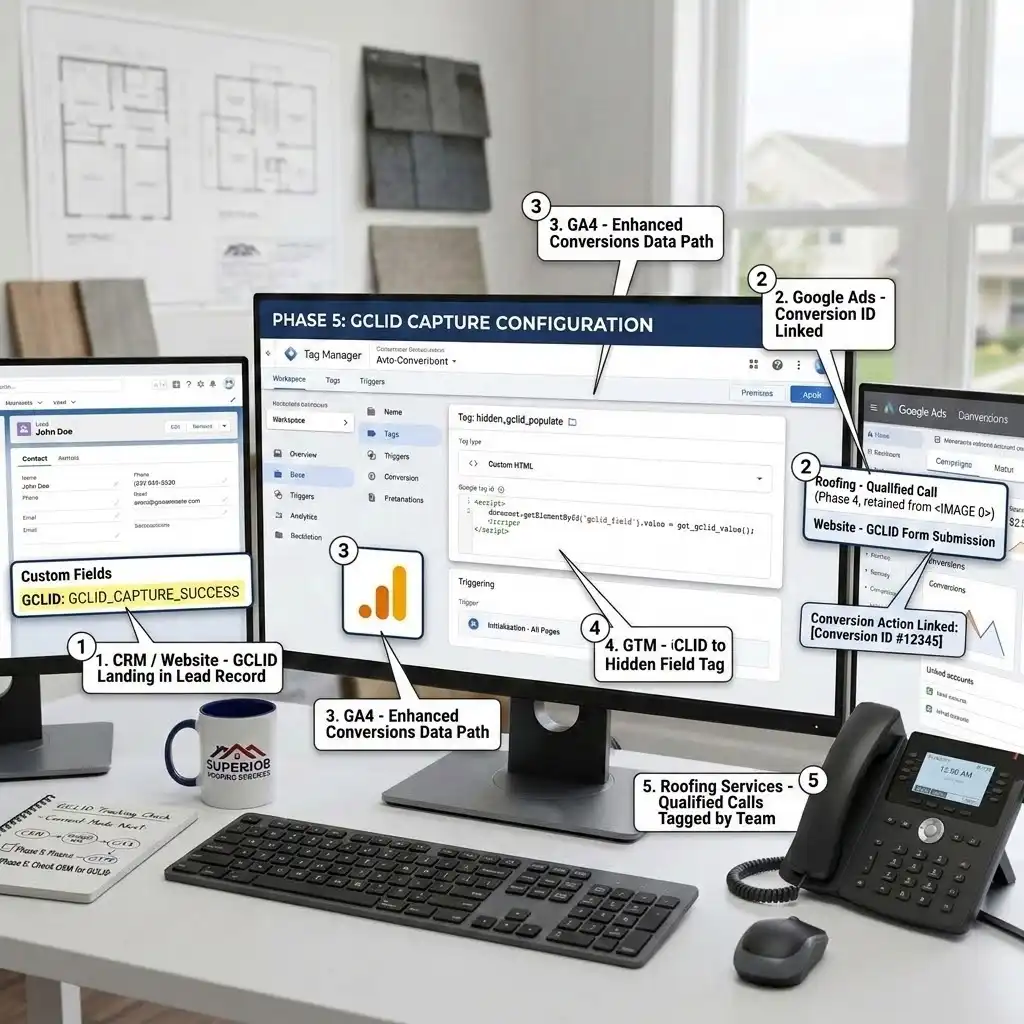
Phase 5: Capture the GCLID — The Bridge to Your CRM
This is the phase that separates roofers who think they track conversions from roofers who actually do. Remember the GCLID — the unique fingerprint Google attaches to every ad click? To carry a real sale back to Google weeks later, that GCLID must travel from the click → into your form → into your CRM → and back out to Google when the deal closes.
The principle (no heavy code needed). When a homeowner lands on your site from an ad, the GCLID is available (the Conversion Linker stored it in Phase 1). You add a hidden field to your lead form — an invisible form field the visitor never sees — and populate it with the GCLID. When they submit, the GCLID rides along with their name, phone, and email straight into your CRM record.
How to set it up, depending on your stack:
- If your form/CRM has native GCLID capture (HubSpot, GoHighLevel, many form builders): turn on their built-in “capture GCLID / click ID” or “tracking parameters” feature and map it to a hidden field. This is the cleanest route — no custom scripting.
- If you need to populate it yourself: add a hidden field named, for example, gclid to your form, and have it filled from the stored GCLID value the Conversion Linker captured. (If you’d like, I can hand you the exact paste-ready snippet for your specific form — it’s a tiny addition, and I’ve left it out here because your form platform may already do it natively.)
Also capture email and phone for Enhanced Conversions. Make sure your lead form collects the homeowner’s email and phone number, because Enhanced Conversions for Leads (Phase 6) uses this first-party data, hashed for privacy, to match offline outcomes back to the original ad click even when the GCLID alone is not enough. Why both? GCLID is the strongest signal, but click IDs can expire or be unavailable in some browsers. Email and phone give Google a privacy-safe backup to match the conversion.
CRITICAL STEP: Confirm the GCLID is actually landing in your CRM. Submit a test lead by visiting your own site with a test ?gclid=test123 in the URL, fill out the form, and check that test123 appears in the new CRM record. If it does not, stop and fix this before going further — everything downstream depends on it.
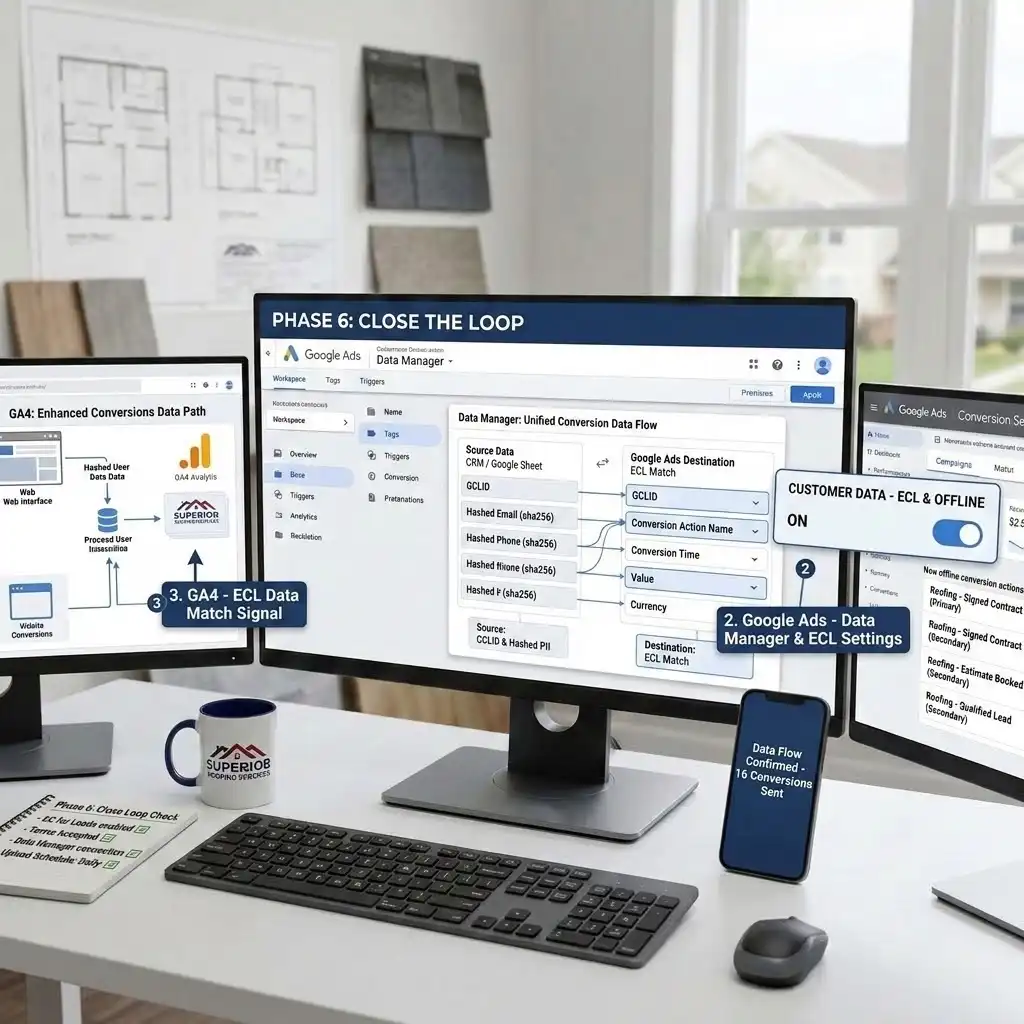
Phase 6: Close the Loop — Enhanced Conversions for Leads via Data Manager
Now we connect the most important dot: telling Google when a lead became a real, paying roof. This is done with Enhanced Conversions for Leads (ECL) — an upgraded version of offline conversion import that matches your offline sales back to Google Ads using both the GCLID and hashed first-party data (email/phone).
Important 2026 update — read this first. Google has consolidated how this works. As of 2026, Enhanced Conversions for web and leads are being combined into a single on/off setting, and offline conversion uploads now run through Google Ads Data Manager rather than the legacy Google Ads API path (the old API upload route is being retired for accounts that were not already using it). The practical takeaway: use Google Ads Data Manager as your upload home. It connects directly to sources like HubSpot, Salesforce, Google Sheets, BigQuery, and more, or accepts scheduled file uploads — so you may not need any custom API work at all.
Step 1 — Opt in and accept the terms. In Google Ads, go to Goals → Conversions → Settings, expand the Customer data section, and turn on Enhanced Conversions. Review and accept the Google Ads Data Processing / Customer Data Terms. Why? You cannot upload first-party data without accepting these terms — it is a hard requirement.
Step 2 — Create your offline conversion actions. These mirror your real sales stages. Create conversion actions for the outcomes that matter:
- Roofing – Qualified Lead (your office confirmed it’s a real, in-area homeowner)
- Roofing – Estimate Booked (an inspection/quote scheduled)
- Roofing – Signed Contract (the closed deal — with a dollar value) For each, choose the Import / offline source and category Qualified lead, Converted lead, etc. Set a conversion value where it makes sense — especially on Signed Contract, where you can pass the actual job value.
Step 3 — Connect your data source in Data Manager. In Google Ads, open Tools → Data Manager, and connect your CRM (e.g., HubSpot or Salesforce) or a Google Sheet. Map your columns: the GCLID, conversion action name, conversion time (when the stage happened), conversion value, currency, and hashed email/phone. Data Manager hashes the personal data in transit so you stay privacy-safe. Why a Google Sheet is a great start: If your CRM connector is complex, a structured Sheet your team updates (or your CRM exports to) is a fully supported, reliable upload method.
Step 4 — Upload daily and upload everything. Schedule uploads to run daily — Google strongly recommends this for the freshest signals. And here is a rule that trips people up: upload ALL conversions for the event, not just the ones you think came from Google Ads. Enhanced Conversions for Leads needs the complete picture to attribute correctly. Do not upload zero-value placeholder rows or backfill old data unless you are deliberately making conversion adjustments.
Step 5 — Mark new actions Secondary for 2–3 weeks. When you first launch a new offline conversion action, set it as Secondary for the first two to three weeks. Why? This lets you watch the data flow in and confirm it is accurate before it starts influencing Smart Bidding. Once you trust it, promote Signed Contract (and possibly Qualified Lead) to Primary so bidding optimizes toward real jobs.
The payoff: From this point on, every time your team marks a deal “won” in the CRM, that revenue flows back to Google Ads, gets matched to the original click via GCLID and hashed data, and teaches Smart Bidding to find more homeowners just like that one. You have closed the loop.
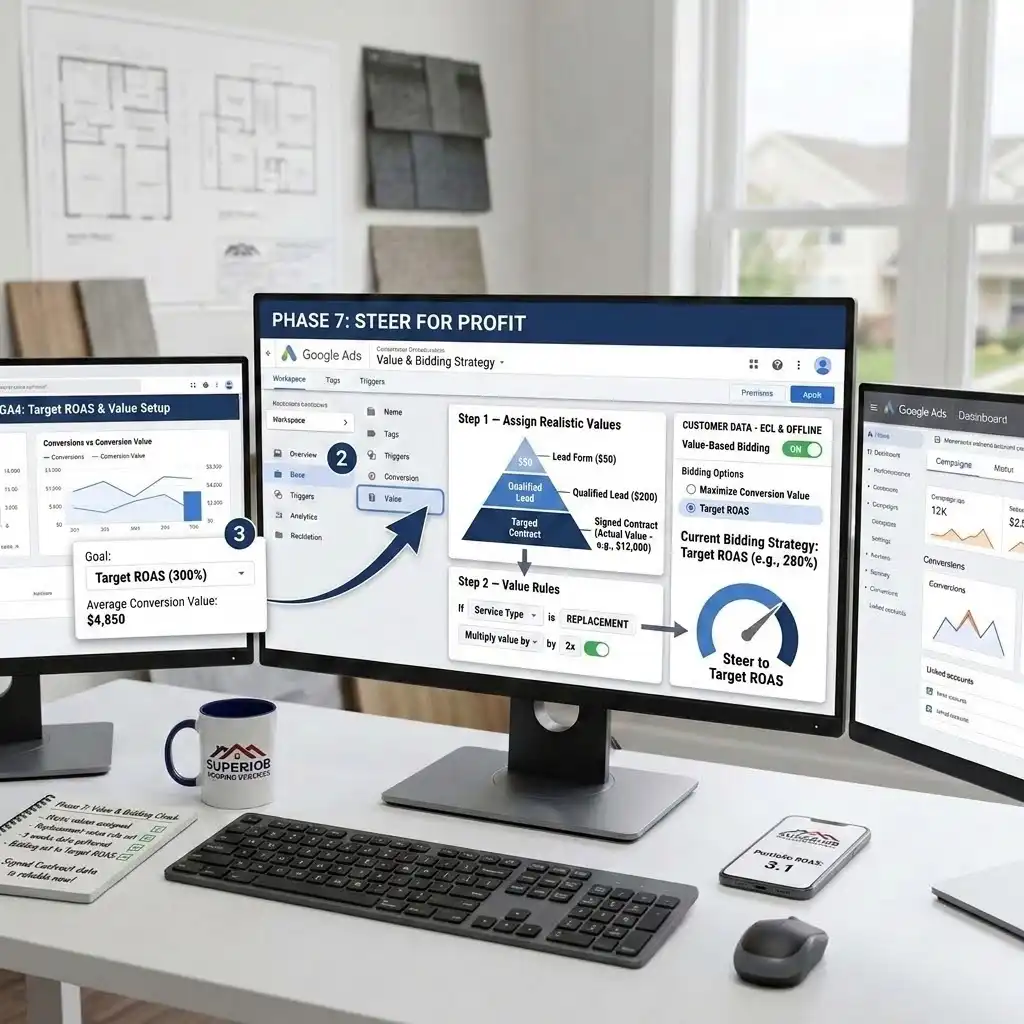
Phase 7: Set Conversion Values and Align Smart Bidding
Tracking outcomes is half the job; assigning value to them is what turns tracking into profit steering.
Step 1 — Assign realistic values. A lead form is worth less than a qualified lead, which is worth less than a signed contract. You can use static values (e.g., Qualified Lead = $200, Signed Contract = your average job value, or the actual job value passed from the CRM). Why values matter: They let you switch to Target ROAS bidding, where Google optimizes for revenue per dollar spent, not just conversion count.
Step 2 — Use value rules if needed. If a replacement is worth far more than a repair, you can set different values per service or use Google’s value rules to weight high-value conversions. This nudges Google to chase the jobs that actually move your bottom line.
Step 3 — Pick the right bidding strategy. Start with Maximize Conversions while you gather data, then graduate to Maximize Conversion Value / Target ROAS once your Signed Contract conversions and values are flowing reliably. Why wait? Value-based bidding needs enough value data to learn from; switch too early and it has nothing to optimize against.
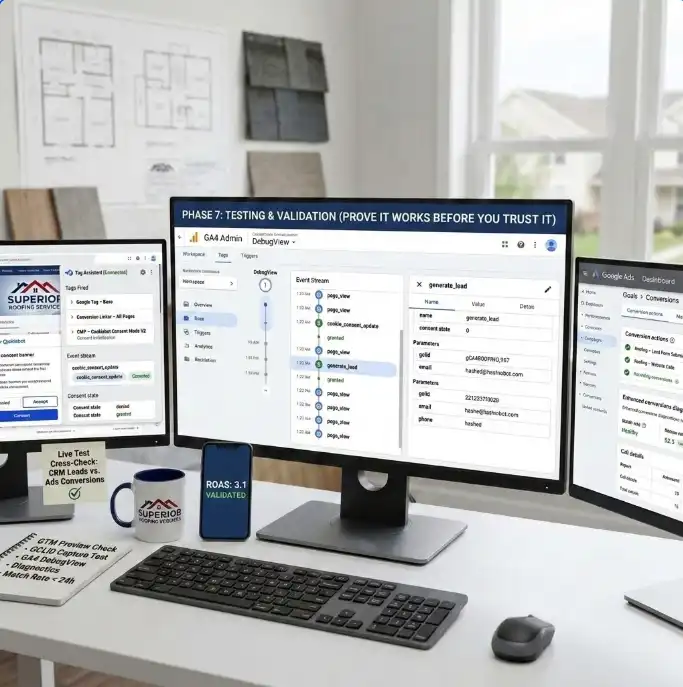
Testing & Validation (Prove It Works Before You Trust It)
Never assume tracking works — verify it, like a final roof inspection before you call the job done. Here is the full validation pass.
1. Test in GTM Preview Mode
In GTM, click Preview (top right) and enter your website URL. A new window opens, connected to your site with the Tag Assistant debug panel.
- Load your homepage. Confirm Google Tag – Base and Conversion Linker – All Pages fire on the first load. Confirm CMP – Cookiebot Consent Mode V2 fires on Consent Initialization.
- Interact with the consent banner. Accept cookies and watch the consent state flip from denied to granted for the relevant signals (you’ll see the cookie_consent_update event). Then reload and decline to confirm tags respect a “denied” state.
- Submit a real test lead. Fill out your form and reach the thank-you page. Confirm GA4 / Ads – Conversion – Lead Form fires exactly once.
- Tap your phone number. Confirm Ads – Conversion – Click to Call fires on the tel: click.
2. Verify the GCLID is captured
Visit your site with ?gclid=test123 appended to the URL. Submit a test lead. Then open your CRM and confirm test123 is sitting in the GCLID field of that new record. This single test confirms your entire offline bridge works. If it’s empty, fix Phase 5 before anything else.
3. Check GA4 DebugView
In GA4, open Admin → DebugView. With GTM Preview active, perform your test actions and watch events like generate_lead arrive in real time. This confirms your analytics layer is healthy and your audiences will be accurate.
4. Confirm conversions in Google Ads
- In Goals → Conversions, your website actions will move from “No recent conversions” to “Recording conversions” within 24–48 hours of real activity.
- For Enhanced Conversions for Leads, open the Enhanced conversions diagnostics report. It flags common problems — missing or wrongly formatted user data, missing GCLIDs, or low match rates — so you can self-diagnose. Aim for a healthy match rate and “Recording” status.
- For calls, check the Call details report (under Insights and reports) to confirm calls are logging with duration and attribution.
5. Run a small live test
Let real traffic run for a few days, then cross-check: do the conversions Google reports roughly match the leads landing in your CRM? Small differences are normal (attribution windows, modeling). Big gaps mean something is misfiring — go back through the phases
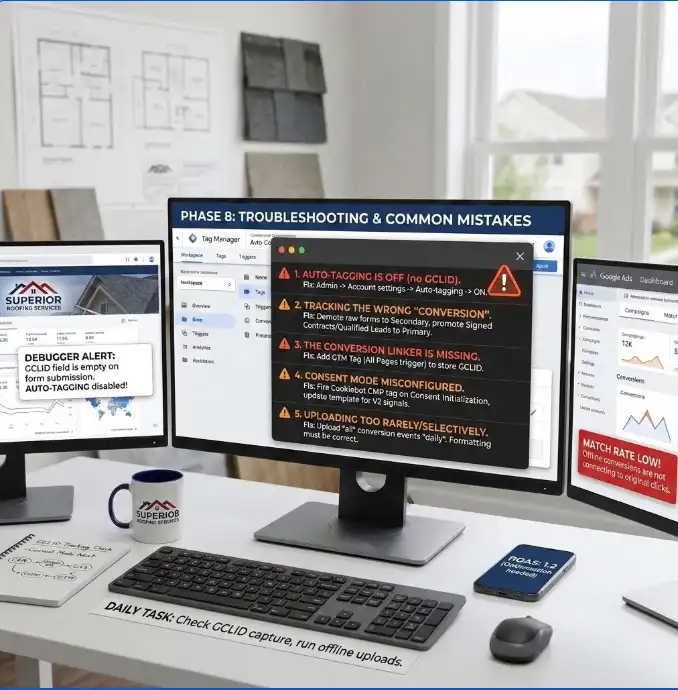
Troubleshooting & Common Mistakes
Even careful builds hit snags. Here are the five mistakes I see most often on roofing accounts, with the exact fix for each.
Mistake 1: Auto-tagging is off (no GCLID)
- The Problem: Your CRM leads have empty GCLID fields, and offline uploads barely match anything.
- The Cause: Auto-tagging is disabled in Google Ads, so clicks never get a GCLID to begin with.
- The Solution: Go to Admin → Account settings → Auto-tagging and turn it ON. This is the foundation of the entire offline bridge; without it, nothing downstream can work.
Mistake 2: Tracking the wrong “conversion”
- The Problem: You have 80 “conversions” but only a handful of real jobs, and lead quality is poor.
- The Cause: Your primary conversion is a top-of-funnel action (any form submit, page view, or click) that fires for junk leads, so Smart Bidding optimizes for junk.
- The Solution: Make Signed Contract (and Qualified Lead) your Primary conversions and demote raw form fills to Secondary. Optimize toward outcomes that actually pay you.
Mistake 3: The Conversion Linker is missing
- The Problem: Conversions are wildly under-reported even though forms are clearly being submitted.
- The Cause: No Conversion Linker tag, so the GCLID is lost between the ad click and the form submission.
- The Solution: Add the Conversion Linker tag in GTM firing on All Pages. This stores the GCLID in a first-party cookie so it survives until the visitor converts.
Mistake 4: Consent Mode set up wrong (data leaks or vanishes)
- The Problem: Either Google Ads warns that Consent Mode isn’t implemented, or you’re losing almost all conversions for EU/UK visitors.
- The Cause: The Cookiebot tag fires on the wrong trigger, the template is outdated (sending only v1 signals, missing ad_user_data and ad_personalization), or the regional default is wrongly set to “granted.”
- The Solution: Fire the Cookiebot CMP tag on Consent Initialization – All Pages, update the template to the latest version, and confirm all four V2 signals are present with a denied default for EEA/UK regions.
Mistake 5: Uploading only “Google” conversions, or uploading too rarely
- The Problem: Your Enhanced Conversions for Leads match rate is low and offline conversions trickle in.
- The Cause: You’re filtering to only Google-attributed deals before upload, uploading weekly instead of daily, or uploading zero-value backfill rows.
- The Solution: Upload all conversions for the event (Google needs the full set to attribute), run uploads daily, and skip zero-value/backfill rows. Use the diagnostics report to confirm formatting (emails lowercased and trimmed, phone numbers in E.164 format like +15551234567).
Conclusion
Take a breath — you just built something most roofing companies never do. You went from counting clicks to tracking every lead all the way to a closed deal. Your website forms and phone calls are measured, the GCLID bridges every lead back to its exact ad, your real sales outcomes flow back into Google Ads through Data Manager, and the whole system is wrapped in Consent Mode V2 compliance.
Here’s what that means in plain terms: Google Ads can finally see which clicks become roofs. Your Smart Bidding will start steering budget toward the homeowners who actually sign, your reporting will show a true cost-per-job and a real ROAS, and you’ll stop paying for the illusion of cheap leads that never close.
Give the system 24–48 hours to start recording, and a few weeks of daily uploads for Smart Bidding to learn. Then make your decisions on facts, not feelings. That’s the whole point: raw, honest data that turns your ad spend into verifiable, signed-roof profit.
Summary
This guide shows roofing companies how to build complete Google Ads conversion tracking — from first click to signed contract. You track website leads (forms and click-to-call) and phone calls, capture the GCLID and store it in your CRM, then upload real outcomes (qualified leads, estimates, closed deals with values) back to Google Ads using Enhanced Conversions for Leads via Data Manager. Google Consent Mode V2 with Cookiebot keeps it compliant. The result: Google optimizes for homeowners who actually buy roofs, giving you a true cost-per-job and real ROAS.
1. Why track closed deals, not leads?
Because leads lie. In roofing, a huge share of inquiries are price-shoppers, wrong service areas, or insurance tire-kickers who never sign. If you optimize toward “leads,” Google finds you more cheap, low-intent inquiries. When you track and upload closed deals with their dollar values, Google’s machine learning finally optimizes toward homeowners who buy roofs. You shift from a vanity cost-per-lead to a real cost-per-job, which is the only number that protects your margin and grows your revenue.
2. What exactly is a GCLID?
GCLID stands for Google Click Identifier. It’s a unique code Google attaches to every ad click when auto-tagging is on — like a tracking number on a package. It records the exact campaign, ad group, keyword, and click that brought a visitor to your site. When you store the GCLID in your CRM with each lead, you can later upload that same GCLID alongside the sale, and Google matches the closed roof back to the precise click that produced it. No GCLID, no reliable offline attribution.
3. Do I really need call tracking?
For most roofers, yes — calls are your highest-intent leads. A homeowner with a leaking ceiling calls, they don’t fill out a form. Native Google call reporting (free) measures call duration and attributes calls to ads, which is a strong start. Dedicated call-tracking software adds recording, lead scoring, and the ability to send only qualified calls back as conversions. Either way, ignoring calls means flying blind on the leads most likely to become jobs.
4. Is Consent Mode V2 required in the US?
Strictly, Consent Mode V2 is required for Google advertising features serving visitors in the EU, EEA, and UK. For a US-and-Canada-only local roofer, it isn’t legally mandated the same way. But US state privacy laws keep expanding, and Advanced Consent Mode actually recovers modeled conversions when users decline cookies — so it improves your data, not just your compliance. Setting it up with Cookiebot now is smart future-proofing that costs little and protects you as rules tighten.
5. What is Enhanced Conversions for Leads?
It’s Google’s upgraded method for importing offline conversions. It takes the sale you closed in your CRM and matches it back to the original ad click using the GCLID plus hashed first-party data (email and phone). The hashing happens privately, so personal data is protected. It’s more durable and accurate than the older offline import alone, and it now runs through Google Ads Data Manager, which connects to CRMs like HubSpot and Salesforce or to a simple Google Sheet.
6. Can I do this without coding?
Largely, yes. Google Tag Manager handles the tags with point-and-click configuration, the conversion actions are built inside Google Ads, and Data Manager connects to your CRM or a Google Sheet directly. The one place a tiny snippet sometimes helps is populating the GCLID hidden field on your form — but many form builders and CRMs (HubSpot, GoHighLevel) capture the GCLID natively, so you may not need any custom code at all. If you do, it’s a small, one-time addition.
7. How long until I see results?
Conversions usually start “Recording” within 24–48 hours of real activity. But Smart Bidding needs more — typically two to four weeks of consistent, daily offline uploads before it has enough closed-deal data to meaningfully shift your budget toward better leads. Patience here pays off. Resist the urge to change strategies every few days; let the system gather enough signal to learn the patterns that lead to signed roofs.
8. What if my GCLID isn't being captured?
First, confirm auto-tagging is ON in Google Ads. Second, confirm the Conversion Linker tag is firing on all pages in GTM. Third, test by visiting your site with ?gclid=test123 in the URL, submitting your form, and checking your CRM record for test123. If it’s missing, the hidden field isn’t being populated — check your form’s GCLID capture setting or the snippet feeding the field. Fix this before doing anything else, because every offline conversion depends on it.
9. Do I need GA4 for this?
You don’t strictly need GA4 to send conversions to Google Ads, but it’s strongly recommended. GA4 gives you full-funnel reporting, lets you see how visitors move through your site before converting, and is the cleanest place to build remarketing audiences. It also shares a tagging foundation with your Google Ads setup, so installing it once supports both platforms. For a roofing company that wants to truly understand its marketing, GA4 is well worth the modest extra setup.
10. Should I use a Google Sheet or connect my CRM?
Both work. Connecting your CRM (HubSpot, Salesforce) through Data Manager is the most automated — deals flow up as your team marks them won. But a structured Google Sheet that your team updates, or that your CRM exports to on a schedule, is fully supported and reliable, and it’s often the fastest way to launch. Start with whichever you can run daily and accurately. You can always upgrade to a deeper CRM connection once the process is humming.
 Need Help Advanced Tracking Setup?