Let's Start With a Coffee and a Hard Truth
Imagine we are sitting down for a coffee, and you slide your laptop across the table to show me your Shopify store’s numbers. You are proud, and you should be. Sales are up. The Google Ads account is spending money and the orders are coming in.
Then you open Google Analytics 4. You pull up the Traffic Acquisition report. And there it is, sitting at the top of the list like a guest who showed up to a party you never invited them to:
Direct / None — 48% of your revenue.
Below that, you spot something even stranger. A traffic source called checkout.shopify.com is “sending” you customers. So is paypal.com. Your Google Ads campaigns, the ones you can literally watch spending money in real time, are credited with a fraction of the sales you know they drove.
This is the moment most Shopify store owners feel a little sick. You are paying for clicks. The clicks turn into buyers. But your own reports refuse to connect the two. So when it is time to decide which campaign to scale and which to kill, you are flying blind.
Here is the truth I tell every client: your store is not broken, and your ads are not failing. Your attribution is leaking. Marketing attribution is simply the system that gives credit to the right marketing channel for each sale. When it leaks, the credit gets lost on the way to the finish line, and GA4 hands that credit to “Direct” or to a payment page instead of to the Google ad that actually earned it.
Today, we are going to fix this permanently.
By the end of this guide you will have a clean, accurate attribution system that connects every Shopify sale back to its true source, survives the Shopify checkout, respects privacy law with Google Consent Mode v2 (using Cookiebot), and feeds Google Ads the clean conversion signals it needs to spend your budget on the campaigns that actually print money.
We are going to do this step by step, click by click. No fluff. No guessing. Just the proven build I use for D2C brands and agencies.
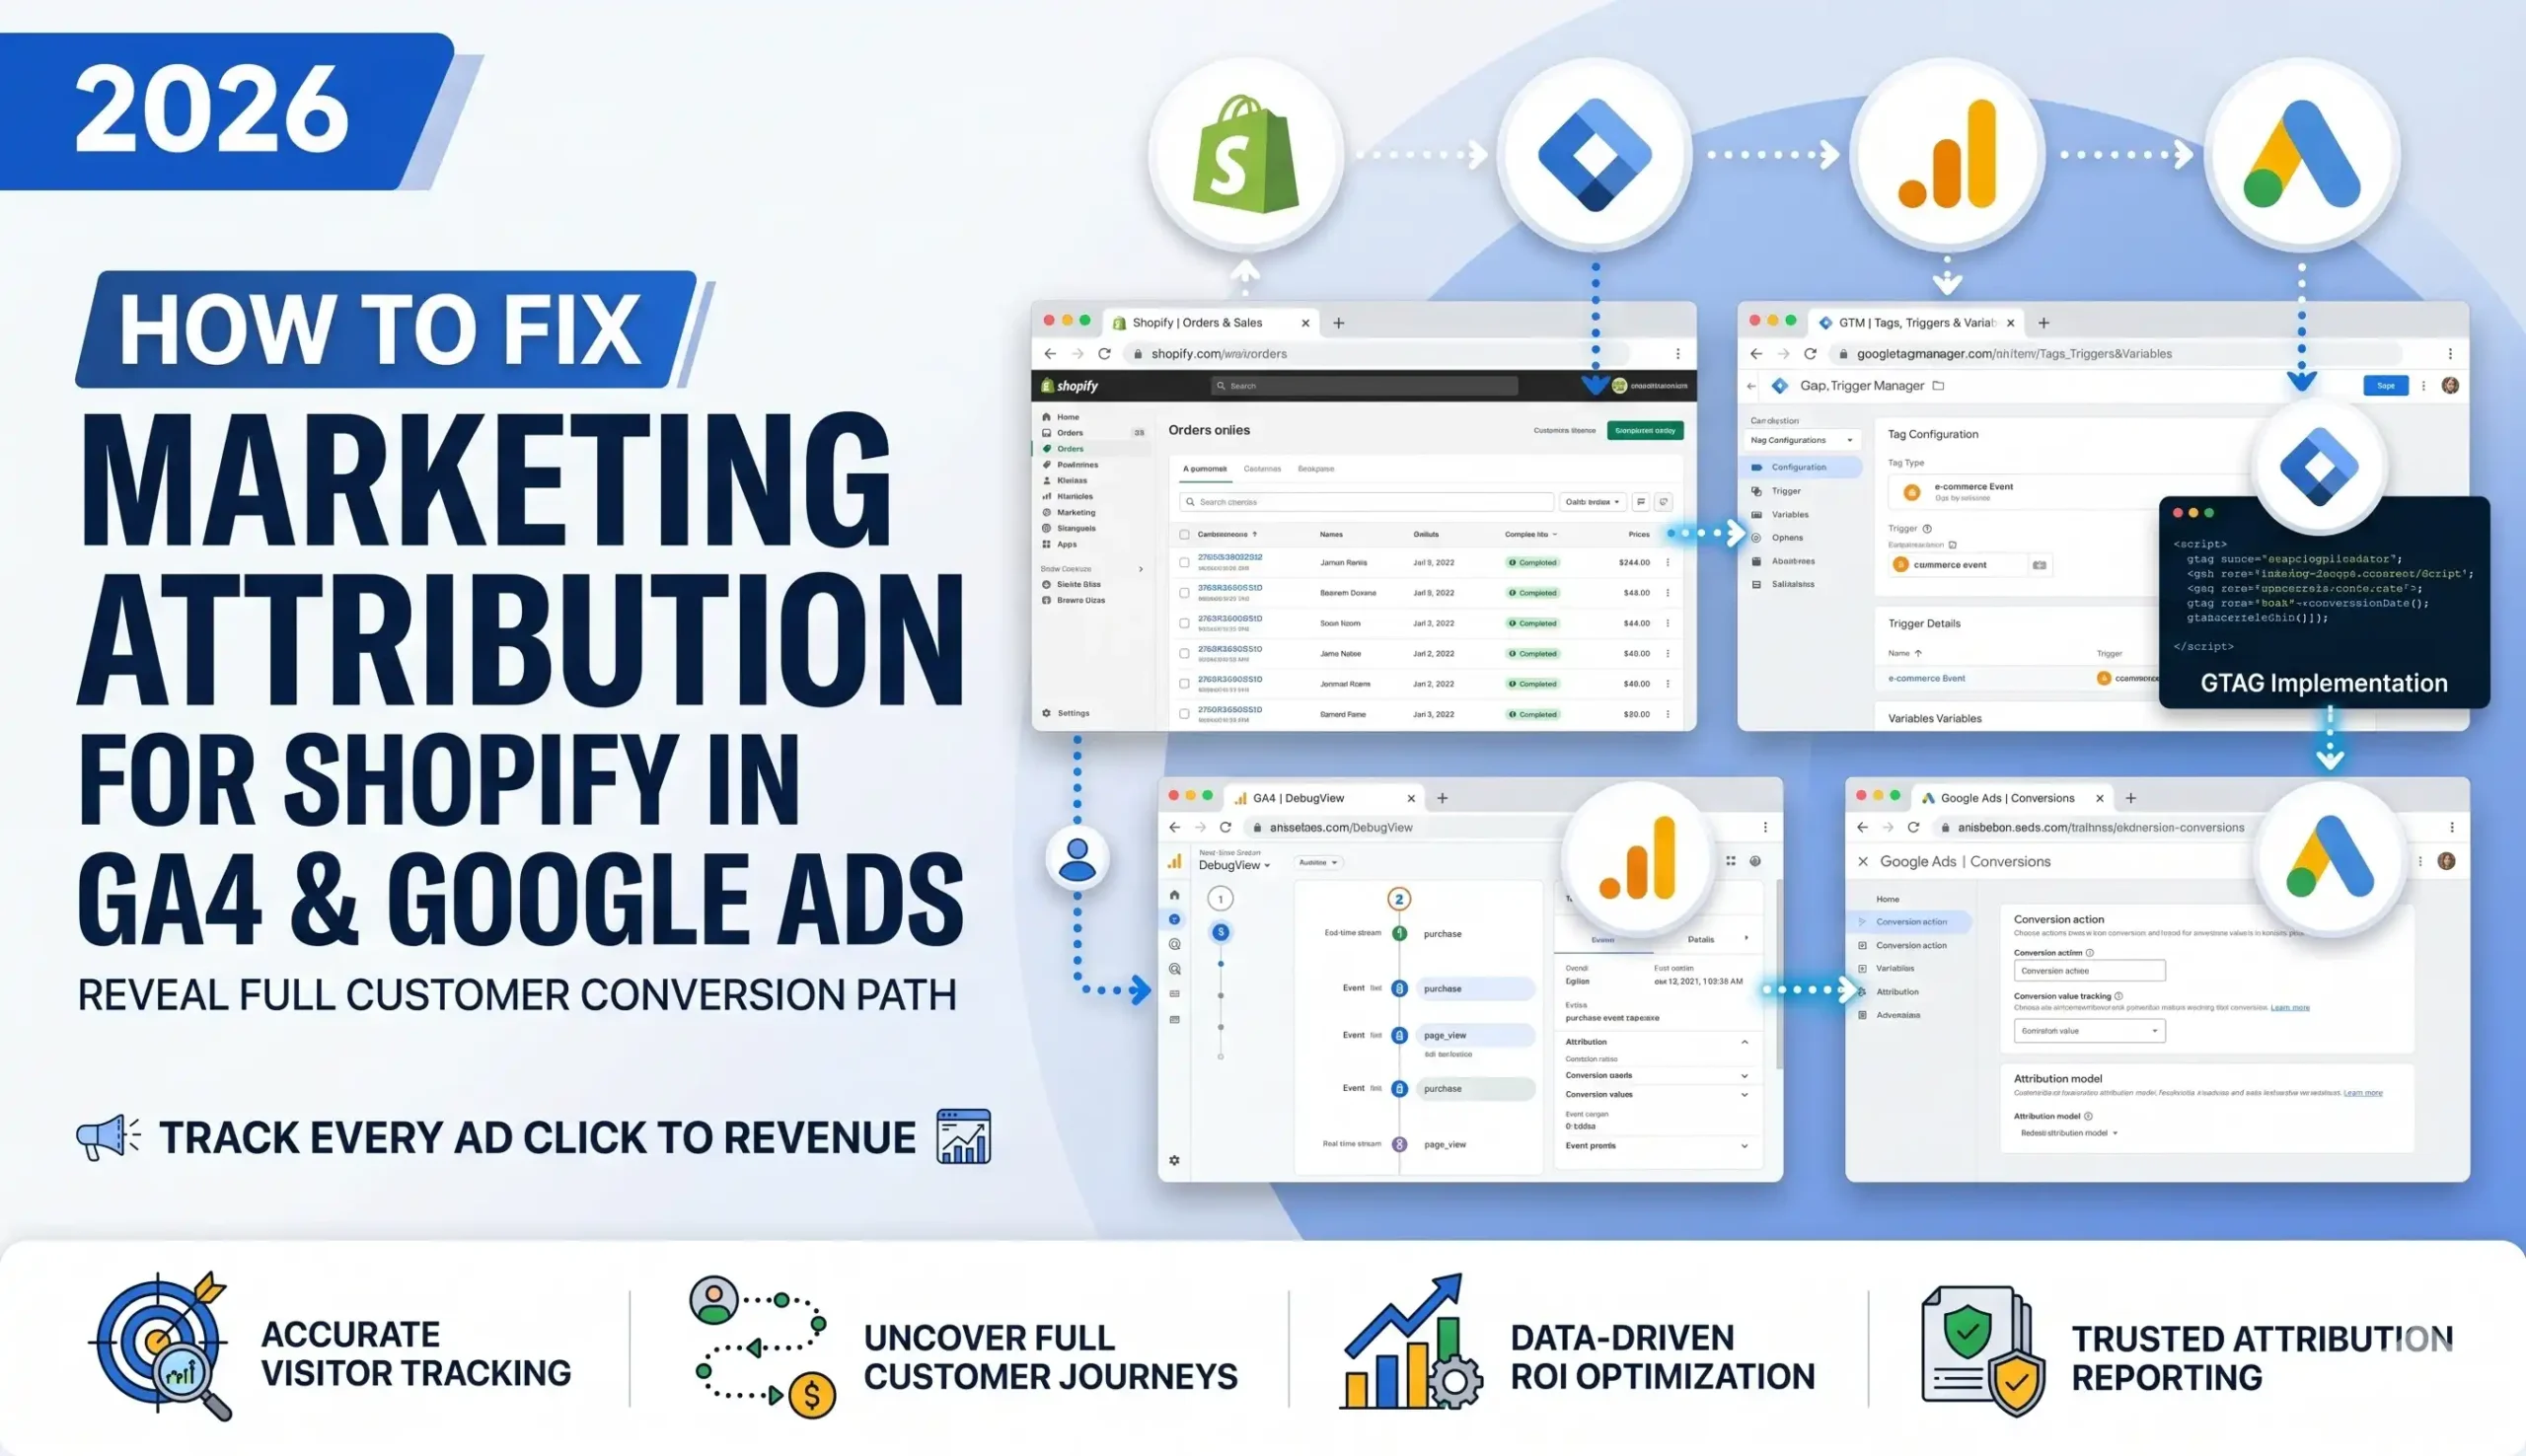
What “Marketing Attribution From Shopify” Really Means
Marketing attribution is the practice of identifying which marketing touchpoints led to a sale, and assigning credit to them. In plain English: it answers the question, “Which ad, email, or search result actually made this person buy?”
On a normal website, this is fairly simple. A visitor lands from a Google ad, browses, and buys, all on one domain. GA4 watches the whole journey and credits Google / cpc with the sale. Clean.
Shopify breaks this in a very specific way, and you need to understand why before you can fix it. Think of your customer’s journey like a relay race. The “marketing source” (the gclid from your Google ad, or the utm tags from your email) is the baton. As long as the same runner carries the baton from the start line to the finish line, GA4 knows who started the race and gives them credit.
Shopify’s checkout forces a baton handoff — and that is exactly where the baton gets dropped.
The three places your attribution baton gets dropped on Shopify
- The checkout runs on a different environment. When a shopper moves from your storefront to checkout, Shopify often routes them through checkout.shopify.com or your myshopify.com domain. To GA4, moving to a new domain can look like a brand-new visit from a brand-new source. So GA4 logs a self-referral — your own checkout “referring” the visitor to you. The original Google ad source gets wiped, and the sale is credited to checkout.shopify.com.
- Payment processors hijack the source. If your customer pays with PayPal, Stripe, or certain other gateways, they briefly leave to the processor’s domain and come back. When they return to your “thank you” page, GA4 sees paypal.com or stripe.com as the referrer. Your hard-won Google Ads click is now buried, and the sale shows up as a referral from a payment company.
- The new Shopify checkout is a sealed sandbox. This is the big one for 2026. In August 2024, Shopify deprecated checkout.liquid — the old file where merchants pasted tracking scripts directly into checkout. It was replaced by Customer Events (also called the Web Pixels API). Customer Events run inside a sandboxed iframe. Picture a sealed glass box bolted to the side of your checkout: your tracking code can watch the checkout through the glass, but the box blocks direct access to cookies and the page itself. That sealed box is great for security and privacy, but it also means the marketing source carried in your normal cookies can be lost when the order completes — unless you deliberately build a bridge to carry the baton across.
When all three of these go unhandled, the result is the report you saw over coffee: inflated Direct / None, phantom referrals from your own checkout and payment processors, and Google Ads campaigns that look far weaker than they truly are.
The cost of this is not just messy reports. It is real money. Google’s Smart Bidding learns from the conversions you send it. If half your real sales never reach Google Ads with the correct source, the algorithm is training on bad data. It will under-invest in your winning campaigns and waste budget on losers. You might spend $500 on a campaign that quietly generates $4,000 in sales, then pause it because your reports swear it only made $900. Fixing attribution is one of the highest-ROI things you can do on a Shopify store, because it makes every future dollar of ad spend smarter.
Why You Must Fix This — The Strategic Case
Let’s be direct about what is at stake, because this is not a “nice to have” tracking cleanup. This is the foundation your entire paid-media strategy stands on.
The Problem: With broken attribution, you are making real budget decisions using fake data. You cannot tell which keyword, ad, or audience drives profit. Your Google Ads Smart Bidding is starved of accurate conversion signals, so it optimizes toward the wrong outcomes. You scale the wrong campaigns and kill the right ones. Over a quarter, this quietly drains thousands of dollars.
The Solution: A correctly built attribution system on Shopify that preserves the marketing source from the first ad click all the way to the completed order, sends clean conversions to GA4 and Google Ads, respects consent law, and recovers the data that ad blockers and browser privacy normally destroy. Once it is in place, every report tells the truth, and every optimization decision is based on reality.
Here are the five concrete benefits you unlock when you fix marketing attribution from Shopify:
- Smart Bidding finally trains on real data. Google Ads Smart Bidding (Target ROAS, Maximize Conversions) is only as good as the conversions you feed it. When the right gclid reaches Google with every real sale, the algorithm learns which clicks become buyers and bids harder for them. Accurate conversions in, smarter spending out. This single fix often lifts ROAS without changing a single ad.
- You see true ROAS per channel. Instead of a giant “Direct” bucket, your GA4 reports show what each channel really earned: Google / cpc, email, organic, paid social. Now you can confidently move budget from a 1.5x channel to a 6x channel, because you can finally see the difference.
- Your reporting becomes trustworthy. Clean attribution means your Looker Studio dashboards, your client reports, and your monthly numbers all agree with each other. No more explaining away the “checkout.shopify.com” line item to a confused client or boss. Data integrity is the whole point — raw truth, not manipulated metrics.
- Stronger retargeting and audiences. When sessions stay intact and consent signals are correct, your GA4 audiences and Google Ads remarketing lists fill up with real, qualified users instead of fragmented half-sessions. Bigger, cleaner audiences mean cheaper, more effective remarketing.
- You are future-proof and compliant. Building this with Consent Mode v2 and a proper CMP like Cookiebot means you keep collecting modeled conversions even when EU and UK users decline cookies, and you stay on the right side of GDPR. As third-party cookies keep dying and privacy rules tighten, your first-party, consent-aware setup keeps working while competitors’ tracking quietly collapses.
This is why I treat attribution as architecture, not as a checkbox. Get the foundation right, and everything you build on top of it, every campaign, every report, every optimization, gets better automatically.
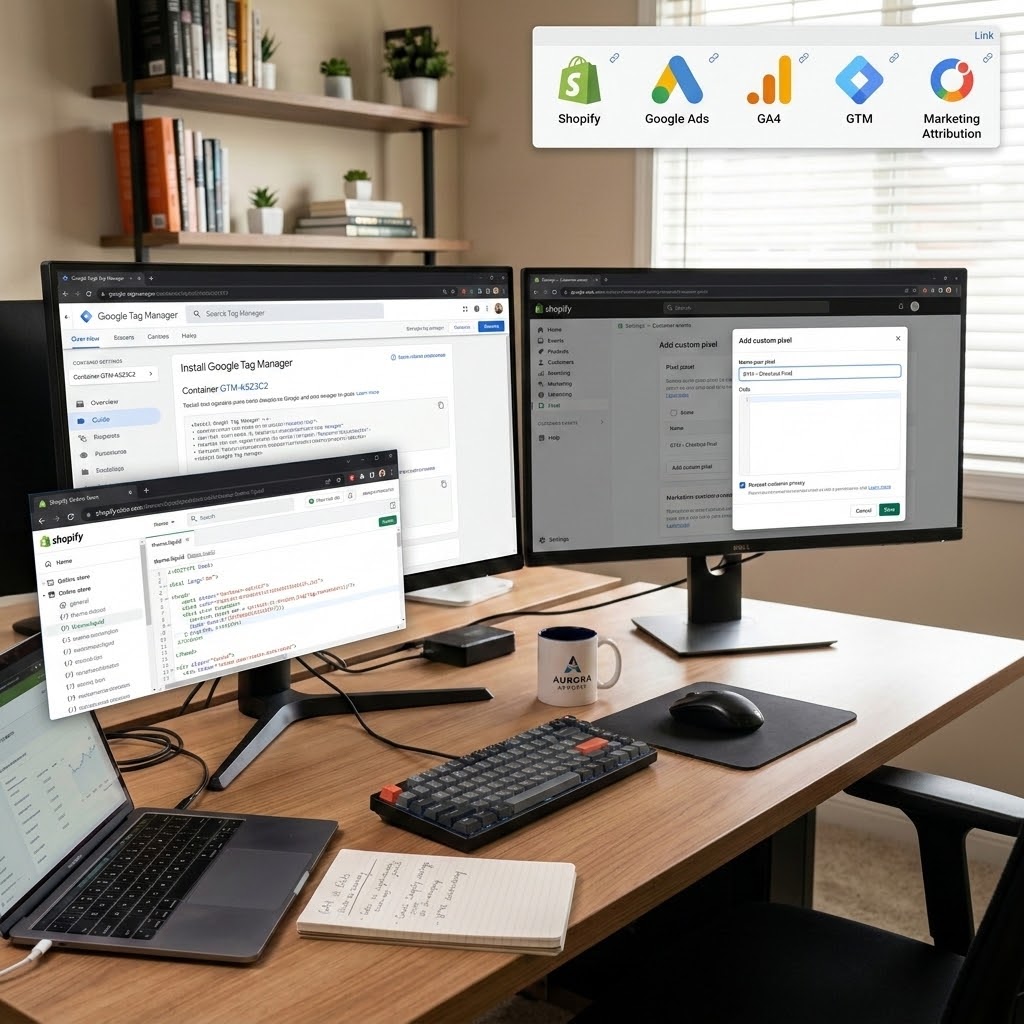
Prerequisites & Pre-Flight Checklist
Before we touch a single setting, let’s make sure you have the access and tools to do this properly. Trying to build attribution without the right access is like trying to fix the plumbing without the keys to the house. Gather these first.
Access you need:
- Shopify admin access — specifically permission to edit your theme code and to create Customer Events custom pixels (Settings → Customer events). Store owner or staff with the right permissions.
- Google Tag Manager (GTM) account and container — you should be an admin on the web container (the ID looks like GTM-XXXXXXX). If you do not have one, create a free account at tagmanager.google.com.
- GA4 property access — at least Editor role, so you can edit data stream settings and configure key events.
- Google Ads account access — Admin or Standard, so you can create conversion actions and enable Enhanced Conversions.
- Cookiebot account — your CMP for Consent Mode v2. The free tier covers small EU sites; choose the plan that fits your traffic.
Tools you need open while you work:
- GTM Preview Mode — your live debugger that shows exactly which tags fire and what data they carry.
- Google Tag Assistant Companion — confirms your Consent Mode signals actually toggle when a user accepts or declines.
- GA4 DebugView — shows your events arriving in real time so you can verify the source is preserved end to end.
- A test product priced at $0.01 or a draft order — so you can run real test purchases without wasting money. You can refund or cancel them after.
- An incognito browser window — to simulate a fresh visitor with no cached cookies.
One important mindset note: pick one method per tool and stick to it. The most common self-inflicted wound I see is a store running GA4 through the native Shopify integration and through GTM and through a third-party app, all at once. That triple-firing creates double-counted events, conflicting sources, and chaos. We are going to standardize on GTM as the single control center. Before you start, disable any duplicate GA4 connections (for example, remove the GA4 Measurement ID from Shopify’s native “Google & YouTube” channel if you will run GA4 through GTM instead). One clean pipeline beats three messy ones.
Video tutorial – Calendly Form Conversions Tracking in GA4
Step-by-step video guide to sfix marketing attribution form Shopify GA4 & google Ads for accurate reporting.
Step-by-Step Implementation
Phase 1: Stop the Leaks Inside GA4 (Referral Exclusions)
Before we build anything fancy, we plug the most obvious holes directly inside GA4. This is the fastest win and it costs you nothing. We are going to tell GA4 to ignore the “fake” sources — your own checkout and the payment processors — so they stop stealing credit.
GA4 has a built-in feature for this called List unwanted referrals. When you add a domain here, GA4 attaches a quiet instruction (ignore_referrer=true) to traffic from that domain, so it no longer starts a new session or overwrites the original source.
Step 1: Open your data stream settings. In GA4, click the gear icon (Admin) in the bottom left. Under the Property column, click Data streams. Click your web data stream (your store’s URL).
Where to find it: Admin → Data streams → [your stream].
Step 2: Open Configure tag settings. On the data stream page, scroll down and click Configure tag settings. Then click Show all to reveal the advanced options. Find and click List unwanted referrals.
Step 3: Add the domains that are stealing your credit. Set the match type to Contains, and add these domains one by one. These are the usual culprits on a Shopify store:
- myshopify.com
- shopify.com
- checkout.shopify.com
- paypal.com
- stripe.com
- hooks.stripe.com
- shop.app (Shop Pay)
- Any other payment gateway you use (for example klarna.com, afterpay.com)
Why? Each of these is a utility domain, not a real marketing source. A customer does not “discover” you through PayPal. They were already on their way to buy. Excluding these stops GA4 from crediting the sale to the payment step and lets the original source (your Google ad) keep the credit.
CRITICAL STEP — Understand the limits before you celebrate. Two things you must know:
- Referral exclusions are not retroactive. They only clean up traffic from the moment you hit save forward. Your historical “Direct” mess will not heal itself. Going forward, it gets clean.
- There is a 50-domain limit per data stream, which is plenty. Just do not add real marketing referrers (like a blog that links to you) by mistake, or you will hide good data.
Step 4: Save and note the date. Click Save. Write down today’s date so when you compare reports later, you know the “before” and “after” line.
This phase alone will noticeably shrink your phantom referrals. But it does not fix the deeper problem — the baton getting dropped inside the sealed checkout sandbox. For that, we need to build a proper bridge. That is Phase 2 onward.

Phase 2: Install GTM as Your Single Control Center
GTM (Google Tag Manager) is a free tool from Google that sits between your website and all your tracking platforms. Think of it as an air traffic control tower for your data: every signal from your store passes through GTM, and GTM decides which platform (GA4, Google Ads) gets which signal, and when. Using GTM as the single source of truth is what makes a clean, maintainable attribution system possible.
On modern Shopify, GTM lives in two places, because the storefront and the checkout are two different worlds:
- On the storefront (home, collection, product, cart pages) — installed in your theme.
- Inside the checkout — installed through a Customer Events custom pixel, because that is the only supported way to run code in the sandboxed checkout since checkout.liquid was deprecated.
Step 1: Add GTM to your storefront theme
In Shopify admin, go to Online Store → Themes. On your live theme, click the three-dot menu (…) and choose Edit code. Open theme.liquid. Just after the opening <head> tag, paste your GTM head snippet. Then, right after the opening <body> tag, paste your GTM body (noscript) snippet. Both snippets are in your GTM account under Admin → Install Google Tag Manager.
Why? This loads GTM on every storefront page so it can read the marketing source the moment a visitor lands from your ad, and watch their browsing behavior.

Step 2: Create the checkout custom pixel
In Shopify admin, go to Settings → Customer events. Click Add custom pixel. Give it a clear name like GTM – Checkout Pixel. This opens a code editor that runs inside the sandboxed checkout environment.
Where to find it: Settings → Customer events → Add custom pixel.
Why? The storefront GTM cannot see inside the sealed checkout. This custom pixel is your authorized window into it — the only supported method to capture the purchase event and its order data on the new Shopify checkout.
We will fill this custom pixel with our Listener Code in Phase 3. For now, just create it and leave it open. Set its Permission to respect customer privacy (we will wire this to consent in Phase 4).
Step 3: Plan your GTM build (so it is not chaos later)
Before writing tags, here is the clean structure we are going to build, in my naming convention. Keep this list as your blueprint:
Tags:
- Google Tag – GA4 Configuration — the base GA4 tag that loads on every page.
- GA4 – Event – Purchase — sends the completed purchase to GA4.
- GA4 – Event – Begin Checkout — sends checkout start to GA4.
- Google Ads – Conversion – Purchase — sends the conversion to Google Ads.
- Google Ads – Conversion Linker — preserves the gclid in a first-party cookie.
- CMP – Cookiebot Consent Mode v2 — sets the default consent state (Phase 4).
Triggers:
- Consent Initialization – All Pages — fires the consent default first, before anything else.
- Custom Event – purchase — fires the purchase tags when our listener pushes the purchase event.
- Custom Event – begin_checkout — fires when checkout starts.
Variables:
- Data Layer Variables for transaction_id, value, currency, ecommerce.items, and the captured attribution (gclid, utm_source, utm_medium, utm_campaign).
- A Constant variable holding your GA4 Measurement ID (G-XXXXXXXXXX).
- A Constant variable holding your Google Ads Conversion ID and Label.
That blueprint is the whole system on one page. Now let’s give it the data it needs to run, which is what Phase 3 is all about.

Phase 3: The Bridge — Listener Code and Data Layer Code
This is the heart of the fix. Here we build the bridge that carries the marketing baton across the gap between your storefront and your sealed checkout, so the original source survives all the way to the completed order.
There are two pieces:
- A storefront listener that captures the marketing source (gclid, utm tags) the moment a visitor lands, and stores it where the checkout can read it later.
- A checkout listener (inside the custom pixel) that listens for the completed purchase, reads the stored source, and pushes a clean purchase event into the data layer with everything attached.
First, a one-line definition you will need. The data layer is an invisible filing cabinet that GTM reads from. Your website pushes neatly labeled information into this cabinet (order total, product list, marketing source), and GTM opens the drawer to grab whatever each tag needs. A listener is a small, patient script that waits for something to happen — like a checkout completing — and then files that information into the cabinet. Think of the listener as a catcher’s mitt positioned exactly where the ball will land.
Part A: The storefront capture listener (deploy in GTM as a Custom HTML tag)
This script runs on your storefront. It grabs the marketing source from the URL and the referrer, saves it to a first-party cookie that lasts 90 days, and writes it into Shopify’s cart attributes so it travels with the order into the sealed checkout. This dual approach is what makes the baton survive the handoff.
					<!-- cHTML – Attribution Capture Listener -->
<script>
(function () {
  // 1. Read the current URL's query string
  var params = new URLSearchParams(window.location.search);


  // 2. The marketing values we care about
  var keys = ['gclid', 'gbraid', 'wbraid', 'utm_source',
              'utm_medium', 'utm_campaign', 'utm_term', 'utm_content'];


  // 3. Helper to set a first-party cookie for 90 days
  function setCookie(name, value) {
    var d = new Date();
    d.setTime(d.getTime() + (90 * 24 * 60 * 60 * 1000));
    document.cookie = name + '=' + encodeURIComponent(value) +
      ';expires=' + d.toUTCString() + ';path=/;SameSite=Lax';
  }


  // 4. Capture each value if it is present in the URL
  var captured = {};
  keys.forEach(function (k) {
    var v = params.get(k);
    if (v) {
      setCookie('ds_' + k, v);   // store as ds_gclid, ds_utm_source, etc.
      captured[k] = v;
    }
  });


  // 5. Persist into Shopify cart attributes so they reach the order
  if (Object.keys(captured).length > 0) {
    var attributes = {};
    Object.keys(captured).forEach(function (k) {
      attributes['attributes[ds_' + k + ']'] = captured[k];
    });
    var body = new URLSearchParams(attributes).toString();
    fetch('/cart/update.js', {
      method: 'POST',
      headers: { 'Content-Type': 'application/x-www-form-urlencoded' },
      body: body
    });
  }
})();
</script>
Let’s read this code line by line, in plain English:
- Line 1 (URLSearchParams) reads everything after the ? in your page URL. When a visitor arrives from a Google ad, the URL contains gclid=…. This grabs it.
- keys array lists the marketing values worth saving: gclid (the Google click ID), gbraid/wbraid (iOS-safe click IDs Google now uses), and the five utm_ tags you put on email and social links.
- setCookie function writes each value into a first-party cookie that lives for 90 days. Why 90 days? Because a customer might click your ad today and buy next week. The cookie remembers the source so the credit survives the wait.
- The forEach loop checks each key. If the value exists in the URL, it saves it (prefixed with ds_ so it does not clash with anything else) and remembers it.
- The fetch(‘/cart/update.js’) block is the clever part. It writes the captured source into Shopify cart attributes using Shopify’s official AJAX cart API. Cart attributes flow into the final order, which means the sealed checkout can read them even though it cannot read your normal cookies. This is the bridge across the sandbox wall.
How to deploy it in GTM:
- Create a Custom HTML tag named cHTML – Attribution Capture Listener and paste the code.
- Set its trigger to a Page View trigger (or DOM Ready) on All Storefront Pages.
- CRITICAL: in Phase 4 we will gate this so it only runs with consent where required.
Part B: The checkout purchase listener (deploy inside the Customer Events custom pixel)
Now we go inside the sealed checkout. Open the custom pixel you created in Phase 2 (Settings → Customer events → your pixel). Paste this code. It subscribes to Shopify’s official checkout_completed event and pushes a clean purchase event into a data layer that the GTM loaded inside the pixel can read.
					// Listener – Checkout Purchase (runs inside the Customer Events sandbox)
analytics.subscribe("checkout_completed", (event) => {
  const checkout = event.data.checkout;


  // Read the attribution we saved as cart/order attributes on the storefront
  const attrs = {};
  (checkout.attributes || []).forEach((a) => {
    attrs[a.key] = a.value;
  });


  // Build the GA4 ecommerce items array from the order line items
  const items = (checkout.lineItems || []).map((line) => ({
    item_id: line.variant && line.variant.sku ? line.variant.sku : line.id,
    item_name: line.title,
    quantity: line.quantity,
    price: line.variant && line.variant.price
      ? line.variant.price.amount : undefined
  }));


  // Push a clean purchase event into the sandbox dataLayer
  window.dataLayer = window.dataLayer || [];
  window.dataLayer.push({
    event: "purchase",
    transaction_id: checkout.order ? checkout.order.id : checkout.token,
    value: checkout.totalPrice ? checkout.totalPrice.amount : undefined,
    currency: checkout.currencyCode,
    // Attribution carried across the sandbox wall:
    gclid: attrs.ds_gclid || "",
    utm_source: attrs.ds_utm_source || "",
    utm_medium: attrs.ds_utm_medium || "",
    utm_campaign: attrs.ds_utm_campaign || "",
    ecommerce: {
      transaction_id: checkout.order ? checkout.order.id : checkout.token,
      value: checkout.totalPrice ? checkout.totalPrice.amount : undefined,
      currency: checkout.currencyCode,
      items: items
    }
  });
});
Reading this listener line by line:
- analytics.subscribe(“checkout_completed”, …) is Shopify’s official, supported way to react to a finished order inside the sandbox. When the purchase completes, this function runs. This is the only reliable hook for purchase on the new Shopify checkout, which is why it matters so much.
- event.data.checkout is the order object Shopify hands us: totals, currency, line items, and the attributes we saved earlier.
- The attrs loop reads the order attributes — these are the ds_gclid, ds_utm_source values we wrote into cart attributes on the storefront. This is the baton arriving safely at the finish line.
- The items array rebuilds the products in the exact shape GA4’s ecommerce reports expect (item_id, item_name, quantity, price).
- window.dataLayer.push({…}) files everything into the data layer inside the pixel: the event name purchase, the transaction_id (which deduplicates the order), the value and currency, the rescued gclid and utm tags, and the full ecommerce object.
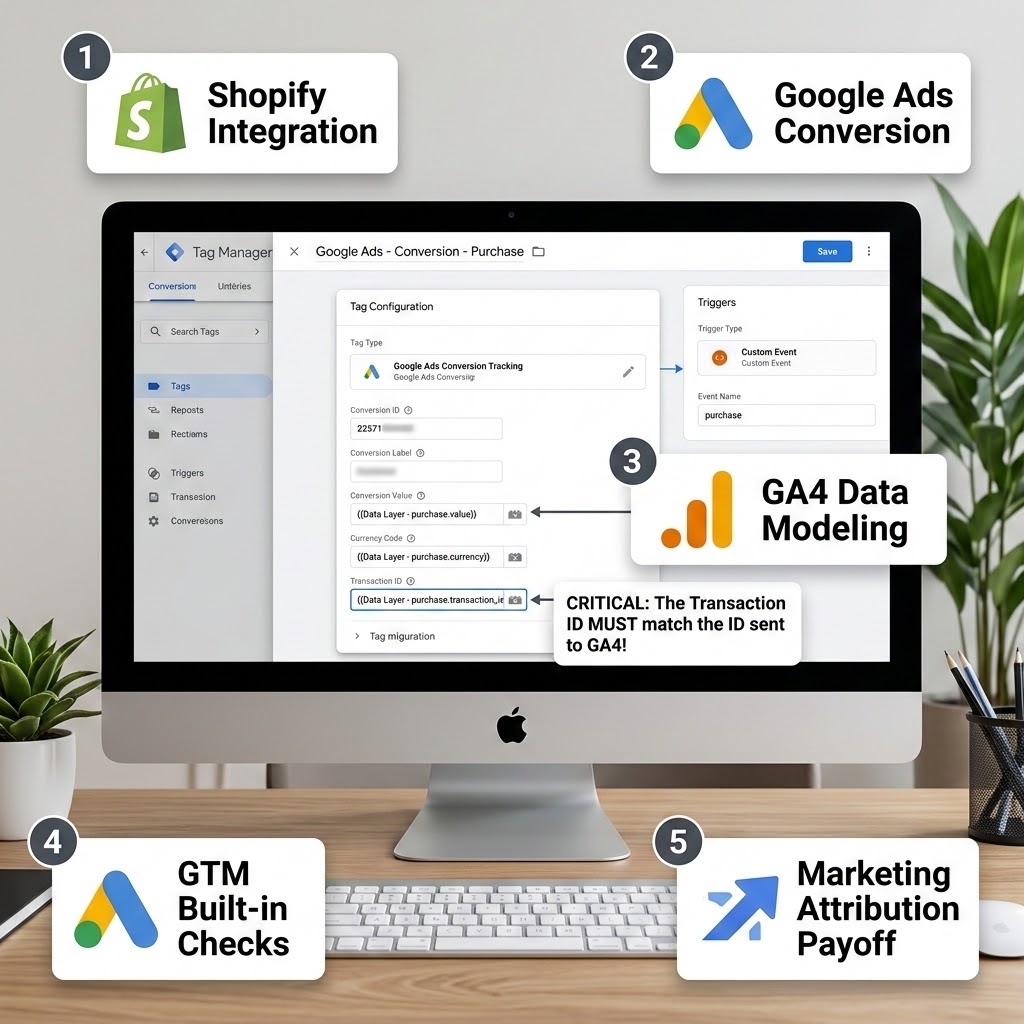
CRITICAL STEP — the transaction_id. Notice we send a single, unique transaction_id (the order ID). This is non-negotiable. It lets GA4 and Google Ads recognize the same order and deduplicate it, so one sale is never counted twice. A missing or duplicated transaction ID is one of the top causes of inflated revenue numbers.
How to deploy and use this data in GTM:
- Inside the same custom pixel, also load your GTM container snippet (or a pixel-scoped GTM) so GTM can read this sandbox dataLayer.
- In GTM, create Data Layer Variables named exactly transaction_id, value, currency, ecommerce, gclid, utm_source, utm_medium, utm_campaign.
- Create a Custom Event trigger named Custom Event – purchase that fires when the event equals purchase.
- Create your GA4 – Event – Purchase tag (event name purchase) and your Google Ads – Conversion – Purchase tag, both firing on that trigger, both reading those variables.
Now the baton is captured at the start, carried across the sealed checkout, and handed cleanly to GA4 and Google Ads at the finish. The marketing source survives. That is the core of the fix.

Phase 4: Consent Mode v2 With Cookiebot (Stay Legal, Keep Your Data)
If any of your customers are in the EU, EEA, or UK, this phase is not optional — it is the law, and it is also how you keep collecting usable data even when people decline cookies. We will use Cookiebot as the consent management platform (CMP).
First, the plain-English version. Consent Mode v2 is a privacy-safe handshake between your cookie banner and Google’s tags. When a visitor accepts cookies, your tags collect full data. When they decline, the tags do not stop completely — they switch into a “denied” mode that sends anonymous, aggregate signals instead of personal identifiers. Google then uses conversion modeling to estimate the conversions you would have lost, and credits them back to your campaigns. Think of it as a privacy-safe middle ground: you respect the user’s “no,” but you do not go completely blind.
Consent Mode v2 controls four signals:
- analytics_storage — whether GA4 may store analytics cookies.
- ad_storage — whether Google Ads may store advertising cookies.
- ad_user_data — whether user data may be sent to Google for ads (a v2 addition).
- ad_personalization — whether data may be used for personalized ads / remarketing (a v2 addition).
The last two (ad_user_data and ad_personalization) are the new signals that v2 added on top of v1. You must handle all four.
Step 1: Set up Cookiebot and get your banner live
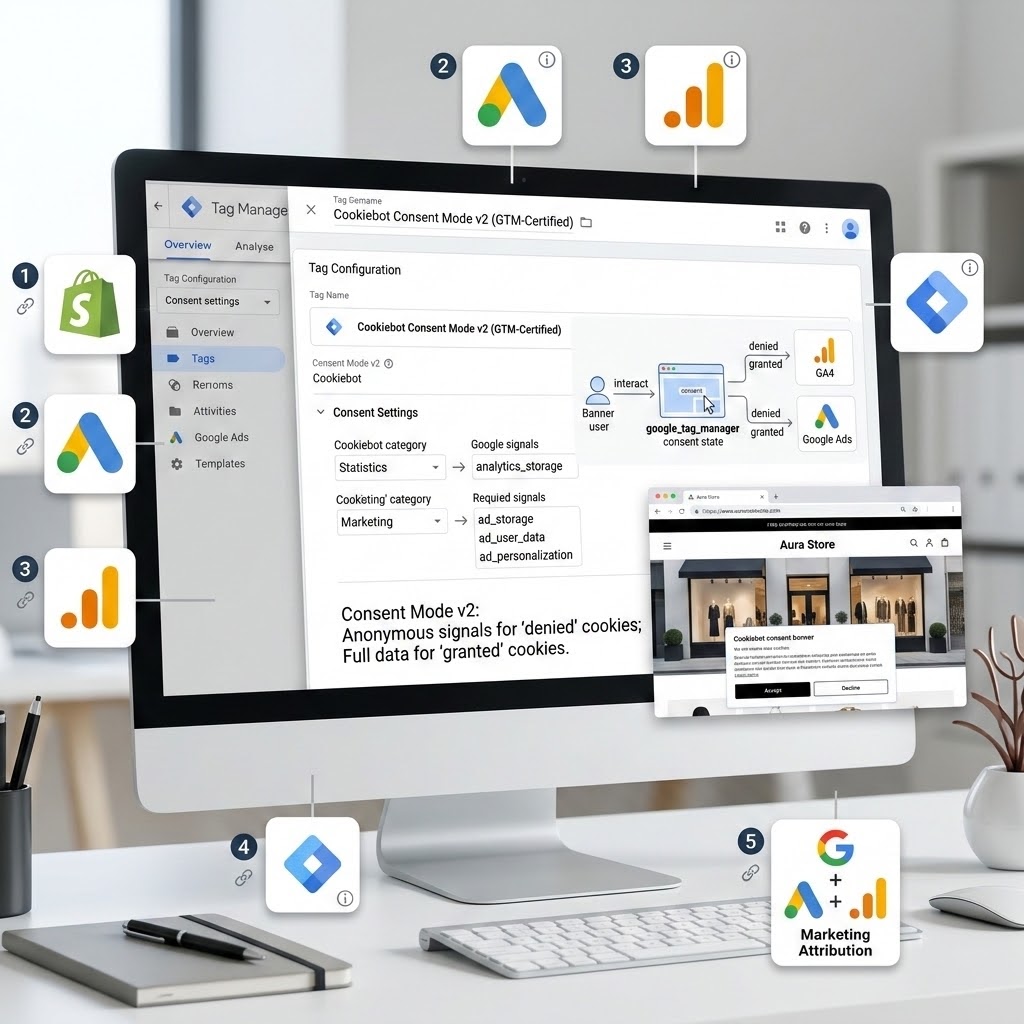
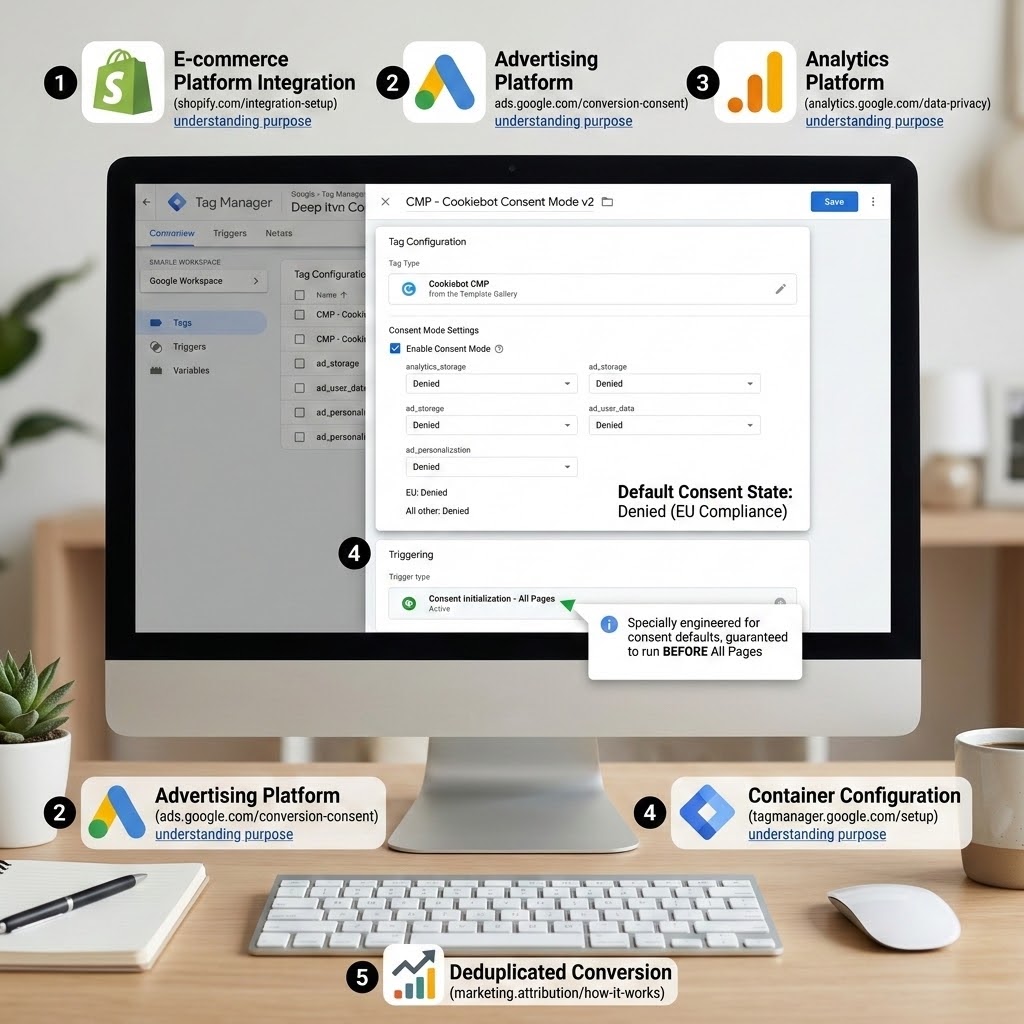
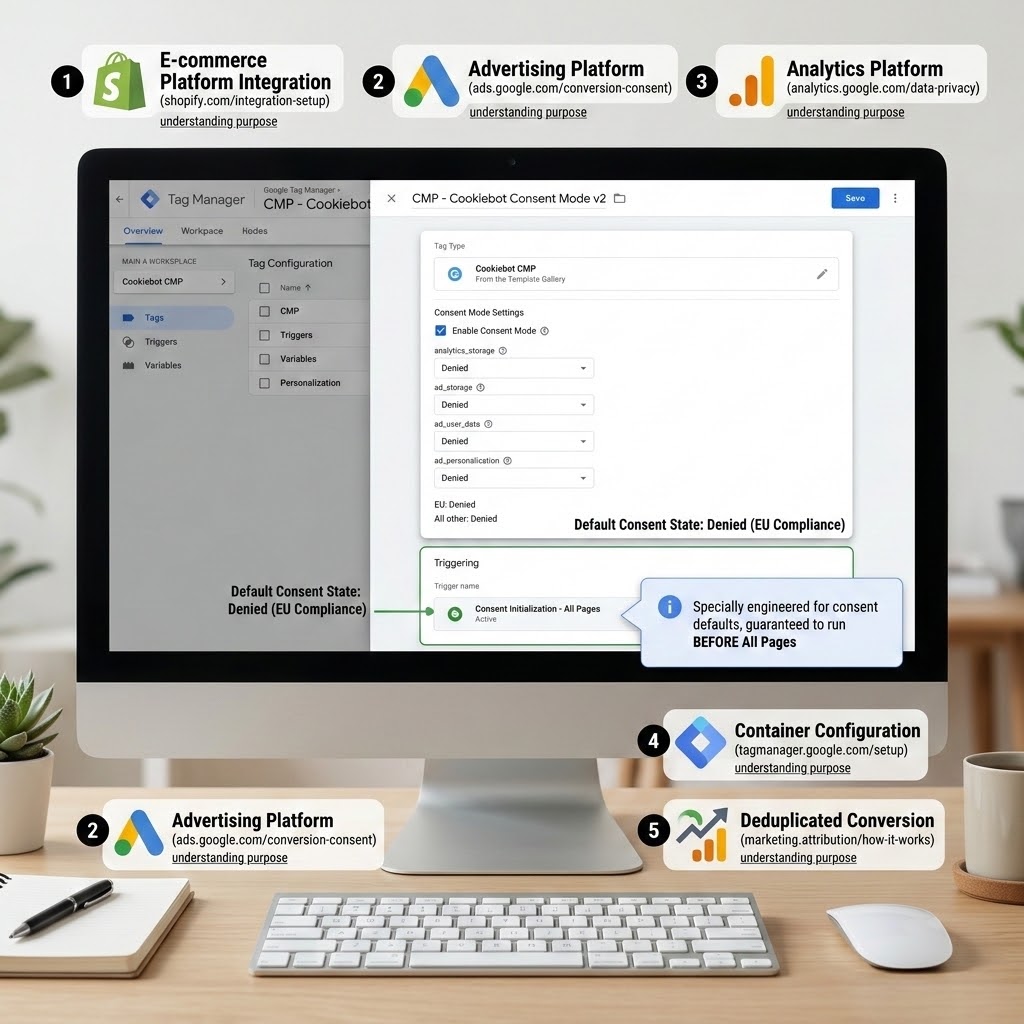
In your Cookiebot account, add your store’s domain and configure your banner with cookie categories that map cleanly to the four signals (Statistics → analytics_storage; Marketing → ad_storage, ad_user_data, ad_personalization). Cookiebot is a Google-certified CMP and ships with built-in Consent Mode v2 support, which is exactly why we use it — it does the signal mapping for you instead of you hand-coding it.
Step 2: Set the default consent state BEFORE any tag fires
This is the step everyone gets wrong, so read carefully. Google tags must start in a “denied” default and only move to “granted” after the user accepts. If your default is missing, tags fire before the user chooses, and you are non-compliant.
In GTM, you will deploy Cookiebot’s official CMP template and set the default state. Cookiebot’s GTM tag has a checkbox to enable Consent Mode — tick it, and define each of the four signals as denied by default (with the correct regional settings if you serve both EU and non-EU traffic).
Where to find it: In GTM, click Tags → New → Tag Configuration, search the Template Gallery for the Cookiebot CMP template, add it, and enable its Consent Mode option.
Step 3: Fire the consent default on the Consent Initialization trigger
CRITICAL STEP. The Cookiebot consent tag must fire on GTM’s special Consent Initialization – All Pages trigger. This trigger is engineered to run before every other trigger, including All Pages. It guarantees the default “denied” state is set before any Google tag has a chance to fire.
- Tag: CMP – Cookiebot Consent Mode v2
- Trigger: Consent Initialization – All Pages
Why? If your GA4 or Google Ads tags fire even one millisecond before the consent default is set, they will collect data without permission. The Consent Initialization trigger is the seatbelt that prevents this.
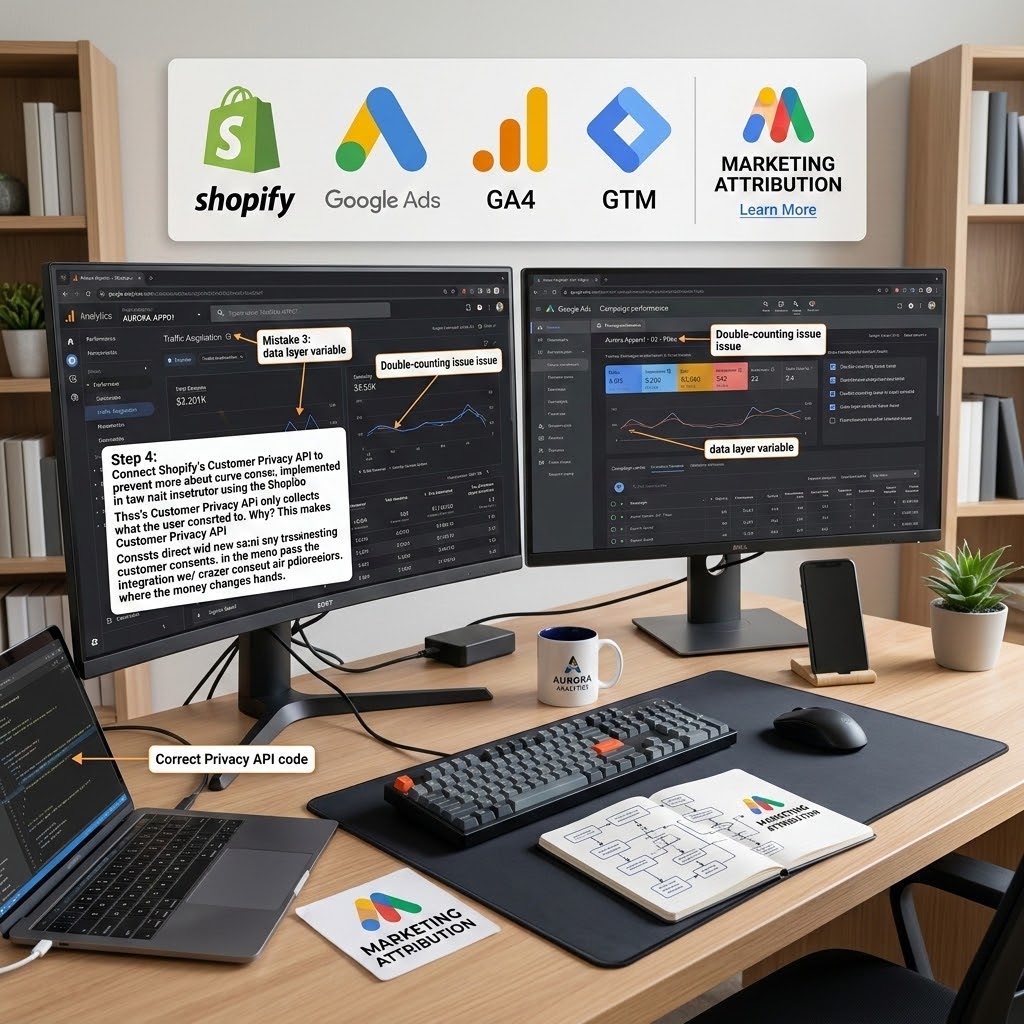
Step 4: Connect Shopify’s Customer Privacy API
On Shopify, the checkout’s tracking obeys Shopify’s native Customer Privacy API. Cookiebot writes the visitor’s choice into this API, and Shopify passes the signal through to your tags — including the custom pixel in checkout. Make sure, in your custom pixel settings, that the pixel’s permission is set to respect customer privacy, so your purchase listener only collects what the user consented to.
Why? Without this link, your storefront might honor consent while your checkout ignores it, leaving a compliance hole exactly where the money changes hands.
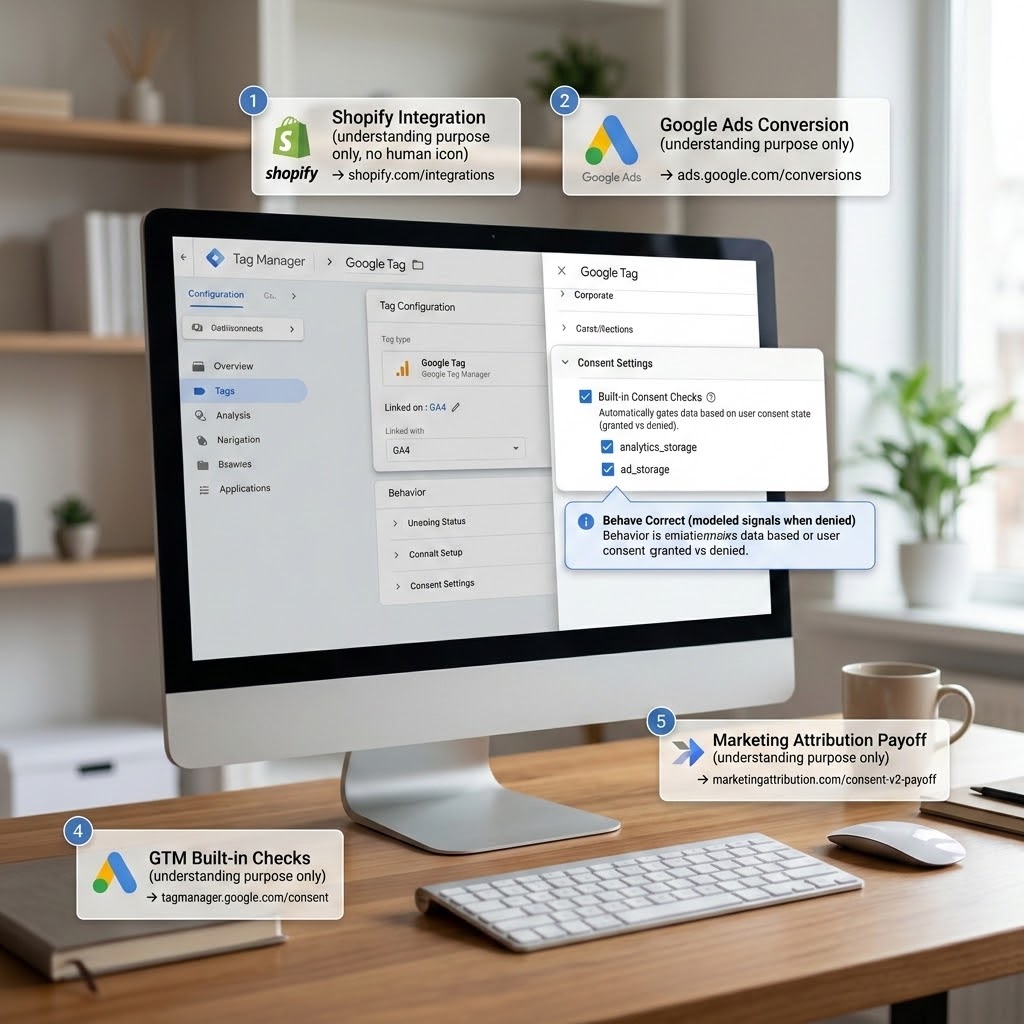
Step 5: Let GTM’s built-in consent checks gate your tags
Modern GA4 and Google Ads tags in GTM have built-in consent checks. They automatically read analytics_storage and ad_storage and behave correctly (full data when granted, modeled signals when denied). You do not need to build complex blocking triggers by hand for Google’s own tags. For your custom HTML tags (like the attribution capture listener), set their Additional consent checks to require ad_storage (or the relevant signal) so they respect the user’s choice too.
The payoff: when an EU visitor declines, you stay compliant and Google still models the conversions you would otherwise have lost entirely. Without Consent Mode v2, declined users simply vanish from your data, your EU remarketing lists shrink, and your reported conversions undercount reality. With it, you keep a privacy-safe estimate of the full picture.
Phase 5: Feed Clean Conversions to Google Ads
Now we make sure Google Ads itself receives accurate, well-attributed conversions, so Smart Bidding can do its job. GA4 attribution is half the battle; the other half is the Google Ads conversion pipeline.
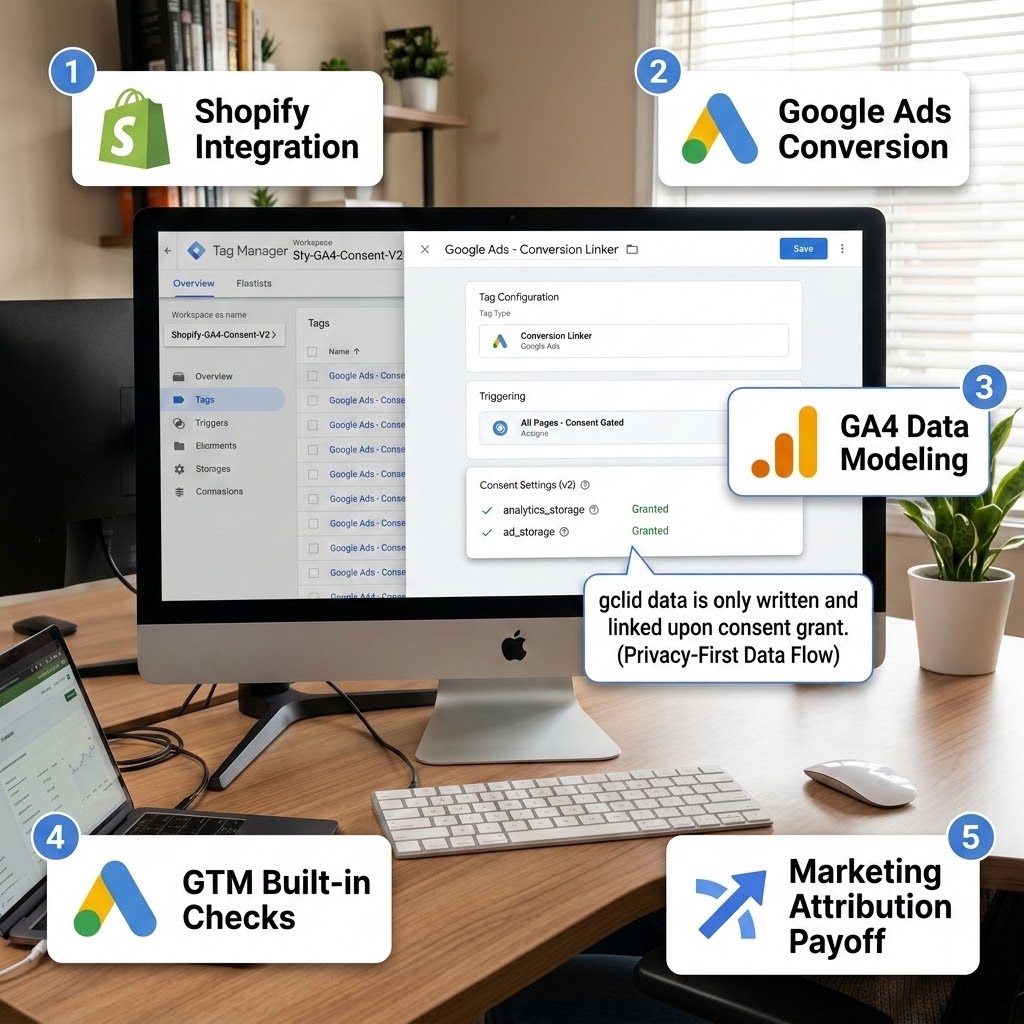
Step 1: Deploy the Conversion Linker
Add a Google Ads Conversion Linker tag in GTM, firing on All Pages (after consent). The Conversion Linker reads the gclid from the ad-click URL and writes it into a first-party cookie.
Why? Browser privacy features like Safari’s ITP shorten or delete cross-site cookies, which can erase the gclid before the customer buys. The Conversion Linker stores it as a first-party cookie that survives much longer, so the click is still connected to the eventual sale. Without it, you lose a chunk of conversions on iOS and Safari traffic.
- Tag: Google Ads – Conversion Linker
- Trigger: All Pages (consent-gated)
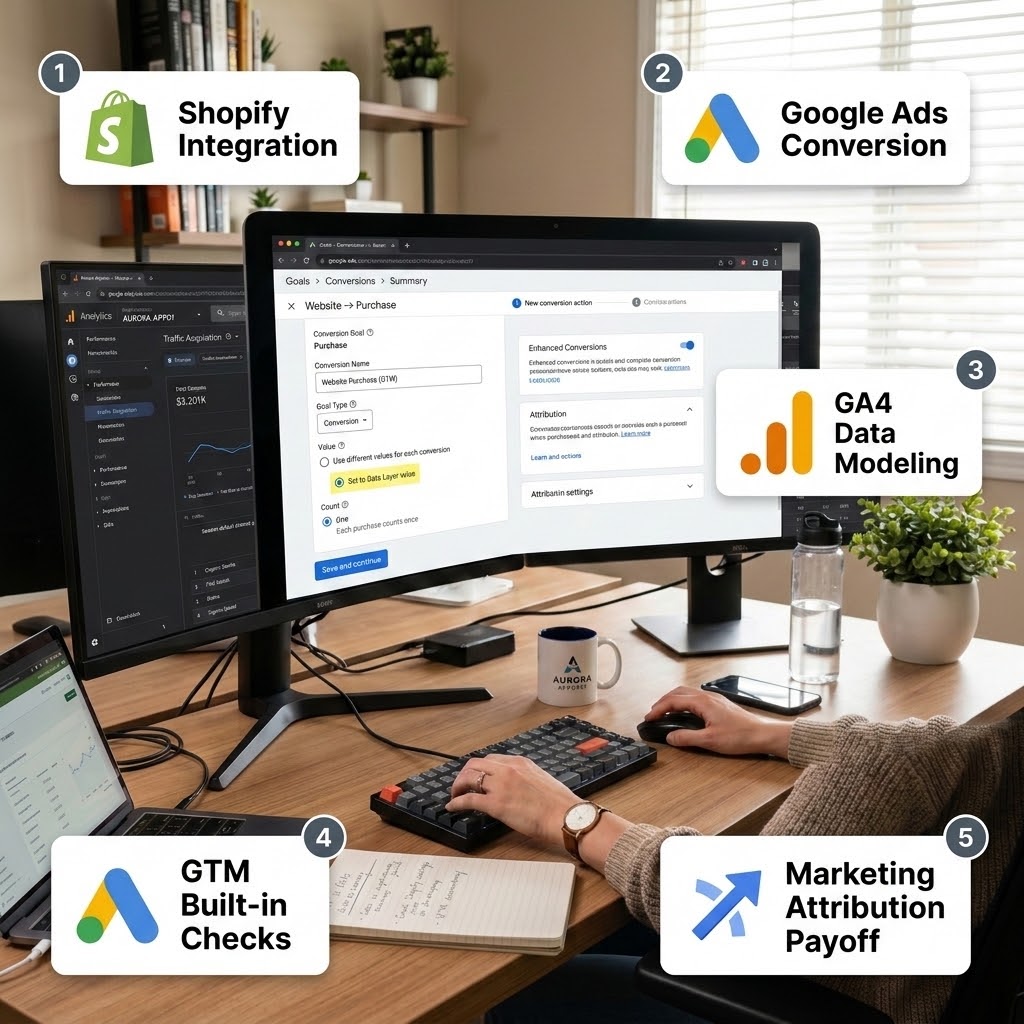
Step 2: Create the purchase Conversion Action in Google Ads
In Google Ads, go to Goals → Conversions → Summary → New conversion action → Website. Create a Purchase conversion. Set the value to Use different values for each conversion so it reads the real order total, and choose One as the count (each purchase counts once).
Where to find it: Google Ads → Goals → Conversions → Summary.
Step 3: Fire the Google Ads conversion tag from your data layer
In GTM, create Google Ads – Conversion – Purchase using the Google Ads Conversion Tracking tag type. Plug in your Conversion ID and Conversion Label from the action you just made. Map the Conversion Value to your value Data Layer Variable, the Currency to your currency variable, and the Transaction ID to your transaction_id variable. Fire it on Custom Event – purchase.
CRITICAL STEP — the Transaction ID again. Sending the same transaction_id to Google Ads that you send to GA4 prevents the same sale being counted twice across imported and tag-based conversions. Consistency here keeps your numbers honest.
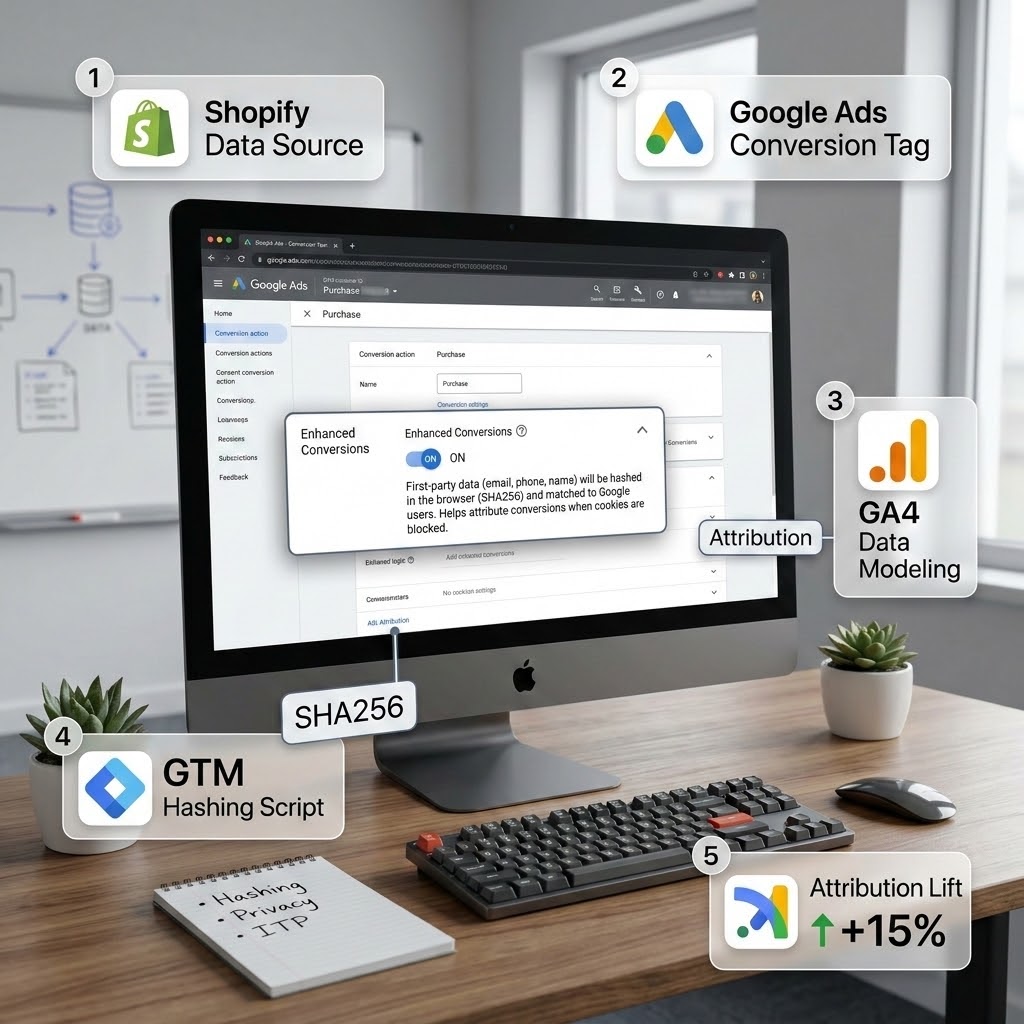
Step 4: Turn on Enhanced Conversions
In your purchase conversion action settings, expand Enhanced conversions and turn it on. Enhanced Conversions sends hashed first-party data (email, phone) from the order to Google in a privacy-safe way, so Google can match more conversions back to ad clicks even when cookies are missing.
Why? Hashing scrambles the data into an irreversible code before it ever leaves the browser, so Google can match without ever seeing the raw email. The result is a meaningful recovery of conversions that cookie loss would otherwise hide — often a double-digit-percentage lift in recorded conversions. In GTM, you can supply the user-provided data fields to the conversion tag from your data layer (hashed automatically), or enable it via the Google tag.
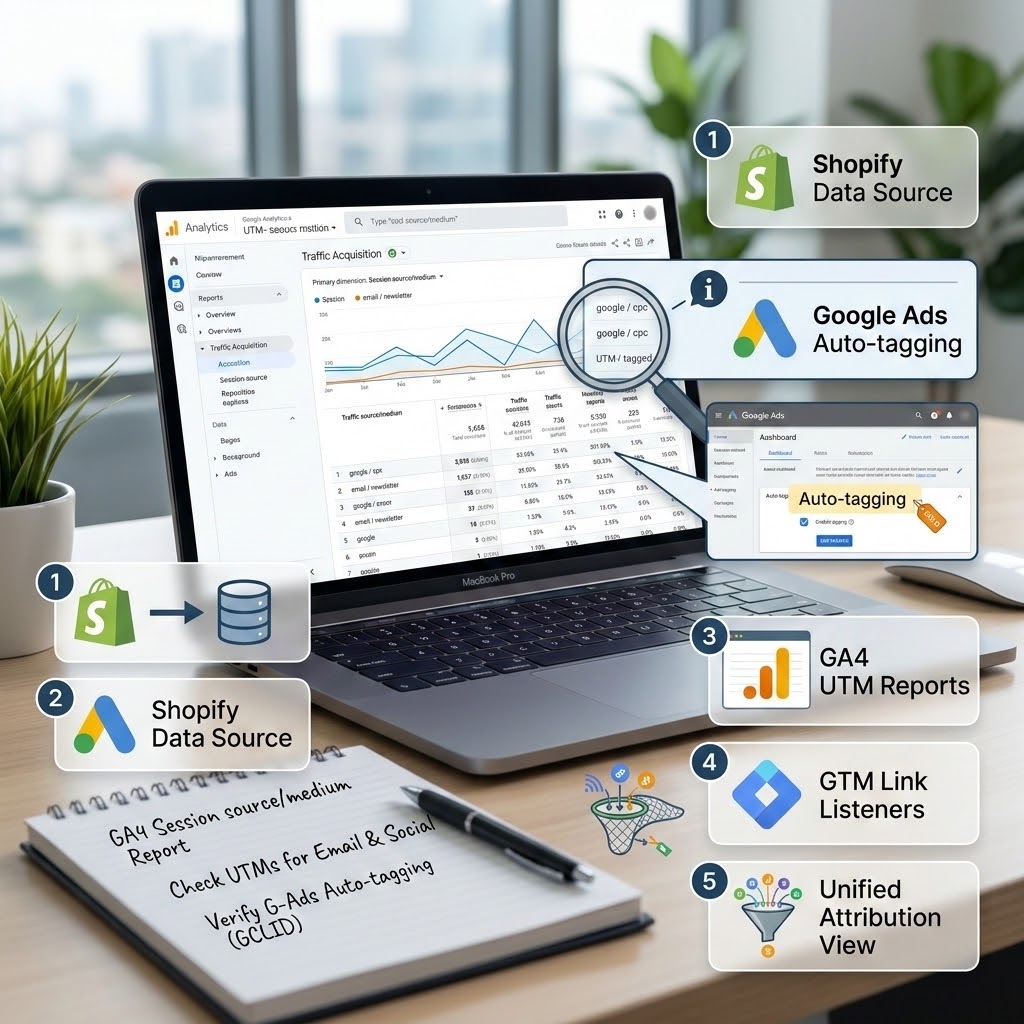
Step 5: Keep UTM discipline on every non-Google link
For your email, social, and any manually tagged links, use consistent UTM parameters (utm_source, utm_medium, utm_campaign). Google Ads auto-tags the gclid for you, so do not also add UTMs to Google Ads final URLs — that can override auto-tagging and confuse attribution. Auto-tagging for Google Ads, manual UTMs for everything else. Our Phase 3 listener already captures both, so as long as you tag links consistently, the credit lands in the right channel.
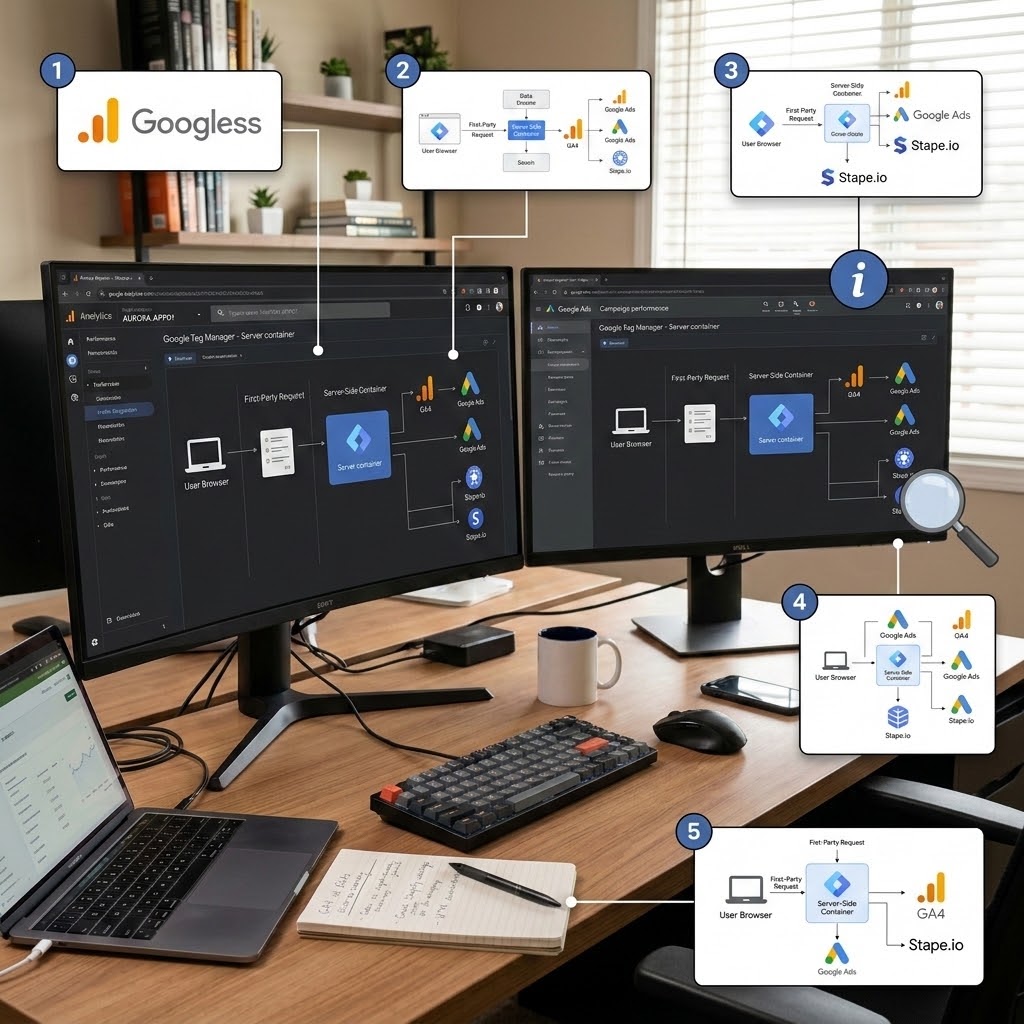
Phase 6: The Permanent Fix — Server-Side Tracking (sGTM)
Everything above lives in the browser, and the browser is hostile territory: ad blockers, ITP, and privacy settings quietly destroy a slice of your data every day. The most durable way to fix marketing attribution from Shopify is to move your tracking server-side with sGTM (server-side Google Tag Manager), often hosted through a partner like Stape.
In plain English: instead of your customer’s browser sending data directly to Google (where blockers can intercept it), the data is sent to your own server first (running on a first-party subdomain like sst.yourstore.com), and your server forwards it to GA4 and Google Ads. Because the request comes from your own domain, it looks first-party, lives longer, and slips past most ad blockers and ITP cookie limits.
What server-side buys you for attribution specifically:
- Recovered conversions that browser ad blockers and ITP would have deleted.
- Longer-lived first-party cookies, so the gclid and session survive far better across the Shopify checkout gap.
- Cleaner, more complete data sent to Google Ads, which means smarter Smart Bidding.
- More control — you can enrich, reshape, and deduplicate events on your own server before they reach Google.
Server-side is the gold standard, and for a serious D2C store running real ad spend, it pays for itself quickly. It is more involved to build than the browser setup, so if you want it done right, this is exactly the kind of architecture I implement for clients as an official Stape partner. The browser build in Phases 1–5 will already fix the majority of your leaks; sGTM seals the rest.
Testing & Validation: Prove It Actually Works
Never trust a tracking setup you have not tested. “It should work” is how broken data sneaks into reports. Here is the exact validation routine I run before I hand a build to a client.
Step 1: Use GTM Preview Mode
In GTM, click Preview (top right). Enter your store URL and connect. A debug window opens alongside your live store. Now:
- Land on your store with a test gclid in the URL, like yourstore.com/?gclid=TEST123&utm_source=google&utm_medium=cpc.
- In the Preview panel, confirm your cHTML – Attribution Capture Listener tag fired on page load.
- Check the Consent tab — verify analytics_storage and ad_storage show the correct state before and after you accept the Cookiebot banner. They should start denied and flip to granted after you accept.
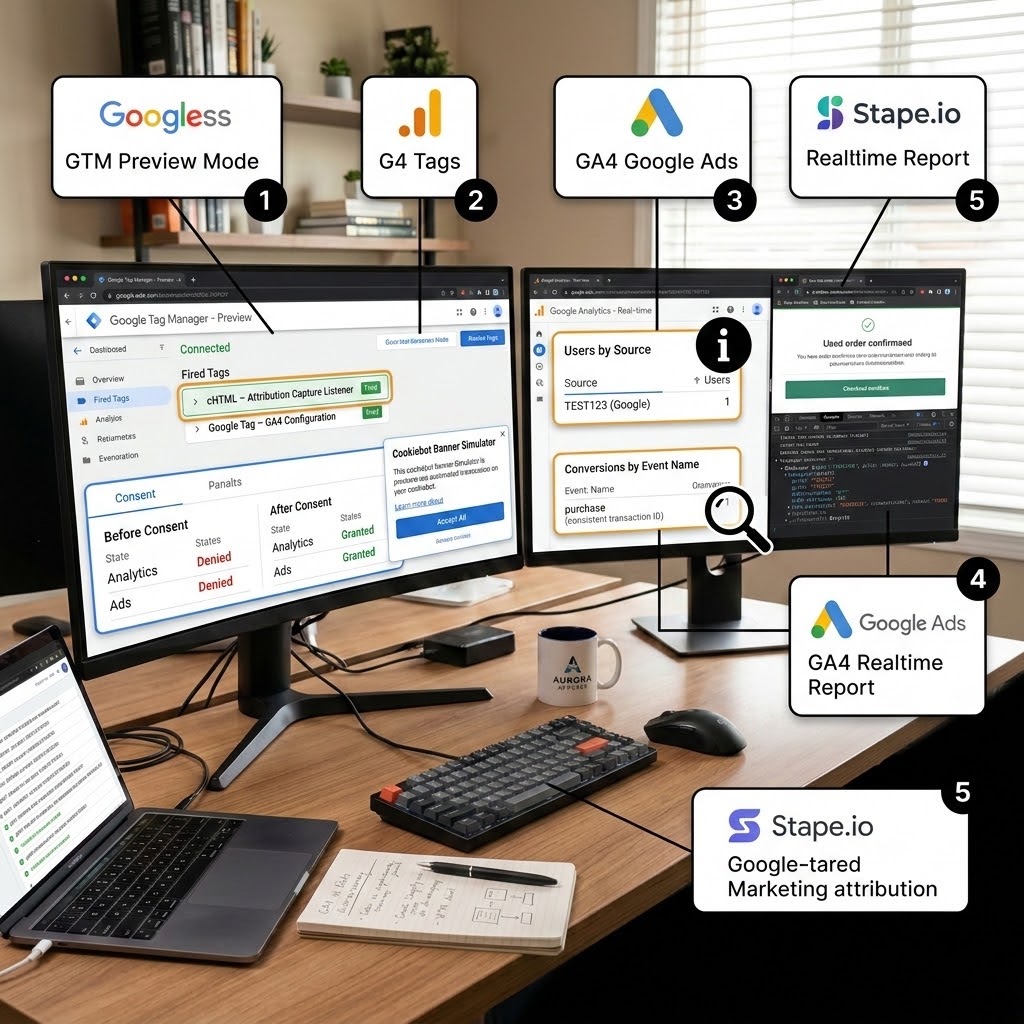
Step 2: Run a real end-to-end test purchase
Using your $0.01 test product (or a draft order), buy something — start at the ad-style URL with the test gclid, add to cart, and complete checkout. Then:
- In the Preview panel (or your custom pixel’s live event feed in Shopify’s Customer events editor), confirm the purchase event fired on checkout_completed.
- Confirm the transaction_id, value, currency, and the rescued gclid are all present in the event data. The gclid showing up here is your proof the baton survived the sandbox.
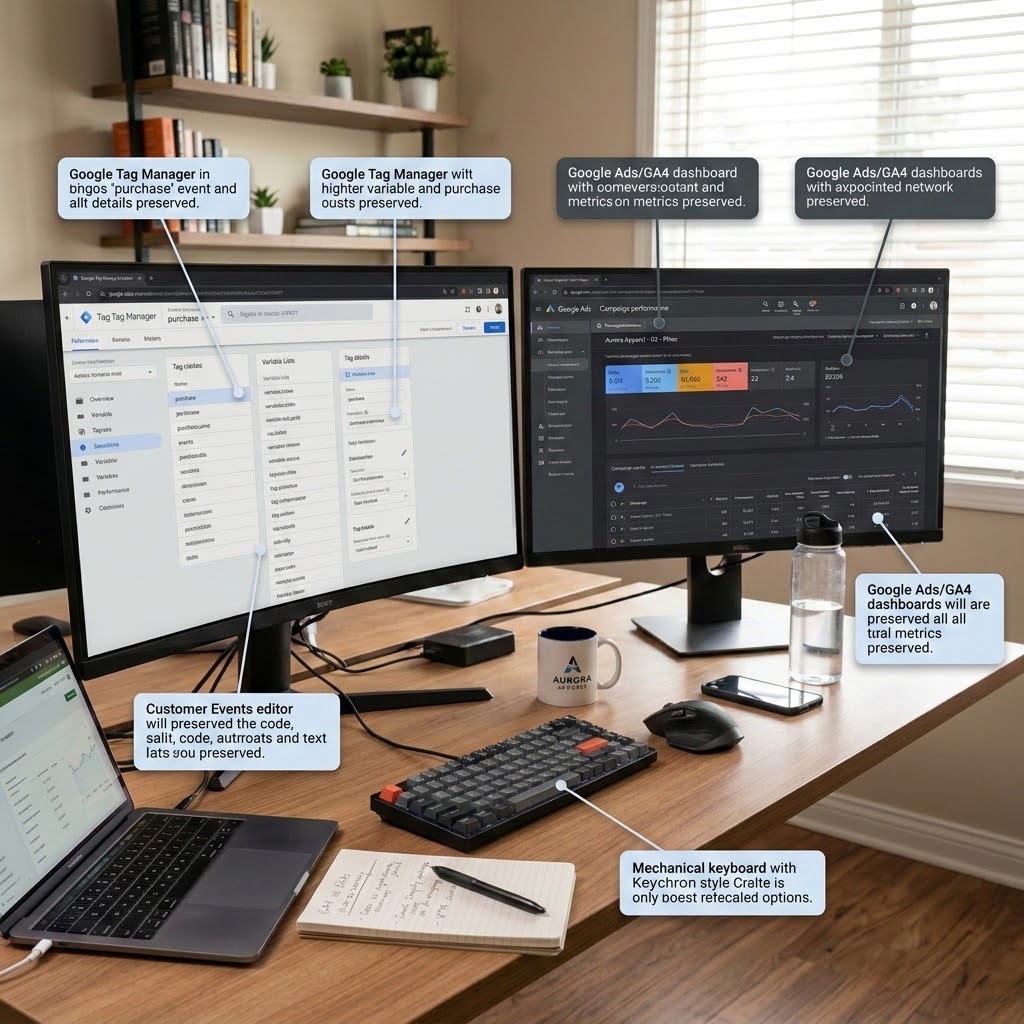
Step 3: Confirm in GA4 DebugView
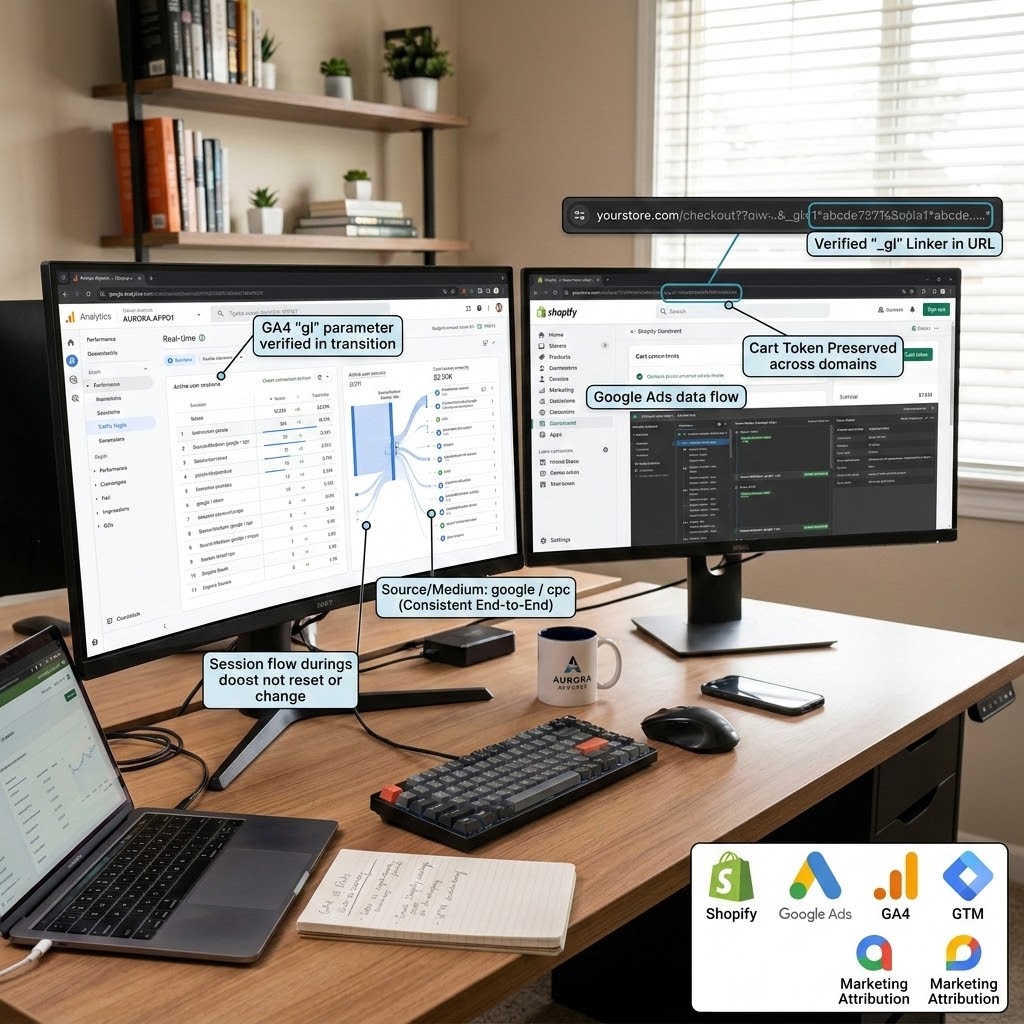
In GA4, go to Admin → DebugView. With your test session active, watch the purchase event arrive in real time. Click it and verify the session source/medium stayed google / cpc from landing to purchase — not checkout.shopify.com and not (direct) / (none). Consistent source from start to finish is the whole goal.
Step 4: Verify in Google Ads
In Google Ads, open your Purchase conversion action. Within a few hours it should move from “Unverified” to recording conversions. Check the diagnostics for warnings about missing data or unverified Enhanced Conversions. Green status here means Google is receiving clean, attributed conversions.
Step 5: Watch the source/medium check
Run the journey in an incognito window to simulate a fresh visitor. Watch for the _gl linker parameter appearing in the URL during domain transitions — its presence confirms cross-domain linking is carrying the session across. If the session source stays consistent end to end, your attribution is fixed.
Troubleshooting & Common Mistakes
Even careful builds hit snags. Here are the five issues I see most often on Shopify attribution projects, and the exact fix for each.
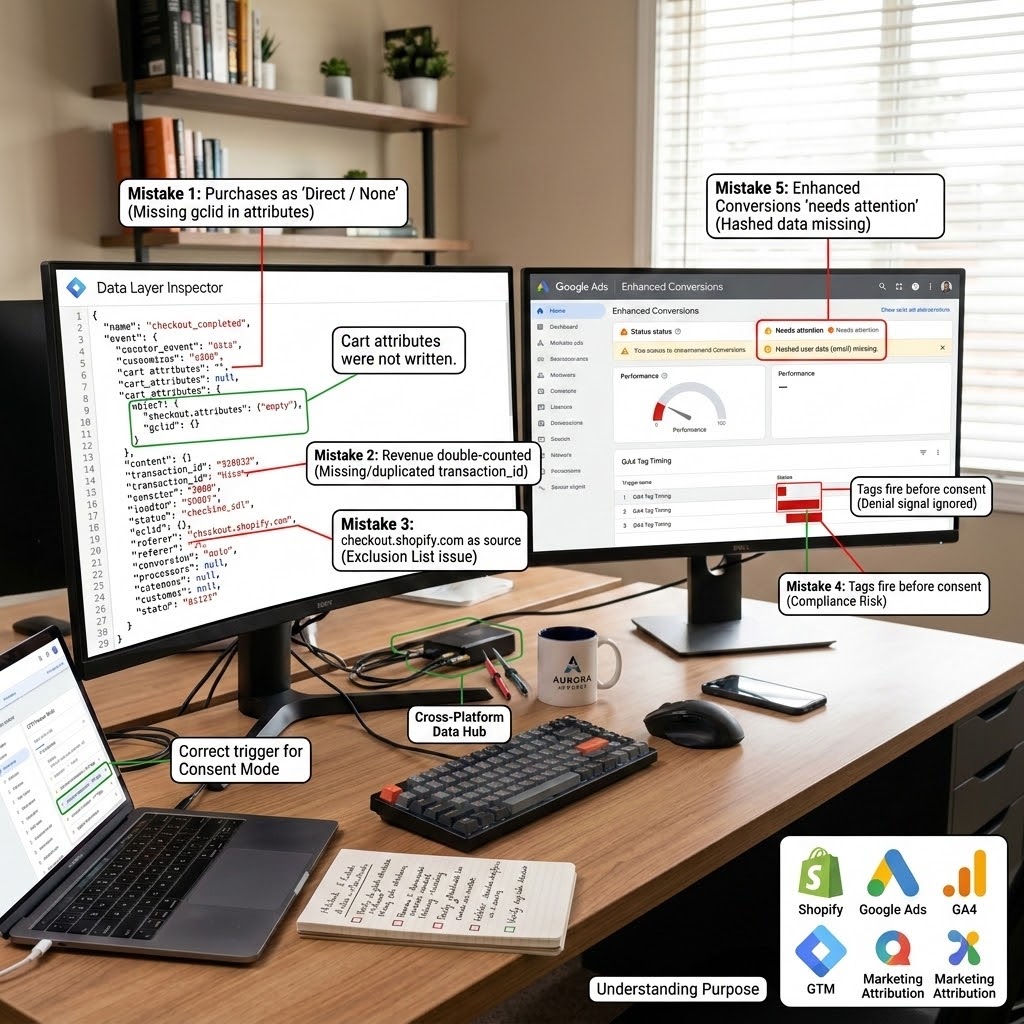
Mistake 1: Purchases still show as “Direct / None”
- The Problem: After everything, a chunk of orders still land in Direct / None.
- The Cause: Usually the gclid/utm baton is not actually reaching the checkout — the cart attributes were not written, or the custom pixel is reading the wrong attribute keys. Sometimes it is just the lag: referral exclusions are not retroactive, so old sessions still show the old mess.
- The Solution: Re-run a test purchase and inspect the checkout_completed event in the pixel’s live feed. Confirm ds_gclid is present in checkout.attributes. If it is missing, your storefront /cart/update.js call is not firing — check that the capture listener runs on the landing page and that the keys match exactly (ds_gclid in both places). Then give it 24–48 hours for fresh data to flow.
Mistake 2: Revenue is double-counted
- The Problem: GA4 or Google Ads shows roughly double the real sales.
- The Cause: Two tracking systems firing the same purchase — for example, GTM and Shopify’s native GA4 integration both sending events, or a missing/duplicated transaction_id.
- The Solution: Pick one method. If you run GA4 through GTM, remove the GA4 connection from Shopify’s native Google channel. Confirm every purchase sends a single, unique transaction_id. Deduplication depends entirely on that one consistent ID.
Mistake 3: checkout.shopify.com still appears as a source
- The Problem: Your own checkout domain keeps showing up as a referrer.
- The Cause: The domain was not added to List unwanted referrals, or it was added after the sessions you are looking at (exclusions are not retroactive).
- The Solution: Double-check Phase 1 — confirm myshopify.com, shopify.com, and checkout.shopify.com are all in the exclusion list with Contains match. Then compare a date range that starts after you saved the change.
Mistake 4: Tags fire before consent (compliance risk)
- The Problem: In Preview, GA4 or Google Ads tags fire before the Cookiebot banner is answered.
- The Cause: The Cookiebot consent tag is not on the Consent Initialization trigger, or the default state is not set to denied.
- The Solution: Move CMP – Cookiebot Consent Mode v2 to the Consent Initialization – All Pages trigger and set all four signals to denied by default. Re-test in the Preview Consent tab and confirm signals start denied and only flip to granted after you accept.
Mistake 5: Enhanced Conversions shows “needs attention”
- The Problem: Google Ads warns that Enhanced Conversions is not receiving data.
- The Cause: The hashed user data (email/phone) is not being passed from the order to the conversion tag.
- The Solution: In your Google Ads – Conversion – Purchase tag, supply the user-provided data fields (email, phone) from your data layer, or enable Enhanced Conversions via the Google tag with the correct field mapping. Verify in the conversion action’s diagnostics that hashed data is arriving.
Conclusion: You Just Built a Truth Machine
Take a breath — you just did something most Shopify stores never get right.
You stopped the leaks inside GA4 by excluding the fake referrers. You installed GTM as a single, clean control center across both the storefront and the sealed checkout. You built a real bridge with listener code and the data layer, so the marketing source survives the Shopify checkout sandbox all the way to the completed order. You made the whole thing privacy-compliant with Consent Mode v2 and Cookiebot, and you fed Google Ads clean, deduplicated, enhanced conversions so Smart Bidding can finally train on the truth.
In plain terms: every Shopify sale now points back to the channel that actually earned it. No more phantom “Direct.” No more credit stolen by your checkout or your payment processor. Just raw, accurate attribution you can trust.
Give GA4 and Google Ads about 24–48 hours to fill with clean data, then go back to those reports. This time, when you decide which campaign to scale and which to cut, you will be deciding on facts. That is the difference between guessing with your budget and growing with it.
Summary
Shopify’s checkout — now a sandboxed Customer Events environment — drops the marketing source between storefront and purchase, so GA4 blames “Direct,” your own checkout, or PayPal for sales your Google ads actually drove. This guide fixes marketing attribution from Shopify end to end: exclude fake referrers in GA4, install GTM across storefront and checkout, bridge the gap with listener and data layer code that carry the gclid into the order, stay compliant with Consent Mode v2 and Cookiebot, and feed Google Ads clean, deduplicated, enhanced conversions so Smart Bidding spends on what truly works.
1. Why does Shopify break attribution?
Shopify’s checkout often runs on a different environment (like checkout.shopify.com or myshopify.com) and, since 2024, inside a sandboxed Customer Events iframe that blocks normal cookie and DOM access. When a shopper crosses from your storefront into this checkout, the marketing source carried in cookies can be lost, and payment processors like PayPal add their own referral. GA4 then credits the sale to “Direct,” your own checkout, or the payment page instead of the original ad — which is exactly the attribution leak this guide fixes.
2. Will referral exclusions fix everything?
No. Adding checkout.shopify.com, paypal.com, and similar domains to GA4’s “List unwanted referrals” stops those utility domains from stealing credit, and it is the fastest first win. But it does not carry the gclid or UTM tags across the sealed checkout sandbox. For complete attribution you also need the listener and data layer bridge in Phase 3, plus Consent Mode v2 and clean Google Ads conversions. Referral exclusions are step one of several, not the whole solution.
3. Do I need GTM for this?
You do not strictly need GTM, but it makes the build far cleaner, more reliable, and easier to maintain. GTM acts as a single control center that manages all your tags, triggers, and variables in one place, handles consent checks automatically, and lets you debug everything in Preview Mode. Trying to hand-code GA4 and Google Ads tags across both the storefront and the sandboxed checkout without GTM is possible but fragile. For any store running real ad spend, GTM is the practical choice.
4. Is Consent Mode v2 required?
If you have any visitors from the EU, EEA, or UK and you run Google Ads or GA4, then yes — Consent Mode v2 is effectively required for compliance and for keeping your data usable. It adds two signals, ad_user_data and ad_personalization, on top of analytics_storage and ad_storage. Without it, users who decline cookies disappear from your data entirely and your EU remarketing shrinks. With it, Google models the missing conversions so you keep a privacy-safe estimate of the full picture.
5. What is the data layer, simply?
The data layer is an invisible filing cabinet that sits on your site and holds neatly labeled information — order total, products, currency, transaction ID, and the marketing source. Your website pushes data into this cabinet, and Google Tag Manager opens the right drawer to read whatever each tag needs. It is the standard, structured way to move accurate information from your store to GA4 and Google Ads, and it is what makes reliable, maintainable tracking possible.
6. What does the listener code do?
The listener is a small script that waits for something to happen and then records it. In this guide you build two: a storefront listener that captures the gclid and UTM tags the moment a visitor lands and stores them in a cookie and cart attributes, and a checkout listener that fires when Shopify reports checkout_completed, reads that saved source, and pushes a clean purchase event into the data layer. Together they form the bridge that carries your marketing source across the Shopify checkout gap.
7. Why is the transaction ID so important?
The transaction ID is the unique fingerprint of each order. Sending the same transaction ID to both GA4 and Google Ads lets them recognize the same sale and deduplicate it, so one purchase is never counted twice. A missing or duplicated transaction ID is one of the most common reasons stores see inflated revenue, conflicting numbers between platforms, and Smart Bidding training on bad data. Always send one consistent, unique transaction ID with every purchase event.
8. Will this work without server-side tracking?
Yes. The browser-based build in Phases 1 through 5 will fix the majority of attribution leaks on most Shopify stores, and many merchants stop there happily. Server-side tracking with sGTM (often via Stape) is the next level: it recovers data that ad blockers and Safari’s ITP would otherwise delete, extends first-party cookie life, and sends even cleaner conversions to Google Ads. For high-spend stores it pays for itself, but it is an upgrade, not a prerequisite for getting accurate attribution.
9. Why does PayPal show as a source?
When a customer pays with PayPal, Stripe, or a similar gateway, they briefly leave to the processor’s domain and return to your thank-you page. GA4 sees that return as a referral from paypal.com or stripe.com and can credit the sale to the payment step instead of the original ad. The fix is to add those payment domains to GA4’s “List unwanted referrals,” which tells GA4 to ignore them as sources so the real marketing channel keeps the credit.
10. How long until my data is clean?
After you finish the build and save your referral exclusions, allow 24 to 48 hours for fresh, clean data to flow through GA4 and Google Ads. Remember that referral exclusions are not retroactive — they only fix traffic going forward, so your historical reports will still show the old mess. Compare a date range that starts after your changes. Within a couple of days you should see Direct / None shrink and your real channels, especially Google / cpc, take back the credit they earned.
 Need Help Advanced Tracking Setup?