
Table of Contents
ToggleQuick Answer
Setting up reliable tracking on Funnelish sales funnels requires deploying Google Tag Manager (GTM) across your funnel apps, injecting a dynamic e-commerce JavaScript event listener, and configuring cross-domain session linking to bridge your primary storefront (like Shopify) with Funnelish third-party checkouts. By deploying standardized Data Layer events, you can feed accurate e-commerce parameters (purchase, begin_checkout, upsell conversions) simultaneously into Google Analytics 4 (GA4), the Triple Whale Pixel, and Microsoft Clarity without duplicating transactions or breaking attribution models.
Key Takeaways
- Stop Data Loss on Third-Party Checkouts: Default native Funnelish pixel integrations often fail on one-click post-purchase upsells and downsells, causing up to 40% ROAS misattribution in paid ad dashboards.
- Unify User Journeys via Cross-Domain Linker: Passing the GA4 _gl parameter, _fbp, _fbc, and Triple Whale visitor IDs across domain boundaries prevents session breakage when users move between your main store domain and Funnelish subdomains.
- Deploy First-Party Pixel Signals: Combining GTM with Triple Whale’s Pixel script guarantees first-party attribution accuracy across Meta, TikTok, and Google Ads campaigns.
- Visualize Micro-Conversions with Microsoft Clarity: Mapping custom Funnelish event triggers to Clarity session recordings allows you to watch real user session heatmaps right where checkout friction occurs.
- Ensure Full Privacy Compliance: Setting up Cookiebot Consent Mode v2 ensures your analytics and ad pixels respect visitor consent choices automatically across international regions.
Introduction: The $32,000 Scaling Campaign Attribution Breakdown
A high-volume D2C e-commerce brand scaling a direct-response fitness product on Meta and TikTok ads reached out to me with a critical analytics issue. They were routing over $32,000 a month in paid traffic through a high-converting Funnelish sales funnel that integrated with a Shopify store backend for order fulfillment.
Their media buyers relied on Triple Whale for attribution and GA4 for user funnel analysis. However, their dashboards showed conflicting numbers. Triple Whale reported a dismal 1.15 ROAS, while Shopify backend revenue confirmed a profitable 2.65 ROAS. Meanwhile, GA4 showed that 65% of all purchasing customers originated from “Direct / None” traffic, completely wiping out paid ad attribution for Meta and TikTok ad sets.
					[ Paid Ads (Meta/TikTok) ]
          |
          v
[ Primary Storefront: brand.com ]
          |
          v  (Session ID Lost! GA4 sees "Direct", Triple Whale loses cookie!)
[ Funnelish Checkout: checkout.brand.com ]
          |
          +---> Main Product Purchase (Tracked inconsistently)
          +---> One-Click Post-Purchase Upsell (MISSED COMPLETELY!)
When I audited their Funnelish container and GTM architecture, I found three underlying problems:
- Their Funnelish app was running isolated pixel scripts that did not communicate with their main domain’s cookie jar, breaking the visitor session as soon as a user clicked into the checkout funnel.
- One-click post-purchase upsells were processing inside backend webhooks without pushing front-end Data Layer events, leaving Triple Whale and GA4 blind to 35% of the brand’s total order revenue.
- Microsoft Clarity was installed directly on their main site but omitted from Funnelish pages, making it impossible to see why mobile users were dropping off on step two of the order form.
Fixing these issues requires moving away from basic, isolated app integrations and building a centralized, GTM-driven tracking architecture across Funnelish. In this guide, I will walk you through the complete setup step-by-step.
Why Funnelish Tracking Breaks & Why It Matters
Funnelish is a popular sales funnel builder designed to run direct-to-consumer landing pages, order forms, and high-converting post-purchase upsell flows. However, its modular architecture introduces tracking challenges that standard web analytics installations cannot handle out of the box.
The Technical Vulnerabilities of Native Funnelish Tracking
- Cross-Domain Session Fragmentation: When a visitor transitions from your primary site (e.g., brand.com) to a Funnelish checkout subdomain (e.g., offer.brand.com), browsers enforce strict cookie boundaries. Without an explicit cross-domain linker (_gl parameter), GA4 strips referrer details and registers the visitor as a new, untracked session from “Direct”.
- Upsell & Downsell Attribution Gaps: Post-purchase upsells occur after the initial transaction is complete. Standard pixel extensions often fail to execute client-side scripts during fast, one-click redirect transitions, causing post-purchase revenue to be missing from Triple Whale and Meta Ads.
- Double-Counting Multi-Step Events: Native scripts placed on both Funnelish apps and Shopify thank-you pages frequently fire purchase tags twice for a single buyer, artificially inflating reported ROAS.
- Ad Blocker Data Suppression: Up to 30% of desktop and Safari mobile users run strict tracking protection. Native third-party scripts loaded without first-party routing get blocked before capturing conversion signals.
The Strategic Benefits of a Unified GTM + Triple Whale + Clarity Architecture
- End-to-End Attribution Accuracy: Aligning client-side GTM Data Layer pushes with Triple Whale’s Pixel ensures every dollar generated across main offers and upsells maps back to the exact ad, ad set, and creative.
- Granular Visual Behavior Analytics: Integrating Microsoft Clarity across all Funnelish steps lets you watch session recordings and heatmaps filtered by specific funnel interactions (e.g., users who abandoned at the credit card step).
- Consolidated Privacy & Consent Handling: Running Cookiebot Consent Mode v2 ensures that user tracking choices apply uniformly across your main website and Funnelish funnel steps.
					+-----------------------------------------------------------------------------------+
|               NATIVE FUNNELISH PIXELS VS. UNIFIED GTM ARCHITECTURE                |
+--------------------------+-------------------------+------------------------------+
| Analytics Metric         | Native App Integration  | Unified GTM Architecture     |
+--------------------------+-------------------------+------------------------------+
| Cross-Domain Continuity  | Broken (Splits Sessions)| Preserved via Linker Params  |
| Post-Purchase Upsells    | 30-40% Data Loss        | 100% Captured via Listener   |
| Triple Whale Attribution | Inaccurate ROAS         | Precise First-Party Matching |
| Behavior Heatmapping     | Partial / Main Site Only| Full Funnel Step Recordings  |
| Consent Mode Compliance  | Unregulated             | Fully Automated via CMP      |
+--------------------------+-------------------------+------------------------------+
Prerequisites & Setup Checklist
Before configuring your tracking stack, confirm you have the administrative permissions and software setups listed below:
					+-----------------------------------------------------------------------------------+
|                        SYSTEM INFRASTRUCTURE CHECKLIST                            |
+-----------------------+----------------------------------+------------------------+
| Tool / Platform       | Required Access Level            | Core Functionality     |
+-----------------------+----------------------------------+------------------------+
| Funnelish Account     | Admin Access                     | Embed GTM & Custom JS  |
| Web GTM Container     | Administrator Rights             | Deploy Listener & Tags |
| Google Analytics 4    | Editor / Admin Access            | E-commerce Analytics   |
| Triple Whale          | Admin Access / API Key           | First-Party Attribution|
| Microsoft Clarity     | Admin Access                     | Heatmaps & Recordings  |
| Cookiebot CMP         | Domain Admin Access              | Consent Management     |
| Primary Site (Shopify)| Admin Access                     | Cross-Domain Alignment |
+-----------------------+----------------------------------+------------------------+
- Funnelish Admin Workspace: Ability to edit Funnelish funnel settings, global HTML/JS headers, and step-level custom code apps.
- Google Tag Manager Container: Admin rights to create custom tags, triggers, variables, and custom HTML scripts.
- GA4 Measurement ID: Access to your GA4 property stream settings (G-XXXXXXXXXX).
- Triple Whale Pixel Account: Access to your Triple Pixel tracking snippet and Triple Whale API key.
- Microsoft Clarity Project: Active project setup with your unique Clarity Project ID (clarity_id).
- Cookiebot CMP Account: An active setup on Cookiebot configured for Google Consent Mode v2.
Video Walkthrough Tutorial
For a visual demonstration of setting up GA4, Triple Whale, and Microsoft Clarity across Funnelish sales funnels, watch the step-by-step video tutorial below:
Step-by-Step Implementation Guide
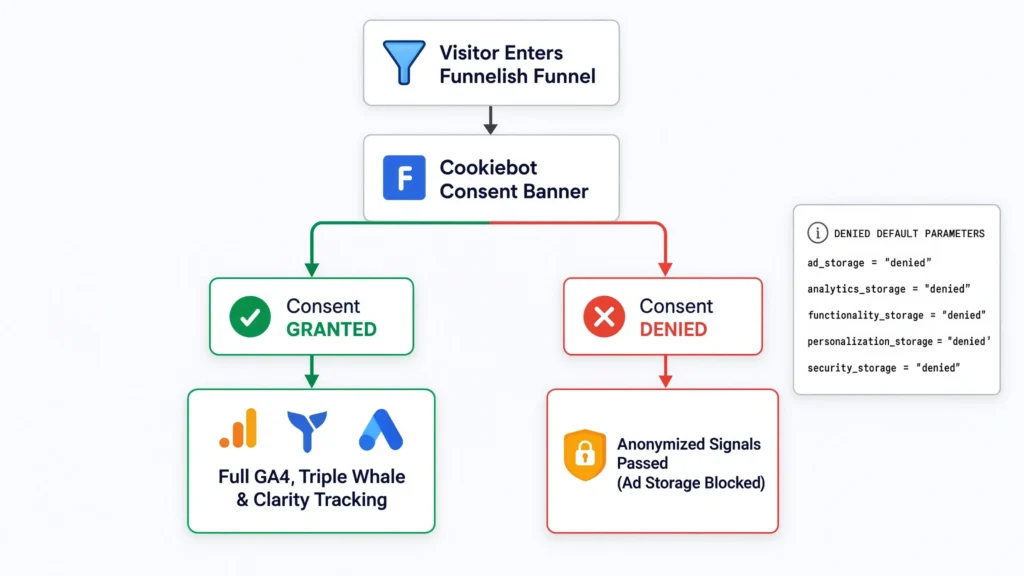
Phase 1: Implement Cookiebot Consent Mode V2 on Funnelish
Before deploying any analytics tags, set up a privacy enforcement framework using Cookiebot CMP to ensure all data collection complies with global privacy regulations (GDPR, CCPA).
					[ Visitor Enters Funnelish Funnel ]
                 |
                 v
     [ Cookiebot Consent Banner ]
                 |
        +--------+--------+
        |                 |
        v                 v
 [ Consent GRANTED ]   [ Consent DENIED ]
        |                 |
        v                 v
Full GA4, Triple Whale  Anonymized Signals Passed
& Clarity Tracking      (Ad Storage Blocked)
- Log into your Cookiebot Account and add your primary store domain along with any Funnelish subdomains (e.g., checkout.yourbrand.com).
- Open your Web GTM Container, navigate to the Community Template Gallery, and search for the official Cookiebot CMP template.
- Add the Cookiebot tag to your container, setting default consent states to denied for ad_storage, analytics_storage, ad_user_data, and ad_personalization.
- Attach this tag to the Consent Initialization – All Pages trigger so it executes before any tracking scripts load.
- Ensure your GA4, Triple Whale, and Clarity tags respect built-in consent checks.
Phase 2: Deploy Google Tag Manager Across Funnelish Funnel Steps
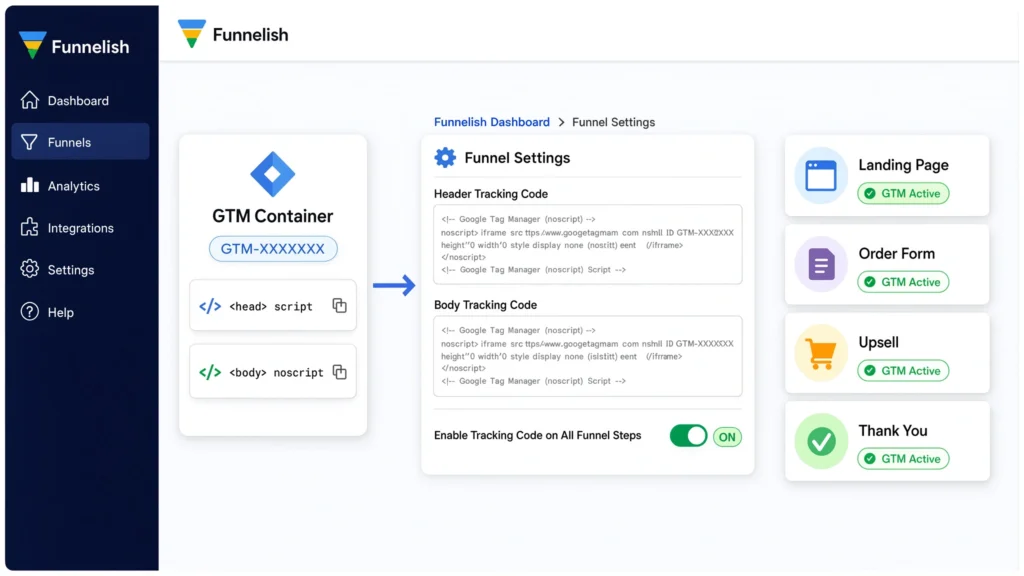
To maintain a consistent tracking setup, install your GTM container scripts globally across all Funnelish funnel steps.
- In your GTM Workspace, click on your Container ID (GTM-XXXXXXX) at the top right to open the installation snippet modal.
- Copy the <head> JavaScript snippet and the <body> noscript snippet.
- Log into your Funnelish Dashboard, navigate to Funnel Settings > Custom Code.
- Paste the GTM <head> snippet into the Header Tracking Code text area.
- Paste the GTM <body> snippet into the Body Tracking Code text area.
- Toggle Enable Tracking Code on All Funnel Steps to ON and save your changes.
Phase 3: Inject Custom Funnelish E-Commerce JavaScript Listener
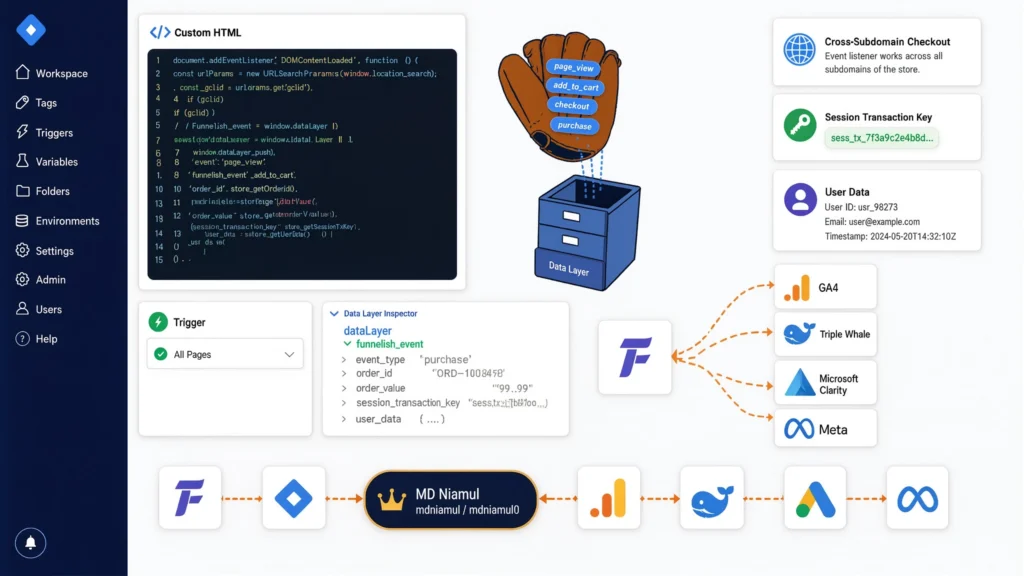
Funnelish processes form steps, order submissions, and upsell button clicks dynamically using JavaScript. Standard page-load triggers inside GTM will miss these actions.
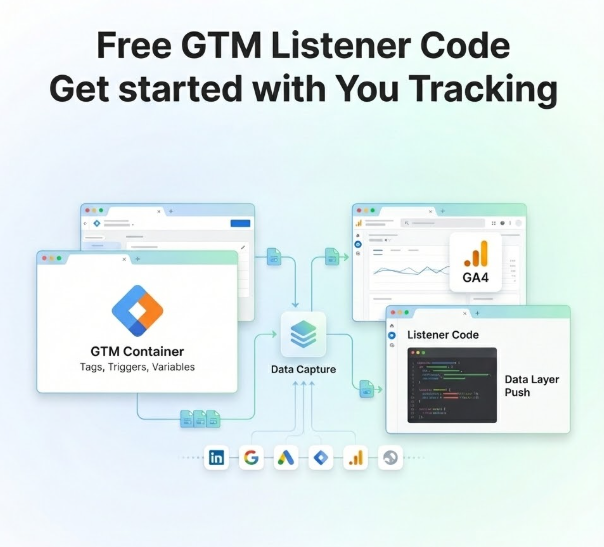
Think of an event listener like a catcher’s mitt—it catches dynamic funnel actions (like step transitions, credit card submissions, and one-click upsell accepts) and pushes them into the Data Layer (which acts as an invisible filing cabinet for Tag Manager). If your checkout operates across subdomains, passing these events cleanly into the Data Layer preserves session tracking.
Complete Funnelish E-Commerce JavaScript Listener Code
Create a Custom HTML Tag in Web GTM named chtml – Funnelish Event Listener, attached to the Initialization – All Pages trigger:
					<script>
(function() {
  // Utility: Retrieve Cookie by Name
  function getCookie(name) {
    var value = "; " + document.cookie;
    var parts = value.split("; " + name + "=");
    if (parts.length === 2) return parts.pop().split(";").shift();
    return '';
  }

  // Utility: Parse Query String Parameters
  function getQueryParam(param) {
    var urlParams = new URLSearchParams(window.location.search);
    return urlParams.get(param) || '';
  }

  // Generate or retrieve persistent Session Transaction Key
  function getTransactionKey() {
    var key = sessionStorage.getItem('fnl_trans_key');
    if (!key) {
      key = 'fnl_' + Date.now() + '_' + Math.floor(Math.random() * 1000000);
      sessionStorage.setItem('fnl_trans_key', key);
    }
    return key;
  }

  window.dataLayer = window.dataLayer || [];

  // 1. Capture Initial Product View on Funnel Step
  document.addEventListener('DOMContentLoaded', function() {
    if (window.funnelish && window.funnelish.product) {
      var prod = window.funnelish.product;
      window.dataLayer.push({
        'event': 'view_item',
        'ecommerce': {
          'currency': prod.currency || 'USD',
          'value': parseFloat(prod.price || 0),
          'items': [{
            'item_id': String(prod.id || prod.sku || 'fnl_prod'),
            'item_name': prod.name || document.title,
            'price': parseFloat(prod.price || 0),
            'quantity': 1
          }]
        }
      });
    }
  });

  // 2. Listen for Funnelish Main Form Order Submission
  document.addEventListener('click', function(e) {
    var submitBtn = e.target.closest('.fnl-pay-btn, .submit-btn, [data-funnelish-submit]');
    if (submitBtn) {
      var emailVal = (document.querySelector('input[type="email"], input[name="email"]') || {}).value || '';
      var phoneVal = (document.querySelector('input[type="tel"], input[name="phone"]') || {}).value || '';

      window.dataLayer.push({
        'event': 'begin_checkout',
        'ecommerce': {
          'currency': 'USD',
          'user_data': {
            'email': emailVal,
            'phone': phoneVal
          }
        }
      });
    }
  });

  // 3. Listen for Funnelish Global Conversion / Upsell Event Trigger
  if (typeof window.funnelish !== 'undefined') {
    window.funnelish.on('purchase', function(data) {
      var orderId = data.order_id || getTransactionKey();
      var totalValue = parseFloat(data.total || data.price || 0);
      var itemsArray = [];

      if (data.products && Array.isArray(data.products)) {
        itemsArray = data.products.map(function(p) {
          return {
            'item_id': String(p.id || p.sku),
            'item_name': p.name,
            'price': parseFloat(p.price || 0),
            'quantity': parseInt(p.quantity || 1)
          };
        });
      } else {
        itemsArray.push({
          'item_id': String(data.product_id || 'fnl_main_item'),
          'item_name': data.product_name || 'Funnelish Offer',
          'price': totalValue,
          'quantity': 1
        });
      }

      window.dataLayer.push({
        'event': 'purchase',
        'transaction_id': String(orderId),
        'ecommerce': {
          'transaction_id': String(orderId),
          'value': totalValue,
          'tax': parseFloat(data.tax || 0),
          'shipping': parseFloat(data.shipping || 0),
          'currency': data.currency || 'USD',
          'items': itemsArray
        },
        'user_data': {
          'email': data.email || '',
          'phone': data.phone || '',
          'first_name': data.first_name || '',
          'last_name': data.last_name || '',
          'fbp': getCookie('_fbp'),
          'fbc': getCookie('_fbc')
        }
      });
    });

    // 4. Listen specifically for One-Click Post-Purchase Upsell Accept
    window.funnelish.on('upsell_accept', function(upsellData) {
      var upsellOrderId = (upsellData.order_id || getTransactionKey()) + '_upsell';
      var upsellPrice = parseFloat(upsellData.price || 0);

      window.dataLayer.push({
        'event': 'purchase_upsell',
        'transaction_id': String(upsellOrderId),
        'ecommerce': {
          'transaction_id': String(upsellOrderId),
          'value': upsellPrice,
          'currency': upsellData.currency || 'USD',
          'items': [{
            'item_id': String(upsellData.product_id || 'fnl_upsell'),
            'item_name': upsellData.product_name || 'One-Time Offer Upsell',
            'price': upsellPrice,
            'quantity': 1
          }]
        }
      });
    });
  }
})();
</script>
Line-by-Line Code Breakdown
- window.funnelish.on(‘purchase’, …): Uses Funnelish’s global client-side API callback to catch order completion events instantly across both credit card and PayPal payment processors.
- getTransactionKey(): Generates a persistent order tracking key in session storage, ensuring that if Funnelish omits a unique order ID string during fast redirects, a structured key is generated for conversion deduplication.
- window.funnelish.on(‘upsell_accept’, …): Captures one-click post-purchase upsell accept clicks, pushing a separate purchase_upsell event to the Data Layer to prevent upsell revenue from being dropped.
- user_data: Collects normalized first-party customer attributes (email, phone, _fbp, _fbc) to support advanced match quality for Triple Whale and ad platforms.
For specialized e-commerce tracking architectures across third-party checkout flows, check out our implementation guides for third-party checkout conversion tracking, Shopify server-side tracking, and e-commerce server-side tracking.
Phase 4: Configure GA4 E-Commerce Tracking & Cross-Domain Linker
Once the JavaScript event listener is pushing structured data into the Data Layer, configure GA4 tags in GTM to log your sales funnel metrics.
					+-----------------------------------------------------------------------------------+
|                        GA4 E-COMMERCE TAG MAPPING TABLE                           |
+----------------------+-------------------------+----------------------------------+
| GTM Tag Name         | Event Trigger           | Key Tag Parameters               |
+----------------------+-------------------------+----------------------------------+
| GA4 - View Item      | `event` = `view_item`   | `ecommerce` object, `items`      |
| GA4 - Begin Checkout | `event` = `begin_check` | `ecommerce` object, `user_data`  |
| GA4 - Purchase Main  | `event` = `purchase`    | `transaction_id`, `value`, `items`|
| GA4 - Purchase Upsell| `event` = `purch_upsell`| `transaction_id`, `value`, `items`|
+----------------------+-------------------------+----------------------------------+
Step 1: Configure GA4 Google Tag & Cross-Domain Linker
- In Web GTM, create a Google Tag with your GA4 Measurement ID (G-XXXXXXXXXX).
- Under Configuration Settings, add the parameter allow_linker and set its value to true.
- Under Shared Settings, click Cross-Domain Tracking Settings. Set domains to an array containing your main domain and your Funnelish subdomain (e.g., [‘brand.com’, ‘checkout.brand.com’]).
- Attach this Google Tag to the Initialization – All Pages trigger.
Step 2: Configure E-Commerce Event Tags
- Create a GA4 Event Tag named GA4 – Purchase:
- Event Name: purchase
- Check Send E-commerce Data and set Data Source to Data Layer.
- Create a Custom Event Trigger in GTM for Event Name: purchase|purchase_upsell (using regex matching).
- Save and publish your GTM workspace changes.

Phase 5: Integrate Triple Whale Pixel for Ad Attribution
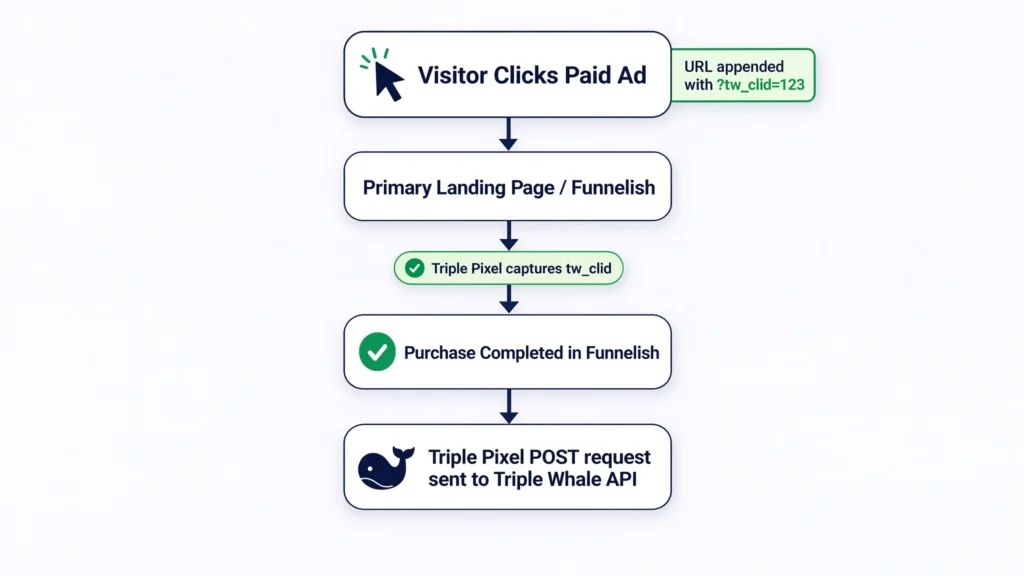
Triple Whale relies on first-party cookie data and explicit URL tracking parameters (triple_pixel) to attribute orders to specific paid ad creatives.
					[ Visitor Clicks Paid Ad ] ---> URL appended with `?tw_clid=123`
                                         |
                                         v
                     [ Primary Landing Page / Funnelish ]
                                         |
                       Triple Pixel captures `tw_clid`
                                         |
                                         v
                     [ Purchase Completed in Funnelish ]
                                         |
              Triple Pixel POST request sent to Triple Whale API
Step 1: Deploy Triple Whale Pixel Snippet via GTM
- Log into Triple Whale Settings > Pixel Setup and copy your master Triple Pixel Script.
- In Web GTM, create a Custom HTML Tag named chtml – Triple Pixel Snippet.
- Paste the Triple Pixel snippet into the HTML field.
- Set the trigger to Initialization – All Pages.
Step 2: Configure Custom Upsell Conversion Pushes for Triple Pixel
To ensure Triple Whale captures post-purchase upsells, add the following script block to your custom listener or execute it inside a dedicated GTM tag attached to the purchase_upsell trigger:
					// Fire Triple Whale Conversion API push for Post-Purchase Upsell
if (window.TriplePixel) {
  window.TriplePixel('track', 'Purchase', {
    value: {{DLV - Ecommerce Value}},
    currency: 'USD',
    order_id: {{DLV - Transaction ID}},
    items: {{DLV - Ecommerce Items}}
  });
}
For more guidance on server-side attribution frameworks, read our articles on server-side tracking services and marketing automation services.
Phase 6: Install Microsoft Clarity Heatmaps & Session Recordings
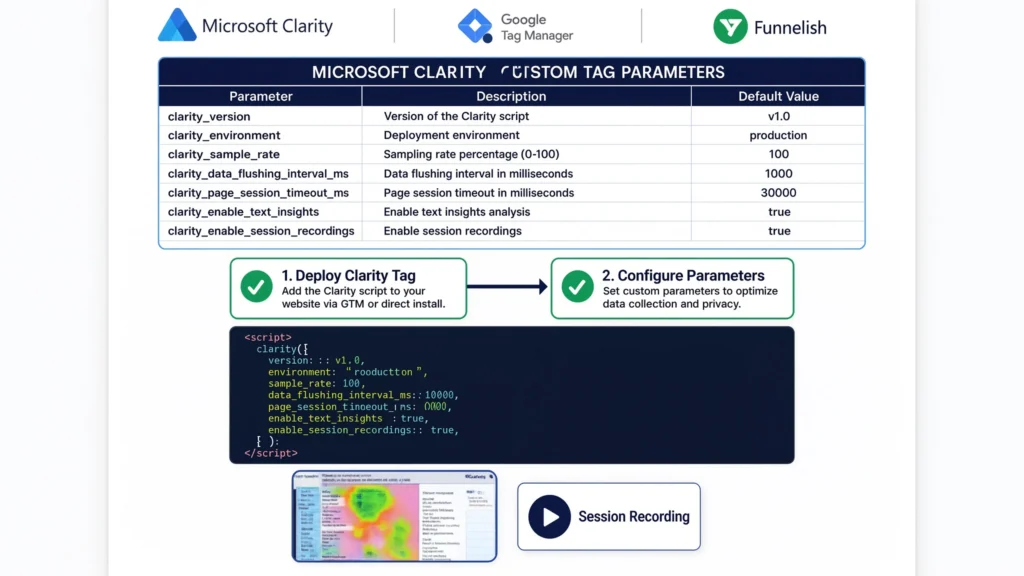
Microsoft Clarity offers visual behavioral insights through heatmaps and session recordings, helping you pinpoint where users encounter friction on your Funnelish pages.
					+-----------------------------------------------------------------------------------+
|                     MICROSOFT CLARITY CUSTOM TAG PARAMETERS                       |
+-----------------------+-------------------------+---------------------------------+
| Clarity Parameter Key | Variable Mapping        | Strategic Purpose               |
+-----------------------+-------------------------+---------------------------------+
| `set` (Custom Tag)    | `funnel_step`           | Filter sessions by funnel page  |
| `identify`            | `user_data.email`       | Bind session to customer order  |
| `set` (Custom Tag)    | `payment_method`        | Analyze drop-offs by gateway    |
+-----------------------+-------------------------+---------------------------------+
1: Deploy Clarity Script via Tag Manager
- Log into Microsoft Clarity and navigate to Settings > Setup to locate your Project ID.
- In Web GTM, install the Microsoft Clarity tag template from the Community Template Gallery.
- Enter your Clarity Project ID.
- Set the tag trigger to All Pages.
Step 2: Configure Custom Clarity Step & User Identifiers
Add a Custom HTML Tag named chtml – Clarity Funnel Step Identifiers, attached to your Funnelish pageview triggers:
					<script>
  if (typeof clarity === "function") {
    // Label the current Funnel Step dynamically inside Clarity recordings
    clarity("set", "funnel_name", "Main Direct Response Funnel");
    clarity("set", "funnel_step", document.location.pathname);

    // Bind session to user ID if available
    var email = {{DLV - User Email}};
    if (email) {
      clarity("identify", email);
    }
  }
</script>
Phase 7: Establish Cross-Domain Linker & Third-Party Checkout Fixes
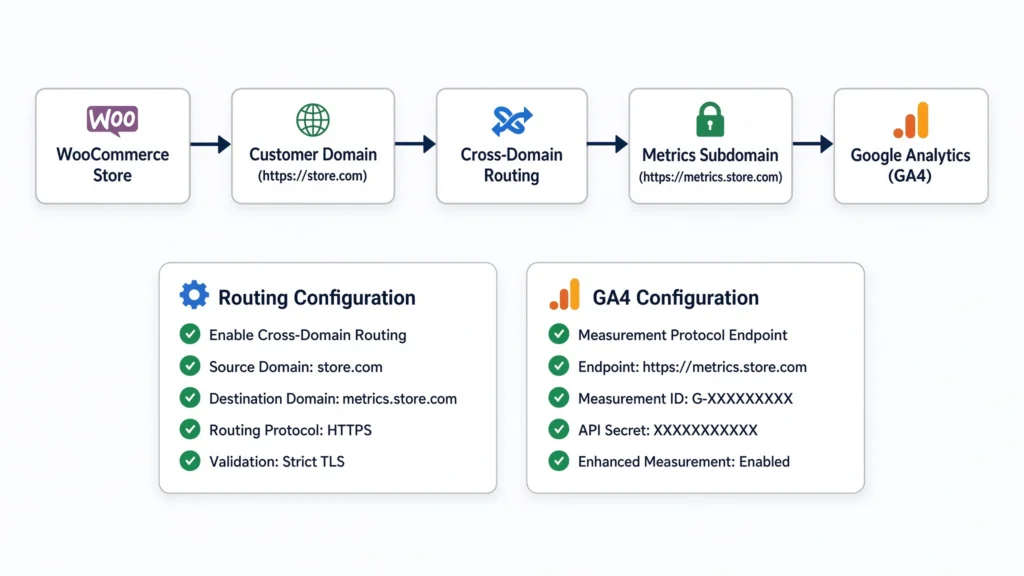
If your Funnelish setup routes users from your primary Shopify store (brand.com) to a Funnelish domain (checkout.brand.com) and then back to a Shopify thank-you page ([brand.com/checkouts/](https://brand.com/checkouts/)…), you must implement a explicit cross-domain linking strategy.
					[ Storefront: brand.com ] ---> Passes `_gl=1*abc...` ---> [ Funnelish: checkout.brand.com ]
                                                                     |
                                                                     v Passes `_gl=1*xyz...`
[ Shopify Thank You: brand.com/orders/123 ] <------------------------+
- Auto-Link Domains Configuration:
In Web GTM, navigate to your GA4 Google Tag configuration.
- In the Configure your domains section, include all domain variations:
- brand.com, checkout.brand.com, funnelish.com.
- Decorate Dynamic Anchor Links:
If your primary site links to Funnelish via JavaScript buttons rather than standard HTML anchor tags (<a>), configure your click handlers to pass the linker query parameter (_gl) using google_tag_manager[‘GTM-XXXXXXX’].linker.decorateURL(targetUrl).
Testing & Validation Framework
Before launching your campaigns, test your complete setup using this systematic diagnostic process:
					+-----------------------------------------------------------------------------------+
|                        SYSTEM TESTING & VALIDATION MATRIX                         |
+-----------------------+-------------------------+---------------------------------+
| Testing Step          | Diagnostic Tool         | Expected Passing Result         |
+-----------------------+-------------------------+---------------------------------+
| 1. Script Loading     | Chrome DevTools Console | GTM, Clarity, Triple Pixel load |
| 2. Consent Enforcement| Cookiebot Console       | Tags blocked prior to consent   |
| 3. Listener Execution | GTM Preview Mode        | Data Layer receives `purchase`  |
| 4. Cross-Domain Check | Browser URL Bar         | `_gl` parameter passes on click |
| 5. GA4 DebugView      | GA4 Debugger Console    | Purchase & upsell events log    |
| 6. Triple Whale Pixel | Triple Whale Helper Ext | Conversion logs with order value|
| 7. Clarity Sessions   | Microsoft Clarity App   | Live recording logs user path   |
+-----------------------+-------------------------+---------------------------------+
- GTM Preview Mode Inspection:
Open GTM and click Preview. Enter your Funnelish landing page URL.
- Verify that chtml – Funnelish Event Listener, Google Tag, Triple Pixel Snippet, and Microsoft Clarity fire on initialization.
- Cross-Domain Session Continuity Check:
- Click from your main domain to your Funnelish checkout page.
- Inspect the URL bar on the Funnelish page. Confirm that the _gl parameter is present (e.g., ?_gl=1*1abcde*…).
- In GA4 DebugView, verify that your visit maintains a single ga_session_id across the transition.
- End-to-End Test Purchase Execution:
Place a test order using a test credit card or coupon code.
- Accept the post-purchase one-click upsell.
- Confirm that GTM Preview logs two distinct conversion events: purchase for the main offer and purchase_upsell for the upsell offer.
- Triple Whale & Clarity Dashboard Verification:
- Check your Triple Whale Live Stream to confirm the test order value matches your test purchase total.
- Open Microsoft Clarity > Impressions / Sessions. Verify that a recording was generated for your session and that custom tags (funnel_step) appear in the session details.
Troubleshooting Common Tracking Errors
Problem 1: GA4 Registers All Purchases as “Direct / None”
- Cause: The cross-domain linker parameter (_gl) is missing when users transition from your main site to the Funnelish checkout, causing GA4 to treat the checkout as a new, unreferred session.
- Solution: Verify that allow_linker: true is configured in your GA4 Google Tag in GTM, and ensure both your primary domain and Funnelish subdomains are listed in the Configure Your Domains setting.
Problem 2: One-Click Post-Purchase Upsells Are Missing in Triple Whale
- Cause: Native Funnelish upsell scripts redirect users to the thank-you page before client-side pixel scripts finish executing.
- Solution: Deploy our custom JavaScript listener tag to catch the window.funnelish.on(‘upsell_accept’) callback instantly and push the payload directly into the Data Layer.
Problem 3: Microsoft Clarity Session Recordings Split into Two Visitors
- Cause: Clarity script is missing cross-domain cookie sharing settings, causing it to generate a new user ID when the visitor moves to the Funnelish subdomain.
- Solution: Deploy Clarity strictly via GTM using a single global container ID across both your main site and Funnelish app settings.
Problem 4: Duplicate Purchase Events Logged in GA4 and Triple Whale
- Cause: GTM purchase tags and native Funnelish app pixel integrations are firing at the same time on the order confirmation step.
- Solution: Deactivate all native pixel apps inside Funnelish settings (Facebook Pixel App, GA4 App) and manage tracking scripts exclusively through your central GTM container.
Problem 5: Cookiebot Banner Fails to Display on Funnelish Pages
- Cause: The Cookiebot CMP script is blocked by an aggressive Funnelish script optimizer or placed below execution priority in header settings.
- Solution: Attach the Cookiebot GTM tag template directly to the Consent Initialization – All Pages trigger in GTM, ensuring it loads before all other scripts.
Conclusion
Direct-response sales funnels built on Funnelish offer strong conversion rates, but incomplete analytics setups can obscure actual marketing ROI. Relying on basic native app scripts often leads to broken cross-domain attribution, untracked post-purchase upsells, and conflicting ROAS metrics across your reporting tools.
Deploying a unified, GTM-driven tracking system resolves these issues. By using a custom Funnelish event listener, establishing cross-domain session continuity, configuring Cookiebot Consent Mode v2, and deploying GA4, Triple Whale, and Microsoft Clarity together, you gain clean, reliable data across every step of your sales funnel.
Summary by MD Niamul
This guide provides a step-by-step walkthrough for configuring GA4, Triple Whale, and Microsoft Clarity across Funnelish sales funnels using Google Tag Manager. By deploying a custom event listener, enabling cross-domain session linking, and configuring Cookiebot Consent Mode v2, you eliminate third-party checkout data loss, maintain accurate paid ad attribution, and capture clean user behavior analytics across every stage of your sales funnel.
Frequently Asked Questions (FAQ)
1.How do I track Funnelish sales funnels in GA4 accurately?
Accurate Funnelish tracking in GA4 requires installing GTM globally across your funnel steps, deploying a custom JavaScript event listener to capture form and upsell actions into the Data Layer, and enabling cross-domain linking (allow_linker: true) between your main domain and Funnelish subdomains.
2.Why are my Triple Whale ROAS numbers different from Funnelish dashboard sales?
Discrepancies occur when native Funnelish pixel apps miss one-click post-purchase upsells or when tracking protection blocks client-side scripts. Deploying the Triple Whale Pixel snippet via GTM alongside a custom JavaScript listener ensures all main offer and upsell conversions map back to your paid campaigns.
3.How do I add Microsoft Clarity heatmaps to Funnelish?
You can add Microsoft Clarity to Funnelish by installing the official Microsoft Clarity tag template in Web GTM and setting its trigger to All Pages. Adding custom Clarity JavaScript calls (clarity(“set”, “funnel_step”, …)) allows you to filter heatmaps and session recordings by specific funnel steps.
4.What is cross-domain tracking and why is it required for Funnelish?
Cross-domain tracking shares visitor session cookies across different domains (e.g., from brand.com to checkout.brand.com). Without it, web analytics tools treat a user moving to your checkout as a new visitor from “Direct” traffic, breaking source attribution for your paid ad campaigns.
5.Can I track one-click post-purchase upsells in Funnelish?
Yes, but tracking upsells requires listening to Funnelish’s dynamic API callbacks (window.funnelish.on(‘upsell_accept’)). Our custom JavaScript listener catches these upsell events in real time and pushes structured purchase_upsell events to the Data Layer for GA4 and Triple Whale.
6.Should I turn off native pixel integrations inside Funnelish settings?
Yes. Running native Funnelish pixel integrations alongside GTM scripts often leads to duplicate tracking tags firing for the same purchase. Managing all tracking tags exclusively through GTM provides complete control over deduplication and event triggers.
7.How does Cookiebot Consent Mode v2 work on Funnelish landing pages?
Cookiebot displays a privacy consent banner when visitors enter your funnel. It communicates user preferences (granted or denied) to GTM. GTM then adjusts tag behavior automatically, ensuring compliance with global privacy regulations like GDPR and CCPA.
8.What is the difference between a main purchase and an upsell event in GTM?
A main purchase event records the primary order form conversion. An upsell event records secondary purchases accepted during post-purchase steps. Tracking them as separate events (purchase and purchase_upsell) ensures order values pass correctly without double-counting initial conversions.
9.Why is my GA4 session ID changing when users reach the Funnelish checkout?
Your GA4 session ID changes if cross-domain tracking is improperly configured or if your GA4 Google Tag lacks the allow_linker configuration. Ensuring both your primary domain and Funnelish subdomains are configured in your GA4 tag maintains session continuity.
10.Do I need custom Data Layer code for Funnelish tracking?
Yes. Because Funnelish loads forms and process steps dynamically via JavaScript without full page reloads, a custom JavaScript listener is needed to translate these actions into standard e-commerce Data Layer events for GTM.
 Need Help Advanced GHL Automation & Tracking Setup?