
Quick Answer
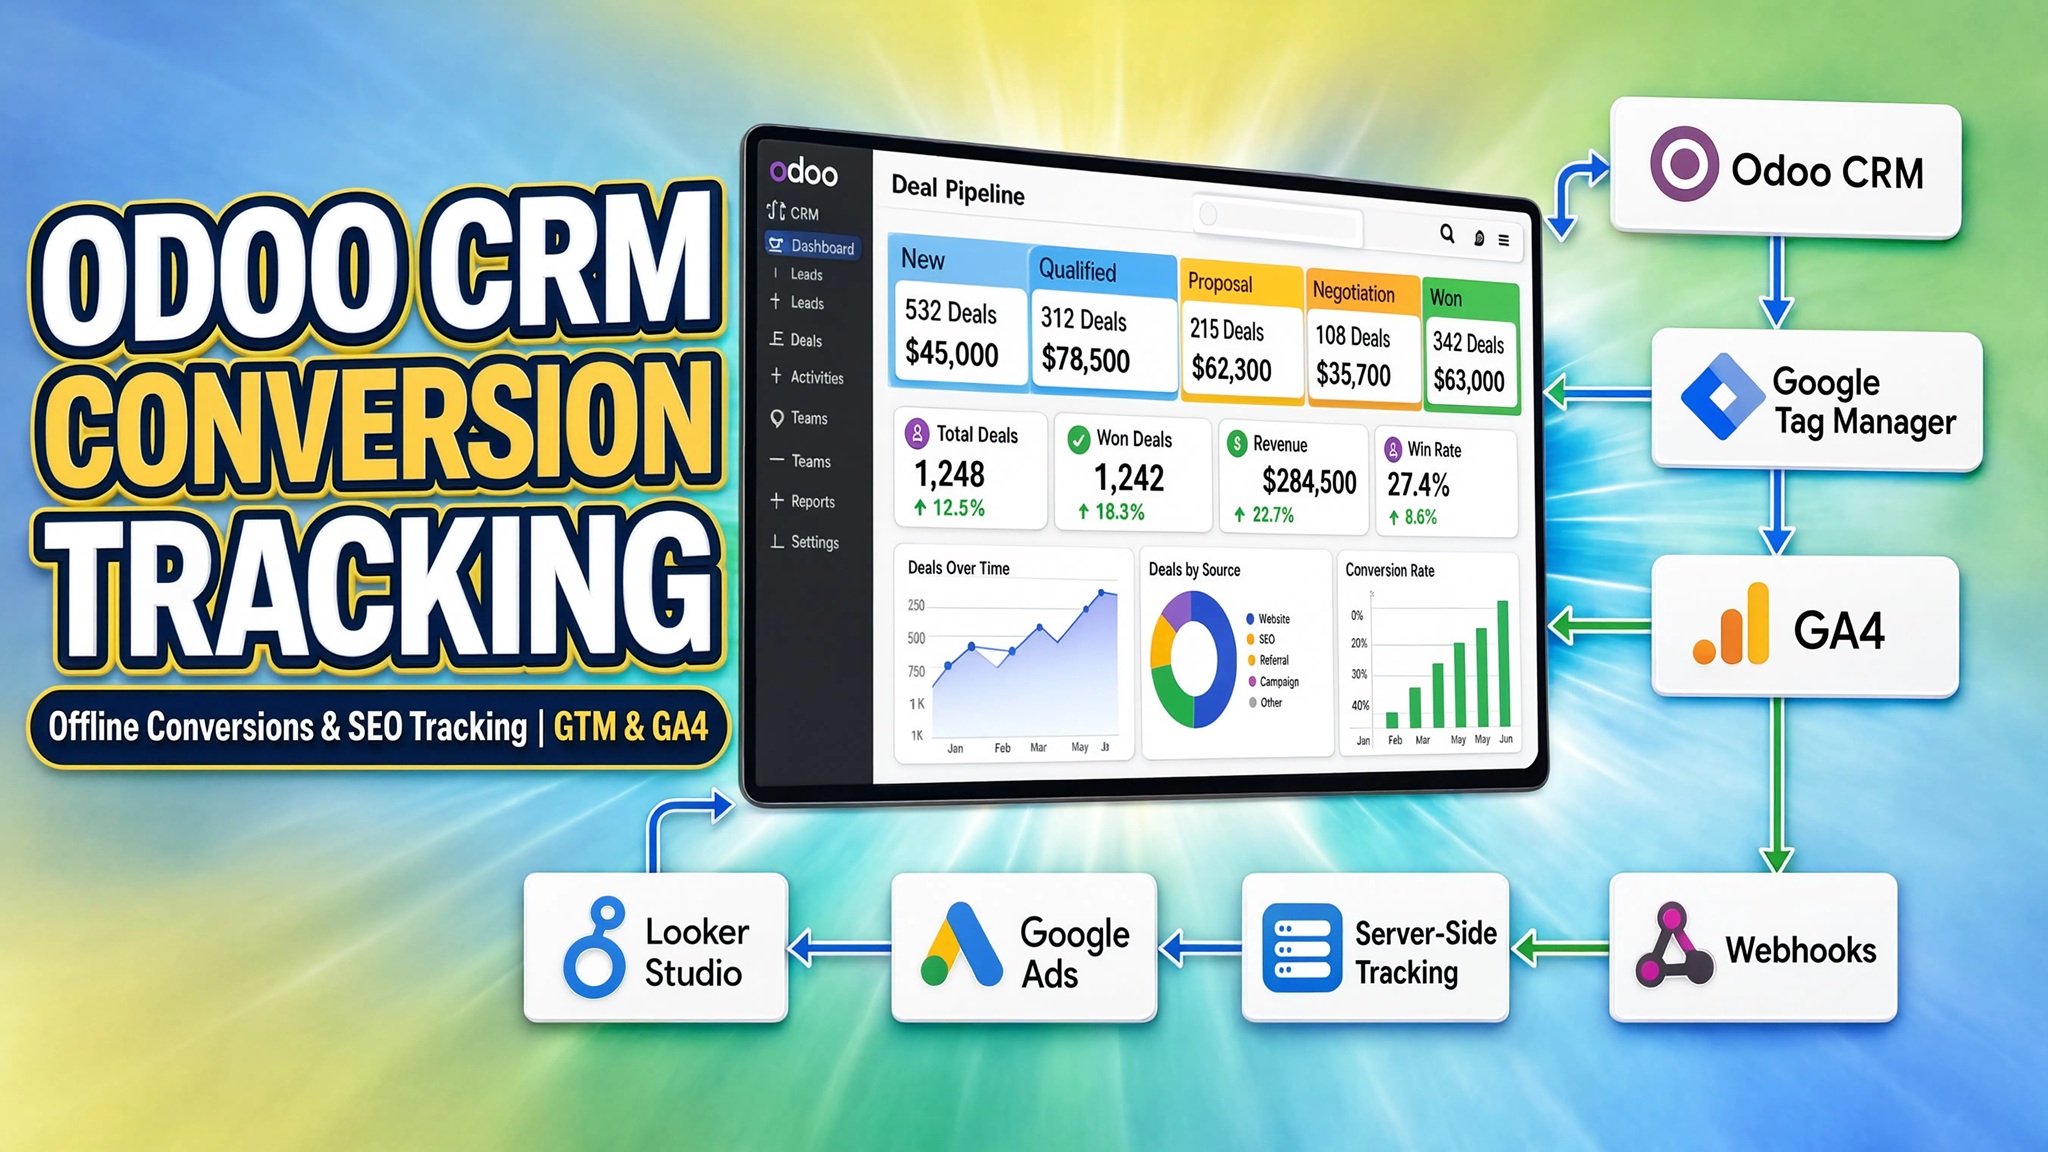
Odoo CRM conversion tracking connects your web traffic source data—such as Google Ads click IDs (gclid), Meta click IDs (fbclid), and organic search referrals—directly into Odoo lead records. By capturing these user IDs in hidden form fields and using server-side webhooks when a deal shifts to “Won,” you can automatically feed real offline conversion revenue back to Google Ads, Meta CAPI, and GA4 for accurate ad optimization.
Key Takeaways
- Beyond Lead Generation: Tracking raw web form submissions is not enough. True ROI tracking measures which specific ad campaigns generate revenue inside Odoo CRM.
- First-Party Parameter Preservation: Custom JavaScript listeners capture gclid, fbclid, utm_source, utm_medium, and client_id cookies before storing them in hidden Odoo form inputs.
- Automated Webhook Pipeline: Server-side webhooks trigger automatically when an Odoo deal moves to the “Won” stage, transmitting conversion data without relying on browser pixels.
- Algorithmic Bidding Power: Passing closed-won revenue data back to Google Ads and Meta Ads enables Smart Bidding models to target high-value buyers instead of junk leads.
- Privacy Compliance: Integrating Google Consent Mode v2 via Cookiebot ensures user privacy preferences are respected across browser tags and server-side endpoints.
Introduction: The $45,000 Blind Spot in B2B Lead Generation
A manufacturing client recently came to me after spending over $45,000 on Google Ads, Meta Ads, and organic SEO content over a six-month period. Their website forms were generating over 600 leads inside Odoo CRM every month. On paper, their marketing agency reported a low Cost-Per-Lead (CPL).
However, when we looked closely at their actual revenue in Odoo, out of those 600 monthly leads, only 12 generated paid contracts. Worse still, their Google Ads account was optimizing aggressively for high-volume, low-intent search terms that filled their CRM with spam leads while ignoring high-value corporate inquiries.
					[Web User Visit] ---> [Fills Odoo Web Form] ---> [Lead Created in Odoo CRM]
  (Google / SEO)           |                           |
                           v                           v
                   [Standard Browser Tag]    [Offline Sales Process (30 Days)]
                   Only Tracks "Lead Submit"           |
                           |                           v
                           x (No Data Feedback)   [Deal Stage: WON ($50,000)]
                           |                           |
                           +<--- (No Value Passed) ----+
When your web tracking stops at the initial form submit event, your ad networks operate in the dark. Browsers cannot see what happens inside your sales pipeline three weeks later.
This guide provides an end-to-end framework to connect Odoo CRM with Google Tag Manager, GA4, Meta Ads, and Server-Side GTM. You will learn how to capture organic SEO parameters, build automated webhooks, push offline conversions back to Google Ads, and run a reliable analytics setup.
Why Odoo CRM Conversion Tracking & SEO Attribution Matters
If you rely solely on client-side form submit events, your digital analytics stops at lead generation. For B2B companies, service providers, and high-ticket sales teams using Odoo, the real business value happens weeks or months after the initial website visit.
The Downside of Disconnected Tracking
- Ad Algorithms Target Spam: Google Ads Smart Bidding targets users who fill out forms easily, regardless of whether those leads buy anything.
- Organic SEO Value Hidden: Without tracking search keywords to closed deals, you cannot tell which blog posts generate paying clients versus casual readers.
- Attribution Loss: Third-party cookie restrictions, browser privacy changes (Safari ITP), and ad blockers strip attribution parameters before a deal closes.
- Wasted Ad Spend: Without offline conversion sync, you spend money on ad groups that generate empty leads while starving high-performing keywords of budget.
- Inaccurate Financial Reporting: ROI dashboards reflect estimated leads rather than verified revenue recorded in your accounting tools.
Business Benefits of Offline Tracking
- Value-Based Bidding (VBB): Automatically feed real revenue amounts back to Google Ads and Meta CAPI to target higher-value customer profiles.
- Full-Funnel SEO Insights: Map organic blog topics directly to closed-won invoice values inside your analytics dashboards.
- Accurate Conversion Matching: Passing hashed customer identifiers (email, phone number) improves match rates on ad network databases.
- Durable Attribution Setup: Server-side webhooks operate directly from Odoo servers to ad endpoints, making them unaffected by browser ad blockers.
Prerequisites & Audit Checklist
Before setting up your Odoo CRM offline tracking pipeline, verify that you have access to the necessary platforms and access levels:
- Odoo CRM Account: Administrator access with rights to create Custom Fields (x_gclid, x_utm_source, etc.) and configure Automated Actions / Webhooks.
- Google Tag Manager (Web Container): Publish access to deploy custom HTML listeners, set up Data Layer triggers, and manage tags.
- Google Tag Manager (Server Container): Administrator access to configure Stape hosting, incoming HTTP clients, and outgoing vendor tags.
- Google Analytics 4 & Google Ads: Editor/Admin rights in GA4 to manage Measurement Protocol keys and Google Ads access to set up Offline Conversion Actions.
- Cookiebot CMP Account: Account access to handle user privacy preferences using Google Consent Mode v2.
Video Walkthrough
If you prefer to follow along visually as we set up Odoo CRM lead tracking, Webhooks, and Server-Side GTM, watch the video tutorial below:
Step-by-Step Implementation Guide
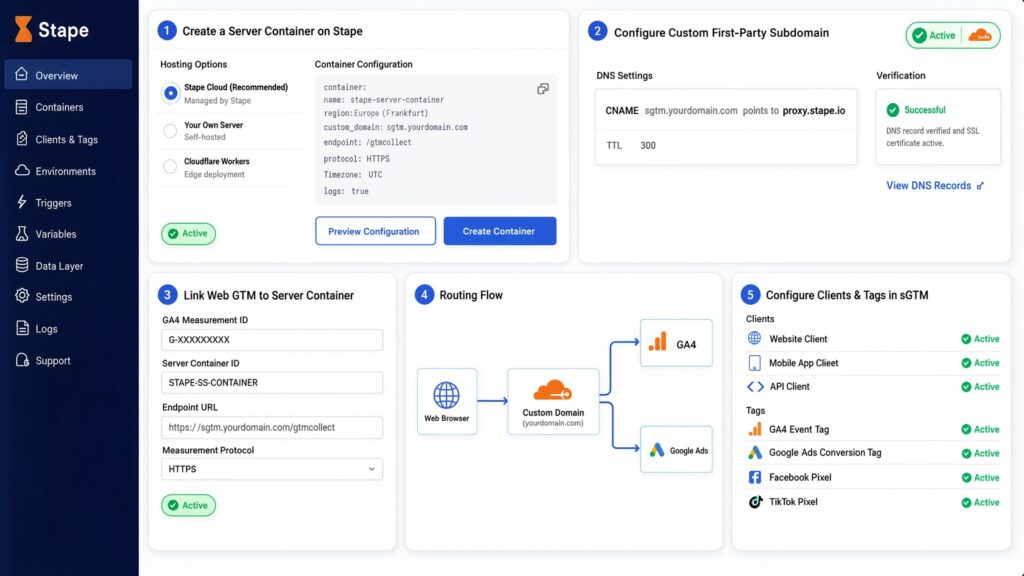
Phase 1: Create Custom Parameter Fields in Odoo CRM
To store user attribution signals when a lead enters Odoo, you must create dedicated custom fields inside the Odoo Lead/Opportunity model (crm.lead).
					+-------------------------------------------------------------------------+
|                    ODOO LEAD MODEL (crm.lead)                           |
+-------------------------------------------------------------------------+
| Standard Fields: Name, Email, Phone, Company Name                       |
| Custom Fields:                                                          |
|  - x_gclid        (Char) -> Stores Google Click Identifier              |
|  - x_fbclid       (Char) -> Stores Meta Click Identifier                |
|  - x_utm_source   (Char) -> Stores Source (e.g., google, organic, newsletter)|
|  - x_utm_medium   (Char) -> Stores Medium (e.g., cpc, organic, email)   |
|  - x_utm_campaign (Char) -> Stores Campaign Name                        |
|  - x_ga_client_id (Char) -> Stores GA4 Client ID                        |
+-------------------------------------------------------------------------+
- Log into your Odoo instance and activate Developer Mode (Settings > General Settings > Activate Developer Mode).
- Navigate to Technical > Database Structure > Models and search for crm.lead.
- Click Edit and add the following custom fields:
- x_gclid (Field Type: char, Label: GCLID)
- x_fbclid (Field Type: char, Label: FBCLID)
- x_utm_source (Field Type: char, Label: UTM Source)
- x_utm_medium (Field Type: char, Label: UTM Medium)
- x_utm_campaign (Field Type: char, Label: UTM Campaign)
- x_ga_client_id (Field Type: char, Label: GA Client ID)
- Save the model configuration. These custom fields will now store key attribution values passed from your web lead forms.
Phase 2: Deploy Google Consent Mode V2 via Cookiebot
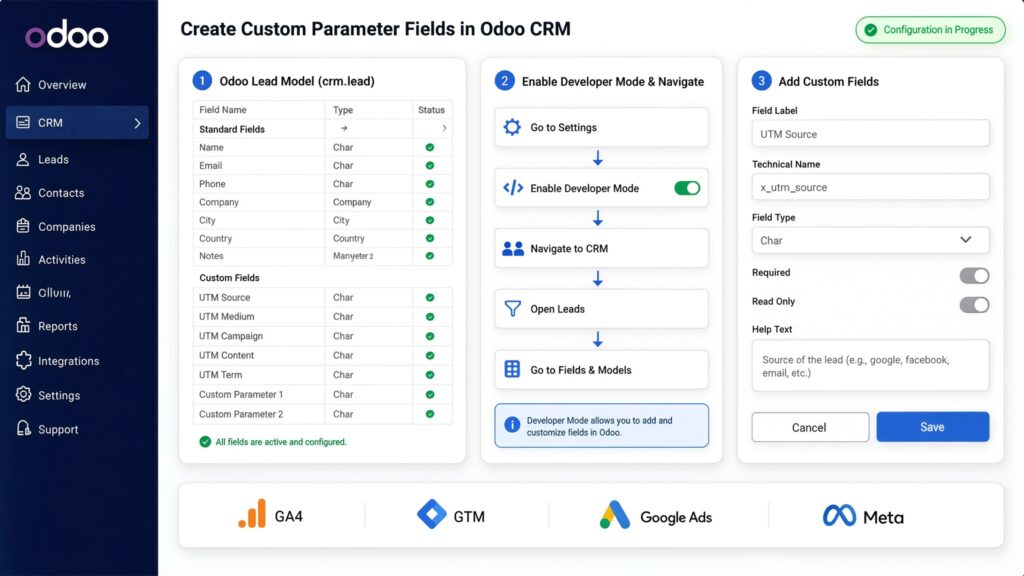
Before deploying custom tracking scripts or collecting first-party parameters, configure your consent management framework to ensure compliance with privacy regulations like GDPR and CCPA.
Using a platform like Cookiebot allows GTM to pause analytics and ad tracking until the user grants explicit consent.
- Open your Web GTM Container, navigate to the Community Template Gallery, and search for Cookiebot CMP.
- Install the template and enter your Cookiebot Domain Group ID.
- Configure your Default Consent State inside GTM:
- ad_storage: denied
- analytics_storage: denied
- ad_user_data: denied
- ad_personalization: denied
- Attach the Cookiebot tag to the Consent Initialization – All Pages trigger.
- When a visitor accepts cookies, Cookiebot issues an update command to GTM (consent update), updating permissions to granted so GTM can record session data.
Phase 3: Add Custom GTM JavaScript Listener & Data Layer Code
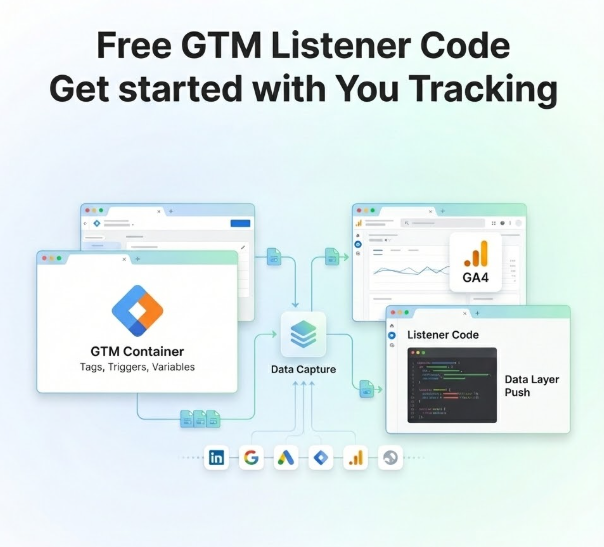
To populate custom Odoo fields automatically when a form is submitted, use a custom JavaScript listener. An event listener functions like a catcher’s mitt—it captures hidden parameters from cookies and query strings, then transfers them to the Data Layer (which acts as an invisible filing cabinet for your analytics scripts).
If your form sits inside an iframe, remember that an iframe is essentially a glass window into another tool: you can see what is happening inside, but your main site cannot interact with it directly without an active window message listener.
1. Custom JavaScript Parameter & Form Listener Tag
Create a Custom HTML tag in Web GTM named chtml – Odoo Parameter & Form Listener and trigger it on Initialization – All Pages:
					<script>
(function() {
  // Utility: Retrieve parameter from URL query string
  function getQueryParam(param) {
    var clientUrl = window.location.search.substring(1);
    var variables = clientUrl.split('&');
    for (var i = 0; i < variables.length; i++) {
      var pair = variables[i].split('=');
      if (pair[0] === param) {
        return decodeURIComponent(pair[1]);
      }
    }
    return '';
  }

  // Utility: Parse first-party cookies (_ga, _fbp)
  function getCookieValue(name) {
    var match = document.cookie.match(new RegExp('(^| )' + name + '=([^;]+)'));
    return match ? match[2] : '';
  }

  // Capture URL Click IDs & Campaign Parameters
  var gclid = getQueryParam('gclid');
  var fbclid = getQueryParam('fbclid');
  var utmSource = getQueryParam('utm_source');
  var utmMedium = getQueryParam('utm_medium');
  var utmCampaign = getQueryParam('utm_campaign');

  // Organic SEO Fallback Detection
  if (!utmSource && document.referrer) {
    var referrerHost = new URL(document.referrer).hostname;
    if (referrerHost.indexOf('google.') !== -1) {
      utmSource = 'google';
      utmMedium = 'organic';
    } else if (referrerHost.indexOf('bing.') !== -1) {
      utmSource = 'bing';
      utmMedium = 'organic';
    } else {
      utmSource = referrerHost;
      utmMedium = 'referral';
    }
  }

  // Persist signals in Session Storage to preserve parameters across page visits
  if (gclid) sessionStorage.setItem('x_gclid', gclid);
  if (fbclid) sessionStorage.setItem('x_fbclid', fbclid);
  if (utmSource) sessionStorage.setItem('x_utm_source', utmSource);
  if (utmMedium) sessionStorage.setItem('x_utm_medium', utmMedium);
  if (utmCampaign) sessionStorage.setItem('x_utm_campaign', utmCampaign);

  // Extract GA4 Client ID from cookie string (_ga.v1.1.XXXXXXXX.YYYYYYYY)
  var rawGaCookie = getCookieValue('_ga');
  var gaClientId = '';
  if (rawGaCookie) {
    var parts = rawGaCookie.split('.');
    if (parts.length >= 4) {
      gaClientId = parts[2] + '.' + parts[3];
    }
  }

  // Auto-populate hidden input fields in Odoo forms upon rendering
  document.addEventListener('submit', function(e) {
    var form = e.target;

    // Check if submitting an Odoo website or contact form
    window.dataLayer = window.dataLayer || [];
    window.dataLayer.push({
      'event': 'odoo_lead_submitted',
      'odoo_form_id': form.getAttribute('id') || 'odoo_web_form',
      'gclid': sessionStorage.getItem('x_gclid') || '',
      'fbclid': sessionStorage.getItem('x_fbclid') || '',
      'utm_source': sessionStorage.getItem('x_utm_source') || 'direct',
      'utm_medium': sessionStorage.getItem('x_utm_medium') || 'none',
      'utm_campaign': sessionStorage.getItem('x_utm_campaign') || '',
      'ga_client_id': gaClientId,
      'user_email': (form.querySelector('input[name="email"]') || {}).value || '',
      'user_phone': (form.querySelector('input[name="phone"]') || {}).value || ''
    });
  });
})();
</script>
2. Direct Server-Side/Odoo Web Template Data Layer Injection
If you edit Odoo XML website templates directly (e.g., website.contactus), insert this Data Layer push block inside your form success view:
					<script>
window.dataLayer = window.dataLayer || [];
window.dataLayer.push({
  'event': 'generate_lead',
  'crm_platform': 'Odoo CRM',
  'lead_type': 'Inbound Service Inquiry',
  'user_data': {
    'email': '<t t-out="lead_email"/>',
    'phone_number': '<t t-out="lead_phone"/>'
  },
  'attribution_data': {
    'gclid': sessionStorage.getItem('x_gclid') || '',
    'fbclid': sessionStorage.getItem('x_fbclid') || '',
    'utm_source': sessionStorage.getItem('x_utm_source') || 'organic',
    'utm_medium': sessionStorage.getItem('x_utm_medium') || 'search',
    'ga_client_id': '<t t-out="ga_client_id"/>'
  }
});
</script>
Line-by-Line Code Breakdown & GTM Variable Mapping
- getQueryParam(‘gclid’): Extracts the Google Click ID query string directly from the landing page URL.
- sessionStorage.setItem(): Stores parameter values in browser session memory so they remain available if the user navigates through multiple pages before submitting a form.
- getCookieValue(‘_ga’): Parses the primary GA4 cookie string to isolate the unique client ID (XXXXXXXX.YYYYYYYY).
- ‘event’: ‘odoo_lead_submitted’: Pushes a unique event name into the Data Layer, which serves as your trigger inside GTM.
- ‘user_data’: Captures contact details so GTM can process and hash them via SHA-256 for Enhanced Conversions.
To set up additional form systems, explore our implementation guides for Zoho Form conversion tracking, HubSpot Form conversion tracking, and GoHighLevel form conversion tracking.
Phase 4: Configure Webhooks for Server-Side GTM Pipeline
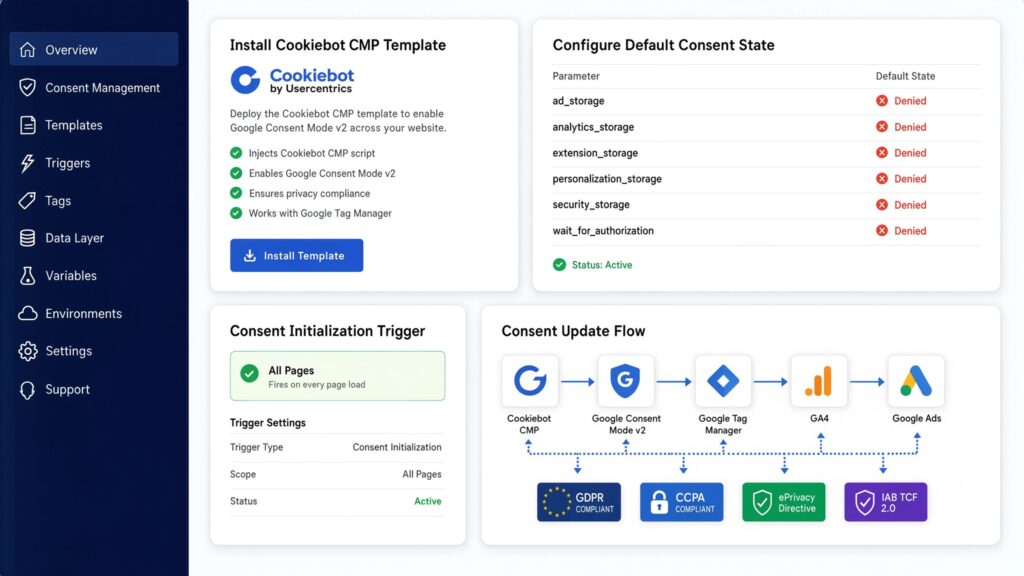
Instead of relying on browser triggers when a deal is won, use Odoo’s automated actions to trigger a webhook. A webhook acts like an automated digital courier—as soon as an internal status changes, it sends a payload directly to your server container.
					[Odoo Sales Desk] ---> (Deal Moved to "Won") ---> [Odoo Automated Action Webhook]
                                                              |
                                                              v
                                              (POST Request via HTTPS JSON)
                                                              |
                                                              v
                                            [Server GTM: metrics.yourdomain.com]
                                                              |
                                           +------------------+------------------+
                                           |                                     |
                                           v                                     v
                                [GA4 Measurement Protocol]            [Google Ads Offline API]
- Create a server container environment using Stape Global Hosting (or Stape European Hosting for strict EU GDPR compliance).
- Configure your custom server subdomain in your DNS provider (e.g., metrics.yourdomain.com pointing as a CNAME to your Stape endpoint).
- Inside Odoo, navigate to Automated Actions (Settings > Technical > Actions > Automated Actions).
- Create a new Action named Send Closed Won Deal to Server GTM:
- Model: Lead/Opportunity (crm.lead)
- Trigger: On Update
- Trigger Field: Stage (stage_id)
- Apply On: Stage Name = ‘Won’
- Action To Do: Execute Code / Send Webhook
- Configure the Webhook Endpoint URL to target your custom sGTM container: [https://metrics.yourdomain.com/odoo-webhook](https://metrics.yourdomain.com/odoo-webhook).
- Define the Webhook JSON payload structure:
					{
  "event_name": "offline_purchase",
  "lead_id": "{{ object.id }}",
  "expected_revenue": "{{ object.expected_revenue }}",
  "currency": "USD",
  "gclid": "{{ object.x_gclid }}",
  "fbclid": "{{ object.x_fbclid }}",
  "utm_source": "{{ object.x_utm_source }}",
  "utm_medium": "{{ object.x_utm_medium }}",
  "ga_client_id": "{{ object.x_ga_client_id }}",
  "email": "{{ object.email_from }}",
  "phone": "{{ object.phone }}"
}
For advanced server container routing setups, see our technical walkthrough on server-side tracking services and e-commerce server-side tracking.
Phase 5: Send Offline Conversions to Google Ads & GA4
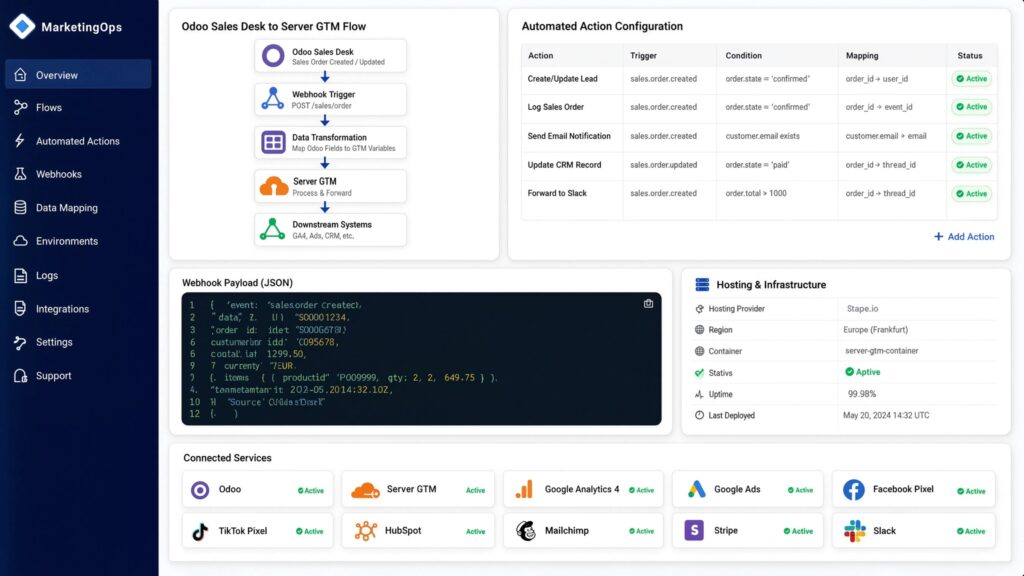
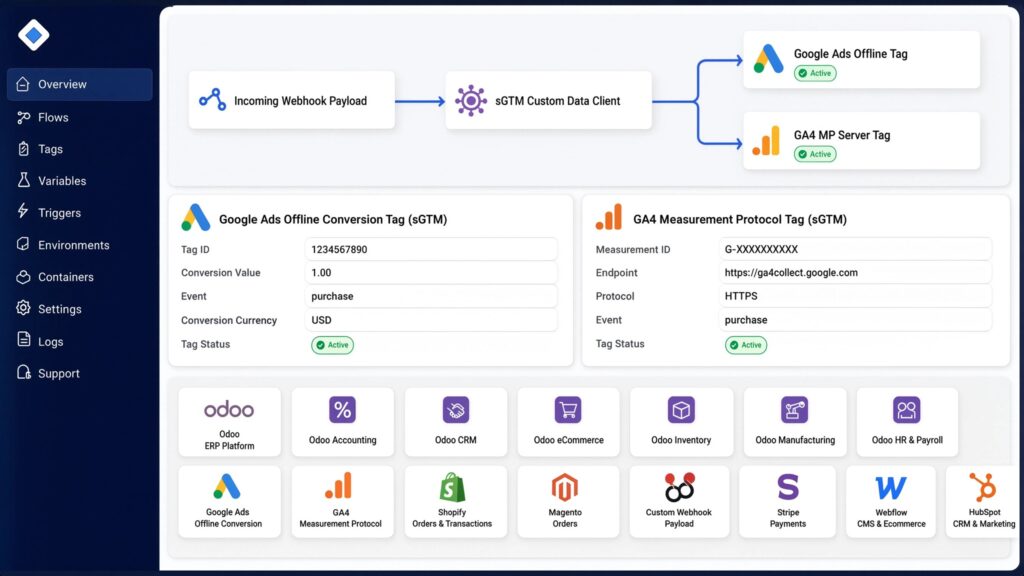
Once your Server GTM container receives incoming webhook payloads from Odoo, configure your server-side tags to route conversion data to Google Ads and GA4.
					Incoming Webhook Payload  --->  [sGTM Custom Data Client]
                                         |
                       +-----------------+-----------------+
                       |                                   |
                       v                                   v
        [Google Ads Offline Tag]                 [GA4 MP Server Tag]
        - GCLID Conversion Upload                - api_secret Verification
        - Enhanced Matching (SHA-256)            - Measurement Protocol Event
                       |                                   |
                       v                                   v
           Google Ads API Endpoint                  GA4 Analytics Processing
1. Google Ads Offline Conversion Tag (sGTM)
- In your sGTM Container, go to Tags > New > Google Ads Offline Conversions.
- Map the incoming payload fields:
- Conversion Upload Type: GCLID-based Upload.
- GCLID: Map to the incoming JSON variable gclid.
- Conversion Value: Map to expected_revenue.
- Currency Code: Map to currency.
- Conversion Time: Set to the timestamp when the webhook fires.
- Enable Enhanced Conversions for Leads and map user parameters (email, phone). sGTM automatically hashes these values using SHA-256 before sending them via HTTPS.
2. GA4 Measurement Protocol Tag (sGTM)
- Create a GA4 Measurement Protocol tag inside sGTM.
- Enter your GA4 Measurement ID and your API Secret Key (found in GA4 > Admin > Data Streams > Measurement Protocol API secrets).
- Map key attributes:
- client_id: Set to the incoming ga_client_id payload variable.
- event_name: Set to offline_deal_won.
- value: Map to expected_revenue.
- currency: USD.
- Trigger this tag when the server client processes requests at /odoo-webhook.
For larger enterprise setups using external CRMs, review our guides on Salesforce conversion tracking and general offline conversion tracking services.
Phase 6: Build an Attribution Dashboard in Looker Studio
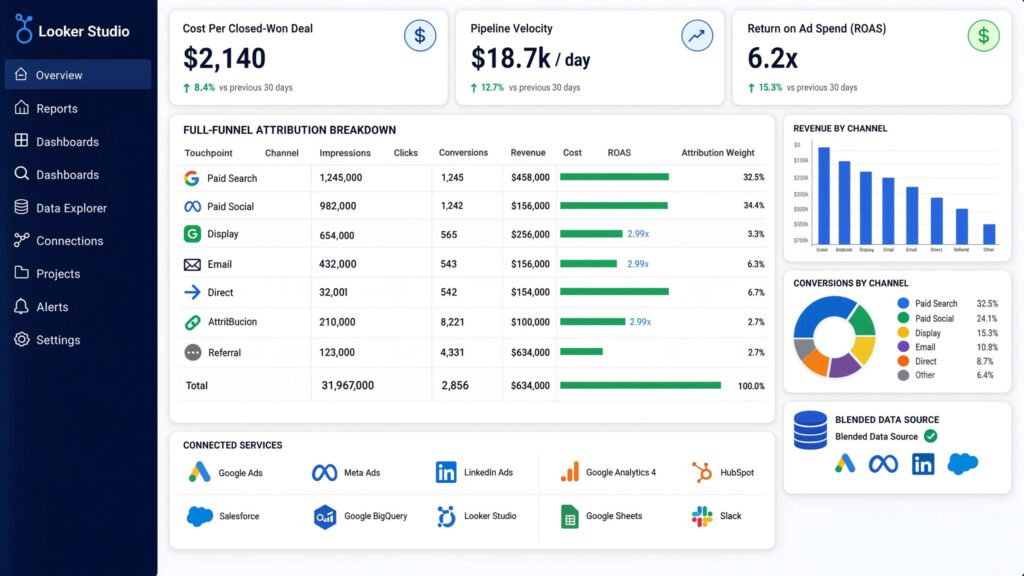
With lead parameters entering Odoo and closed-won revenue flowing into GA4 and Google Ads, you can build an end-to-end Looker Studio dashboard to analyze performance.
- Connect Looker Studio to your GA4 Property and Google Ads Account.
- Create a blended data source that joins online traffic data with Odoo CRM lead events Set up the following performance tables:
					+-----------------------------------------------------------------------------------------+
|                        FULL-FUNNEL ATTRIBUTION BREAKDOWN                                |
+------------------+---------------+--------------+----------------+----------------------+
| Medium / Source  | Web Sessions  | Leads (Odoo) | Closed Deals   | Total Revenue ($)    |
+------------------+---------------+--------------+----------------+----------------------+
| google / cpc     | 14,200        | 310          | 18             | $124,500             |
| google / organic | 22,500        | 180          | 14             | $98,000              |
| meta / paid      | 8,900         | 120          | 3              | $15,000              |
| direct / none    | 4,100         | 25           | 1              | $4,500               |
+------------------+---------------+--------------+----------------+----------------------+
- Add scorecard widgets for key metrics: Cost Per Closed-Won Deal, Pipeline Velocity, and Return on Ad Spend (ROAS).
Testing & Validation Framework
Before running live campaigns, validate your entire tracking path using this testing sequence:
- Step 1: GTM Web Container Validation
- Tool: GTM Preview Mode
- Action: Complete a test web form submission.
- Verification: Confirm that the odoo_lead_submitted event fires and that variables (gclid, utm_source, ga_client_id) populate correctly in the Data Layer.
- Step 2: Odoo Lead Entry Verification
- Tool: Odoo CRM Sales Desk
- Action: Open the newly created test lead record in Odoo.
- Verification: Confirm that your custom fields (x_gclid, x_utm_source, x_ga_client_id) contain the test values.
- Step 3: Webhook Trigger & sGTM Processing
- Tool: sGTM Preview Console (Stape)
- Action: Drag the test lead into the “Won” stage inside Odoo.
- Verification: Confirm that sGTM receives the incoming HTTPS POST request at /odoo-webhook and returns an HTTP 200 OK response.
- Step 4: GA4 DebugView Real-Time Event Check
- Tool: GA4 DebugView
- Action: Inspect real-time stream logs.
- Verification: Verify that the offline_deal_won event appears with the correct value and currency parameters.
- Step 5: Google Ads Conversion Action Match
- Tool: Google Ads Diagnostics
- Action: Navigate to Goals > Conversions > Summary.
- Verification: Confirm that your Offline Conversion action displays an Active status without upload errors.
Troubleshooting Common Tracking Errors
Problem 1: Webhook Fails to Trigger on Deal Stage Updates
- Cause: Odoo Automated Action rules are misconfigured, or the Python execution logic lacks permission to run outbound HTTP requests.
- Solution: Verify that your Automated Action is set to fire On Update for the stage_id field. Test the webhook payload using a testing tool like Webhook.site before pointing it to your sGTM container URL.
Problem 2: Google Ads Rejects Offline GCLID Uploads
- Cause: Uploading conversion events for gclid parameters that are older than 90 days, or attempting to upload conversions less than 24 hours after the original ad click occurred.
- Solution: Ensure your Odoo webhook runs within the 90-day window allowed by Google Ads. Allow a 24-hour buffer after click generation before triggering test conversion imports.
Problem 3: Organic SEO Leads Categorized as “Direct” Traffic inside Odoo
- Cause: Custom GTM listeners are firing after form scripts load, or the referrer policy headers on your site strip organic search query parameters.
- Solution: Attach your GTM Parameter Listener to the Initialization – All Pages trigger so it captures attribution parameters before any form inputs are parsed.
Problem 4: Duplicate Conversion Events in GA4
- Cause: Browser container tags and server webhook endpoints are both firing conversion events without passing a unique transaction ID.
- Solution: Pass a unique transaction_id (such as the Odoo Lead ID object.id) inside both browser events and server webhook payloads to allow automatic deduplication.
Conclusion
Integrating Odoo CRM with Google Tag Manager, GA4, and Google Ads bridges the gap between digital marketing efforts and real business sales. Relying only on browser form submit events leaves your marketing strategy blind to actual customer lifetime value.
By building custom fields in Odoo, using Cookiebot for Consent Mode v2 compliance, capturing user parameters with GTM listeners, and automating offline conversion uploads via sGTM webhooks, you establish a reliable analytics pipeline. This setup equips ad network algorithms to optimize for actual revenue, helping you lower acquisition costs and scale your campaigns effectively.
Summary by MD Niamul
This masterclass guide provides a step-by-step roadmap to set up Odoo CRM offline conversion tracking and SEO attribution using GTM, sGTM, GA4, and Google Ads. By capturing first-party parameters (gclid, fbclid, UTMs, GA Client ID) in custom Odoo fields and automating webhook events when deals move to “Won,” you create a reliable tracking pipeline. This setup ensures your marketing platforms optimize for real revenue rather than raw form submissions.
1.Why do standard GA4 form tags fail for Odoo?
Standard GA4 form tags only track when a user submits an online web form. They cannot track offline sales activities, like when a sales representative qualifies a lead, issues an invoice, or closes a deal inside Odoo CRM weeks later.
2.How does Odoo capture the Google Click ID (GCLID)?
When a visitor lands on your site from a Google Ad, a custom GTM JavaScript listener parses the gclid parameter from the URL query string. The script stores this string in session storage and injects it into a hidden form input on your Odoo form upon submission.
3.Is server-side tracking required for Odoo offline conversion tracking?
While you can upload manual CSV spreadsheets of conversion data into Google Ads, using Server-Side GTM with automated Odoo webhooks provides a real-time, automated tracking pipeline. This removes manual data entry and sends conversion data back to ad networks instantly.
4.What occurs if a user rejects cookies on the website?
If a user declines cookies via the Cookiebot banner, Google Consent Mode v2 sets analytics and ad storage settings to denied. GTM then blocks client-side tracking cookies, and the listener script avoids capturing personalized identifiers, keeping your setup compliant with privacy laws.
5.How do I track organic SEO leads inside Odoo CRM?
The custom GTM listener script checks the document.referrer property when no paid UTM parameters exist. If the referrer domain matches an organic search engine (such as Google or Bing), the script marks the source as google and the medium as organic, storing these values in Odoo fields.
6.Can I pass revenue values back to Meta Ads (Facebook)?
Yes. By setting up a Meta Conversions API (CAPI) tag inside your Server GTM container, you can process incoming Odoo closed-won webhooks and transmit Purchase or Lead Qualified events with exact financial values back to Meta Ads.
7.How does transaction deduplication work for offline conversions?
By attaching a unique identifier—such as the unique Odoo Lead ID (object.id)—to both the initial web lead event and the server-side conversion webhook, GA4 and ad platforms can recognize matching records and prevent double-counting.
8.Will sGTM tracking bypass browser ad blockers?
Yes. Running Server GTM on a first-party custom subdomain (such as metrics.yourdomain.com) routes tracking data through your own server infrastructure. This prevents tracking requests from being blocked by standard client-side browser extensions.
9.How long does it take for Google Ads to show offline conversions?
Once sent via the Google Ads API or sGTM, offline conversions typically appear in your Google Ads reporting dashboard within 3 to 12 hours, provided the uploaded click ID is valid and within the 90-day window.
10.What is the benefit of mapping the GA4 Client ID to Odoo?
Storing the GA4 Client ID (_ga cookie value) in Odoo allows you to use the GA4 Measurement Protocol API. This lets you attach offline closed-won deal events back to the user’s original web session inside GA4 reports.
 Need Help Advanced GHL Automation & Tracking Setup?