
Quick Answer
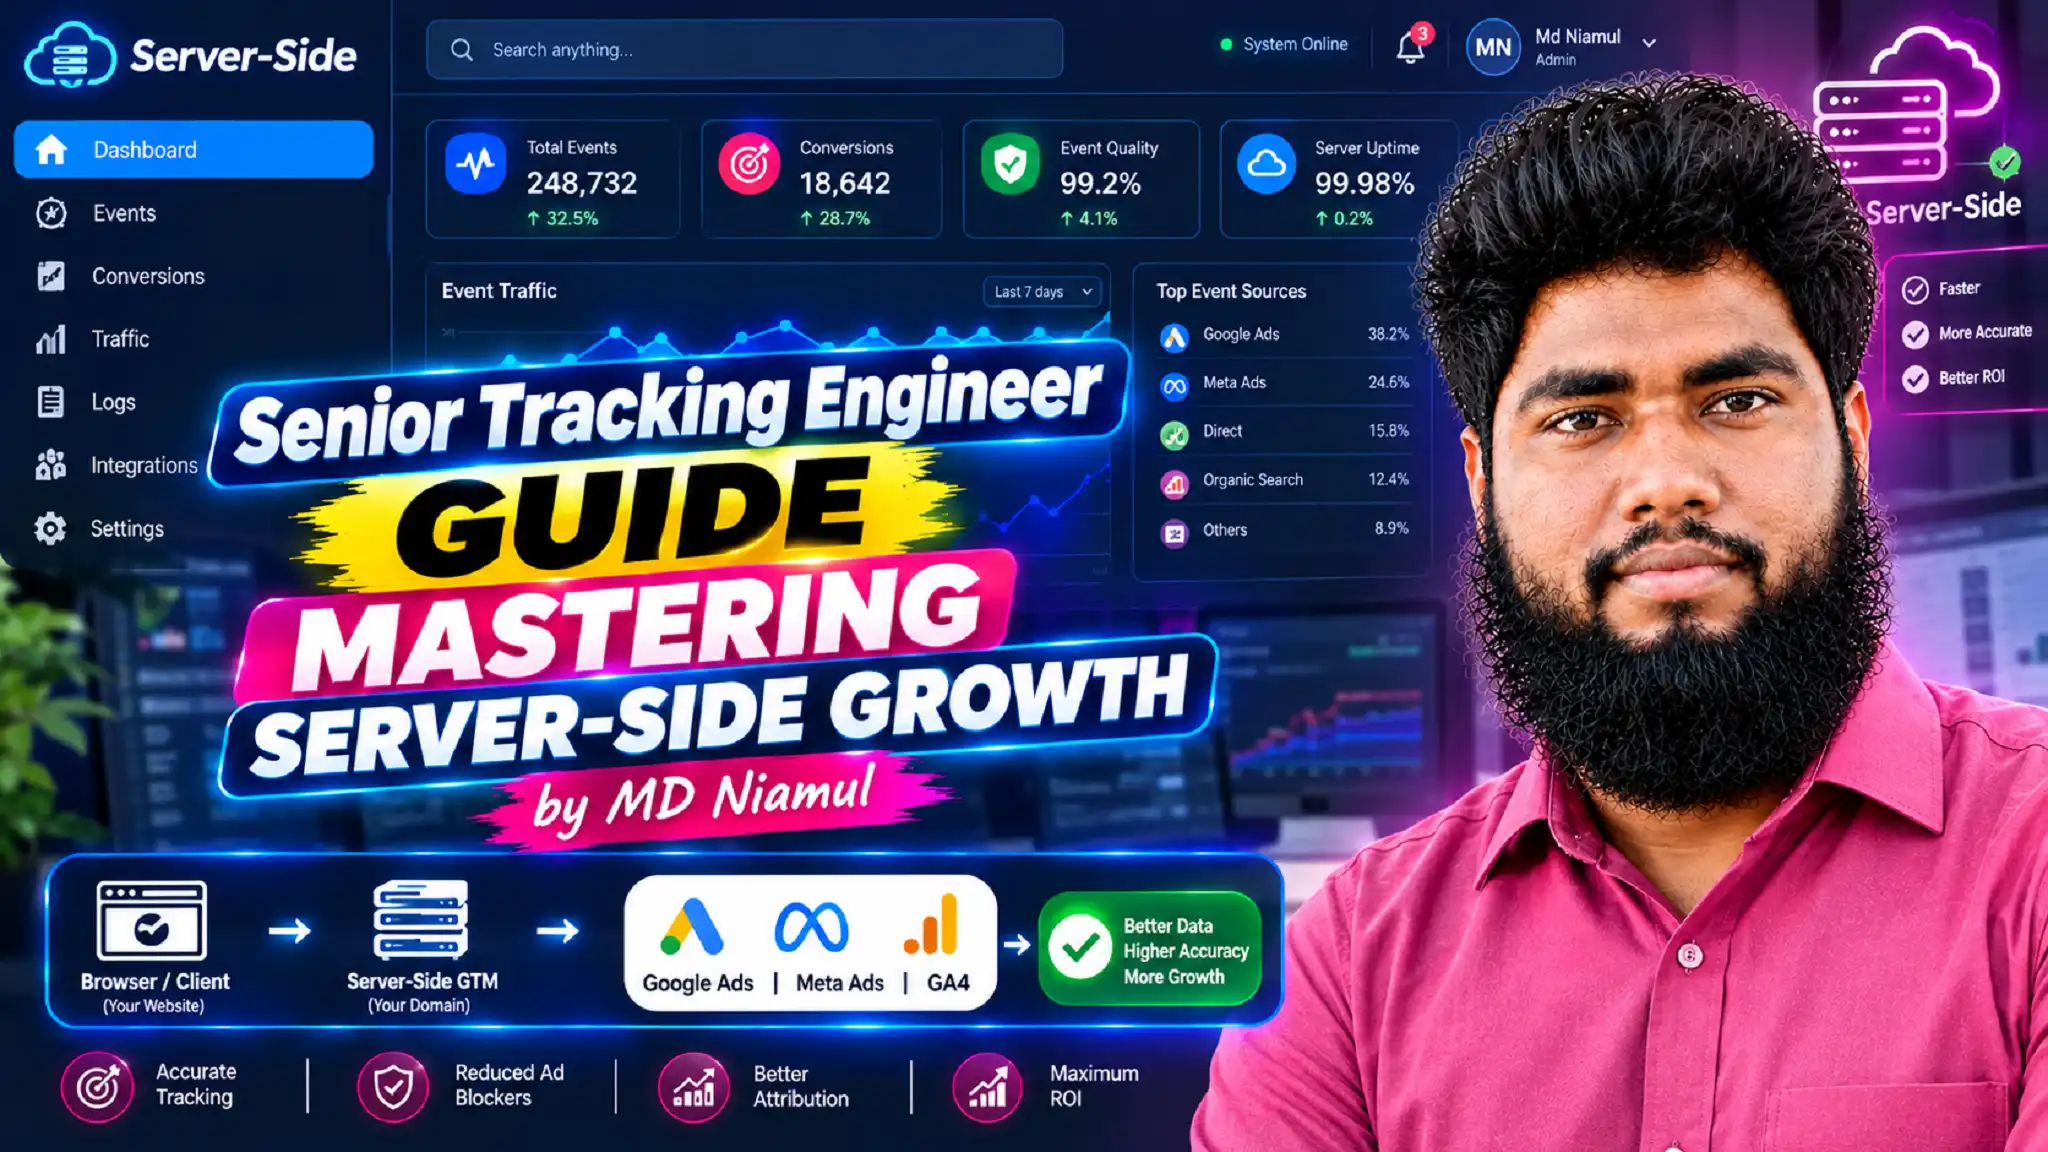
Transitioning from a traditional web tag manager to a Senior Tracking Engineer requires moving away from fragile browser-based scripts toward first-party server-side data architecture. By deploying Server-Side Google Tag Manager (sGTM) on a custom domain, routing events through multi-channel Conversion APIs (Meta CAPI, Google Ads, TikTok), and maintaining compliance with Google Consent Mode V2, you can bypass ad blockers and Safari ITP to achieve 99% data accuracy and significantly boost ad performance.
Key Takeaways
- Browser Tracking is Broken: Client-side scripts lose up to 30%–40% of conversion data due to iOS updates, Safari ITP, and aggressive ad blockers.
- The Engineering Mindset: Senior Analytics Engineers build robust, first-party cloud pipelines using sGTM rather than relying solely on browser tags.
- First-Party Subdomain Power: Hosting your sGTM container under a custom subdomain (e.g., metrics.yourdomain.com) extends cookie lifetimes from 7 days back to 1 to 2 years.
- EMQ Optimization: Sending deduplicated, hashed user parameters (em, ph, fbp, fbc) to Meta CAPI directly increases Event Match Quality and lowers Cost Per Acquisition (CPA).
- Full Privacy Compliance: Integrating Cookiebot with Google Consent Mode V2 ensures fully legal data collection without compromising attribution accuracy.
Introduction The Day the Pixels Died
Imagine launching a high-budget ad campaign, scaling it up, and watching your reported sales in Meta Ads Manager drop by 35% overnight—even though your actual bank account balance remains stable.
That exact scenario happened to an e-commerce client who contacted me after spending thousands of dollars on unoptimized ads. Their client-side Meta Pixel and Google Ads tags were blocked by Safari’s Intelligent Tracking Prevention (ITP) and modern ad-blocking browser extensions. The ad platforms were essentially running blind, incapable of optimizing for real buyers.
					+-----------------------------------------------------------------------+
|                       OLD BROWSER-BASED PIPELINE                      |
|                                                                       |
|  User Browser  --->  [ Ad Blockers / ITP Capping ]  --->  Ad Platform |
|                          (30-40% Data Lost)                           |
+-----------------------------------------------------------------------+

+-----------------------------------------------------------------------+
|                    SERVER-SIDE TRACKING PIPELINE                      |
|                                                                       |
|  User Browser  --->  First-Party Cloud (sGTM)  --->  Multi-Channel    |
|                      (100% Signal Control)           Conversion APIs  |
+-----------------------------------------------------------------------+
To survive and scale in modern digital marketing, you cannot rely on basic client-side tags. Web analytics professionals must evolve into Senior Tracking Engineers. This guide walks you through building an enterprise-grade, server-side data infrastructure designed to recover lost signals, boost Event Match Quality (EMQ), and secure predictable ad scaling.
Why Server-Side Tracking is No Longer Optional
Browser tracking relies on third-party scripts loaded directly inside the user’s browser. Think of a client-side tracking script as a postcard sent through the open mail: anyone along the delivery path can read it, alter it, or simply throw it in the trash.
Server-side tracking acts like a secured, private courier service. Your website sends a single, first-party data stream to your own cloud server (Server-Side GTM). Your server then formats, cleanses, hashes, and routes that data directly to advertising endpoints via secure APIs.
					+--------------------------+-----------------------------------+-----------------------------------+
| Feature / Metric         | Client-Side (Browser) Tracking    | Server-Side (sGTM) Tracking       |
+--------------------------+-----------------------------------+-----------------------------------+
| Data Accuracy            | 60% – 70% (High signal loss)      | 95% – 99% (Near complete capture) |
| Cookie Lifetime (Safari) | Max 7 days (often 24 hours)       | Up to 1 to 2 years (First-party)  |
| Impact of Ad Blockers    | Easily blocked by browser rules   | Completely bypassed via subdomain |
| Event Match Quality      | Low to Moderate (3.0 - 6.0)       | High to Excellent (8.5 - 10.0)    |
| Page Load Speed Impact   | Heavy (Multiple JS SDKs loaded)   | Lightweight (Single client ping)  |
| Data Control & Privacy   | Raw data sent straight to vendors | You inspect and anonymize first  |
+--------------------------+-----------------------------------+-----------------------------------+
5 Core Benefits of Server-Side Data Architecture
- Bypasses Browser Restrictions: Bypasses AdBlockers, Brave Shields, and Safari ITP restriction rules by serving scripts from your own root domain.
- Extends Cookie Longevity: Custom server headers convert fragile client-side cookies into durable, HTTP-only first-party cookies.
- Maximizes Ad Engine Performance: Higher Event Match Quality (EMQ) gives ad algorithms the necessary data to target high-intent audiences accurately.
- Improves Site Performance: Removing multiple heavy third-party JavaScript files lowers Core Web Vitals scores and boosts conversion rates.
- Enforces Data Governance: You maintain complete control over what data is collected, stripped, or anonymized before sending it to third-party endpoints.
If you are running e-commerce stores, review my dedicated E-commerce Server-Side Tracking Service or learn how to handle Shopify Server-Side Tracking effectively.
Prerequisites & Checklist
Before building your server-side infrastructure, ensure you have the required platform access:
					+--------------------------+-------------------------------------------------+
| Tool / Platform          | Required Access Level                           |
+--------------------------+-------------------------------------------------+
| Web Google Tag Manager   | Publish / Admin Access                          |
| Server Google Tag Manager| Container Admin Access                          |
| Hosting Provider         | Stape.io or Google Cloud Platform (GCP)         |
| Domain DNS Settings      | CNAME / A-Record access (Cloudflare, GoDaddy)   |
| Meta Business Manager    | Admin access to Pixel and Conversions API       |
| Google Ads Account       | Admin / Edit access for Enhanced Conversions    |
| Consent Management (CMP) | Cookiebot or CookieYes Account                  |
+--------------------------+-------------------------------------------------+
Video Tutorial: Server-Side Tracking Masterclass
Watch the video tutorial below to see the practical implementation step-by-step:
Step-by-Step Implementation Guide
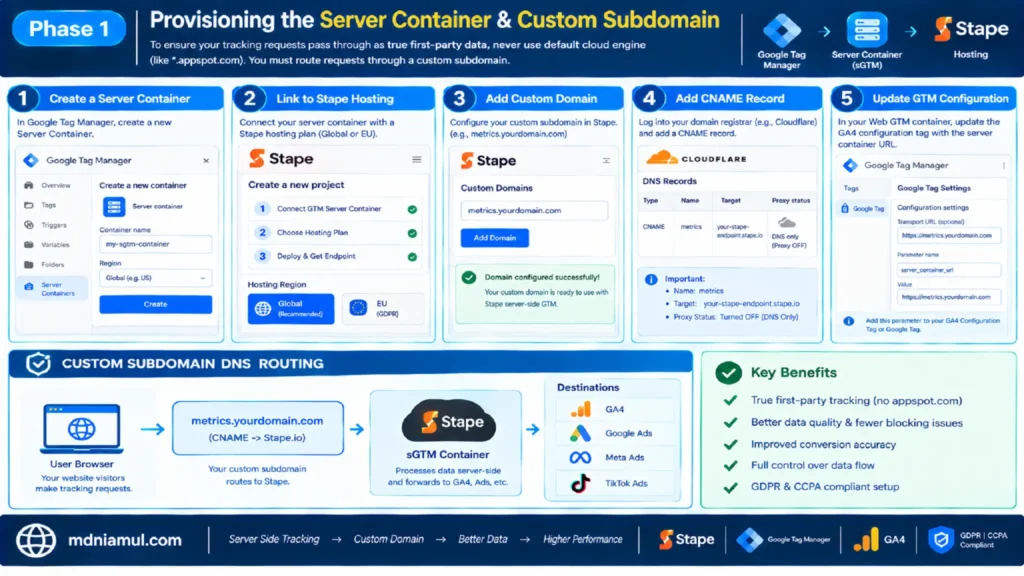
Phase 1: Provisioning the Server Container & Custom Subdomain
To ensure your tracking requests pass through as true first-party data, never use default cloud engine domains (like *.appspot.com). You must route requests through a custom subdomain.
- Create a new Server Container in Google Tag Manager.
- Link your container to a dedicated hosting vendor like Stape.io Global Hosting (or Stape.io EU Hosting for strict GDPR environments).
- Set up a custom domain inside Stape (e.g., metrics.yourdomain.com).
- Log into your domain registrar (e.g., Cloudflare) and add a CNAME Record:
- Name: metrics
- Target: your-stape-endpoint.stape.io
- Proxy Status: Turned OFF (DNS Only).
- In your Web GTM Container, update your GA4 Configuration Tag or Google Tag transport URL:
- Navigate to Google Tag Settings -> Configuration Settings.
- Add parameter: server_container_url = [https://metrics.yourdomain.com](https://metrics.yourdomain.com).
					+-----------------------------------------------------------------------+
|                      CUSTOM SUBDOMAIN DNS ROUTING                     |
|                                                                       |
|  User Browser  --->  metrics.yourdomain.com  --->  sGTM Container     |
|                      (CNAME -> Stape.io)                              |
+-----------------------------------------------------------------------+
Phase 2: Deploying Custom JavaScript Event Listener Code
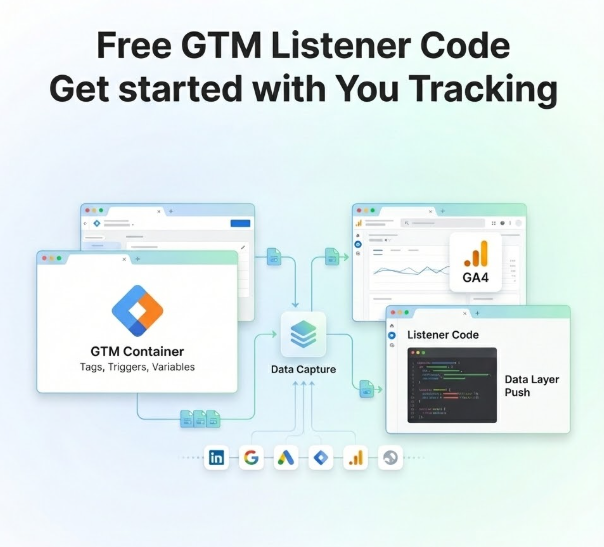
When forms or non-standard checkouts do not push clean events to the browser data layer, a Senior Tracking Engineer writes a custom event listener. This script captures user interactions, extracts user details (email, phone, click IDs), and triggers a clean data layer event.
Add a Custom HTML Tag in Web GTM fired on All Pages (or relevant interactive pages):
					<script>
(function() {
  // Utility function to normalize and clean input strings
  function cleanInput(val) {
    return val ? val.trim().toLowerCase() : '';
  }

  // Event listener for form submissions across the website
  document.addEventListener('submit', function(e) {
    var form = e.target;
    if (!form) return;

    // Extract common fields for Advanced Matching / EMQ
    var emailInput = form.querySelector('input[type="email"], input[name*="email"]');
    var phoneInput = form.querySelector('input[type="tel"], input[name*="phone"]');
    var nameInput  = form.querySelector('input[name*="name"], input[name*="first_name"]');

    var userData = {
      email: emailInput ? cleanInput(emailInput.value) : '',
      phone: phoneInput ? cleanInput(phoneInput.value) : '',
      firstName: nameInput ? cleanInput(nameInput.value) : ''
    };

    // Push structured data layer payload
    window.dataLayer = window.dataLayer || [];
    window.dataLayer.push({
      'event': 'custom_form_submission',
      'form_id': form.id || 'generic_form',
      'user_data': userData
    });
  }, true);
})();
</script>
Phase 3: Structuring the Master Data Layer Payload
To send user and e-commerce data to your server container, structure your client-side data layer pushes uniformly. For complex setups like HubSpot or Zoho, refer to my tutorials on HubSpot Form Conversion Tracking and Zoho Form Conversion Tracking.
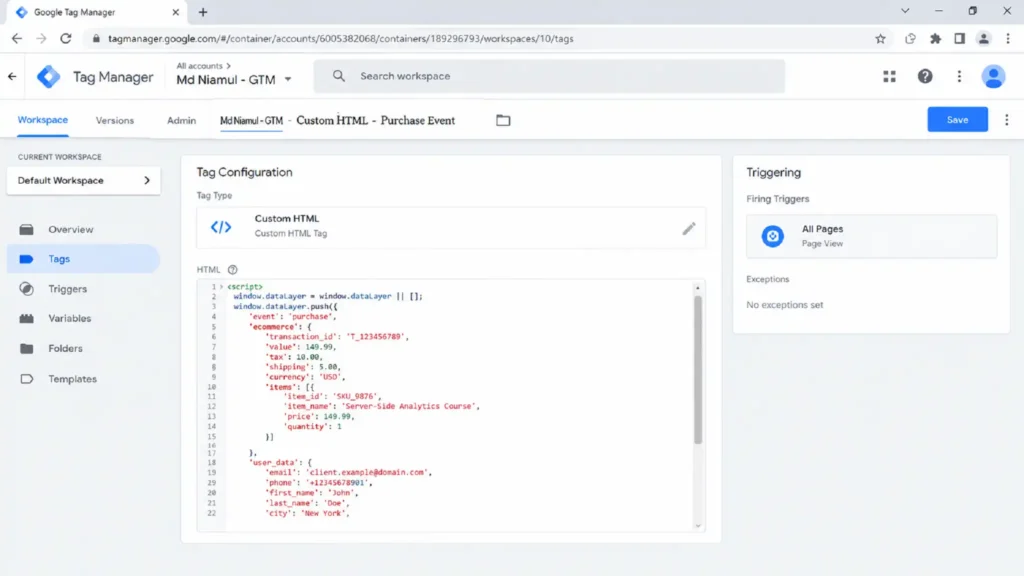
Below is an example of a standardized purchase event Data Layer code snippet:
					<script>
window.dataLayer = window.dataLayer || [];
window.dataLayer.push({
  'event': 'purchase',
  'ecommerce': {
    'transaction_id': 'T_123456789',
    'value': 149.99,
    'tax': 10.00,
    'shipping': 5.00,
    'currency': 'USD',
    'items': [{
      'item_id': 'SKU_9876',
      'item_name': 'Server-Side Analytics Course',
      'price': 149.99,
      'quantity': 1
    }]
  },
  'user_data': {
    'email': 'client.example@domain.com',
    'phone': '+12345678901',
    'first_name': 'John',
    'last_name': 'Doe',
    'city': 'New York',
    'state': 'NY',
    'zip': '10001',
    'country': 'US'
  }
});
</script>
Phase 4: Implementing Meta Conversions API (CAPI) with Deduplication
Deduplication prevents double-counting when both the client-side browser Pixel and the Server-Side CAPI send the same event to Meta.
					+-----------------------------------------------------------------------+
|                       EVENT DEDUPLICATION LOGIC                       |
|                                                                       |
|  Browser Pixel Event  --->  event_name + event_id  ---\               |
|                                                        +--> Meta Engine|
|  Server CAPI Event    --->  event_name + event_id  ---/ (Deduplicated)|
+-----------------------------------------------------------------------+
Steps in Web GTM:
- Create a variable: Unique Event ID (using a GTM unique ID variable template).
- Attach event_id to both your Web Meta Pixel Tag and your Client GA4 Event Tag.
Steps in Server GTM (sGTM):
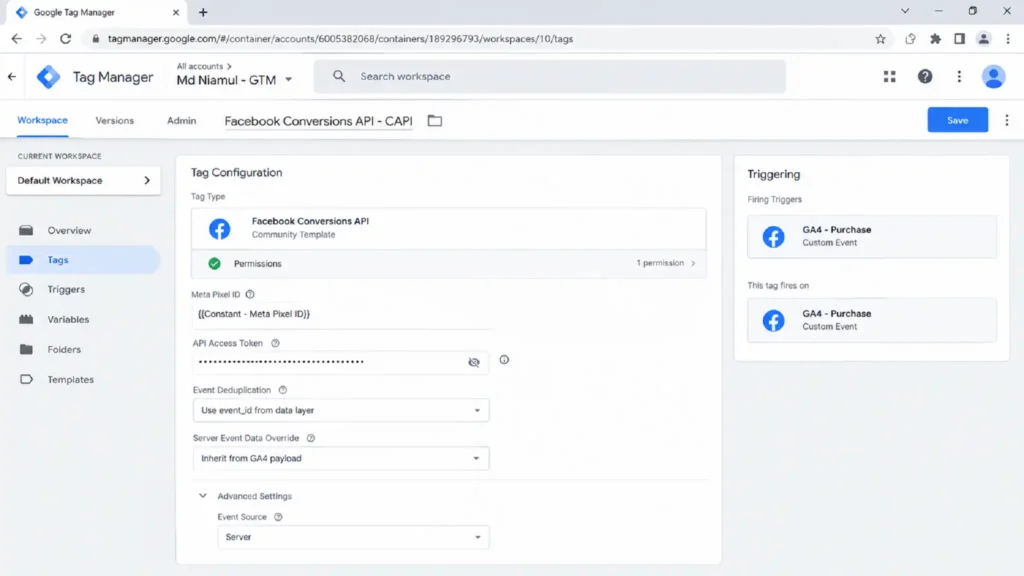
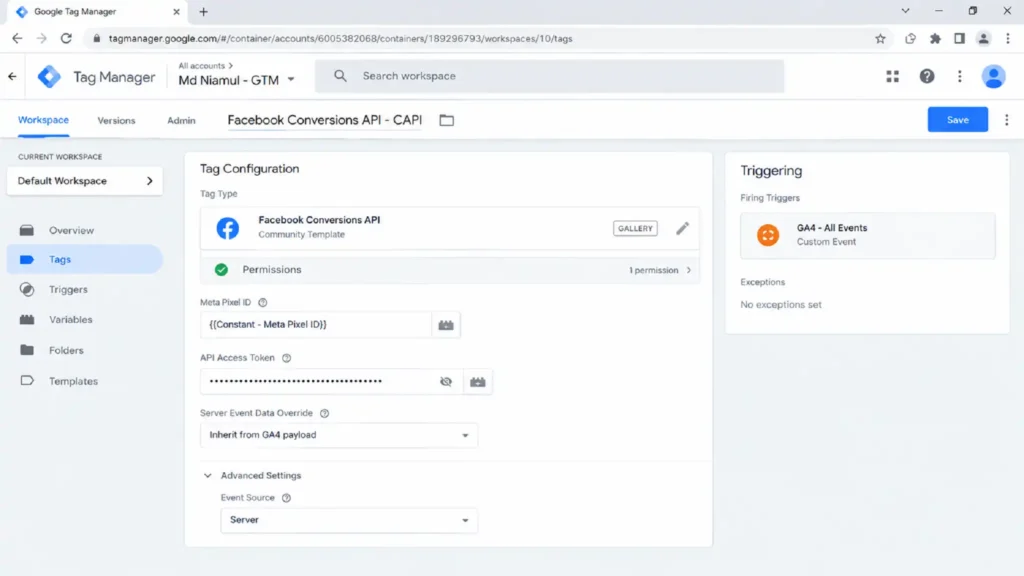
- Install the official Facebook Conversions API Tag from the Community Template Gallery.
- Create a Trigger in sGTM:
- Trigger Type: Custom
- Condition: Client Name equals GA4.
- Configure Tag settings:
- Meta Pixel ID: {{Constant – Meta Pixel ID}}
- API Access Token: Paste token from Meta Events Manager.
- Server Event Data Override: Select inherited event data parameters from GA4 payload.
					+-------------------------+-------------------------------+-----------------------------------+
| Parameter Name          | Incoming GA4 / DL Path        | Meta CAPI Target Parameter        |
+-------------------------+-------------------------------+-----------------------------------+
| Event Name              | event_name                    | event_name (e.g. Purchase)        |
| Event ID                | event_id                      | event_id (for deduplication)      |
| Hashed Email            | user_data.email               | user_data.em (SHA-256)            |
| Hashed Phone            | user_data.phone               | user_data.ph (SHA-256)            |
| Browser IP              | ip_address                    | client_ip_address                 |
| User Agent              | user_agent                    | client_user_agent                 |
| Meta Browser Cookie     | _fbp                          | fbp                               |
| Meta Click Cookie       | _fbc                          | fbc                               |
+-------------------------+-------------------------------+-----------------------------------+
Phase 5: Google Ads Enhanced Conversions via sGTM
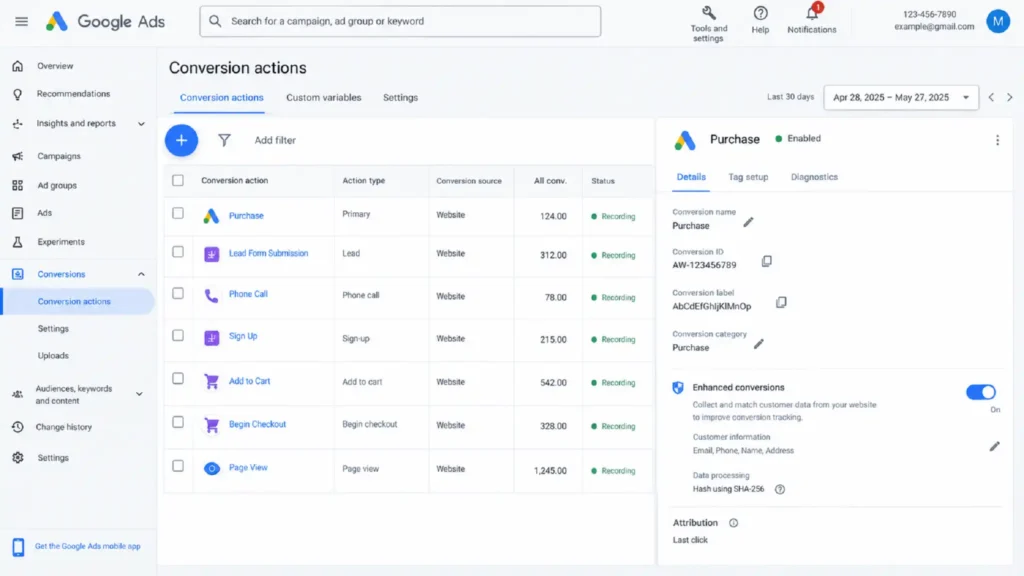
Google Ads Enhanced Conversions securely sends first-party user data (hashed using SHA-256) from your server container directly to Google’s conversion servers.
- Enable Enhanced Conversions inside your Google Ads Conversion Action settings.
- In sGTM, create a Google Ads Conversion Tag:
- Conversion ID: AW-123456789
- Conversion Label: AbCdEfGhIjKlMnOp
- User Data: Select User Data Variable extracted from the GA4 event data incoming stream.
- Attach your Purchase trigger (Fires on Event Name equals purchase).
This setup ensures that even if user consent limits client-side storage, conversion events paired with hashed first-party user details allow Google Ads to accurately match conversions to ad clicks. For non-standard checkout applications, read my guide on Third-Party Checkout Conversion Tracking.
Phase 6: Google Consent Mode V2 Setup with Cookiebot
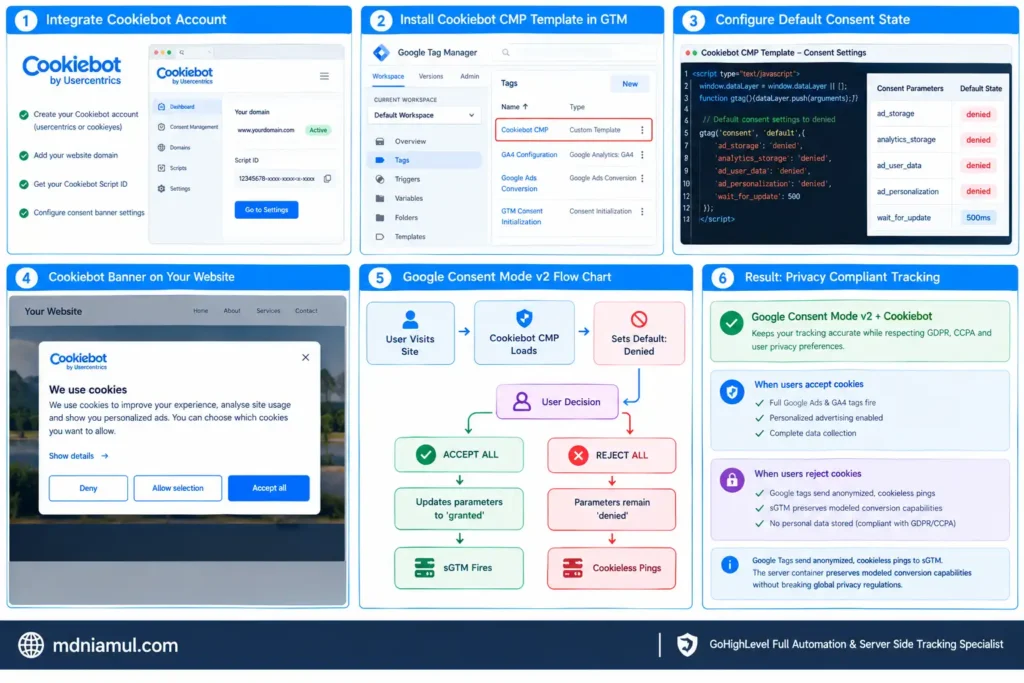
Google Consent Mode V2 requires explicit consent signals (analytics_storage, ad_storage, ad_user_data, ad_personalization) before storing cookies or firing personalized advertising tags.
- Integrate the CMP using Cookiebot Account Setup (or CookieYes Account Setup).
- Install the Cookiebot CMP Template inside your Web GTM Container.
- Configure the Default Consent State (placed before any analytics or advertising tags execute):
					+----------------------------------+-----------------------+
| Consent Parameter                | Default State         |
+----------------------------------+-----------------------+
| ad_storage                       | denied                |
| analytics_storage                | denied                |
| ad_user_data                     | denied                |
| ad_personalization               | denied                |
| wait_for_update                  | 500ms                 |
+----------------------------------+-----------------------+
+———————————————————————–+
| CONSENT MODE V2 FLOW CHART |
| |
| User Visits Site —> Cookiebot CMP Loads —> Sets Default: Denied |
| |
| User Decision: |
| – ACCEPT ALL —> Updates parameters to ‘granted’ —> sGTM Fires |
| – REJECT ALL —> Parameters remain ‘denied’ —> Cookieless Pings|
+———————————————————————–+
When users reject cookies, Google Tags send anonymized, cookieless pings to sGTM. The server container preserves modeled conversion capabilities without breaking global privacy regulations (GDPR, CCPA).
Testing & Validation Procedures
Never push a server-side setup straight to production without full verification across all debugging tools.
					+-----------------------+----------------------------------+------------------------------------+
| Validation Step       | Tool Used                        | Expected Outcome                   |
+-----------------------+----------------------------------+------------------------------------+
| 1. Incoming Client    | Web GTM Preview / GA4 DebugView  | `server_container_url` pings 200 OK|
| 2. Cloud Processing   | sGTM Preview Console             | GA4 Client parses incoming event   |
| 3. Meta CAPI Test     | Meta Events Manager Test Events  | Shows 'Server' & 'Deduplicated'    |
| 4. Match Quality Check| Meta Events Quality Overview     | EMQ Score reaches 8.0 or higher    |
| 5. Google Ads Status  | Google Ads Diagnostics Screen    | 'Enhanced Conversions Active'      |
+-----------------------+----------------------------------+------------------------------------+
1. sGTM Preview Console
Open sGTM Preview Mode alongside Web GTM Preview Mode. Execute a test transaction. Confirm that the incoming GA4 event generates a 200 HTTP Response and fires both the Meta CAPI and Google Ads Conversion tags successfully.
Lorem ipsum dolor sit amet, consectetur adipiscing elit. Ut elit tellus, luctus nec ullamcorper mattis, pulvinar dapibus leo.
					+-----------------------------------------------------------------------+
| sGTM PREVIEW CONSOLE                                                  |
| Event: purchase | Client: GA4 | Response: 200 OK                      |
|                                                                       |
| Tags Fired:                                                           |
|  [x] Meta CAPI Tag - Sent (200)                                       |
|  [x] Google Ads Conversion Tag - Sent (200)                           |
+-----------------------------------------------------------------------+
2. Meta Test Events
Copy your unique Test Event Code from Meta Events Manager (TEST12345). Paste it into the Meta CAPI tag configuration in sGTM. Execute an event on your website and verify that events show up marked as Browser/Server Deduplicated.
					+-----------------------------------------------------------------------+
| META EVENTS MANAGER TEST WINDOW                                       |
| Event: Purchase | Source: Server | Deduplicated: Yes                  |
| Event Match Quality (EMQ): 9.2 / 10                                   |
+-----------------------------------------------------------------------+
Troubleshooting Common Errors
Error 1: Missing Event ID causing Double Counting in Meta
- Problem: Meta reports twice as many purchases as actually occurred.
- Cause: The event_id string generated on the client-side tag is missing or does not match the server-side tag.
- Solution: Create a single GTM variable using the Unique Event ID template and apply it to both client and server purchase configurations.
Error 2: Low Event Match Quality (EMQ) Score
- Problem: Meta CAPI EMQ remains below 5.0.
- Cause: User parameter values (email, phone) are not being passed from the client data layer, or are being stripped before reaching sGTM.
- Solution: Ensure form field data is collected during user interactions, normalized (lowercase, trimmed), and correctly mapped in sGTM transformation rules.
Error 3: Cookies Expiry Capped at 7 Days in Safari
- Problem: Returning visitors after day 8 are treated as brand-new users in GA4 and ad channels.
- Cause: Custom subdomain is proxying behind Cloudflare or running on a different main IP node without HTTP-only set-cookie headers.
- Solution: Route your custom domain DNS using A/AAAA records directly to Stape or GCP, and enable Stape’s Cookie Header Restore plugin.
Summary by MD Niamul
Adopting a Senior Tracking Engineer mindset involves transitioning away from fragile browser tags toward robust, first-party cloud data pipelines. By deploying sGTM on a custom subdomain, implementing Meta CAPI and Google Ads Enhanced Conversions, and integrating Consent Mode V2 via Cookiebot, you can bypass browser privacy blocks, achieve 99% data accuracy, and safely scale your digital marketing efforts.
1. What is server side tracking?
Server-side tracking routes analytics data from your user’s browser through your own cloud server before sending it to third-party endpoints. This approach bypasses ad blockers, extends first-party cookie life, protects user data privacy, and improves overall website loading speeds.
2. How does sGTM bypass ad blockers?
When configured with a custom first-party subdomain (e.g., metrics.yourdomain.com), sGTM serves scripts directly from your domain’s primary namespace. Ad blockers cannot block these endpoints without breaking core website functionality, allowing your server to capture lost conversion events reliably.
3. What is Event Match Quality?
Event Match Quality (EMQ) is a rating system used by Meta (0 to 10) to determine how effectively customer information (email, phone, location) matches a registered Facebook account. Higher EMQ scores improve ad distribution, reduce overall CPA, and boost conversion attribution.
4. Why set up Google Consent Mode V2?
Google Consent Mode V2 is mandatory for advertisers targeting users in the EEA, UK, and other strictly regulated regions. It dynamically modifies tag behavior based on user consent state, enabling legally compliant analytics and cookieless conversion modeling for users who opt out of tracking.
5. Is server side tracking expensive?
Basic sGTM instances hosted on platforms like Stape cost around $10 to $20 per month for moderate traffic levels. The resulting increase in ad attribution accuracy and lower acquisition costs typically yields a massive return on investment, far exceeding cloud infrastructure fees.
6. Does server side tracking replace client side tags?
It depends on your overall system architecture. Most setups run a hybrid model where GA4 sends a single first-party client ping to sGTM, which then converts, cleanses, and routes data to multiple endpoints (Meta CAPI, Google Ads, TikTok) server-side, eliminating unnecessary client-side SDKs.
7. How does deduplication work in Meta CAPI?
Meta matches client-side pixel events with server-side CAPI events using a shared event_name and unique event_id. When Meta receives both payloads within a 48-hour window, it retains the richer server payload and discards the duplicate event to prevent skewed metrics.
8. What custom domain setup is required?
You need to create a dedicated CNAME or A-Record pointing a subdomain (such as metrics.yourdomain.com) directly to your hosting server (Stape or GCP). This ensures data requests operate strictly within a first-party context, preventing browser privacy engines from capping cookie lifetimes.
9. How do I capture hidden form submissions?
You can deploy a custom JavaScript event listener tag inside Web GTM. This script listens for submit events, extracts available form inputs (such as hashed email or phone number), structures them cleanly, and pushes them straight to the client-side data layer.
10. Can server side tracking fix Safari ITP restrictions?
Yes. Safari’s ITP caps client-side JavaScript cookies to 7 days (and as short as 24 hours). By using sGTM hosted on an A/AAAA record custom domain, you issue HTTP-Only response headers, effectively restoring first-party cookie lifespans up to 1 to 2 years.
 Need Help Advanced GHL Automation & Tracking Setup?