
Quick Answer
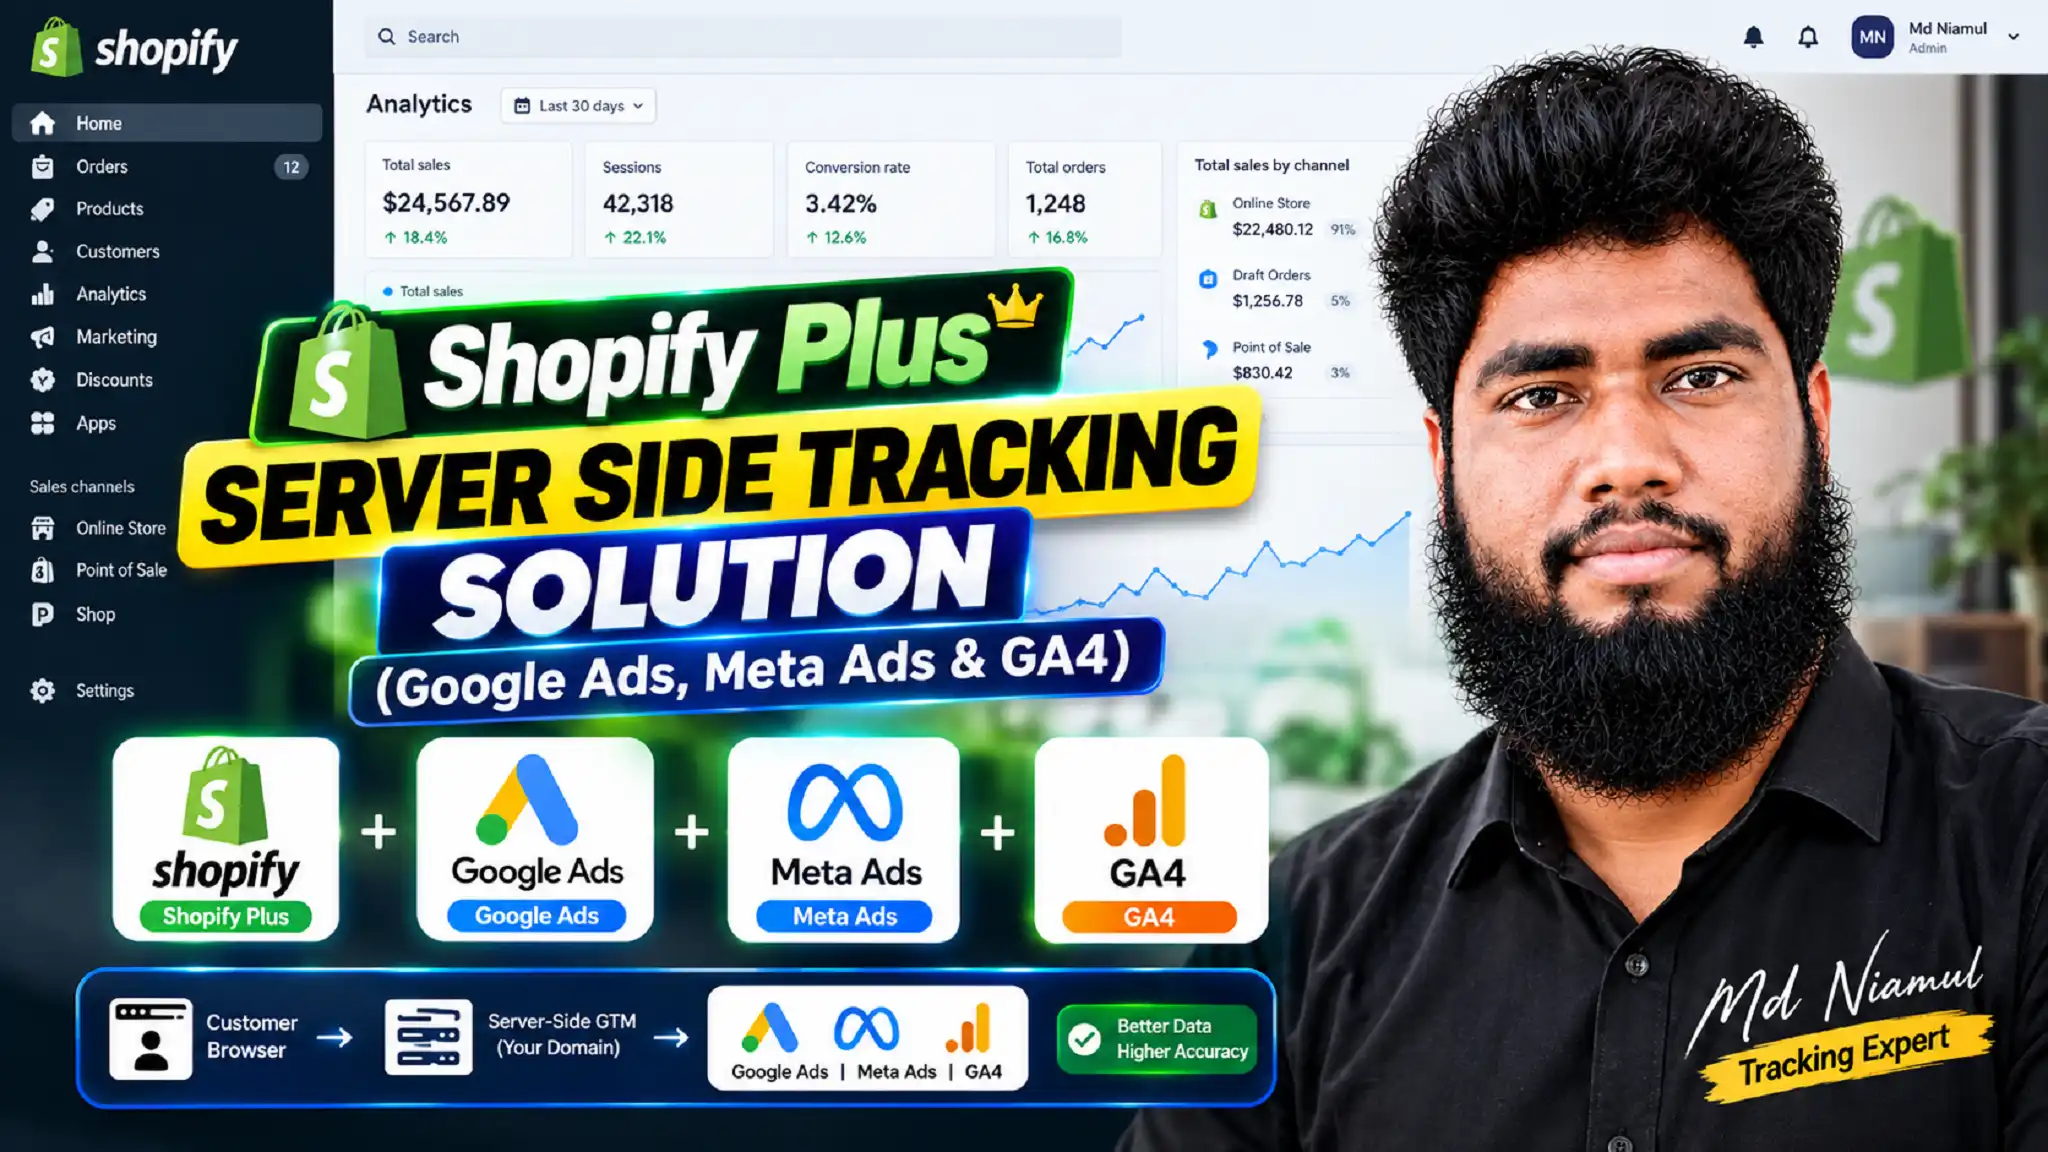
Setting up server-side tracking on Shopify Plus involves routing website events through a dedicated Google Tag Manager (sGTM) server container hosted on Stape.io using a first-party subdomain (such as metrics.yourstore.com). By combining custom Shopify Web Pixels / Customer Events JavaScript listeners with server-side processing, you send hashed customer data and unique event IDs directly to Google Ads, Meta Conversions API (CAPI), and GA4. This bypasses browser restrictions like Apple iOS ITP and ad-blockers, restoring up to 40% of lost conversion data and achieving 99% attribution accuracy.
Key Takeaways
- Recover 40% Lost Data: Server-side tracking routes event pings through a first-party server endpoint, bypassing browser ad-blockers and Safari Intelligent Tracking Prevention (ITP) caps.
- Boost Paid Ad ROAS: Feeding clean conversion signals and user data into Meta Conversions API (CAPI) and Google Ads Enhanced Conversions improves Smart Bidding performance.
- Fix Shopify Checkout Tracking: Utilizing Shopify’s Web Pixels API and Customer Events ensures full data capture across Checkout Extensibility without relying on deprecated theme scripts.
- Eliminate Duplicate Events: Assigning unique event_id parameters across browser and server tags guarantees 100% deduplication in Meta Events Manager and Google Analytics 4.
- Maintain Privacy Compliance: Fully integrates with Google Consent Mode V2 and Cookiebot CMP to respect user privacy choices globally while preserving analytics modeling.
Introduction: The Silent ROAS Killer on Shopify Plus
A high-volume enterprise brand running on Shopify Plus was spending over $150,000 per month across Google Ads and Meta Ads. Their store was generating strong sales, but their ad manager dashboards showed a declining Return on Ad Spend (ROAS). When we audited their reporting, we found that Meta Ads was missing 38% of purchase events, Google Ads Smart Bidding was bidding blindly on incomplete conversion signals, and Google Analytics 4 recorded nearly half of all revenue under Direct or payment gateway referrers like paypal.com.
The brand was losing data because client-side browser tracking is fundamentally broken on modern web browsers. Apple’s iOS privacy updates, Safari ITP short-lived cookie caps, desktop ad-blockers, and network firewalls block standard browser pixels from transmitting order confirmation data back to ad networks.
[ Client Browser ] ──X (Blocked by iOS / Ad-Blockers) ──► [ Meta / Google Ads Dashboard ]
        │
        ▼ (Restored Data Flow via First-Party Subdomain)
[ sGTM Server Container ] ─────────────────────────────► [ 99% Conversion Signal Delivered ]
When high-growth e-commerce stores scale ad spend without server-side infrastructure, ad network learning algorithms starve for conversion signals. Cost per acquisition (CPA) spikes, ad targets miss, and revenue drops.
In this guide, I will show you how to build a server-side tracking infrastructure for Shopify Plus that connects your checkout directly to Google Ads, Meta CAPI, and GA4 for 99% data accuracy.
Why Browser-Side Tracking Fails Shopify Plus Stores
Relying solely on standard browser pixels in today’s privacy-focused environment limits your store’s growth potential.
- Safari ITP and Short-Lived Cookies: Safari’s Intelligent Tracking Prevention (ITP) automatically deletes client-side cookies set by JavaScript within 24 hours to 7 days. If a customer clicks your Meta or Google ad on Monday and completes their purchase on next week’s Tuesday, client-side tracking loses the session. The sale is recorded as direct traffic, and your ad campaign receives zero attribution.
- Ad-Blockers and iOS Privacy Blocks: Over 30% of global internet users active on desktop and mobile employ ad-blockers or privacy extensions. These tools block JavaScript requests sent to third-party domains like connect.facebook.net or google-analytics.com. If a buyer uses an ad-blocker during checkout, browser-based conversion tracking misses the sale entirely.
- Shopify Checkout Extensibility Changes: Shopify has deprecated legacy additional_scripts order status page inputs in favor of Checkout Extensibility and the Web Pixels API. E-commerce stores using outdated checkout scripts experience broken tracking during checkout steps.
5 Key Benefits of Server-Side Tracking for Shopify Plus
- First-Party Cookie Ownership: Setting cookies via first-party server endpoints (metrics.yourstore.com) extends cookie lifetimes up to 1 to 2 years.
- Exact Attribution for Ads: Direct server-to-server pings deliver every order event to Meta CAPI, Google Ads, and TikTok API with zero browser interference.
- Improved Page Load Speed: Offloading tracking scripts from the client browser to a server container reduces client-side JavaScript execution time.
- Higher Event Match Quality (EMQ): Server-side tags send hashed customer parameters (email, phone, address) to ad networks safely to improve user matching.
- Complete Data Security: Filters sensitive customer data on the server before transmitting anonymized event payloads to third-party ad networks.
Prerequisites & System Setup Checklist
Ensure you have the required accounts and administrative access before starting the implementation:
- Shopify Plus Store Admin Access: Required to manage Web Pixels, App Integrations, and Customer Events scripts.
- Google Tag Manager – Web Container: Required to collect front-end site interactions and user parameters.
- Google Tag Manager – Server Container: Required to process and route event payloads server-side.
- Stape.io Hosting Account: Required to host and provision your Server GTM container on a first-party subdomain.
- Google Analytics 4 & Google Ads Admin Access: Required to obtain Measurement IDs, Conversion IDs, and API secrets.
- Meta Business Manager (Admin Access): Required to access Pixel Settings, generate CAPI Access Tokens, and configure Test Events.
- Cookiebot CMP Account: Required to manage Google Consent Mode V2 permissions.
Step-by-Step Server-Side Tracking Implementation
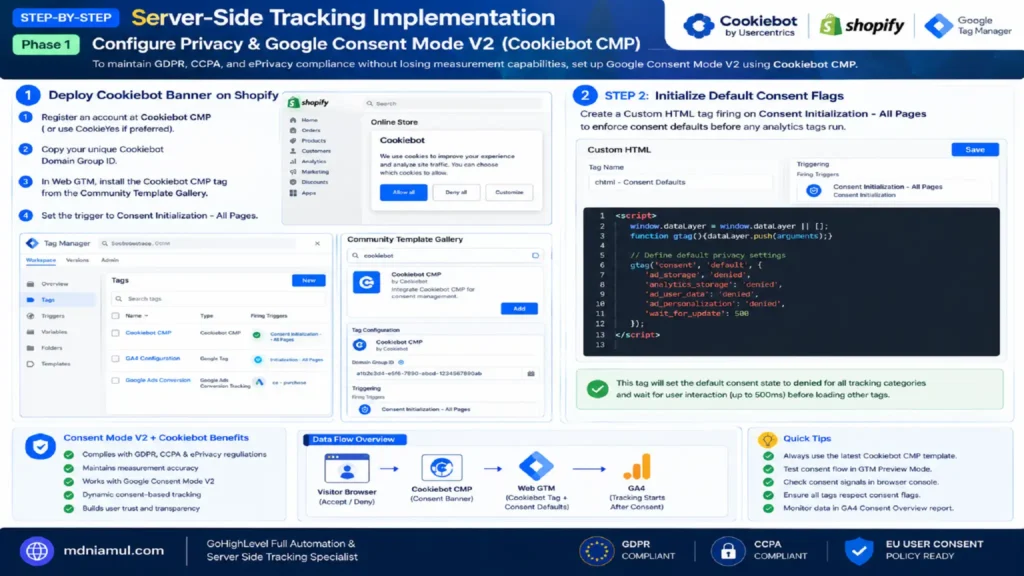
Phase 1: Configure Privacy & Google Consent Mode V2 (Cookiebot CMP)
To maintain GDPR, CCPA, and ePrivacy compliance without losing measurement capabilities, set up Google Consent Mode V2 using Cookiebot CMP.
Step 1: Deploy Cookiebot Banner on Shopify
- Register an account at Cookiebot CMP. (If using CookieYes, access your CookieYes Account).
- Copy your unique Cookiebot Domain Group ID.
- In Web GTM, install the Cookiebot CMP tag from the Community Template Gallery.
- Set the trigger to Consent Initialization – All Pages.
Step 2: Initialize Default Consent Flags
Create a Custom HTML tag firing on Consent Initialization – All Pages to enforce consent defaults before any analytics tags run:
					<script>
  window.dataLayer = window.dataLayer || [];
  function gtag(){dataLayer.push(arguments);}

  // Define default privacy settings
  gtag('consent', 'default', {
    'ad_storage': 'denied',
    'analytics_storage': 'denied',
    'ad_user_data': 'denied',
    'ad_personalization': 'denied',
    'wait_for_update': 500
  });
</script>
Phase 2: Deploy Shopify Plus Customer Events Listener Code
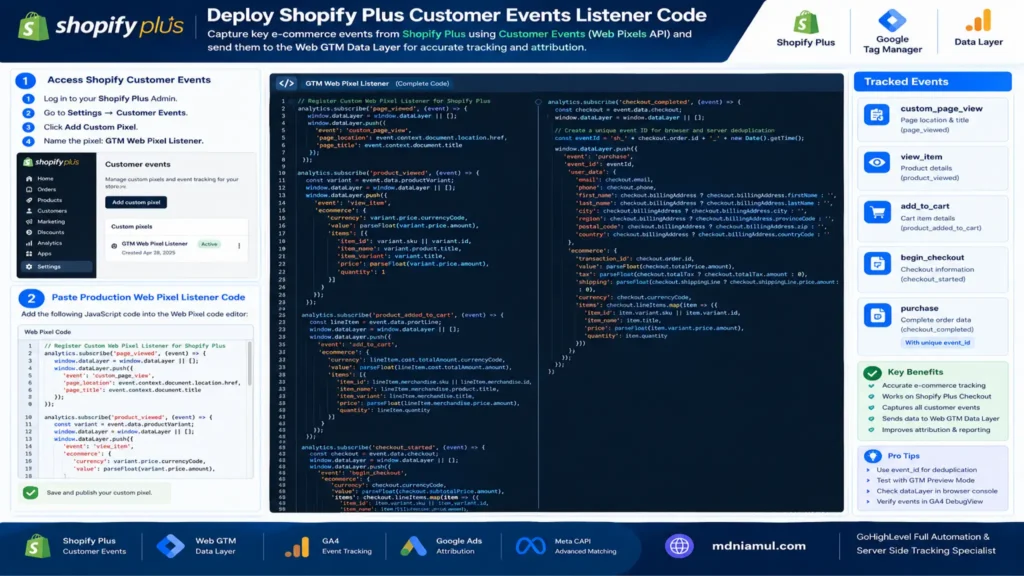
Standard theme scripts cannot reliably access Shopify Plus Checkout Extensibility pages. We deploy a custom JavaScript Listener Code inside Shopify’s Customer Events / Web Pixels API interface to capture e-commerce actions and send them to the Web GTM Data Layer.
Step 1: Access Shopify Customer Events
- Log in to your Shopify Plus Admin.
- Go to Settings -> Customer Events -> click Add Custom Pixel.
- Name the pixel: GTM Web Pixel Listener.
Step 2: Paste Production Web Pixel Listener Code
Paste the following complete JavaScript listener code into the Web Pixel code editor:
					// Register Custom Web Pixel Listener for Shopify Plus
analytics.subscribe('page_viewed', (event) => {
  window.dataLayer = window.dataLayer || [];
  window.dataLayer.push({
    'event': 'custom_page_view',
    'page_location': event.context.document.location.href,
    'page_title': event.context.document.title
  });
});

analytics.subscribe('product_viewed', (event) => {
  const variant = event.data.productVariant;
  window.dataLayer = window.dataLayer || [];
  window.dataLayer.push({
    'event': 'view_item',
    'ecommerce': {
      'currency': variant.price.currencyCode,
      'value': parseFloat(variant.price.amount),
      'items': [{
        'item_id': variant.sku || variant.id,
        'item_name': variant.product.title,
        'item_variant': variant.title,
        'price': parseFloat(variant.price.amount),
        'quantity': 1
      }]
    }
  });
});

analytics.subscribe('product_added_to_cart', (event) => {
  const lineItem = event.data.cartLine;
  window.dataLayer = window.dataLayer || [];
  window.dataLayer.push({
    'event': 'add_to_cart',
    'ecommerce': {
      'currency': lineItem.cost.totalAmount.currencyCode,
      'value': parseFloat(lineItem.cost.totalAmount.amount),
      'items': [{
        'item_id': lineItem.merchandise.sku || lineItem.merchandise.id,
        'item_name': lineItem.merchandise.product.title,
        'item_variant': lineItem.merchandise.title,
        'price': parseFloat(lineItem.merchandise.price.amount),
        'quantity': lineItem.quantity
      }]
    }
  });
});

analytics.subscribe('checkout_started', (event) => {
  const checkout = event.data.checkout;
  window.dataLayer = window.dataLayer || [];
  window.dataLayer.push({
    'event': 'begin_checkout',
    'ecommerce': {
      'currency': checkout.currencyCode,
      'value': parseFloat(checkout.subtotalPrice.amount),
      'items': checkout.lineItems.map(item => ({
        'item_id': item.variant.sku || item.variant.id,
        'item_name': item.title,
        'price': parseFloat(item.variant.price.amount),
        'quantity': item.quantity
      }))
    }
  });
});

analytics.subscribe('checkout_completed', (event) => {
  const checkout = event.data.checkout;
  window.dataLayer = window.dataLayer || [];

  // Create a unique event ID for browser and server deduplication
  const eventId = 'sh_' + checkout.order.id + '_' + new Date().getTime();
  window.dataLayer.push({

    'event': 'purchase',
    'event_id': eventId,
    'user_data': {
      'email': checkout.email,
      'phone': checkout.phone,
      'first_name': checkout.billingAddress ? checkout.billingAddress.firstName : '',
      'last_name': checkout.billingAddress ? checkout.billingAddress.lastName : '',
      'city': checkout.billingAddress ? checkout.billingAddress.city : '',
      'region': checkout.billingAddress ? checkout.billingAddress.provinceCode : '',
      'postal_code': checkout.billingAddress ? checkout.billingAddress.zip : '',
      'country': checkout.billingAddress ? checkout.billingAddress.countryCode : ''
    },
    'ecommerce': {
      'transaction_id': checkout.order.id,
      'value': parseFloat(checkout.totalPrice.amount),
      'tax': parseFloat(checkout.totalTax ? checkout.totalTax.amount : 0),
      'shipping': parseFloat(checkout.shippingLine ? checkout.shippingLine.price.amount : 0),
      'currency': checkout.currencyCode,
      'items': checkout.lineItems.map(item => ({
        'item_id': item.variant.sku || item.variant.id,
        'item_name': item.title,
        'price': parseFloat(item.variant.price.amount),
        'quantity': item.quantity
      }))
    }
  });
});
Phase 3: Web GTM Container Setup & Data Layer Variables
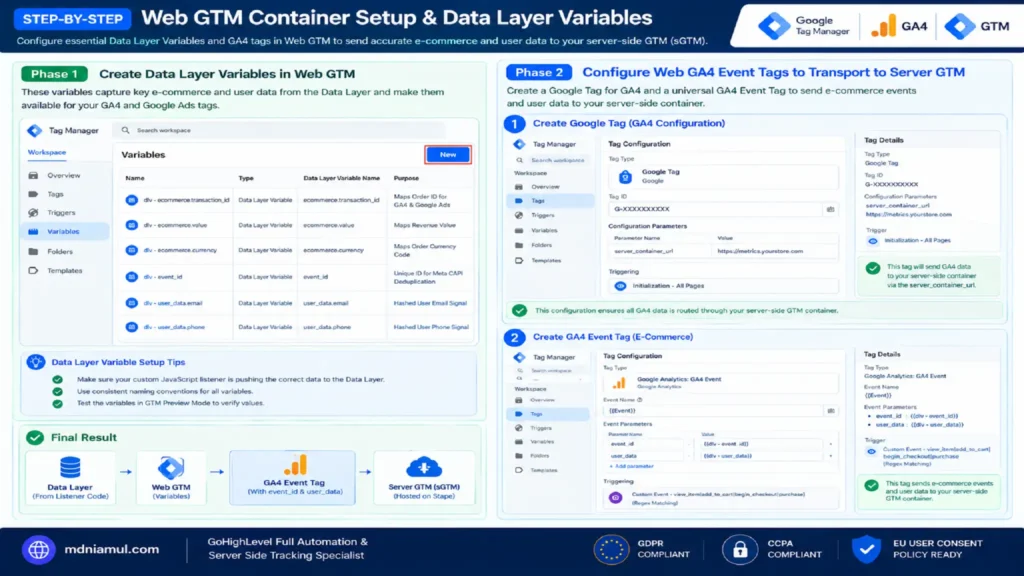
Step 1: Create Data Layer Variables in Web GTM
Here are the required Data Layer Variables to configure in Web GTM:
- Variable Name: dlv – ecommerce.transaction_id
- Variable Type: Data Layer Variable
- Data Layer Variable Name: ecommerce.transaction_id
- Purpose: Maps Order ID for GA4 & Google Ads
- Variable Name: dlv – ecommerce.value
- Variable Type: Data Layer Variable
- Data Layer Variable Name: ecommerce.value
- Purpose: Maps Revenue Value
- Variable Name: dlv – ecommerce.currency
- Variable Type: Data Layer Variable
- Data Layer Variable Name: ecommerce.currency
- Purpose: Maps Order Currency Code
- Variable Name: dlv – event_id
- Variable Type: Data Layer Variable
- Data Layer Variable Name: event_id
- Purpose: Unique ID for Meta CAPI Deduplication
- Variable Name: dlv – user_data.email
- Variable Type: Data Layer Variable
- Data Layer Variable Name: user_data.email
- Purpose: Hashed User Email Signal
- Variable Name: dlv – user_data.phone
- Variable Type: Data Layer Variable
- Data Layer Variable Name: user_data.phone
- Purpose: Hashed User Phone Signal
Step 2: Configure Web GA4 Event Tags to Transport to Server GTM
Create a Google Tag in Web GTM:
- Tag Type: Google Tag
- Tag ID: Your GA4 Measurement ID (G-XXXXXXXXXX)
- Configuration Parameter: server_container_url -> [https://metrics.yourstore.com](https://metrics.yourstore.com)
- Trigger: Initialization – All Pages
Next, create a universal GA4 Event Tag for E-Commerce:
- Tag Name: GA4 – Web Event – All Ecommerce
- Event Name: {{Event}}
- Event Parameters:
- event_id = {{dlv – event_id}}
- user_data = {{dlv – user_data}}
- Trigger: Custom Event trigger matching view_item|add_to_ cart|begin _checkout|purchase (use regex matching).
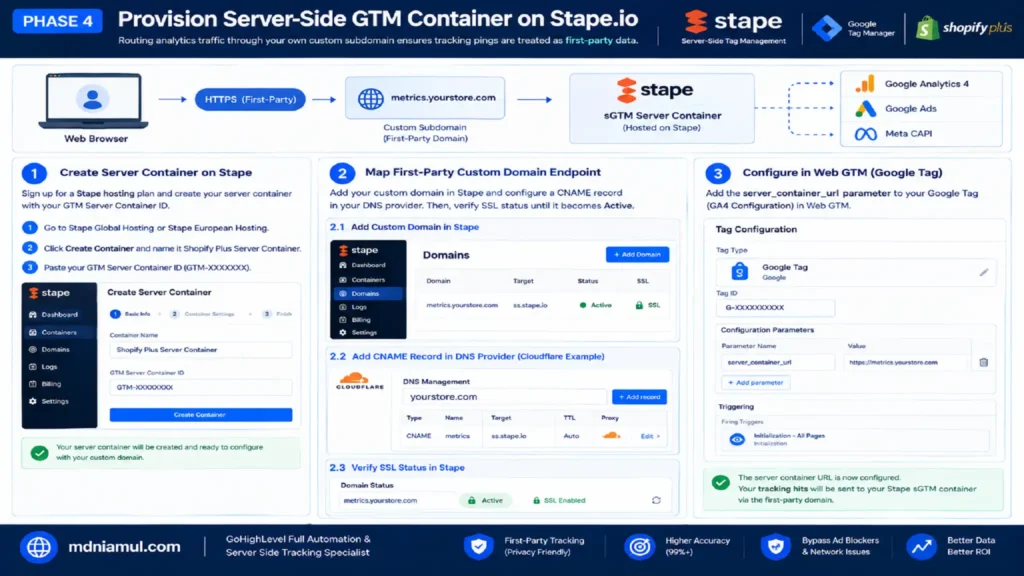
Phase 4: Provision Server-Side GTM Container on Stape.io
Routing analytics traffic through your own custom subdomain ensures tracking pings are treated as first-party data.
[ Web Browser ] ──► [ Custom Subdomain: metrics.yourstore.com ] ──► [ Stape sGTM Server Container ]
Step 1: Create Server Container on Stape
- Sign up for hosting at Stape Global Hosting or Stape European Hosting.
- Click Create Container -> name it Shopify Plus Server Container.
- Paste your GTM Server Container ID (GTM-XXXXXXX).
Step 2: Map First-Party Custom Domain Endpoint
- In Stape, open Domains -> add custom domain metrics.yourstore.com.
- Open your DNS Provider (Cloudflare, GoDaddy, AWS Route53) and add a CNAME record:
- Host / Name: metrics
- Target / Value: ss.stape.io (or your custom Stape cluster target).
- Verify SSL status in Stape until the domain status shows Active.
Phase 5: Server GTM Tags Deployment (GA4, Meta CAPI, Google Ads & TikTok)
In your Server GTM Container, events received from the client container are processed and distributed to marketing platforms via server-to-server APIs.
                                     ┌──► GA4 Measurement Protocol
                                      │
[ sGTM Container ] ──(Client Data)────┼──► Meta Conversions API (CAPI)
                                      │
                                      ├──► Google Ads Enhanced Conversions
                                      │
                                      └──► TikTok Events API
1. Meta Conversions API (CAPI) Server Tag Setup
- Tag Type: Meta Conversions API (by Stape or Official Meta Template)
- Pixel ID: Your Meta Pixel ID
- API Access Token: Generated in Meta Events Manager under Settings.
- Server Event Deduplication:
- Map Event ID parameter to event_id from incoming event data.
- Map User Data parameters (em, ph, fn, ln, ct, st, zp, country) for automatic SHA-256 server-side hashing.
- Trigger: Client Name equals GA4 (or all incoming e-commerce events).
2. Google Ads Enhanced Conversions Server Tag Setup
- Tag Type: Google Ads Conversion Tracking
- Conversion ID: Your Google Ads Conversion ID (AW-XXXXXXXXX)
- Conversion Label: Your Purchase Conversion Label (abc_123XYZ)
- Conversion Value: {{Event Data – value}}
- Currency Code: {{Event Data – currency}}
- Transaction ID: {{Event Data – transaction_id}}
- User Provided Data: Select Enable User Provided Data -> map user fields (Email, Phone, Address) passed from your Web GTM payload.
- Trigger: Client Name equals GA4 AND Event Name equals purchase.
3. TikTok Events API Server Tag Setup
- Tag Type: TikTok Events API
- Access Token: Generated in TikTok Ads Manager under Assets -> Events.
- Pixel ID: Your TikTok Pixel Code.
- Trigger: Client Name equals GA4 AND Event Name matches Regex view_item|add_to_cart|purchase.
For specialized multi-platform server-side tracking setups across various systems, explore my specialized service guides:
- Shopify Server-Side Tracking Service
- Server-Side Tracking Service
- Ecommerce Server-Side Tracking Service
- Third-Party Checkout Conversion Tracking Services
- Marketing Automation Service
- OpenAI Ads Conversion Tracking Services
- Zoho Form Conversion Tracking Service
- Offline Conversion Tracking Services
- HubSpot Form Conversion Tracking Services
- Salesforce Conversion Tracking Service
- GoHighLevel Form Conversion Tracking Services
Comparative Architecture: Client-Side vs Server-Side Shopify Plus Tracking
Below is a detailed feature-by-feature comparison between traditional browser tracking and modern server-side architecture:
- Data Capture Efficiency:
- Traditional Client-Side Tracking: 60% – 70% (30% to 40% lost to ITP & ad-blockers)
- Shopify Plus Server-Side Tracking (sGTM): 99% Capture Rate (bypasses browser blocks)
- Cookie Lifetime (Safari ITP):
- Traditional Client-Side Tracking: Severely Capped (24 Hours – 7 Days)
- Shopify Plus Server-Side Tracking (sGTM): Preserved First-Party Lifetime (up to 2 years)
- Meta Ads Attribution Quality:
- Traditional Client-Side Tracking: Low Event Match Quality Score (3.0 – 5.0)
- Shopify Plus Server-Side Tracking (sGTM): High Event Match Quality Score (8.5 – 10.0)
- Google Ads Conversion Signal:
- Traditional Client-Side Tracking: Unhashed, incomplete basic signals
- Shopify Plus Server-Side Tracking (sGTM): Full Enhanced Conversions with SHA-256 Hashing
- Page Speed & Thread Execution:
- Traditional Client-Side Tracking: High browser load delay (+1.2s to +2.5s)
- Shopify Plus Server-Side Tracking (sGTM): Ultra-Fast (<0.1s browser thread impact)
- Data Privacy & Filtering:
- Traditional Client-Side Tracking: Exposes raw visitor data to third-party scripts
- Shopify Plus Server-Side Tracking (sGTM): Server-Side Data Sanitization & Control
Multi-Channel API Data Flow Matrix
Below is the event-by-event data transformation and destination routing breakdown:
- Event: view_item
- Web Pixel Listener Payload: Product SKU, Price, Currency
- Server GTM Action: Transforms to Meta ViewContent & TikTok ViewContent
- Destination Platform: Meta CAPI, GA4, TikTok API
- Deduplication Signal: Browser event_id = Server event_id
- Event: add_to_cart
- Web Pixel Listener Payload: Variant SKU, Cart Total, Items Array
- Server GTM Action: Transforms to Meta AddToCart & GA4 add_to_cart
- Destination Platform: Meta CAPI, GA4
- Deduplication Signal: Browser event_id = Server event_id
- Event: begin_checkout
- Web Pixel Listener Payload: Subtotal, Items Array, Currency
- Server GTM Action: Transforms to Meta InitiateCheckout & GA4 begin_checkout
- Destination Platform: Meta CAPI, GA4
- Deduplication Signal: Browser event_id = Server event_id
- Event: purchase
- Web Pixel Listener Payload: Order ID, Value, Currency, Hashed Email & Phone
- Server GTM Action: Sends Enhanced Conversions, Meta CAPI Purchase, GA4 Purchase, TikTok Purchase
- Destination Platform: Meta CAPI, Google Ads, GA4, TikTok API
- Deduplication Signal: transaction_id + event_id Matching
Testing & Quality Assurance Framework
To verify your server-side tracking architecture is functioning correctly, follow this diagnostic sequence:
[ Step 1: Web GTM Preview Mode ] ──► [ Step 2: Server GTM Live Preview ] ──► [ Step 3: Meta Test Events Console ] ──► [ Step 4: GA4 DebugView ]
- Web GTM Preview Panel Verification: Click Preview in Web GTM, connect to your Shopify store, and add items to your cart. Verify that events push to the Data Layer and fire the GA4 transport tag targeting [https://metrics.yourstore.com](https://metrics.yourstore.com).
- Server GTM Preview Panel Audit: Open Preview mode in Server GTM. Complete a test purchase in Shopify Plus using bogus gateway settings. Confirm that incoming requests show under Clients -> GA4, and server tags (Meta CAPI, Google Ads, GA4) execute successfully (Status 200).
- Meta Test Events Validation: In Meta Events Manager -> open Test Events -> enter your test server IP / code. Complete a test transaction and verify that events show receiving Browser and Server signals with a Deduplicated status label.
- Google Ads Diagnostics Check: Open Google Ads -> Goals -> Conversions -> click your Purchase conversion action -> open Diagnostics. Verify that Enhanced Conversions reports active data transmission with green status indicators.
Troubleshooting Common Shopify Plus Server-Side Errors
- Problem 1: Deduplication Mismatch Error in Meta Events Manager
- Root Cause: The event_id passed by the client-side Meta Pixel does not match the event_id sent in the server-side CAPI payload.
- Exact Solution: Ensure your Web Pixel listener script generates a single unique string (e.g., sh_ORDERID_TIMESTAMP) and passes it identically to both the browser pixel and the server-side Data Layer variable payload.
- Problem 2: Missing Enhanced Conversions User Parameters in Google Ads
- Root Cause: Customer contact data is captured before checkout or is sent in unformatted plain text.
- Exact Solution: In your Server GTM Google Ads Conversion Tag, verify that User Provided Data variables reference hashed data values (email, phone) properly transformed via SHA-256 formatting functions before transmitting to Google.
- Problem 3: Server GTM Container Returning HTTP 404 or 502 Errors
- Root Cause: DNS CNAME records for your custom domain endpoint (metrics.yourstore.com) are improperly configured or lack active SSL certificates on Stape.io.
- Exact Solution: Re-check your DNS provider to confirm the CNAME record targets your assigned Stape endpoint without proxying (set Cloudflare proxy status to DNS Only / Grey Cloud during initial SSL issuance).
- Problem 4: Checkout Events Not Firing on Shopify Plus
- Root Cause: Script snippets placed in legacy theme templates are blocked on Checkout Extensibility pages.
- Exact Solution: Move all checkout listener code into Shopify Settings -> Customer Events using the Web Pixels API, ensuring sandbox execution across all checkout stages.
Conclusion Scale Store ROAS with Clean Analytics
Relying on outdated browser tracking for Shopify Plus leads to lost conversion data, inaccurate ad attribution, and inefficient ad spend. By deploying a server-side tracking architecture using Web Pixels API, Server GTM, Stape.io, and Consent Mode V2, you build a resilient, high-accuracy analytics setup. This setup restores lost conversion signals, improves ad platform bidding algorithms, and gives you the trustworthy data needed to scale your store profitably.
Summary by MD Niamul
Deploying server-side tracking on Shopify Plus resolves a 40% conversion data loss caused by iOS updates, Safari ITP, and ad-blockers. Utilizing Shopify Web Pixels API alongside Web and Server GTM hosted on Stape.io creates a resilient first-party tracking architecture (metrics.yourstore.com). This setup delivers deduplicated events and hashed customer signals directly to Meta CAPI, Google Ads Enhanced Conversions, and GA4 with Consent Mode V2 compliance, achieving 99% data accuracy to maximize ad ROAS.
1.Why is server-side tracking necessary for Shopify Plus stores?
Server-side tracking is necessary because modern browser restrictions, including Apple iOS privacy controls, Safari ITP cookie caps, and ad-blockers, cause standard browser tracking to lose up to 40% of conversion data. Server-side tracking routes event pings through a first-party subdomain directly to marketing platforms, ensuring 99% data capture accuracy.
2.How does Meta Conversions API (CAPI) deduplication work?
Meta CAPI deduplication pairs browser pixel events with server CAPI events using a shared, unique event_id parameter (such as sh_ORDERID_TIMESTAMP). When Meta receives both pings with matching event IDs within 48 hours, it merges them into a single record, keeping attribution accurate while preventing duplicate counting.
3.Will server-side tracking slow down my Shopify store?
No, server-side tracking actually improves website performance and page speed. Instead of requiring the user’s browser to execute multiple heavy third-party JavaScript tracking files, your site sends a single event ping to your server container, which offloads processing tasks off the user’s browser.
4.What is the function of Shopify’s Web Pixels API in tracking?
Shopify’s Web Pixels API operates within an isolated sandbox environment that safely tracks user interactions across the storefront and Checkout Extensibility pages. It replaces deprecated legacy checkout scripts, providing reliable event triggers (product_viewed, checkout_completed) to populate the Data Layer.
5.How does Google Ads Enhanced Conversions improve bidding?
Google Ads Enhanced Conversions securely transmits hashed customer details (such as email, phone number, and address) from your checkout to Google. Google matches this data against logged-in Google accounts to attribute conversions that browser tracking missed, improving Smart Bidding optimization.
6.Do I still need a Web GTM container if I use Server GTM?
Yes, a Web GTM container remains necessary. Web GTM runs in the user’s browser to capture user interactions, initialize Consent Mode, and collect customer inputs. It then formats and forwards these events as a single data payload to your Server GTM container for processing.
7.How does a first-party subdomain protect tracking cookies?
Routing tracking traffic through a first-party subdomain (like metrics.yourstore.com) configures tracking cookies at the DNS server level rather than via client-side JavaScript. Browsers treat these as first-party functional cookies, preventing Safari ITP from deleting them prematurely.
8.How does Google Consent Mode V2 impact server-side tracking?
Google Consent Mode V2 dynamically modifies tag behavior based on user consent selections made on your CMP banner (such as Cookiebot). If a user denies analytics consent, Server GTM suppresses cookie storage while transmitting cookieless signals, ensuring compliance with global privacy regulations.
9.What is the setup cost for hosting Server GTM on Stape.io?
Stape.io provides affordable hosting for Server GTM containers, starting with a free tier for light traffic and scaling to predictable monthly plans based on server request volumes. It removes the need to manually configure complex cloud infrastructure on Google Cloud Platform or AWS.
10.How long does it take for server-side events to populate in GA4?
Server-side events appear in GA4 DebugView within seconds during live testing. Final processed metrics populate standard GA4 dashboard reports and Looker Studio dashboards within 24 to 48 hours.
 Need Help Advanced GHL Automation & Tracking Setup?