
Quick Answer
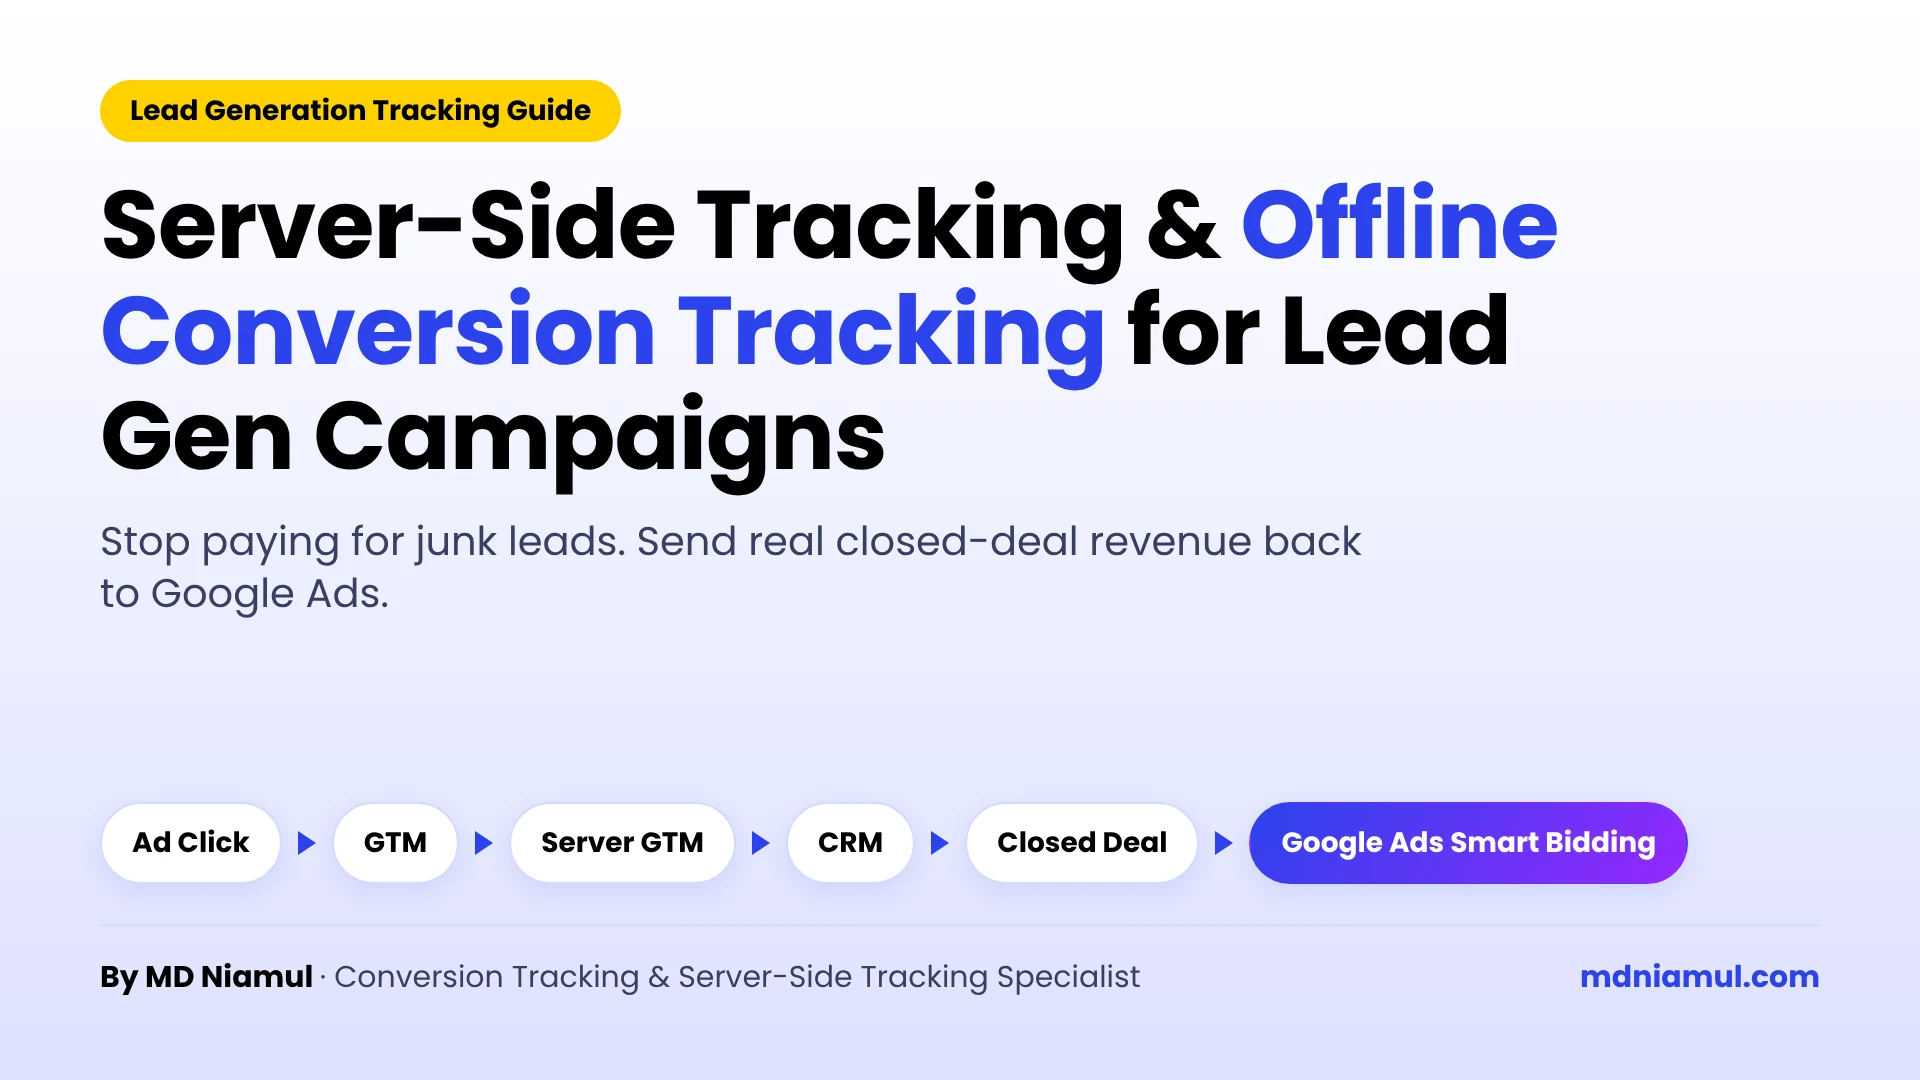
Server-side tracking and offline conversion tracking fix the two reasons lead generation campaigns fill your CRM with junk. Server-side tracking moves data collection from the visitor’s browser to your own server, so fewer conversions are lost to ad blockers and browser privacy limits. Offline conversion tracking saves the Google Click ID with every lead and sends the closed-deal revenue back to Google Ads. Together they teach Smart Bidding to find buyers, not just cheap form fills.
Key Takeaways
- The problem: Google Ads only sees the form fill. It never learns which leads became paying customers, so it buys more of the cheapest ones.
- Browser tracking leaks: Safari’s ITP, ad blockers, and privacy settings stop many conversions from ever reaching your ad account.
- Server-side tracking plugs the leak: a Server-Side GTM container on your own subdomain collects the data first-hand.
- The click ID is the thread: capture the
gclidon the landing page, store it on the lead in HubSpot, Salesforce, or Zoho, and keep it until the deal closes. - Send revenue back: when a deal is won, an automation in n8n, Zapier, or Make reports the real value to Google Ads.
- 2026 update: Google now treats click-ID-only imports as a legacy method and recommends enhanced conversions for leads, which also uses hashed email and phone.
Introduction: Why Your Lead Gen Campaigns Keep Buying Junk Leads
It is Monday morning. You open Google Ads and the numbers look great. Cost per lead is down. Lead volume is up. Then you open your CRM.
Wrong numbers. Fake emails. Students looking for free advice. People who never pick up the phone.
Your ad account says you are winning. Your sales team says you are not.
This is the most common problem I fix for lead generation clients, and the ads are rarely the cause. The cause is that Google Ads stops watching at the form fill. It has no idea what happens after that. So the algorithm does exactly what you told it to do: it finds more people who fill in forms, as cheaply as possible.
In this guide I will show you why server-side tracking and offline conversion tracking are essential for lead gen campaigns, and how the full setup works step by step. By the end, you will know how to connect an ad click to a closed deal, and how to send that revenue back so Google Ads optimizes for sales instead of form fills.
A Worked Example: Two Keywords, Two Very Different Stories
Here is an example with simple numbers. They are made up to show the logic, but the pattern is one I see in real accounts all the time.
| Metric | Keyword A | Keyword B |
|---|---|---|
| Ad spend | $2,000 | $1,800 |
| Form fills (what Google Ads sees) | 100 | 30 |
| Cost per lead | $20 | $60 |
| Closed deals (what your CRM sees) | 2 | 9 |
| Revenue at $1,500 per deal | $3,000 | $13,500 |
| Return on ad spend | 1.5x | 7.5x |
If Google Ads only sees form fills, Keyword A looks three times better than Keyword B. Smart Bidding will move budget to Keyword A. That is the wrong decision, and it gets made automatically, every day.
Once closed deals flow back into Google Ads, the picture flips. Keyword B is the winner, and the algorithm can finally see it.

Why Browser Tracking Is No Longer Enough
Standard tracking runs inside the visitor’s browser. Think of it as a courier who has to walk through a crowded street to deliver your conversion to Google. Many couriers never arrive.
Three things stop them:
- Intelligent Tracking Prevention (ITP). This is Safari’s built-in privacy feature. It shortens the life of tracking cookies, so a lead who clicks today and converts next week may no longer be linked to the ad.
- Ad blockers. These browser extensions block requests to known tracking domains before they leave the device.
- Privacy restrictions. Browser settings and consent choices limit what can be stored and sent.
How much data you lose depends on your audience, your devices, and your market. In the accounts I audit, browser-only tracking can miss up to 30% of conversions. When that data is missing, Google’s bidding system is flying blind. It cannot tell which keywords led to a sale, so it spreads your budget across the wrong ones.
Browser-Only Tracking vs. Server-Side + Offline Conversion Tracking
| Area | Browser-only tracking | Server-side + offline conversion tracking |
|---|---|---|
| Where data is collected | In the visitor’s browser | On your own first-party server subdomain |
| Ad blockers and ITP | Often block or shorten tracking | Much less affected, because requests go to your own domain |
| What Google Ads learns | A form was submitted | Which leads qualified, which deals closed, and for how much |
| What Smart Bidding optimizes for | Cheap form fills | Qualified leads and real revenue |
| Link between ad click and sale | Lost after the form fill | Kept in your CRM through the click ID and hashed contact data |
| Privacy control | Each tag sends data on its own | You decide on the server what is sent, with Consent Mode V2 |

What Are Server-Side Tracking and Offline Conversion Tracking?
Server-side tracking means your website sends conversion data to a server you control, and that server passes it on to Google Ads and other platforms. It is like using your own private delivery van instead of a courier on the street. The tool for this is a Server-Side Google Tag Manager container, usually called sGTM.
Offline conversion tracking means reporting sales that happen away from your website. A phone call that closes a deal. A signed contract. An invoice paid three weeks after the first click. Your CRM knows about these wins. Google Ads does not, unless you tell it.
The piece that connects the two is the Google Click ID, or gclid. This is a unique code Google adds to your landing page URL after every ad click. Think of it as a luggage tag. If the tag stays on the lead all the way through your sales process, you can always trace a closed deal back to the exact click that started it.
What changed in 2026: Google now calls the click-ID-only import a legacy feature and recommends enhanced conversions for leads. It still uses the gclid, and it adds hashed email and phone number as a backup match key. In this guide we set up both, so a deal can still be matched when the click ID is missing.
Prerequisites & Setup Checklist
Before you start, make sure you have these in place:
- Google Ads: admin access, and auto-tagging turned on. Auto-tagging is what adds the
gclidto your URLs. - Google Tag Manager: publish access to your Web container and a Server container.
- Server hosting: a tagging server on Stape Global or Stape Europe, and access to your domain’s DNS settings.
- CRM: admin access to HubSpot, Salesforce, Zoho, or the CRM you use, so you can add fields and build automations.
- Lead forms: the ability to add a hidden field to your website forms.
- Automation tool: n8n, Zapier, or Make, unless your CRM has a direct Google Ads connection.
- Consent banner: a consent management platform with Google Consent Mode V2 if you get visitors from the EU, EEA, or UK.
Video Tutorial Walkthrough
Prefer to watch? In this short video I explain why lead gen campaigns need server-side tracking and offline conversion tracking, and how the pieces fit together.
Step-by-Step Implementation Guide
The setup has six phases. Each one builds on the one before it, so follow them in order.
Phase 1: Capture the Google Click ID with Google Tag Manager
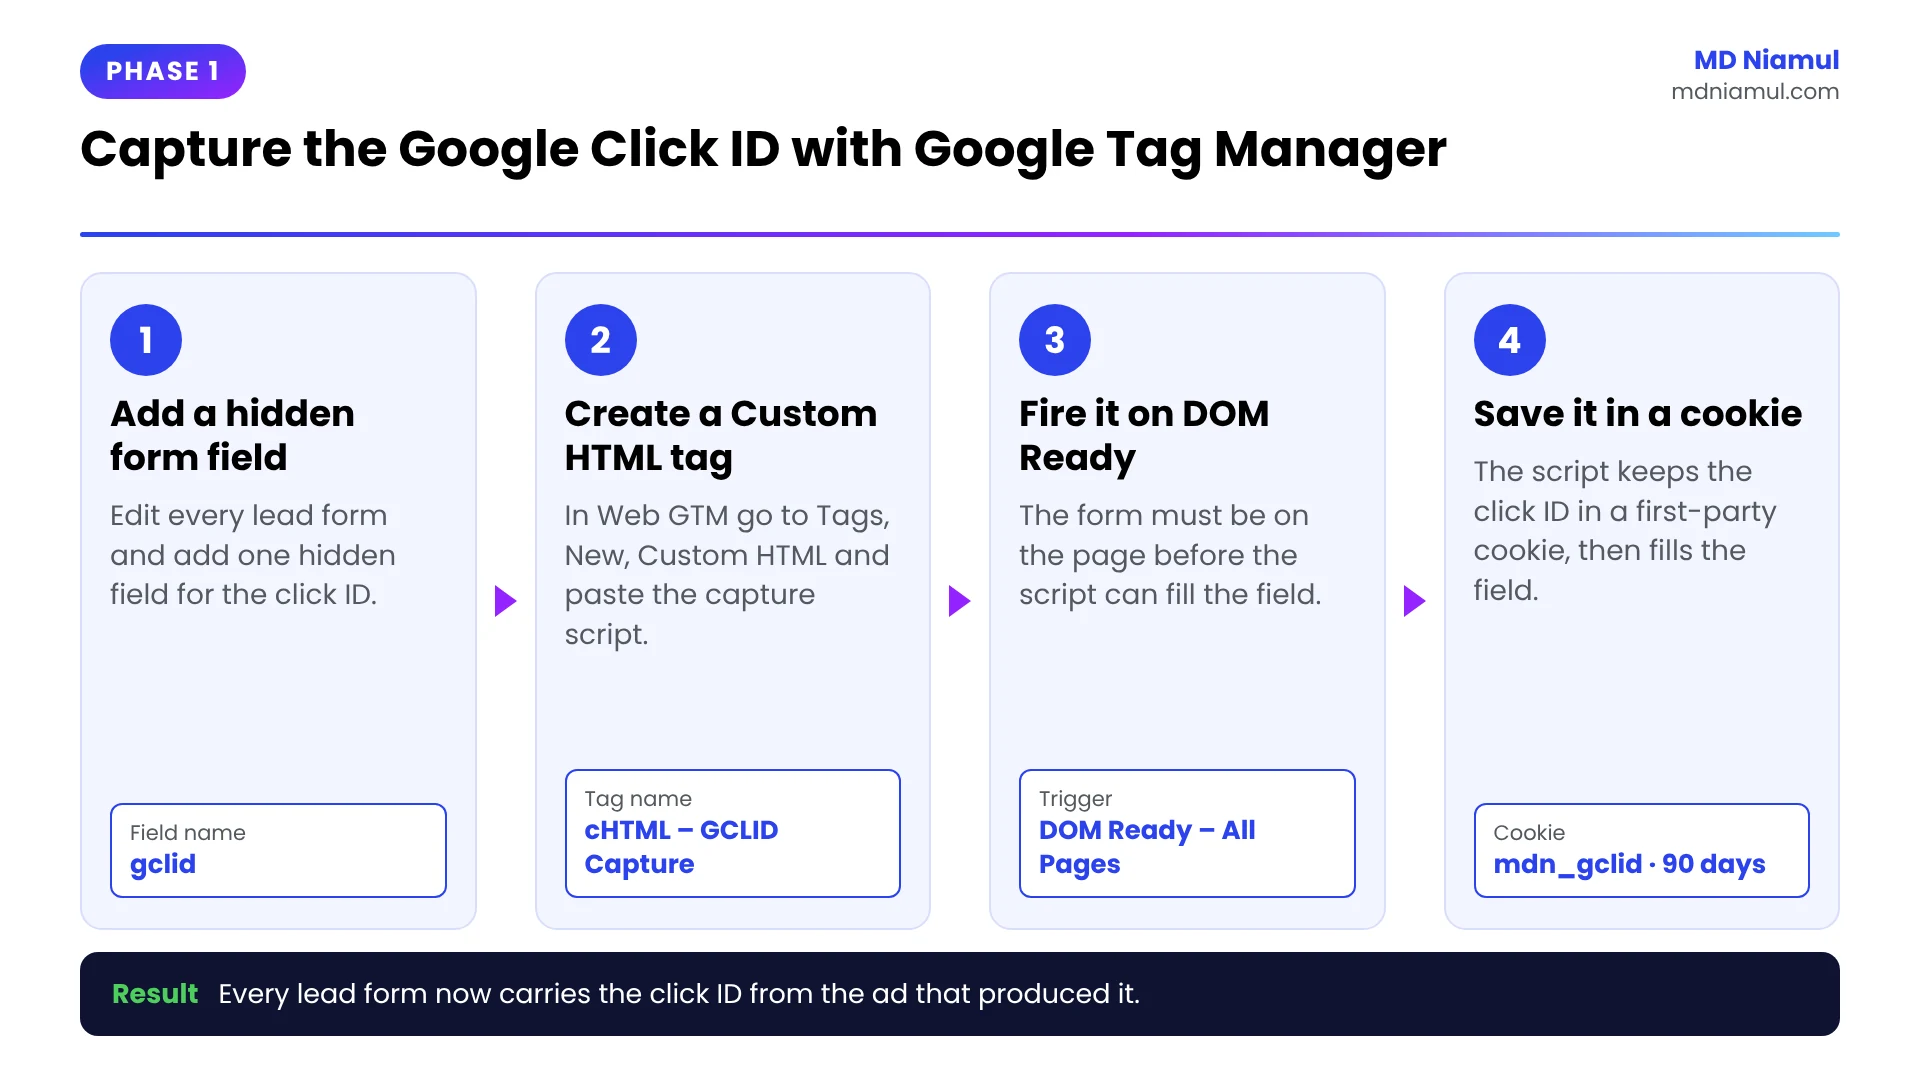
The click ID only appears in the URL of the first page the visitor lands on. If they browse to another page before filling in your form, it is gone. So we save it in a first-party cookie, then copy it into a hidden form field.
Step 1: Add a hidden field to your lead forms
- Open your form builder and edit each lead form.
- Add a new hidden field.
- Set the field name to
gclid. - Save the form.
Why? The hidden field is the pocket that carries the click ID from your website into your CRM. Without it, the ID has nowhere to go.
Step 2: Create the click ID capture tag
- In your Web GTM container, click Tags in the left menu, then New.
- Click Tag Configuration and choose Custom HTML.
- Paste the code below.
- Under Triggering, choose DOM Ready on all pages. The form must exist on the page before the script can fill it.
- Name the tag
cHTML – GCLID Captureand click Save.
<script>
(function () {
  var COOKIE_NAME = 'mdn_gclid';
  var COOKIE_DAYS = 90;

  // 1. Read the gclid from the landing page URL
  var match = /[?&]gclid=([^&#]+)/.exec(window.location.search);
  if (match) {
    var expires = new Date();
    expires.setTime(expires.getTime() + COOKIE_DAYS * 24 * 60 * 60 * 1000);
    document.cookie = COOKIE_NAME + '=' + match[1] +
      '; expires=' + expires.toUTCString() + '; path=/; SameSite=Lax';
  }

  // 2. Read the saved gclid back from the cookie
  var saved = document.cookie.match(new RegExp('(?:^|; )' + COOKIE_NAME + '=([^;]*)'));
  if (!saved) { return; }

  // 3. Copy it into every hidden field named "gclid"
  function fillFields() {
    var fields = document.querySelectorAll('input[name="gclid"]');
    for (var i = 0; i < fields.length; i++) {
      fields[i].value = saved[1];
    }
  }
  fillFields();
  // Run again for forms and pop-ups that load late
  setTimeout(fillFields, 2000);
})();
</script>
How the code works
- Part 1 looks for
gclidin the page URL. If it finds one, it saves it in a cookie for 90 days. The value is saved exactly as it arrives, because the click ID is case sensitive. - Part 2 reads the saved value on every later page view.
- Part 3 writes the value into any hidden field named
gclid, then tries once more after two seconds for forms that load late.
Consent: this tag stores an advertising identifier. If you use Consent Mode, open the tag’s Advanced Settings, go to Consent Settings, and require ad_storage before it fires.
Phase 2: Store the Click ID in Your CRM
Now the click ID travels with the form. The CRM needs a place to keep it, and that place must stay attached to the record until the deal closes.
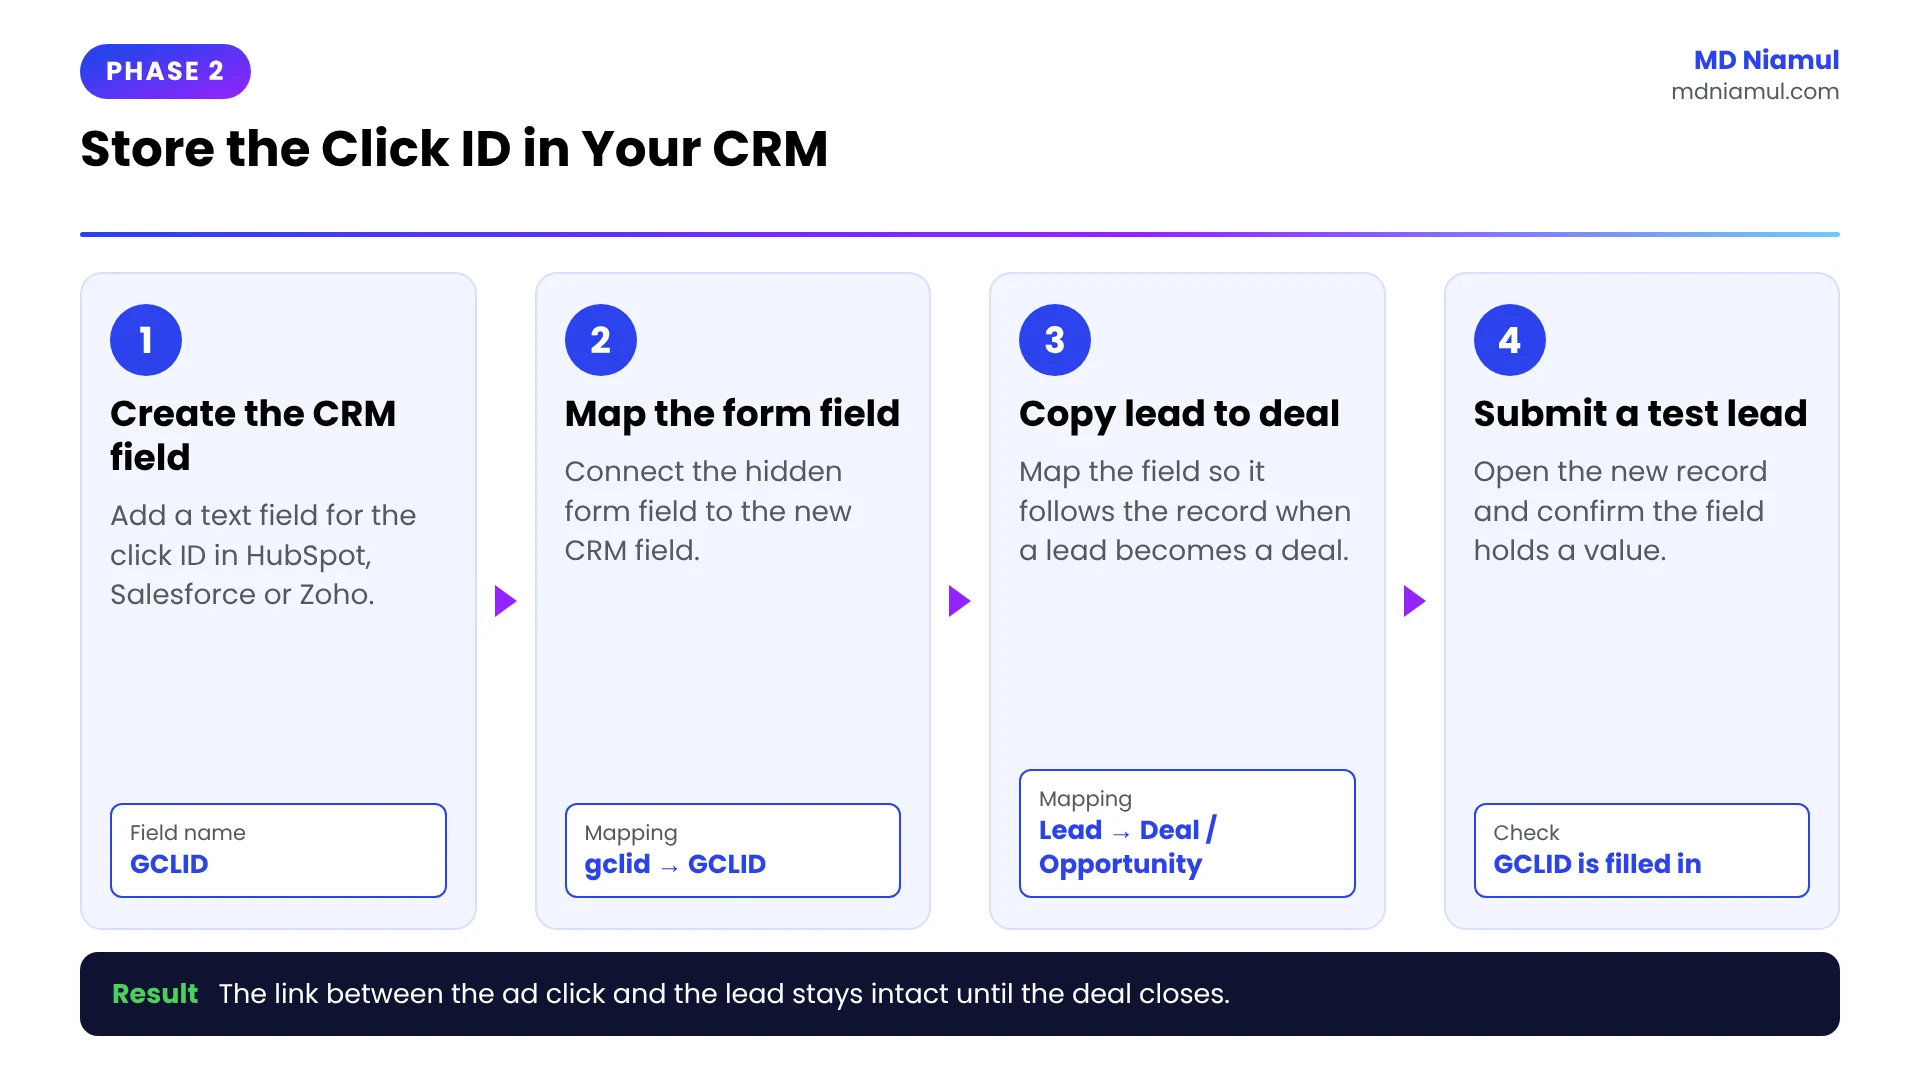
Step 1: Create the field in your CRM
| CRM | Where to store the click ID | What to check |
|---|---|---|
| HubSpot | HubSpot has its own Google ad click ID contact property that it fills in when its tracking code is on your site. You can also create a custom single-line text property named GCLID. |
Open a test contact and confirm the property holds a value after an ad click. |
| Salesforce | Create a custom text field named GCLID on the Lead object and another on the Opportunity object. |
Map the Lead field to the Opportunity field in the lead conversion field mapping, so the value survives when a lead is converted. |
| Zoho CRM | Create a custom single-line field named GCLID on Leads and on Deals. |
Map the field in the lead conversion mapping so it copies to the deal. |
Step 2: Map the hidden form field to the CRM field
- Open your form’s integration or field mapping settings.
- Map the hidden form field
gclidto the CRM fieldGCLID. - Submit a test lead and open the new record in your CRM.
- Confirm the
GCLIDfield is filled in.
Critical step: the most common failure is a click ID that sits on the lead but never reaches the deal. If your sales team works from deals or opportunities, the value must copy across when the lead is converted.
If your forms come from a specific CRM, I have dedicated setup pages for HubSpot form conversion tracking, Salesforce conversion tracking, and Zoho form conversion tracking.
Phase 3: Move Your Tracking to Server-Side GTM
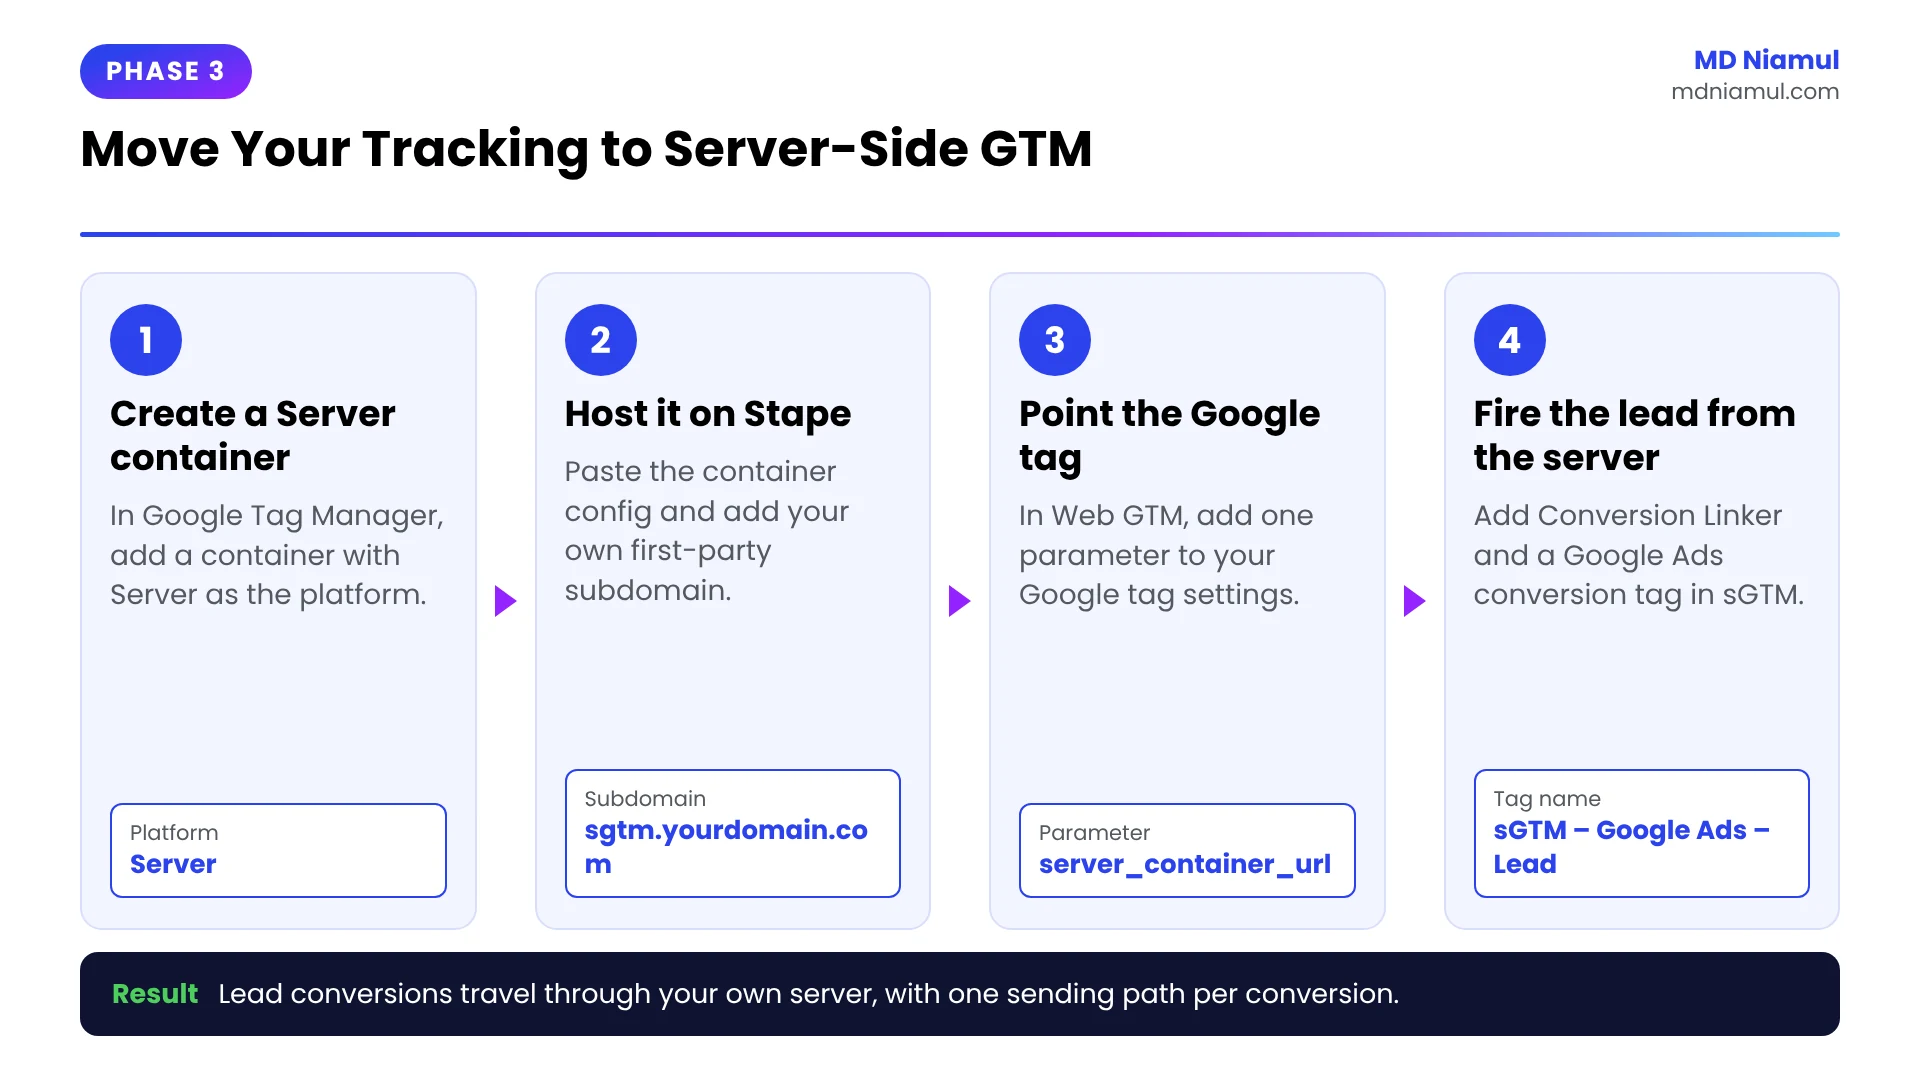
With the click ID safe in your CRM, we fix the data loss at the top of the funnel. A server container is a second Tag Manager container that runs on a server instead of in the browser. Your website talks to it through your own subdomain, so the requests look like normal first-party traffic.
Step 1: Create the server container and host it
- In Google Tag Manager, create a new container and choose Server as the target platform.
- Choose Manually provision tagging server and copy the container configuration code.
- In Stape, create a new sGTM container and paste that configuration code.
- Add a custom subdomain such as
sgtm.yourdomain.comand create the DNS records Stape shows you.
Why a subdomain? It makes the tagging server part of your own website in the browser’s eyes. This is what makes the setup first-party.
Step 2: Point your website’s Google tag at the server
- In your Web GTM container, open your Google tag (the GA4 one).
- Under Configuration settings, add the parameter
server_container_url. - Set the value to
https://sgtm.yourdomain.com. - Save the tag.
Step 3: Send the lead conversion from the server
- In your Server container, confirm the GA4 client exists under Clients. It receives the data from your website.
- Go to Tags, click New, and choose Conversion Linker. Fire it on all page view events.
- Create another tag and choose Google Ads Conversion Tracking. Enter your Conversion ID and Conversion Label.
- Set the trigger to a Custom trigger where Event Name equals your lead event, for example
generate_lead. - Name the tag
sGTM – Google Ads – Leadand save.
Avoid double counting: if the same Google Ads conversion already fires from your Web container, pause that web tag once the server tag is verified. Two tags sending the same conversion action will count each lead twice.
For a deeper look at how this fits a full measurement plan, see my server-side tracking service page and the server-side growth guide.
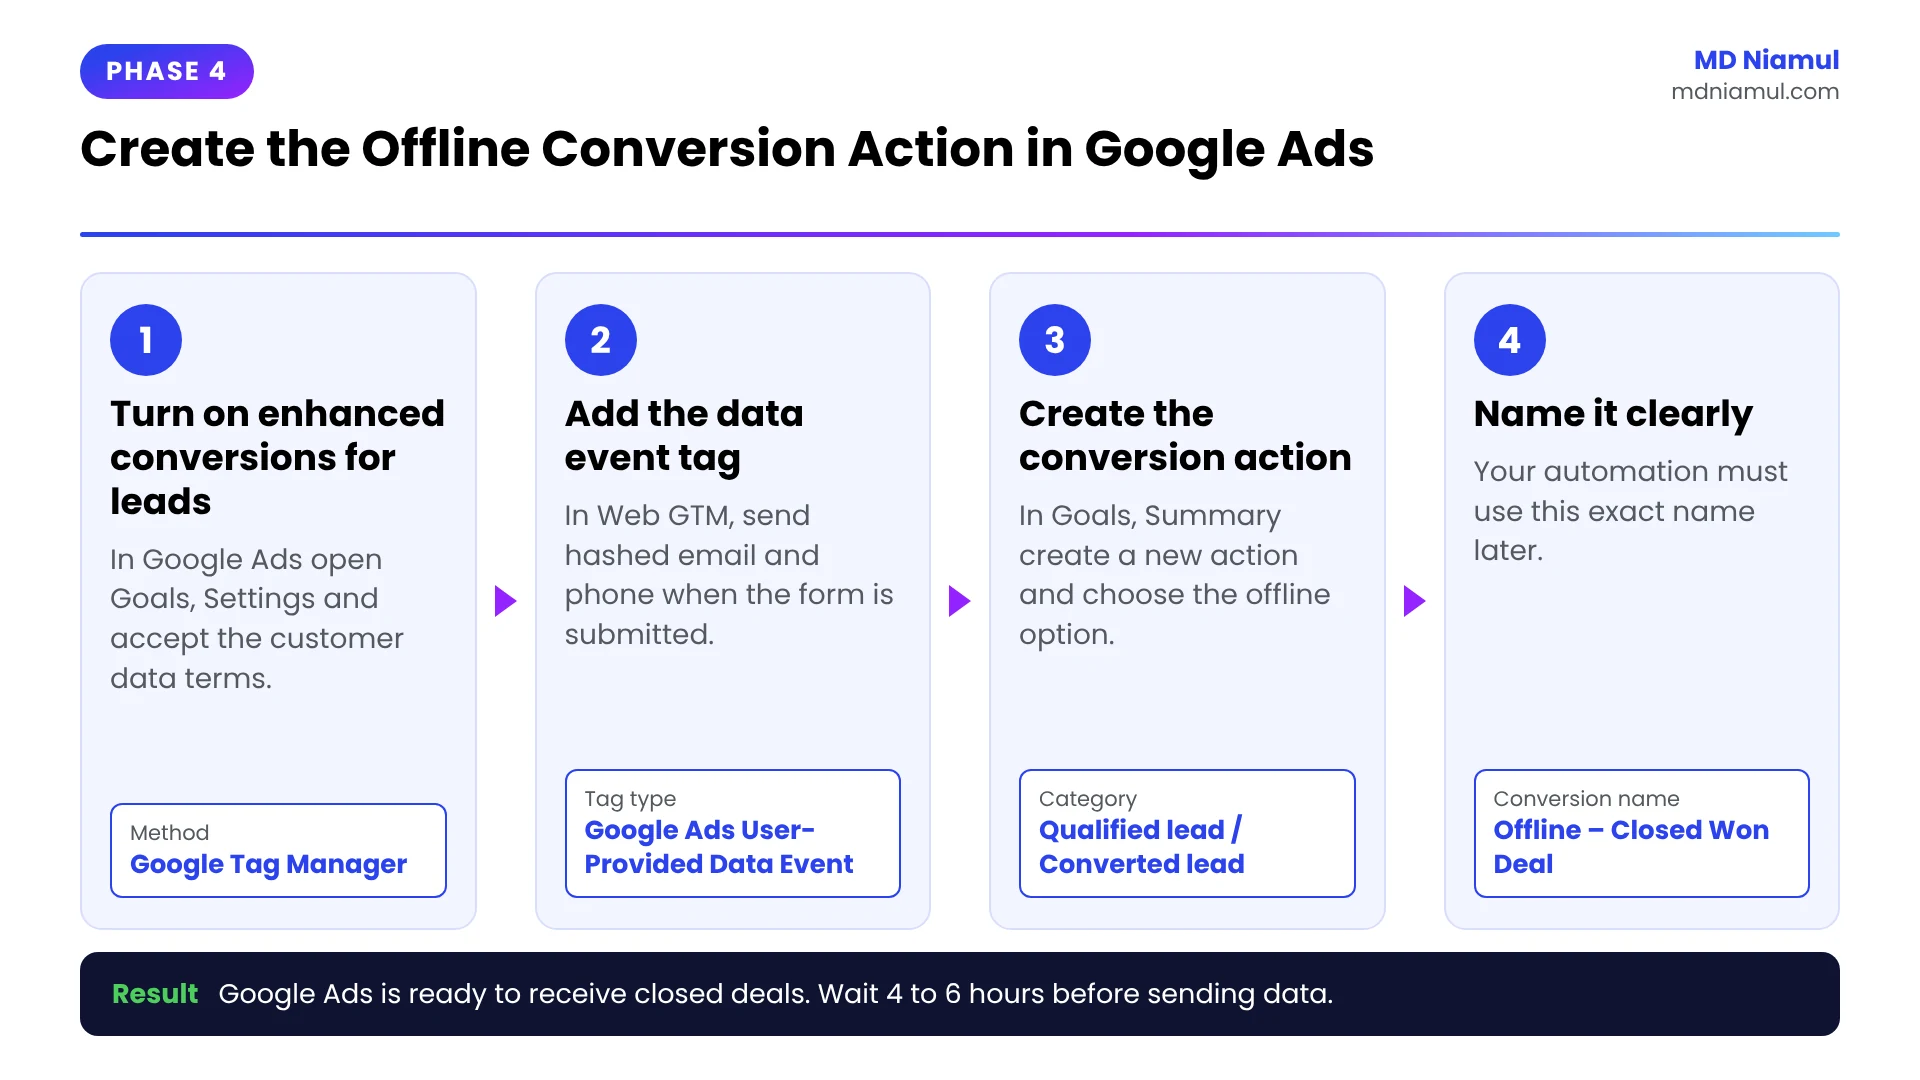
Phase 4: Create the Offline Conversion Action in Google Ads
Google Ads needs a named conversion action to receive your closed deals. We also turn on enhanced conversions for leads, so hashed contact details can match a deal when the click ID is missing.
Step 1: Turn on enhanced conversions for leads
- In Google Ads, open the Goals menu and click Settings.
- Turn on enhanced conversions for leads and choose Google Tag Manager as the method.
- Open the customer data terms, read them, and accept.
Step 2: Add the User-Provided Data Event tag in Web GTM
- In your Web GTM container, go to Tags and click New.
- Choose the tag type Google Ads User-Provided Data Event.
- Enter your Google Ads Conversion ID.
- Under User-provided data, create a new User-Provided Data variable and point it at the email and phone fields of your form.
- Set the trigger to your form submission event, then save.
Why? This tag sends a hashed copy of the email and phone number to Google at the moment the form is submitted. Later, when the same hashed details arrive with a closed deal, Google can match the two. Google’s own setup steps are in the Tag Manager guide for enhanced conversions for leads.
Step 3: Create the conversion action
- In Google Ads, open Goals and click Summary.
- Click the button to create a new conversion action and choose the offline option. Google has renamed this button more than once, so look for Conversions offline or Import.
- Choose your data source: a direct connection, the Zapier integration, or skip it and connect a source later.
- Pick a conversion category such as Qualified lead or Converted lead.
- Give it a clear name, for example
Offline – Closed Won Deal. You will type this exact name into your automation later. - Save the conversion action.
Timing: Google’s documentation says to wait 4 to 6 hours after creating a conversion action before you send data to it. See Google’s offline conversion setup guide for the current screens.
Phase 5: Send Closed Deals Back to Google Ads Automatically
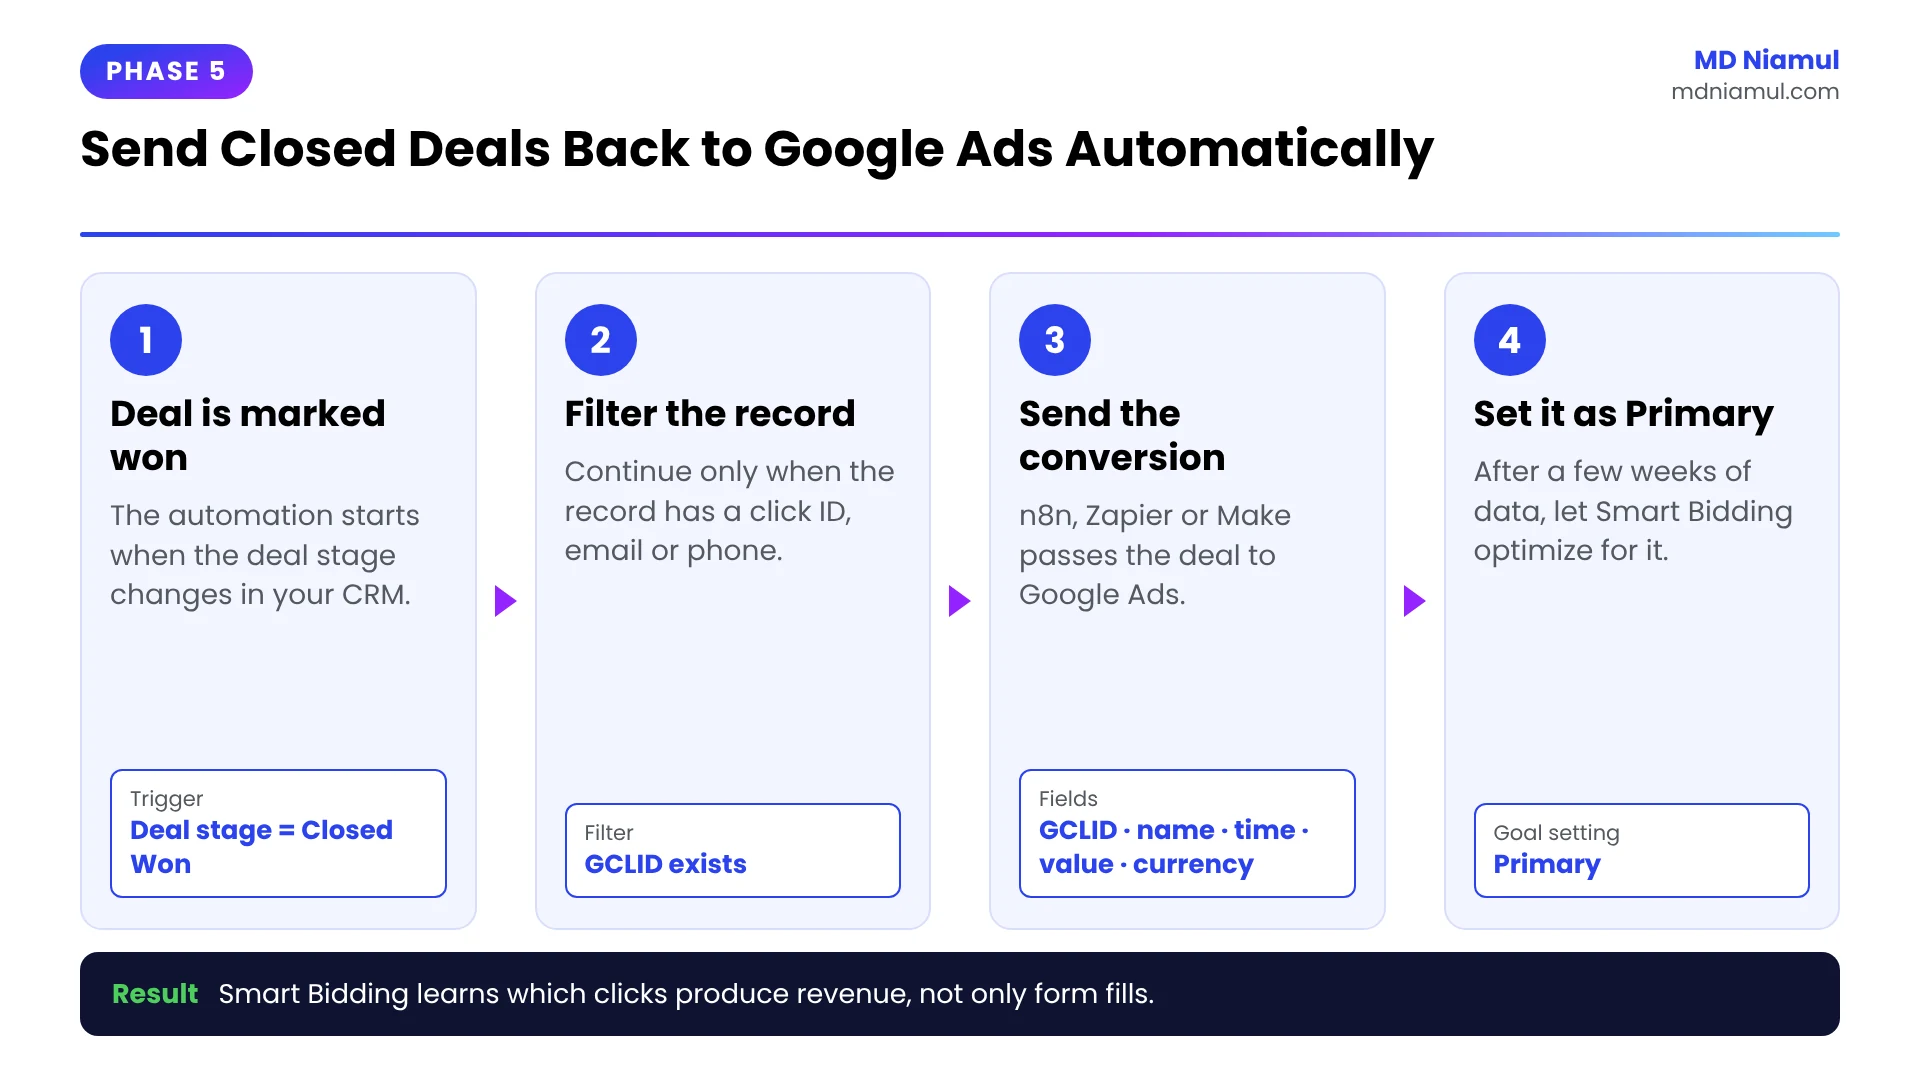
This is the step that changes what the algorithm chases. When your sales team marks a deal as won, the revenue goes back to Google Ads on its own. Nobody has to export a spreadsheet.
Step 1: Choose your route
| Route | Best for | How it works |
|---|---|---|
| Direct CRM connection | HubSpot and Salesforce users | Connect the CRM as a data source in Google Ads. Google pulls new conversions on a schedule. |
| Zapier | Fast setup, small to medium volume | A Zap watches for a won deal and runs the Google Ads Send Offline Conversion action. |
| n8n or Make | Custom logic, several CRMs, higher volume | A workflow listens for the deal update, formats the data, and sends it to Google Ads. |
| Google Sheets | CRMs with no connector | The CRM writes won deals to a sheet, and Google Ads reads that sheet on a schedule. |
Step 2: Build the automation
- Trigger: deal stage changes to Closed Won in your CRM.
- Filter: continue only if the record has a click ID, or an email or phone number.
- Action: send the conversion to Google Ads with these fields.
| Field | What to send | Example |
|---|---|---|
| Google Click ID | The value of the CRM GCLID field |
The long code saved from the ad click |
| Email / phone | The contact’s details, for enhanced conversions for leads | Hashed by the connector before sending |
| Conversion action | The exact name from Phase 4 | Offline – Closed Won Deal |
| Conversion time | The date and time the deal closed | The deal’s close date |
| Value | The deal amount | 1500.00 |
| Currency | ISO currency code | USD |
Limits to know: Google does not import a standard offline conversion that arrives more than 90 days after the ad click. For enhanced conversions for leads the limit is 63 days. If your sales cycle is longer, send an earlier stage such as Qualified Lead as well. Full rules are in Google’s import guidelines.
Step 3: Choose what Smart Bidding optimizes for
Sending the data is not enough. You also have to tell Google Ads to use it.
- Let the offline conversion collect data for a few weeks first.
- In Goals > Summary, set the offline conversion action to Primary.
- Set the plain form-fill conversion to Secondary, so it is still reported but no longer drives bidding.
If you only close a handful of deals each month, the algorithm will not have enough signal. In that case, optimize for a mid-funnel stage like Qualified Lead and keep closed deals as a reported value.
If you want this workflow built for you, see my offline conversion tracking service and marketing automation service.
Phase 6: Stay Compliant with Google Consent Mode V2
Consent Mode is how your website tells Google tags what the visitor agreed to. Think of it as a traffic light for your tags. Green means the tag can use cookies and send data. Red means it must hold back.
- Install your consent management platform’s tag in Web GTM and fire it on Consent Initialization – All Pages, so it runs before every other tag.
- Set the default state of
ad_storage,ad_user_data,ad_personalization, andanalytics_storageto denied for regions that require consent. - Check that your Google Ads tags and the
cHTML – GCLID Capturetag only fire afterad_storageis granted. - If your CRM connector asks for a consent field when you send offline conversions, pass the visitor’s real consent status with the lead.
Server-side tracking does not remove the need for consent. It gives you more control over what is sent, and you are still responsible for respecting each visitor’s choice.
The Full Data Flow at a Glance
Here is the whole journey, from the first ad click to the moment Google Ads learns about the sale.
| # | What happens | Where |
|---|---|---|
| 1 | A visitor clicks your ad and lands with a gclid in the URL |
Google Ads |
| 2 | The click ID is saved in a first-party cookie and added to the hidden form field | Web GTM |
| 3 | The visitor submits the form. The lead event goes to your server container, and hashed email and phone go to Google | Web GTM + sGTM |
| 4 | The lead and its click ID are stored in the CRM | HubSpot, Salesforce, or Zoho |
| 5 | Sales works the lead and marks the deal Closed Won | CRM |
| 6 | The automation sends the click ID, deal value, and close time to Google Ads | n8n, Zapier, or Make |
| 7 | Smart Bidding learns which clicks produce revenue and bids for more of them | Google Ads |

Testing & Validation Workflow
Test every link in the chain before you trust the numbers.
- Test the click ID capture. Open GTM Preview mode. Load your landing page with
?gclid=TEST123added to the URL. Confirm thecHTML – GCLID Capturetag fired. - Check the hidden field. Go to another page that has a form. Right-click the form, choose Inspect, and find the
gclidinput. Its value should beTEST123. - Check the CRM. Submit the form and open the new record. The
GCLIDfield should hold the test value. - Check the lead-to-deal copy. Convert the test lead into a deal and confirm the click ID followed it.
- Check the server container. Open Preview in your Server container, submit the form again, and confirm the lead event arrived and the
sGTM – Google Ads – Leadtag fired. - Run a real end-to-end test. A made-up click ID will be rejected by Google Ads. Click one of your own live ads, submit the form, mark the deal as won, and let the automation run.
- Check Google Ads. Open the conversion action and review its diagnostics. Imported conversions usually take a few hours to appear.
Troubleshooting Common Mistakes
Mistake 1: The click ID field is empty in the CRM
The Problem: leads arrive, but the GCLID field is blank.
The Cause: auto-tagging is off, a redirect strips the URL parameters, the hidden field has a different name, or the form sits inside an iframe that the script cannot reach.
The Solution: turn on auto-tagging in Google Ads account settings. Test the landing page URL to see if the gclid survives the redirect. Match the field name exactly. For iframe forms, pass the value into the iframe URL or use the form tool’s own hidden field feature.
Mistake 2: The click ID is on the lead but not on the deal
The Problem: the automation runs on won deals, but most have no click ID.
The Cause: the field was never mapped from the lead or contact to the deal or opportunity.
The Solution: add the lead conversion field mapping in your CRM, or change the automation to look up the click ID from the related contact.
Mistake 3: Google Ads rejects the uploaded conversions
The Problem: the automation shows success, but Google Ads reports errors.
The Cause: the conversion name does not match exactly, the conversion time is earlier than the click, the click is older than the import limit, or the click ID changed case in a spreadsheet or formula.
The Solution: copy the conversion name straight from Google Ads. Send the deal’s close time, not the lead’s creation time. Keep the click ID as plain text and never change its capital letters.
Mistake 4: Conversions are counted twice
The Problem: lead numbers in Google Ads are roughly double the CRM.
The Cause: the same conversion action fires from both the Web container and the Server container.
The Solution: keep one sending path per conversion action. Pause the web tag after you verify the server tag.
Mistake 5: Data is flowing but performance does not change
The Problem: closed deals show up in Google Ads, yet the campaigns still chase cheap leads.
The Cause: the offline conversion is still set to Secondary, so Smart Bidding ignores it.
The Solution: set the offline action to Primary and the form fill to Secondary. Then give the bidding strategy a few weeks to relearn.
Beyond Google Ads: The Rest of Your Tracking Stack
The same idea applies to every platform you advertise on. Once your server container is running, you can extend it.
- Conversion APIs. Send server-side events to Meta, TikTok, Pinterest, and Snapchat, so each platform’s algorithm gets the same quality of signal.
- Third-party checkouts. If the sale finishes on Shopify, Stripe, or PayPal, track the transaction there and attribute it to the right click.
- Reporting. Bring ad spend and closed revenue together in GA4, Looker Studio, and BigQuery, so you can see profit by campaign and keyword.
If you want to see how every channel contributes to a sale, my marketing attribution tracking service covers that. And if your lead forms themselves are not firing correctly, start with my guide on fixing Google Ads conversion tracking for lead forms and calls.
Conclusion
You now have the full picture. Server-side tracking makes sure the lead is recorded. The click ID keeps the lead tied to its ad. Offline conversion tracking tells Google Ads which leads turned into money.
Your next three moves are simple. First, add the hidden field and the capture tag, and confirm a click ID reaches your CRM. Second, create the offline conversion action and send your first won deal. Third, after a few weeks of data, switch that action to Primary.
Stop paying for junk leads. Start optimizing for real sales.
Summary by MD Niamul
Lead generation campaigns fill a CRM with junk leads when Google Ads can only see form fills. Server-side tracking fixes lost data by collecting conversions on a first-party server container instead of in the browser, where ITP, ad blockers, and privacy settings block them. Offline conversion tracking fixes lead quality: Google Tag Manager captures the Google Click ID (gclid), the CRM stores it with the lead, and an automation in n8n, Zapier, or Make sends the closed-deal value back to Google Ads. Enhanced conversions for leads adds hashed email and phone as a backup match. With Consent Mode V2 in place, Smart Bidding then optimizes for real revenue instead of cheap leads.
Frequently Asked Questions (FAQ)
1. What is offline conversion tracking?
Offline conversion tracking is a way to tell Google Ads about sales that happen away from your website, such as a deal closed by phone or a contract signed weeks after the first click. You save the Google Click ID with each lead in your CRM. When the lead becomes a customer, you send that click ID, the sale value, and the sale time back to Google Ads. The platform then knows which ad, keyword, and campaign produced real revenue.
2. Why do my Google Ads leads look like junk?
Google Ads optimizes for the conversion you give it. If that conversion is a form fill, the algorithm looks for the people most likely to fill in a form at the lowest cost. Those people are often not buyers. Google cannot see which leads your sales team qualified or closed, so it cannot tell a good lead from a bad one. Sending qualified leads and closed deals back as offline conversions gives the algorithm the signal it needs to find better leads.
3. What is server-side tracking?
Server-side tracking means your website sends conversion data to a server you control, and that server forwards it to platforms like Google Ads and Meta. With standard tracking, the visitor’s browser sends the data directly, and browser privacy features or ad blockers can stop it. A Server-Side Google Tag Manager container on your own subdomain receives the data first-hand, which reduces data loss and gives you control over exactly what each platform receives.
4. Do I need both server-side and offline tracking?
They solve different problems, and lead generation campaigns benefit from both. Server-side tracking improves how many website conversions are recorded in the first place. Offline conversion tracking improves the quality of the signal by reporting what happened after the form was submitted. If you only add server-side tracking, you get a more complete count of form fills, but Google still does not know which ones became sales. Used together, you get complete data and meaningful data.
5. What is a GCLID?
GCLID stands for Google Click ID. It is a unique code that Google Ads adds to your landing page URL every time someone clicks an ad, as long as auto-tagging is turned on in your account. The code identifies that single click, including the campaign, ad group, and keyword behind it. If you save the GCLID with the lead in your CRM, you can later send it back to Google Ads with a sale, and Google will credit the right click.
6. How do I store the GCLID in my CRM?
Add a hidden field named gclid to your lead forms. Use a small script in Google Tag Manager to read the click ID from the URL, save it in a first-party cookie, and place it in the hidden field. Then create a matching field in your CRM and map the form field to it. In Salesforce and Zoho, also map the field from the lead to the opportunity or deal, so the value is still there when the sale closes.
7. Is GCLID import still supported in 2026?
Yes, the click ID still works and Google still recommends sending it whenever you have it. What changed is that Google now describes click-ID-only import as a legacy feature and recommends enhanced conversions for leads. That method uses the click ID together with hashed email and phone number, so a sale can still be matched when the click ID was lost. Custom API integrations also moved to Google’s Data Manager API in 2026. Standard CRM connectors and tag-based setups keep working.
8. How long do offline conversions take to appear?
Google’s documentation says imported conversions take about three hours to show in your account. After you create a new conversion action, wait four to six hours before sending data to it, because conversions sent too early can take up to two days to appear. Also remember the time limit: a standard offline conversion must be uploaded within 90 days of the ad click, and enhanced conversions for leads within 63 days.
9. Can I automate uploads with Zapier or n8n?
Yes. In Zapier, the Google Ads app has a Send Offline Conversion action. You trigger the Zap when a deal is marked as won in your CRM, then pass the click ID, the conversion action name, the time, the value, and the currency. Zapier’s guide notes that enhanced conversions for leads should be set up first. In n8n or Make you build the same flow with more control, which helps when you have several CRMs, custom rules, or higher volume.
10. Does server-side tracking bypass consent?
No. Server-side tracking changes where data is collected and sent from. It does not change your legal duty to respect a visitor’s choice. If someone declines advertising cookies, your tags should not store advertising identifiers or send personal data for ads, whether they run in the browser or on a server. Use Google Consent Mode V2 with a consent management platform, set the default state to denied where consent is required, and pass the real consent status with your data.
 Need Help Advanced GHL Automation & Tracking Setup?