

Quick Answer
A Shopify Meta Pixel and Conversions API audit finds out why Meta receives fewer or messier signals than your store really produces. List every place that sends events to your Meta dataset, check that browser and server events share the same event ID so they deduplicate, remove duplicate pixels and old gateway setups, then route events through one clean path such as Server-Side GTM on Stape. Finish by raising Event Match Quality and testing every event from page view to purchase.
Key Takeaways
- The symptom: your 180-day website audience in Meta is much smaller than your Shopify traffic, so retargeting and lookalikes start from a weak base.
- Diagnose first: rebuilding GTM without finding the cause usually copies the same fault into a new container.
- Three usual causes: missing events, failed deduplication, and more than one pixel setup running at once.
- The event ID rule: the browser event and the server event need the same event name and the same event ID, sent to the same dataset.
- One path only: pick the Shopify Meta app or Server-Side GTM as your source of truth and remove the rest.
- Match quality matters: hashed email, phone, and the
fbpandfbcvalues help Meta recognise more of your visitors.
Introduction: Your Store Is Busy, but Your Meta Audience Is Small
Open two tabs. In the first, your Shopify analytics show a healthy number of sessions for the last six months. In the second, Meta Ads Manager shows your 180-day website visitors audience.
The second number is far smaller than you expected.
The visitors came. Meta just did not record most of them in a way it could use.
This is one of the most common problems I am asked to look at on Shopify stores, and it matters more than it first seems. That audience feeds your retargeting campaigns. It is the seed for your lookalike audiences. When it is underpopulated, every campaign built on it starts with less to work with.
The quick reaction is to rebuild the tracking. I do not start there. I start with a diagnosis, because the cause is rarely “no tracking”. It is usually two or three setups stepping on each other, or one event that quietly stopped firing.
In this guide I will walk you through the same Shopify Meta Pixel and Conversions API audit I use: how to find the root cause, how to fix deduplication, and how to move to a clean server-side setup.
First, a Reality Check: The Two Numbers Never Match Exactly
Before you hunt for faults, know what is normal. Shopify counts sessions. Meta counts people it can recognise. One person who visits five times is five sessions and one audience member. A visitor Meta cannot connect to an account is not added at all.
| Reason the audience is smaller | Normal or a fault? | What to do |
|---|---|---|
| Sessions are counted, not people | Normal | Compare with unique visitors, not sessions |
| Visitor has no Meta account, or cannot be matched | Normal | Improve match quality (Phase 6) |
| Visitor declined cookies in a consent region | Normal | Nothing. Respect the choice |
| Ad blocker or browser privacy feature blocked the pixel | Partly fixable | Add server-side events (Phase 5) |
| PageView does not fire on some templates or on checkout | Fault | Fix the missing events (Phase 2) |
| The audience is built on a different pixel than the one on your store | Fault | Map your pixels (Phase 1) |
So the goal is not a perfect match. The goal is to remove the faults, so the gap that remains is only the normal part.

What Are the Meta Pixel and the Conversions API?
The Meta Pixel is a script that runs in the visitor’s browser and reports what they do. Think of it as a messenger who leaves from the visitor’s own front door. Sometimes the door is locked by an ad blocker or a privacy setting, and the message never leaves.
The Conversions API, often called CAPI, sends the same events from a server instead. Think of it as a second messenger who leaves from your office. Nothing in the visitor’s browser can stop it.
Most stores run both. That is good practice, and it creates one new job: deduplication. When both messengers report the same purchase, Meta has to know it is one purchase, not two. It does that with an event ID, a shared reference number on both messages.
Prerequisites & Setup Checklist
- Shopify: store owner or staff access to Settings, Customer events, the theme code, and installed apps.
- Meta: admin access to the dataset (pixel) in Events Manager and to the ad account.
- Google Tag Manager: access to the Web container and the Server container, if you use them.
- Server hosting: a tagging server on Stape Global or Stape Europe for the server-side part.
- Browser tools: Chrome with the Meta Pixel Helper extension.
For a fast first look, run your store through my free Meta Pixel and CAPI checker and the free Shopify store checker. They show which pixels and tracking apps a page loads.
Video Tutorial Walkthrough
Prefer to watch? In this short video I explain how I audit a Shopify store’s Meta Pixel and Conversions API setup and what the three milestones are.
Step-by-Step Implementation Guide
I work through three milestones: audit and tracking map, implementation, and QA. Below they are split into six phases you can follow in order.
Phase 1: Audit and Build the Tracking Map
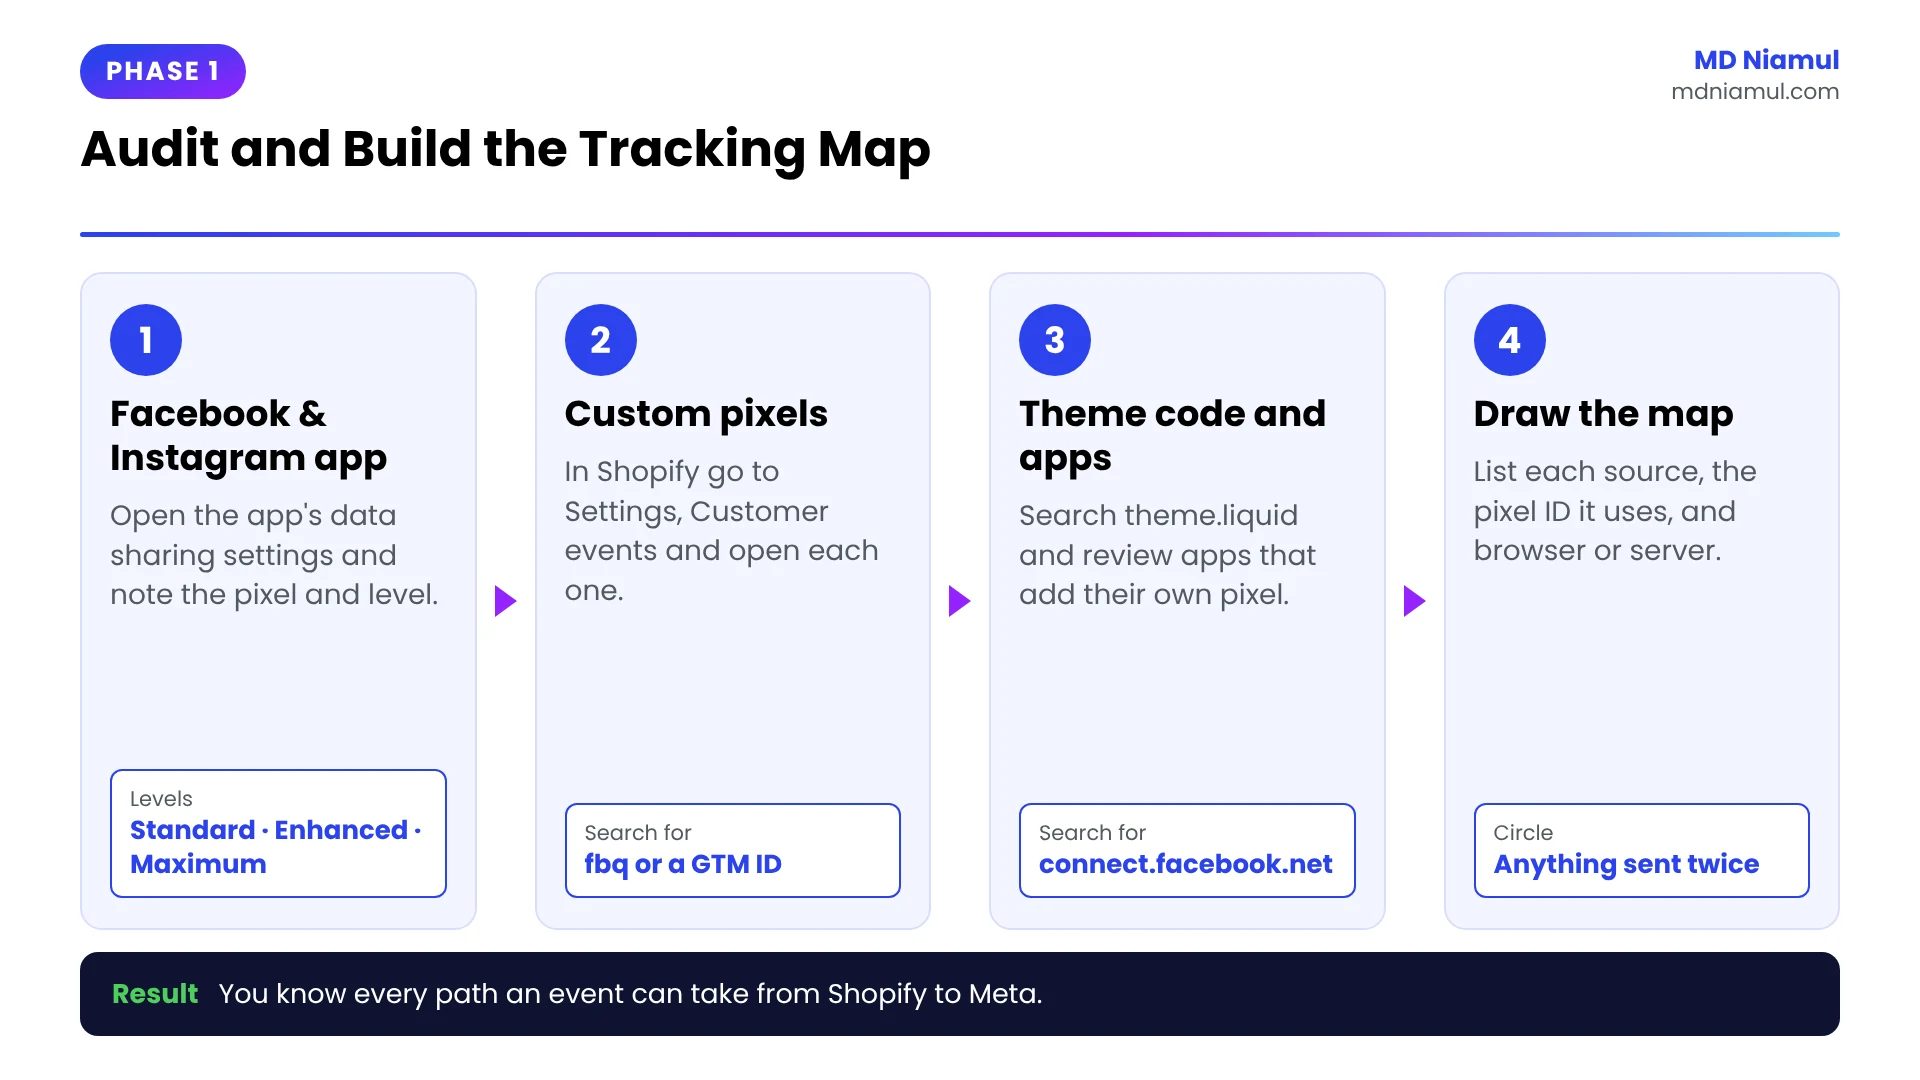
A tracking map is a simple list of every path an event can take from your store to Meta. You cannot fix what you have not listed. On Shopify, a Meta pixel can be installed in several places at once, and each place is easy to forget.
Step 1: Find every place that sends events to Meta
| Where to look | How to check it |
|---|---|
| Facebook & Instagram app | Shopify admin, Sales channels, Facebook & Instagram, Settings, Data sharing settings. Note the pixel and the level. |
| Custom pixels | Shopify admin, Settings, Customer events. Open each custom pixel and search the code for fbq or a GTM ID. |
| Theme code | Online Store, Themes, Edit code. Search theme.liquid and snippets for fbq( and connect.facebook.net. |
| Google Tag Manager | Search your Web container for Meta or Facebook pixel tags, and your Server container for a Conversions API tag. |
| Other apps | Review installed apps for tracking, pixel, feed, or upsell apps that add their own Meta pixel. |
| Conversions API Gateway or partner setup | In Events Manager, open the dataset’s Settings and review the Conversions API section for older connections. |
Step 2: Write down the data sharing level
The Facebook & Instagram app has three customer data sharing levels. They decide what Shopify sends on its own.
| Level | What Shopify sends |
|---|---|
| Standard | Meta pixel only, from the browser |
| Enhanced | Meta pixel plus the Conversions API |
| Maximum | Conversions API and Meta pixel, with Meta’s latest options |
Step 3: Draw the map
- List each source from Step 1.
- Next to each one, write the pixel or dataset ID it sends to.
- Mark whether it sends from the browser, the server, or both.
- Circle anything that sends the same event twice, or sends to a pixel ID you do not recognise.
Critical step: check which pixel your 180-day audience is built on. If the audience uses pixel A and your store now fires pixel B, the audience will stay small no matter what else you fix.
Phase 2: Check Which Events Really Arrive
Now compare the map with what Meta actually receives. This shows which signals are missing.
Step 1: Watch the events live
- In Meta Events Manager, choose your dataset under Data sources.
- Open the Test events tab.
- Enter your store URL to test browser events. For server events, copy the test event code shown there into your server setup.
- In another tab, walk through your store: home page, a collection, a product, add to cart, checkout, and a test order.
- Watch each event appear and note whether it says Browser, Server, or both.
Step 2: Compare against the funnel
| Store action | Meta event you should see | Common fault |
|---|---|---|
| Any page loads | PageView | Missing on some templates, or fires twice |
| Product page | ViewContent | No product ID or value |
| Add to cart | AddToCart | Fires from the browser only |
| Checkout starts | InitiateCheckout | Missing after the move to the new checkout |
| Order placed | Purchase | Counted twice, or value and currency missing |
Why PageView matters most here: a website visitors audience is built from page-level events. If PageView is missing on part of your store, those visitors never enter the audience, even when your Purchase event is perfect.
Good to know: Shopify runs app pixels and custom pixels in a sandbox, which is a sealed box that limits what the script can see. Tools like the Meta Pixel Helper do not always detect pixels that run inside it. Trust the Test events tab over the browser extension.

Phase 3: Check Event ID Consistency and Deduplication
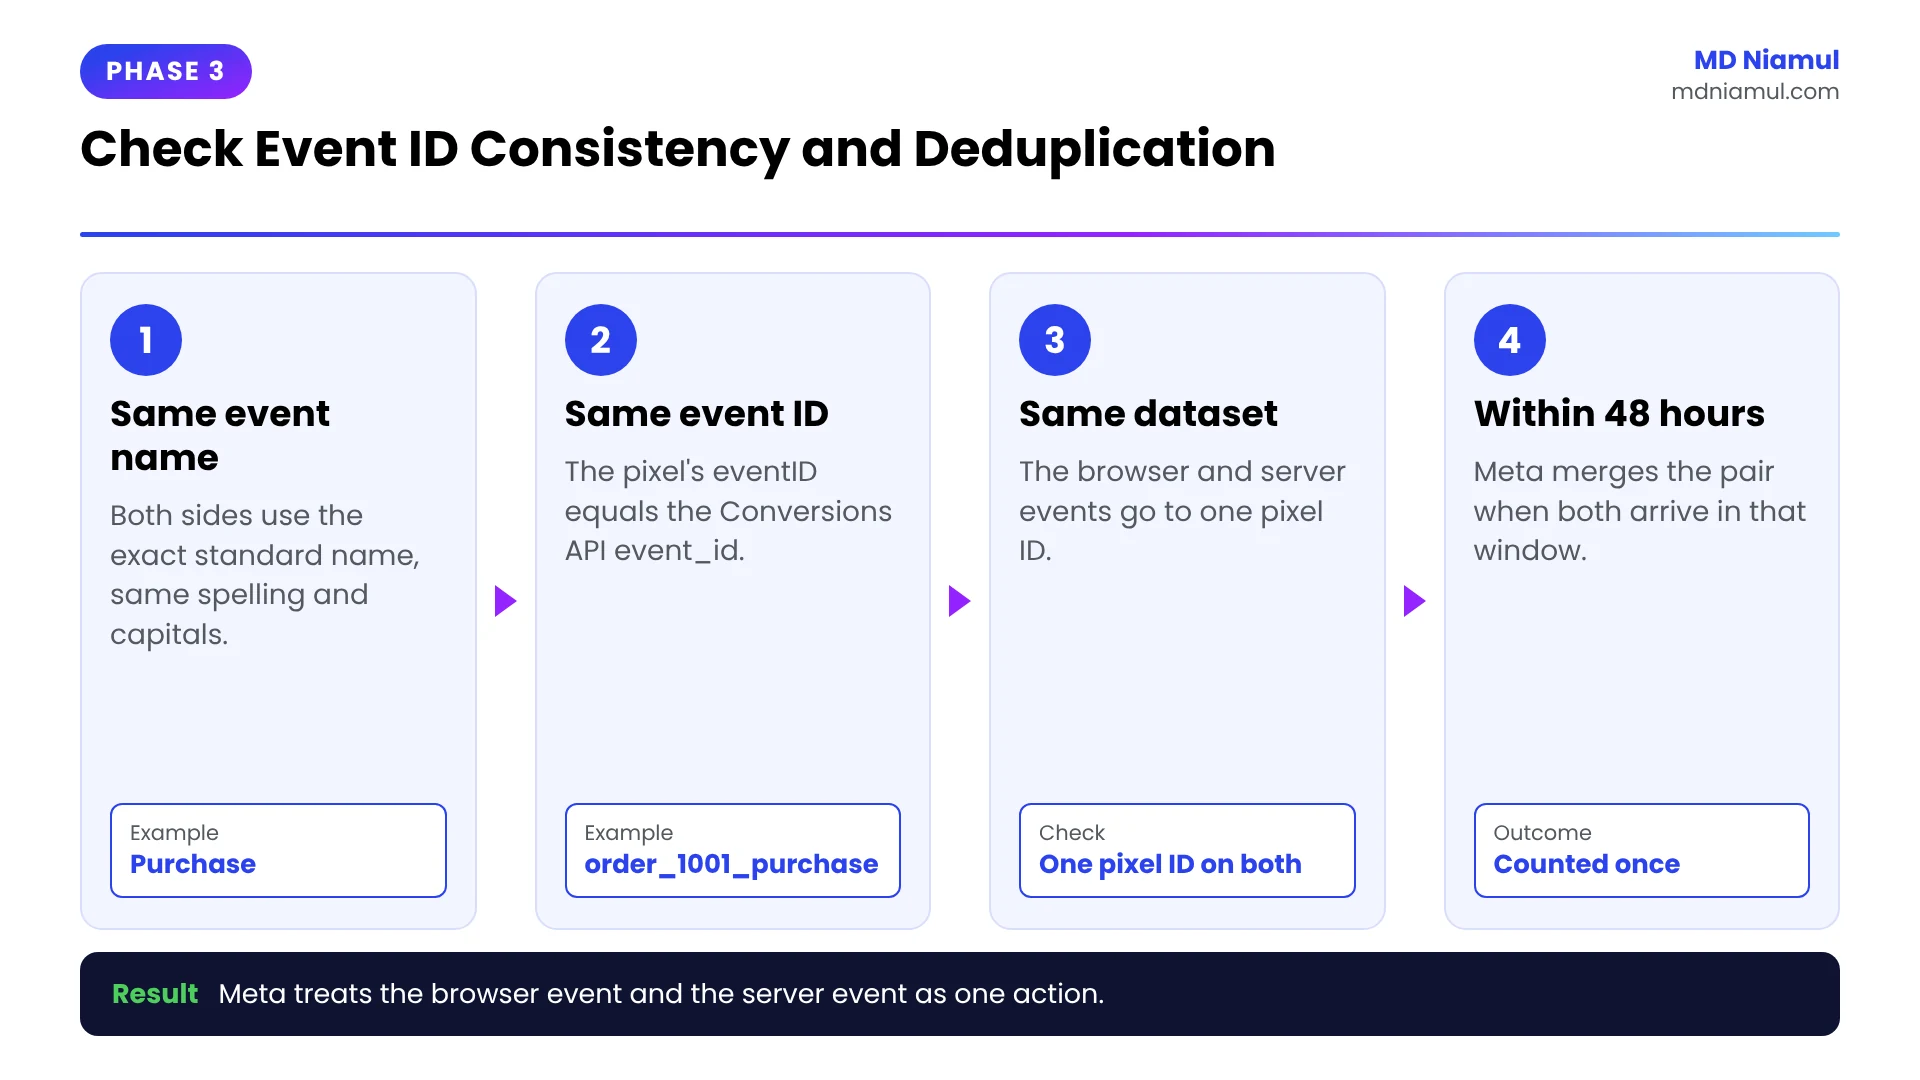
This is where most audits find the real problem. If the browser event and the server event do not carry the same ID, Meta cannot tell they are the same action.
The rule
Meta treats a browser event and a server event as one when all of these are true:
- The event name is the same, for example
Purchase. - The event ID is the same. In the pixel it is called
eventID. In the Conversions API it is calledevent_id. - Both go to the same pixel or dataset.
- They arrive within 48 hours of each other.
Here is what a matching pair looks like:
// 1. Browser: the Meta Pixel sends the purchase with an event ID
fbq('track', 'Purchase',
  { value: 129.00, currency: 'USD' },
  { eventID: 'order_1001_purchase' }
);

// 2. Server: the Conversions API sends the same event name and the same ID
{
  "event_name": "Purchase",
  "event_id": "order_1001_purchase",
  "event_time": 1791500000,
  "action_source": "website",
  "user_data": { "em": ["<hashed email>"], "fbp": "fb.1.1791400000.1234567890" },
  "custom_data": { "value": 129.00, "currency": "USD" }
}
Step 1: Compare the IDs
- In Test events, trigger one action, for example add to cart.
- Click the browser event and the server event to expand them.
- Compare the event ID on both. They must be identical, character for character.
- Repeat for PageView, ViewContent, InitiateCheckout and Purchase.
Step 2: Read the result
| What you see | What it means |
|---|---|
| Same event name and same ID on both | Deduplication works |
| Different IDs on browser and server | Meta counts the action twice |
| Server event has no ID | Meta cannot deduplicate it with the browser event |
| Two browser events for one action | Two pixels are installed. An event ID does not fix this |
Important: an event ID only merges a browser event with a server event. It does not merge two browser events from two different installs. That is why Phase 1 comes first.
You can build and check a server payload with my free Meta CAPI payload builder.
Phase 4: Choose One Path and Remove the Rest
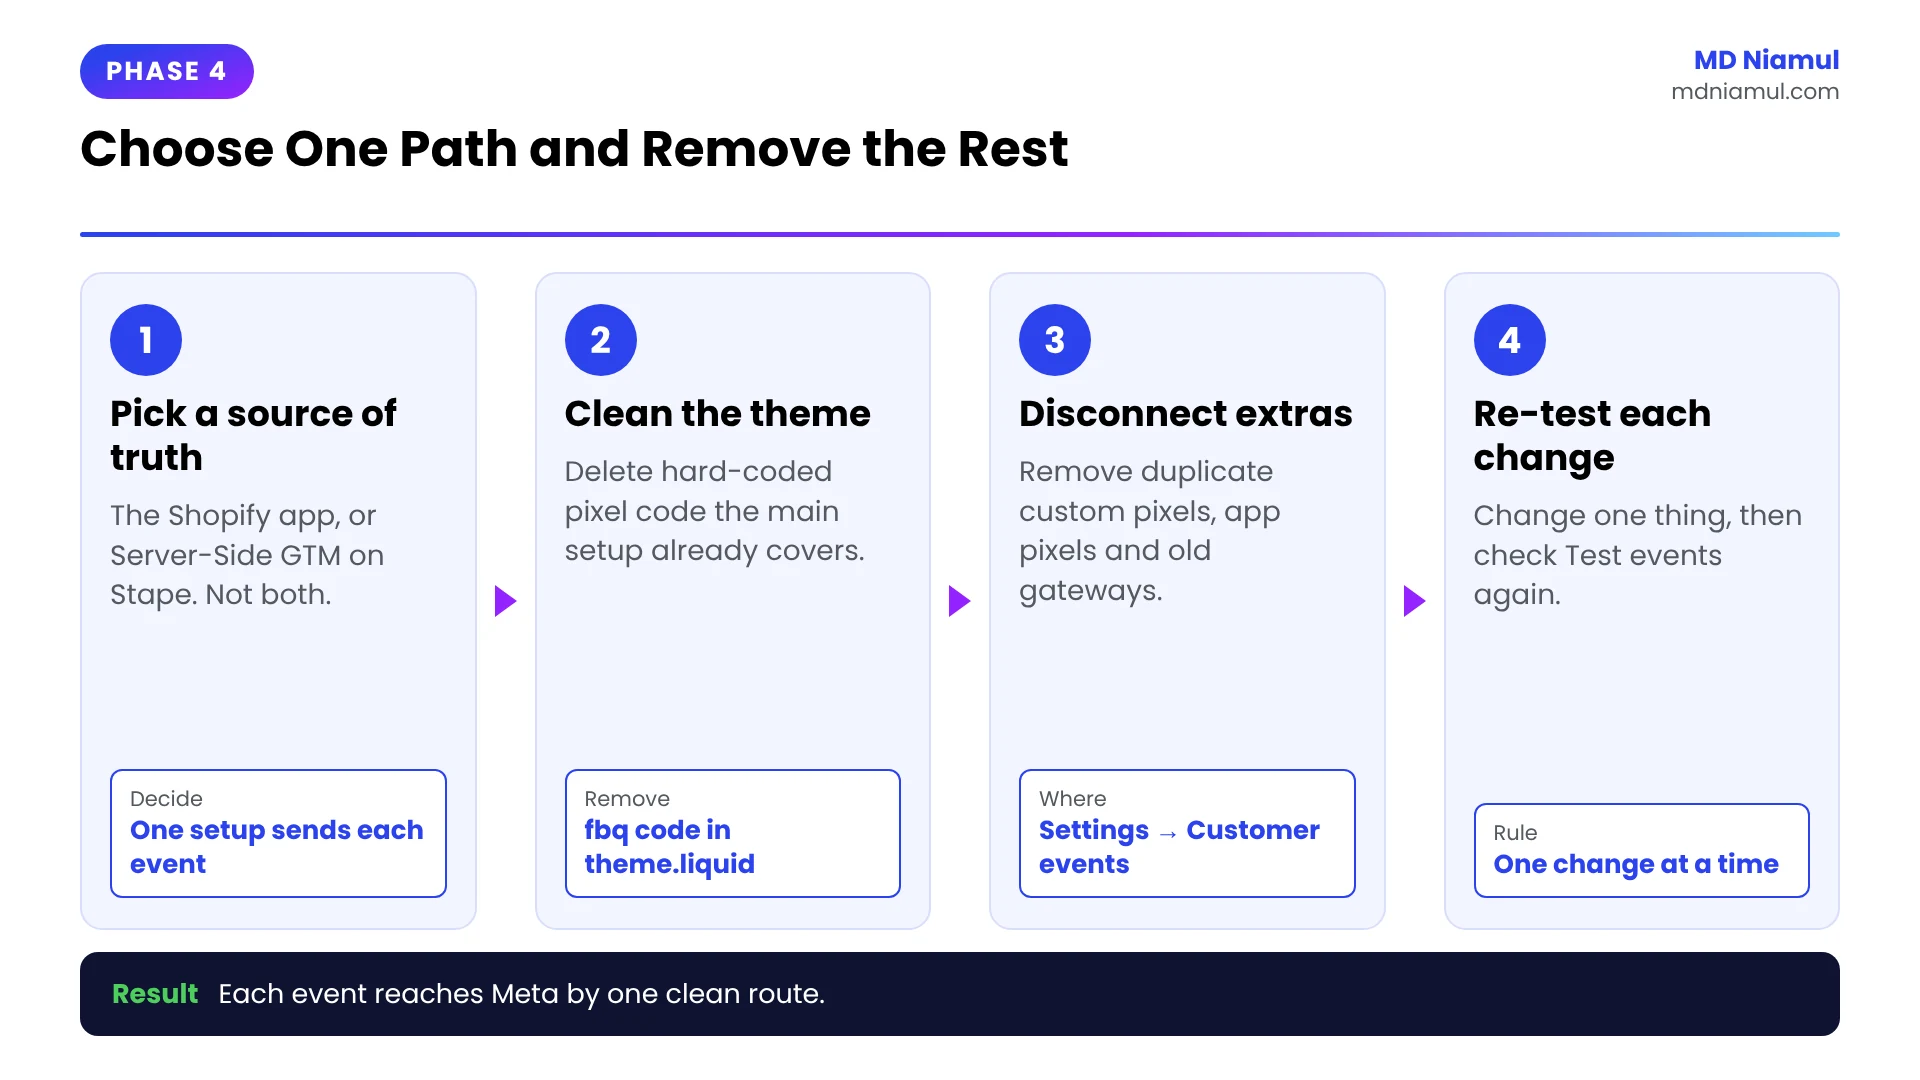
With the map and the test results in hand, decide which setup will be your single source of truth. Then switch off everything else that sends the same events.
Step 1: Pick the architecture
| Option | Best for | Trade-off |
|---|---|---|
| Shopify’s Facebook & Instagram app on Enhanced or Maximum | Stores that want a simple, supported setup | Less control over events and parameters |
| Server-Side GTM on Stape with the Meta pixel and Conversions API tags | Stores that want full control, custom events, and one server for every ad platform | More to build and maintain |
Step 2: Remove what you no longer need
- Delete hard-coded
fbqcode from the theme if the app or GTM already loads the pixel. - Remove or disconnect custom pixels in Customer events that duplicate the main setup.
- Turn off the Meta pixel inside any other app that adds its own.
- If you move to Server-Side GTM, lower or disconnect the app’s data sharing so it does not send the same events again.
- Disconnect old gateway or partner connections you no longer use.
Warning: change one thing at a time and re-test after each change. If you remove three sources at once and events stop, you will not know which one mattered.
Phase 5: Set Up or Repair Server-Side Tracking with Stape
Server-side tracking sends your events from a server you control, on your own subdomain. Browser blockers and short cookie lifetimes affect it much less than a browser pixel.
Step 1: Prepare the server container
- In Google Tag Manager, create a container and choose Server as the platform.
- In Stape, create a container and paste the container configuration from GTM.
- Add a custom subdomain such as
sgtm.yourstore.comand add the DNS records Stape shows you.
Step 2: Send Shopify events to the server
- Install the Stape Conversion Tracking app in Shopify. It creates the data layer for store and checkout events and connects the store to your server container.
- Follow the app’s setup screen to connect your GTM container and your tagging server URL.
- In your Web container, send events to the server container through your Google tag or a data tag.
Step 3: Add the Meta tags
- In Meta Events Manager, open the dataset’s Settings, find the Conversions API section, and generate an access token.
- In your Server container, add a Conversions API tag for Meta from the template gallery.
- Enter your pixel ID and the access token.
- Map the event ID field to the event ID that comes from the web event.
- In your Web container, make sure the Meta pixel tag sends the same event ID variable as its
eventID.
Critical step: the web tag and the server tag must read the event ID from the same variable. If each one creates its own ID, deduplication fails again.
For a full walkthrough of this build, see my guide on Meta Pixel and Conversions API server-side tracking with sGTM and Stape, or my Shopify server-side tracking service.

Phase 6: Raise Event Match Quality
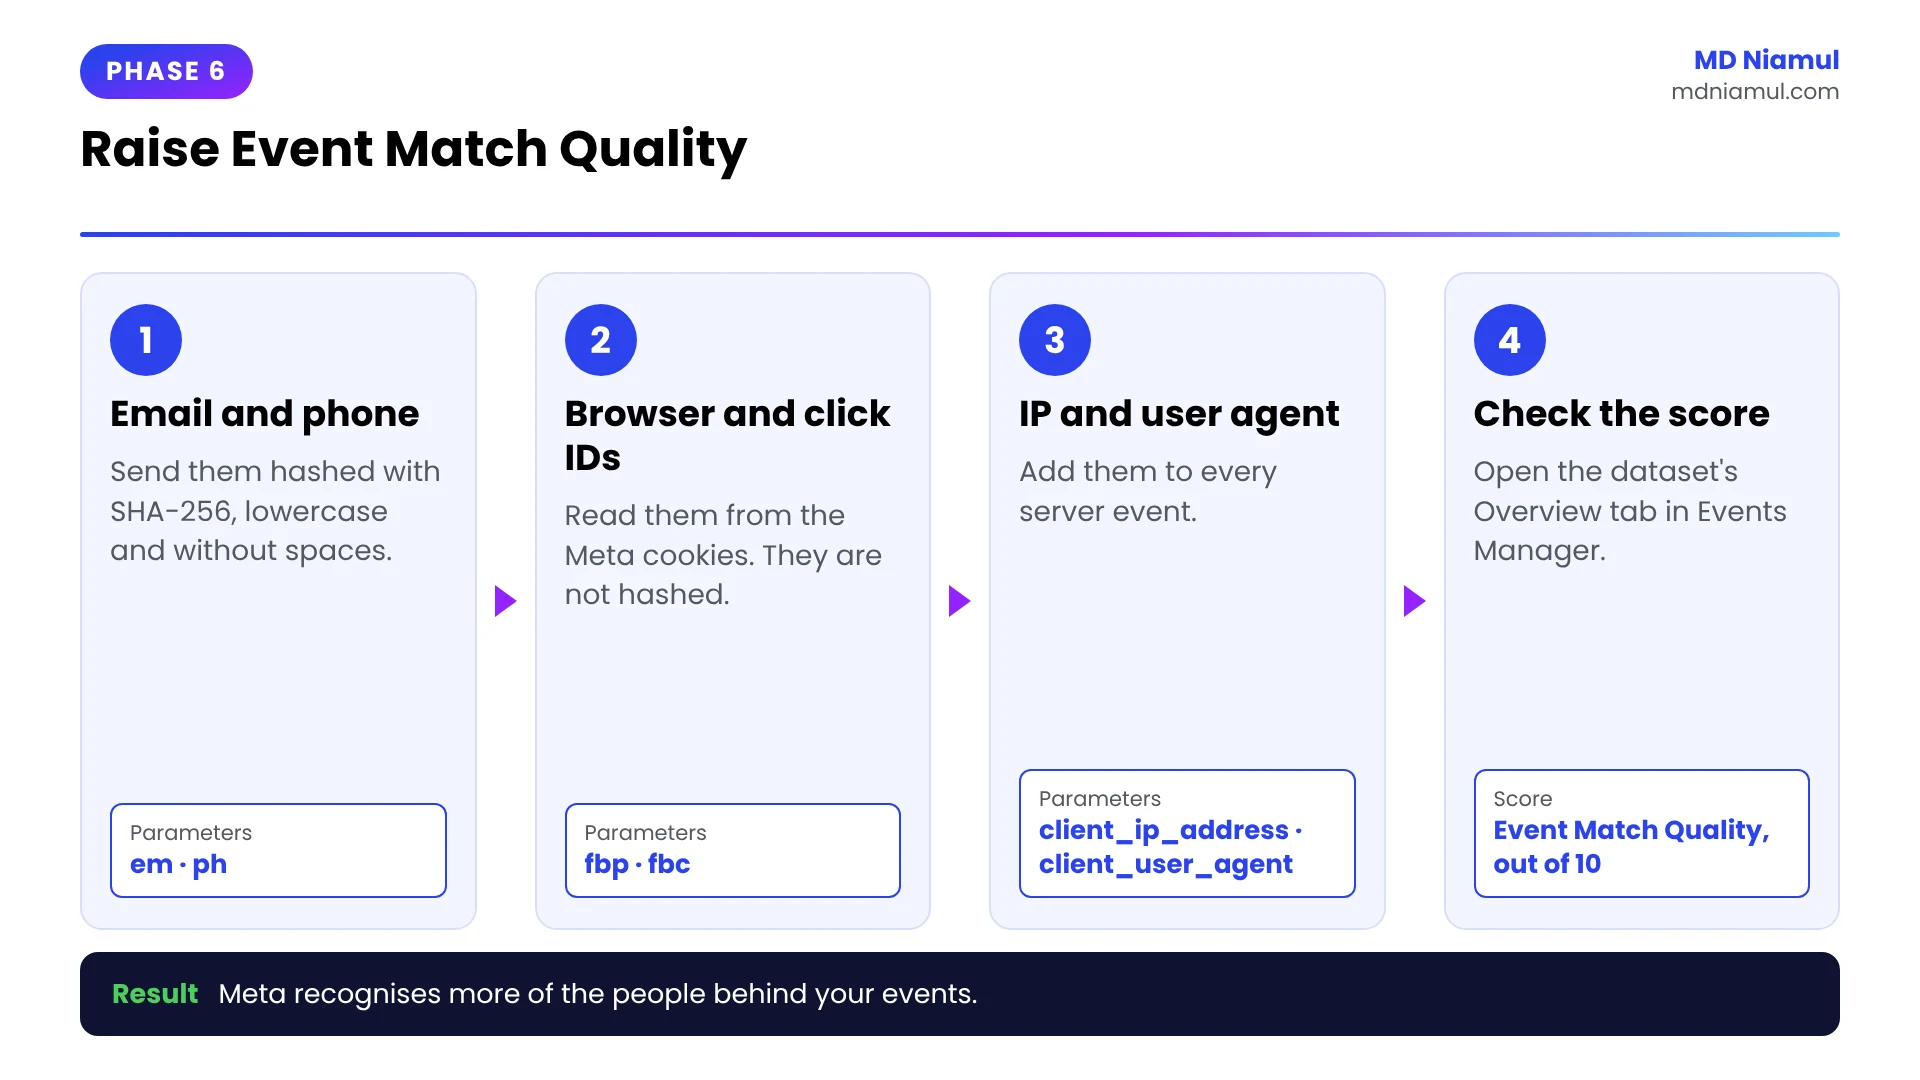
Event Match Quality is Meta’s score, out of 10, for how well the customer details in your events help it recognise the person. A recognised person can join your audience. An unrecognised one cannot.
Step 1: Send the right parameters
| Parameter | What it is | Hashed? |
|---|---|---|
em |
Email address | Yes, SHA-256 |
ph |
Phone number | Yes, SHA-256 |
fn, ln |
First and last name | Yes, SHA-256 |
external_id |
Your own customer ID | Recommended |
fbp |
Meta browser ID from the _fbp cookie |
No |
fbc |
Meta click ID from the _fbc cookie or fbclid |
No |
client_ip_address, client_user_agent |
The visitor’s IP address and browser | No |
Step 2: Check the score
- In Events Manager, open your dataset and look at the events list on the Overview tab.
- Find the Event Match Quality score next to each server event.
- Open the event to see which parameters are sent and which are missing.
- Add the missing ones where your store really has the data, for example email and phone at checkout.
Early events like PageView will always score lower than Purchase, because you know less about the visitor at that point. That is expected. Send fbp, fbc, IP address and user agent on every event, and add email and phone as soon as the customer provides them.
Consent: only send customer details when the visitor has agreed where the law requires it. In consent regions, Shopify holds back pixels until the visitor grants permission.
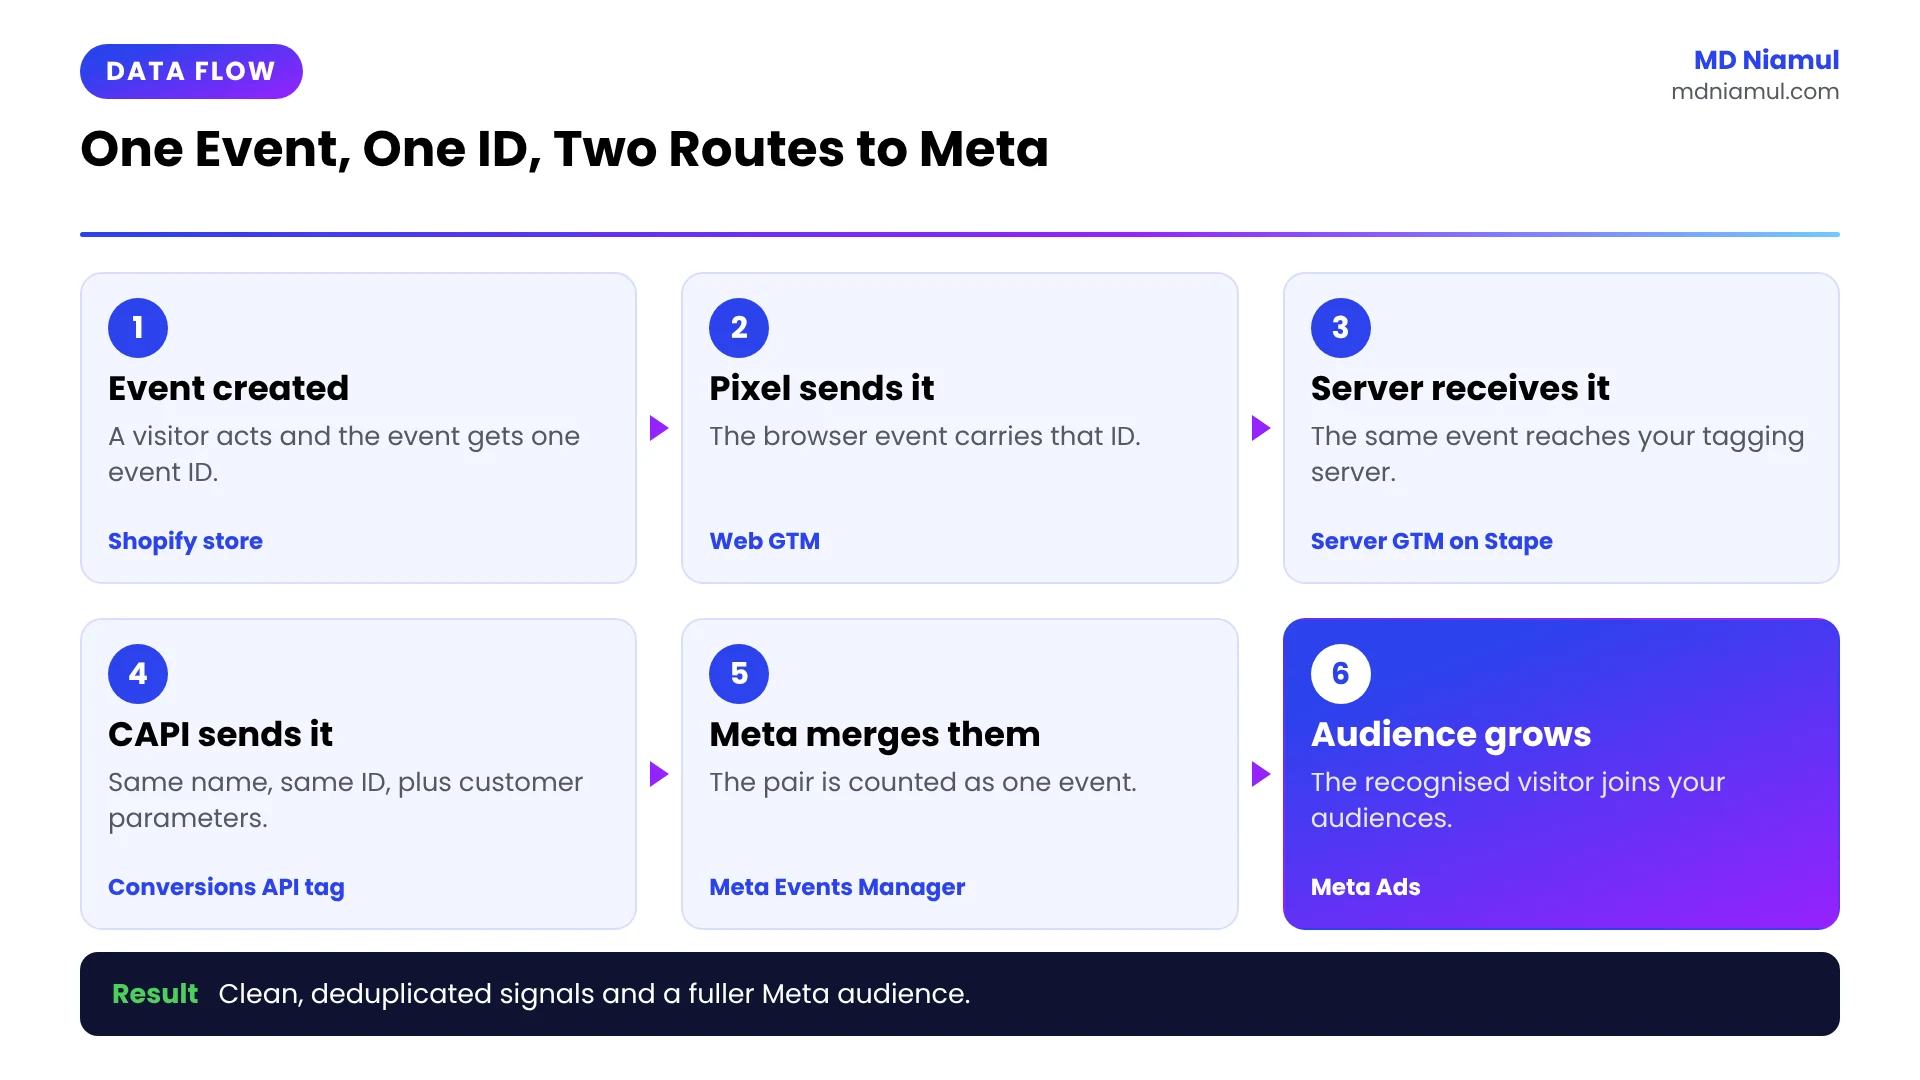
The Full Data Flow at a Glance
| # | What happens | Where |
|---|---|---|
| 1 | A visitor browses the store and an event is created with one event ID | Shopify store |
| 2 | The Meta pixel sends the event from the browser with that ID | Web GTM |
| 3 | The same event travels to your tagging server on your subdomain | Server GTM on Stape |
| 4 | The Conversions API tag sends it to Meta with the same ID and the customer parameters | Server GTM |
| 5 | Meta merges the two into one event | Meta Events Manager |
| 6 | The recognised visitor joins your audiences and the purchase is attributed | Meta Ads |
Testing & Validation Workflow
- Test events tab. Walk the full funnel with the test event code active. Every action should show a browser event and a server event.
- Event IDs. Expand each pair and confirm the IDs match.
- One of each. Confirm there is only one browser PageView per page load and one Purchase per order.
- Place a real test order. Check the Purchase value, currency and product IDs.
- Diagnostics tab. Open Diagnostics in Events Manager a day later and clear any warnings.
- Event Match Quality. Review the scores after a few days of real traffic.
- Audience size. Watch the 180-day audience over the following weeks. It grows forward from the fix. It does not refill the past.
- Write the playbook. Document the final map, the event list and the test steps, so the next person can check the setup in minutes.
Troubleshooting Common Mistakes
Mistake 1: Purchases are doubled in Meta
The Problem: Meta reports about twice as many purchases as Shopify.
The Cause: the browser and server events have different event IDs, or two separate setups both send Purchase.
The Solution: make both tags read one event ID variable, and remove the extra setup you found in Phase 1.
Mistake 2: Two PageView events on every page
The Problem: Test events shows two browser PageView events per page load.
The Cause: the pixel is loaded twice, usually by the Shopify app and again by theme code or GTM.
The Solution: keep one loader. Delete the hard-coded pixel from the theme or pause the GTM pixel tag.
Mistake 3: Server events arrive, but nothing is deduplicated
The Problem: you see browser and server events side by side, both counted.
The Cause: the server event has no event ID, the event names differ in spelling or capital letters, or the two events go to different pixel IDs.
The Solution: use the exact standard event name on both sides, map the event ID on the server tag, and confirm both use the same pixel ID.
Mistake 4: The audience stays small after the fix
The Problem: events look correct, but the 180-day audience barely moves.
The Cause: the audience is built on an old pixel, or not enough time has passed for new visitors to be added.
The Solution: open the audience and check its source pixel. Create a new audience on the correct dataset if needed, then give it a few weeks.
Mistake 5: Event Match Quality is low on Purchase
The Problem: the Purchase event scores poorly even though customers enter their details.
The Cause: email and phone are not passed to the server tag, or they are sent in the wrong format.
The Solution: map email and phone from the checkout data, in lowercase with no spaces before hashing, and send fbp and fbc with them.
What to Set Up Next
- Fix attribution across platforms. See how to fix Shopify attribution for Google Ads and Meta Ads with server-side tracking.
- Running Shopify Plus? Read my Shopify Plus server-side tracking solution.
- Check your consent setup. Follow installing Google Consent Mode v2 on Shopify via GTM.
- Estimate what you are losing. Try the free tracking loss calculator and the free server-side tracking checker.
If you would like this audit done for your store, see my work as a Facebook Conversions API specialist.
Conclusion
A small Meta audience on a busy Shopify store is a symptom. The audit finds the cause: a missing event, a pair of IDs that do not match, or an old pixel still running in the background.
Your next three moves are clear. First, build the tracking map and find every source. Second, test the funnel and compare the event IDs. Third, keep one clean path and remove the rest.
Diagnose first. Then fix once, and measure with confidence.
Summary by MD Niamul
When a Meta 180-day website audience is much smaller than Shopify traffic, the cause is usually missing events, failed deduplication, or more than one Meta pixel setup running at once. A Shopify Meta Pixel and Conversions API audit starts with a tracking map of every source: the Facebook and Instagram app, custom pixels, theme code, Google Tag Manager, other apps and old gateway connections. Next, the Test events tab in Meta Events Manager shows which events arrive from the browser and the server. Browser and server events must share the same event name and event ID, sent to the same dataset within 48 hours, to deduplicate. Then keep one path, such as Server-Side GTM on Stape, remove the rest, and raise Event Match Quality with hashed email and phone plus fbp and fbc.
Frequently Asked Questions (FAQ)
1. Why is my Meta audience smaller than my traffic?
Some difference is normal, because Shopify counts sessions while Meta counts people it can recognise. One visitor with five visits is five sessions but one audience member. Visitors without a Meta account, or who declined cookies, are not added. A large gap usually points to a fault: PageView missing on part of the store, a pixel blocked in the browser with no server event behind it, or an audience built on a different pixel than the one your store fires.
2. What is a Meta Pixel and CAPI audit?
It is a structured check of how your store sends events to Meta. You list every source that fires a pixel or a server event, test which events actually arrive in Events Manager, and compare browser and server events to confirm they deduplicate. You also look for duplicate pixels, old gateway connections and missing customer parameters. The result is a tracking map and a short list of specific fixes, instead of a full rebuild based on guesswork.
3. How does Meta deduplicate pixel and CAPI events?
Meta compares the event name and the event ID. In the pixel the ID is sent as eventID, and in the Conversions API it is sent as event_id. When a browser event and a server event share the same name and the same ID, go to the same pixel or dataset, and arrive within 48 hours, Meta keeps one and discards the other. If the IDs differ or the server event has no ID, both can be counted.
4. How do I find duplicate Meta pixels on Shopify?
Check each place a pixel can be installed. Look at the Facebook and Instagram app’s data sharing settings, the custom pixels under Settings and Customer events, the theme code for fbq or connect.facebook.net, your Google Tag Manager containers, and any app that adds its own pixel. Then use the Test events tab in Events Manager. Two browser PageView events on one page load mean the pixel is loaded twice, and one of the installs should be removed.
5. Should I use the Shopify app or Server-Side GTM?
Both can work. Shopify’s Facebook and Instagram app on the Enhanced or Maximum level is simple and supported, and it suits stores that want little maintenance. Server-Side GTM on a host such as Stape gives you full control over events, parameters and event IDs, and one server can feed Meta, Google Ads, TikTok and others. The important part is to choose one as your source of truth, so the same event is not sent by two setups.
6. What is Event Match Quality?
Event Match Quality is a score out of 10 in Meta Events Manager. It shows how useful the customer information in your server events is for matching the event to a Meta account. Parameters such as hashed email, hashed phone, the fbp browser ID, the fbc click ID, IP address and user agent raise the score. A higher score means Meta recognises more of the people behind your events, which supports attribution and audience building.
7. Which parameters improve match quality most?
Email and phone number are the strongest, because they identify a person directly. Send them hashed with SHA-256, in lowercase and without spaces before hashing. The fbc click ID and the fbp browser ID are also important and are not hashed. Add the visitor’s IP address and user agent on every server event, and an external ID if you have a customer ID. Only send details the customer provided and agreed to share.
8. Does server-side tracking bypass ad blockers?
It reduces the loss, but it is not a way around a visitor’s choice. Server events are sent from your server on your own subdomain, so browser extensions and short cookie lifetimes affect them much less than a browser pixel. They do not override consent. If a visitor declines marketing cookies in a region that requires consent, you should not send their data for advertising, whether from the browser or from a server.
9. Will the audience refill after I fix tracking?
The audience grows forward from the day the fix goes live. Meta cannot add visitors from the past whose events were never received. Over the following weeks, new visitors are recorded properly and the audience becomes more complete, until the full 180-day window has passed under the corrected setup. Also check that the audience is built on the dataset your store now uses. If it points at an old pixel, create a new audience.
10. How long does a tracking audit take?
It depends on how many apps, pixels and past setups the store has. The audit itself is mostly reading settings and testing the funnel, so a simple store can be mapped quickly, while a store with several agencies’ work layered on top takes longer. Fixing and testing come after that. Whatever the size, work in the same order: map every source, test the events, fix deduplication, then remove what is not needed.
 Need Help Advanced GHL Automation & Tracking Setup?