

Quick Answer
To track GoHighLevel form leads with Google Ads Enhanced Conversions, capture the lead’s email and phone number from the embedded GoHighLevel form with a Google Tag Manager listener, push them to the data layer, and map them to a User-Provided Data variable on your Google Ads conversion tag. Turn on Enhanced Conversions in Google Ads, then test in GTM Preview mode. Google hashes the details and uses them to match the lead to the ad click, even when cookies are missing.
Key Takeaways
- The gap: a normal conversion tag only knows that a form was submitted. It depends on a cookie to connect that form to an ad click.
- The fix: Enhanced Conversions adds the lead’s own details, hashed, so Google can match the conversion without the cookie.
- What a lead form needs: email and phone number are enough. Name and address are optional extras.
- The GoHighLevel problem: the form sits inside an iframe, so GTM cannot read the fields directly. A small listener script solves this.
- The build: one listener tag, a few Data Layer Variables, one User-Provided Data variable, and one setting on your existing conversion tag.
- Proof it works: the conversion request carries a hashed
emvalue, and Diagnostics in Google Ads confirms it about 48 hours later.
Introduction: The Lead Is in GoHighLevel, but Google Ads Never Saw It
The first time I compared a GoHighLevel pipeline with a Google Ads account side by side, the two numbers did not agree. The CRM showed every lead. Google Ads showed fewer.
Nothing was broken. The form worked. The conversion tag fired.
The leads were real. Google just could not connect some of them to an ad click.
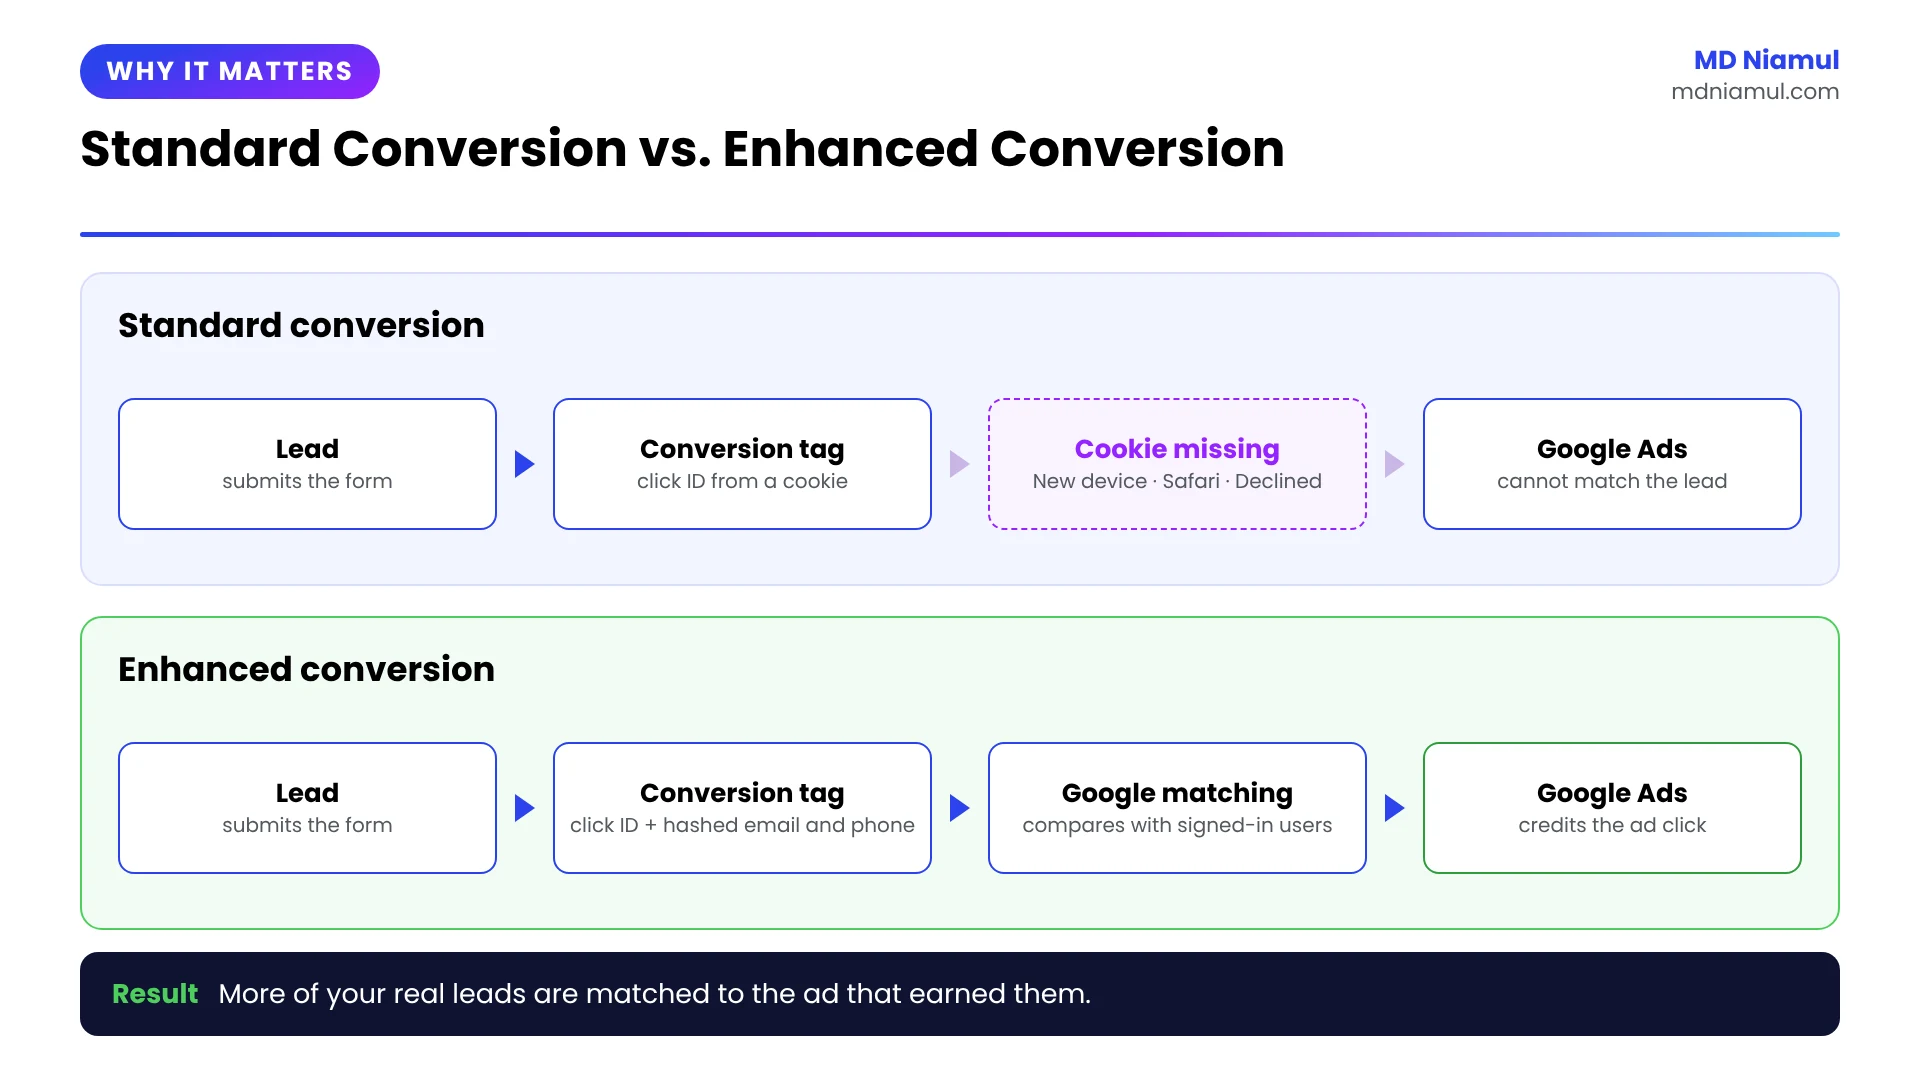
Here is why. A standard Google Ads conversion relies on a click ID stored in a browser cookie. If the visitor clicked the ad on a phone and filled in the form on a laptop, the cookie is not there. If Safari shortened the cookie’s life, it is not there. If the visitor declined or cleared cookies, it is not there. The conversion still happens, but Google cannot say which ad earned it.
Enhanced Conversions closes that gap. Along with the conversion, you send the details the lead typed into your form. Google hashes them and compares them with its signed-in users. Now the match no longer depends on one fragile cookie.
In this guide I will show you how to set up Google Ads Enhanced Conversions for GoHighLevel form leads using Google Tag Manager, step by step. This continues my earlier guide on GoHighLevel form Google Ads conversion tracking with GTM, where we built the base conversion tag. If you have not done that part yet, start there.
Standard Conversion vs. Enhanced Conversion: What Google Receives
| Area | Standard conversion | Enhanced conversion |
|---|---|---|
| What is sent | The conversion and the click ID from a cookie | The conversion, the click ID, and hashed lead details |
| How Google matches the lead | Cookie only | Cookie, or hashed email and phone |
| Lead switches device | Often not matched | Can still be matched |
| Cookie blocked or expired | Often not matched | Can still be matched |
| What Smart Bidding learns from | Part of your leads | More of your leads |
What Is Google Ads Enhanced Conversions for Leads?
Enhanced Conversions is a Google Ads feature that sends first-party customer data with your conversion. First-party data means details the person gave you directly, such as the email address they typed into your form.
Before the data leaves the browser, it is hashed with SHA-256. Think of hashing as a paper shredder that always shreds the same page into the same pattern. Google cannot rebuild the email from the pattern. It can only check whether the pattern matches one it already has for a signed-in user.
The data layer is where the lead’s details wait for GTM. Think of it as an invisible filing cabinet on your page. A script puts a folder in, and GTM reads the folder.
Which Details Does Enhanced Conversions Use?
Google accepts these fields. Only the first four are hashed.
| Detail | Hashed? | Needed for a lead form? |
|---|---|---|
| Yes | Yes. This is the most useful field. | |
| Phone number | Yes | Recommended, together with email |
| First name and last name | Yes | Optional |
| Street, city, region, postal code, country | No | Optional. Only useful as a full address. |
An online store usually has all of these at checkout, so it can send everything. A lead form is different. Most GoHighLevel forms ask for a name, an email and a phone number. Email and phone are enough.
Important: Google only uses address data when first name, last name, postal code and country are all present. If your form does not collect a full address, leave the address fields out. And only send details the lead typed in. A city or postal code guessed from the visitor’s IP address is not user-provided data.
Prerequisites & Setup Checklist
- Google Ads: admin access, auto-tagging turned on, and a lead conversion action already created.
- Google Tag Manager: publish access to the Web container on the page where the form is embedded.
- Existing setup: a Conversion Linker tag and a Google Ads conversion tag for the GoHighLevel form.
- GoHighLevel: a form with at least an email field, embedded on your landing page or funnel page.
- Consent banner: a consent management platform with Google Consent Mode V2 if you have visitors from the EU, EEA or UK.
Not sure what is already installed? Run the page through my free Google Ads audit tool or the free tracking audit tool first.
Video Tutorial Walkthrough
Prefer to watch? In this video I set up Enhanced Conversions for a GoHighLevel form in Google Tag Manager from start to finish.
Step-by-Step Implementation Guide
The setup has six phases. Follow them in order, because each one uses what the phase before it created.
Phase 1: Capture the GoHighLevel Form Data with a Listener
An embedded GoHighLevel form loads inside an iframe. Think of an iframe as a glass window in the wall of your page. You can see the form through it, but GTM stands outside and cannot reach in to read the fields.
The form does help us, though. After a successful submit it sends a message out to the page with the contact’s details. A listener is a small script that waits for that message, like a catcher’s mitt, and drops the details into the data layer.
Step 1: Create the listener tag
- In your Web GTM container, click Tags in the left menu, then the blue New button.
- Click Tag Configuration and choose Custom HTML.
- Paste the code below.
- Under Triggering, choose All Pages.
- Name the tag
cHTML – GoHighLevel Form Listenerand click Save.
If you already added a GoHighLevel listener in the previous guide, keep one listener only. Two listeners would push the lead twice.
<script>
(function () {
  var sent = {};

  window.addEventListener('message', function (event) {
    var data = event.data;

    // 1. GoHighLevel sends an array. The contact details are a JSON string in position 2.
    if (!Array.isArray(data)) { return; }
    if (data[0] !== 'set-sticky-contacts' || data[1] !== '_ud') { return; }

    var contact;
    try { contact = JSON.parse(data[2]); } catch (e) { return; }
    if (!contact || !contact.email) { return; }

    // 2. Fire only once per lead on this page
    if (sent[contact.email]) { return; }
    sent[contact.email] = true;

    // 3. Build the user_data object with the fields the form collected
    var userData = { email: contact.email };
    if (contact.phone) { userData.phone_number = contact.phone; }
    if (contact.first_name) { userData.first_name = contact.first_name; }
    if (contact.last_name) { userData.last_name = contact.last_name; }
    if (contact.city) { userData.city = contact.city; }
    if (contact.state) { userData.region = contact.state; }
    if (contact.postal_code) { userData.postal_code = contact.postal_code; }
    if (contact.country) { userData.country = contact.country; }

    // 4. Hand the lead to Google Tag Manager
    window.dataLayer = window.dataLayer || [];
    window.dataLayer.push({
      event: 'ghl_form_submit',
      user_data: userData
    });
  });
})();
</script>
How the code works
- Part 1 ignores every message that is not the GoHighLevel contact message.
- Part 2 makes sure the same lead is only pushed once on a page.
- Part 3 builds a
user_dataobject and only includes fields that have a value. Google asks you to leave out empty fields. - Part 4 pushes the event
ghl_form_submitto the data layer. This is the event your tags will fire on.
Good to know: this listener relies on the message format the GoHighLevel form sends today. If GoHighLevel changes that format, the listener needs an update, so always confirm it in Preview mode (Phase 2). If you need a listener for a different form tool, my free form tracking listener generator builds one for you.

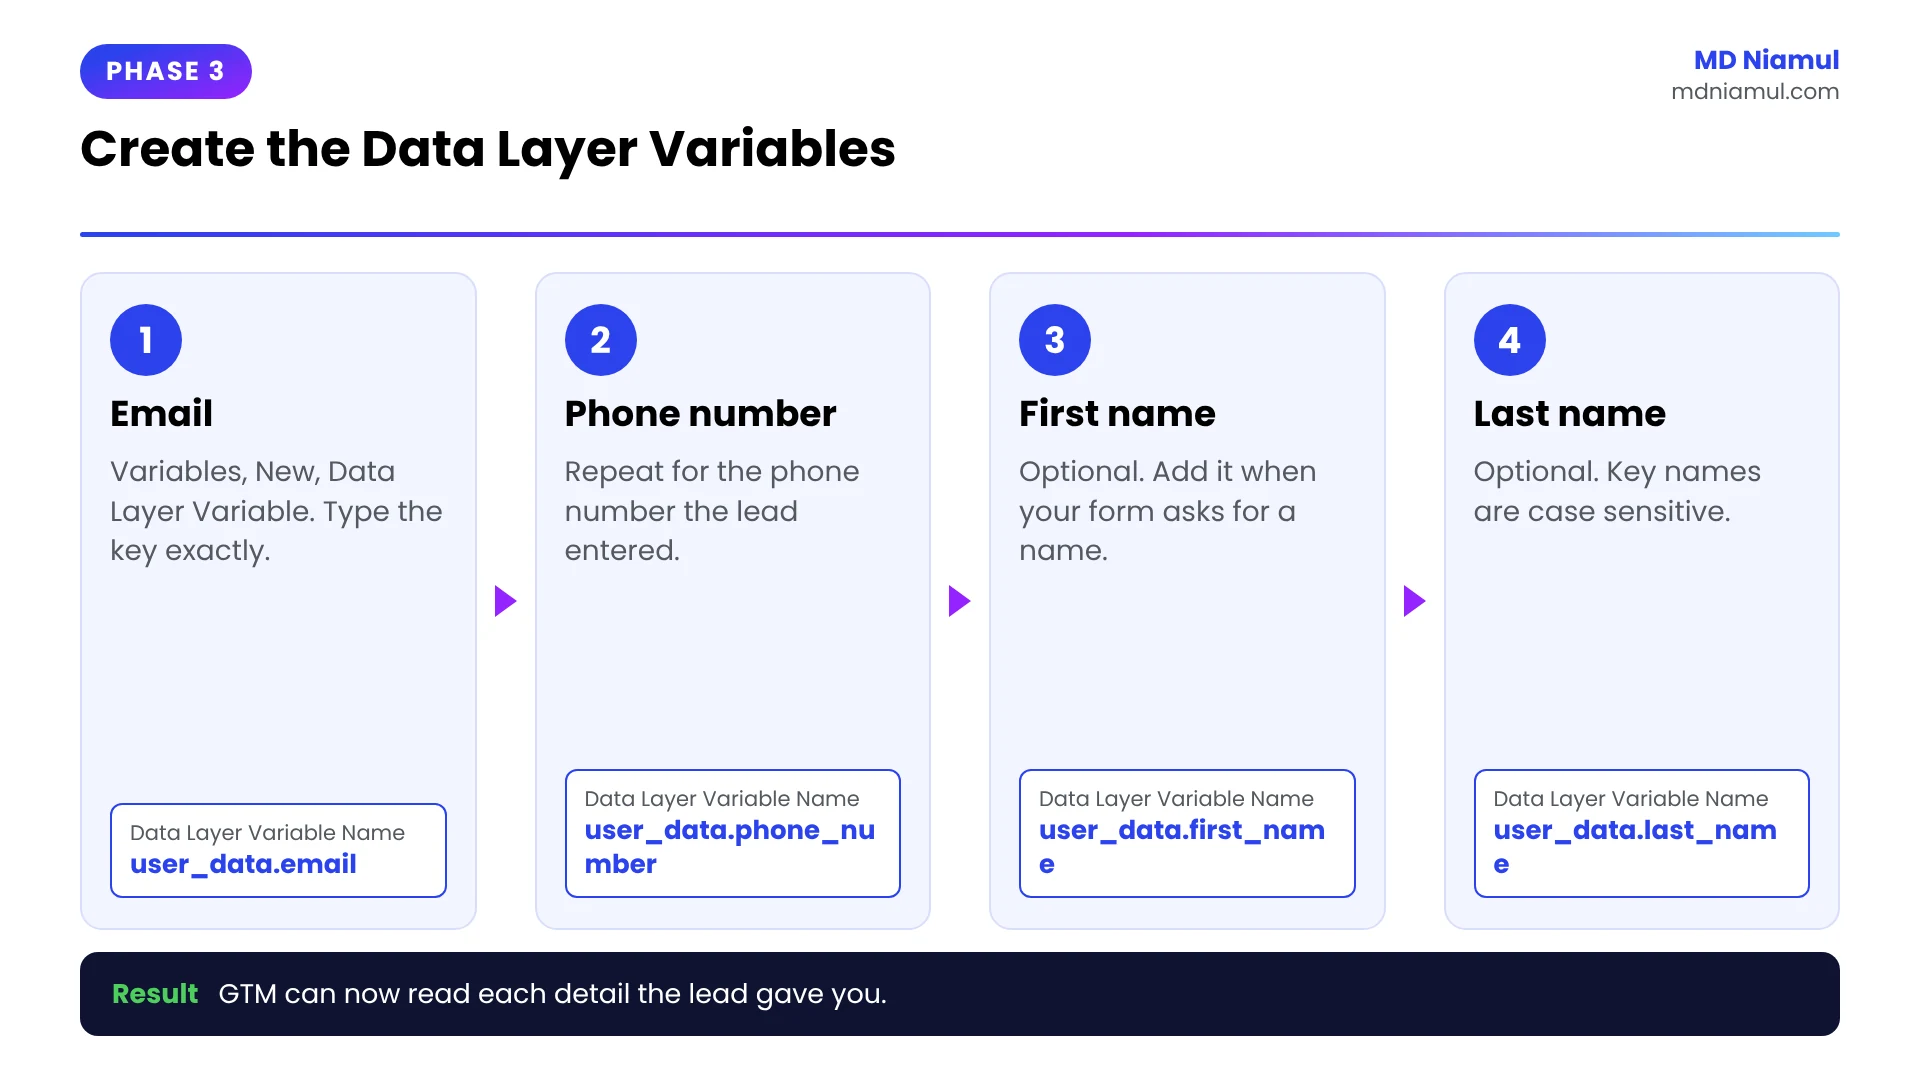
Phase 2: Check the Data Layer in Preview Mode
Before you build anything else, confirm the lead’s details really arrive. This takes two minutes and saves hours of guessing later.
- In GTM, click the Preview button in the top right corner.
- Enter the URL of the page with your GoHighLevel form and click Connect.
- Wait for the form to load, then fill it in with a test name, email and phone number, and submit it.
- Go back to the Tag Assistant tab. In the left timeline, click the event
ghl_form_submit. - Open the Data Layer tab and look for
user_data.
You should see something like this:
| Data layer key | Example value |
|---|---|
event |
ghl_form_submit |
user_data.email |
[email protected] |
user_data.phone_number |
+15551234567 |
user_data.first_name |
Jane |
user_data.last_name |
Doe |
Check the phone format. Google expects the international E.164 format: a plus sign, the country code, then the number, with no spaces or dashes. For example, +15551234567. If your form saves phone numbers in a local format, switch the GoHighLevel phone field to include the country code.
If the ghl_form_submit event does not appear, jump to the troubleshooting section before you continue.
Phase 3: Create the Data Layer Variables
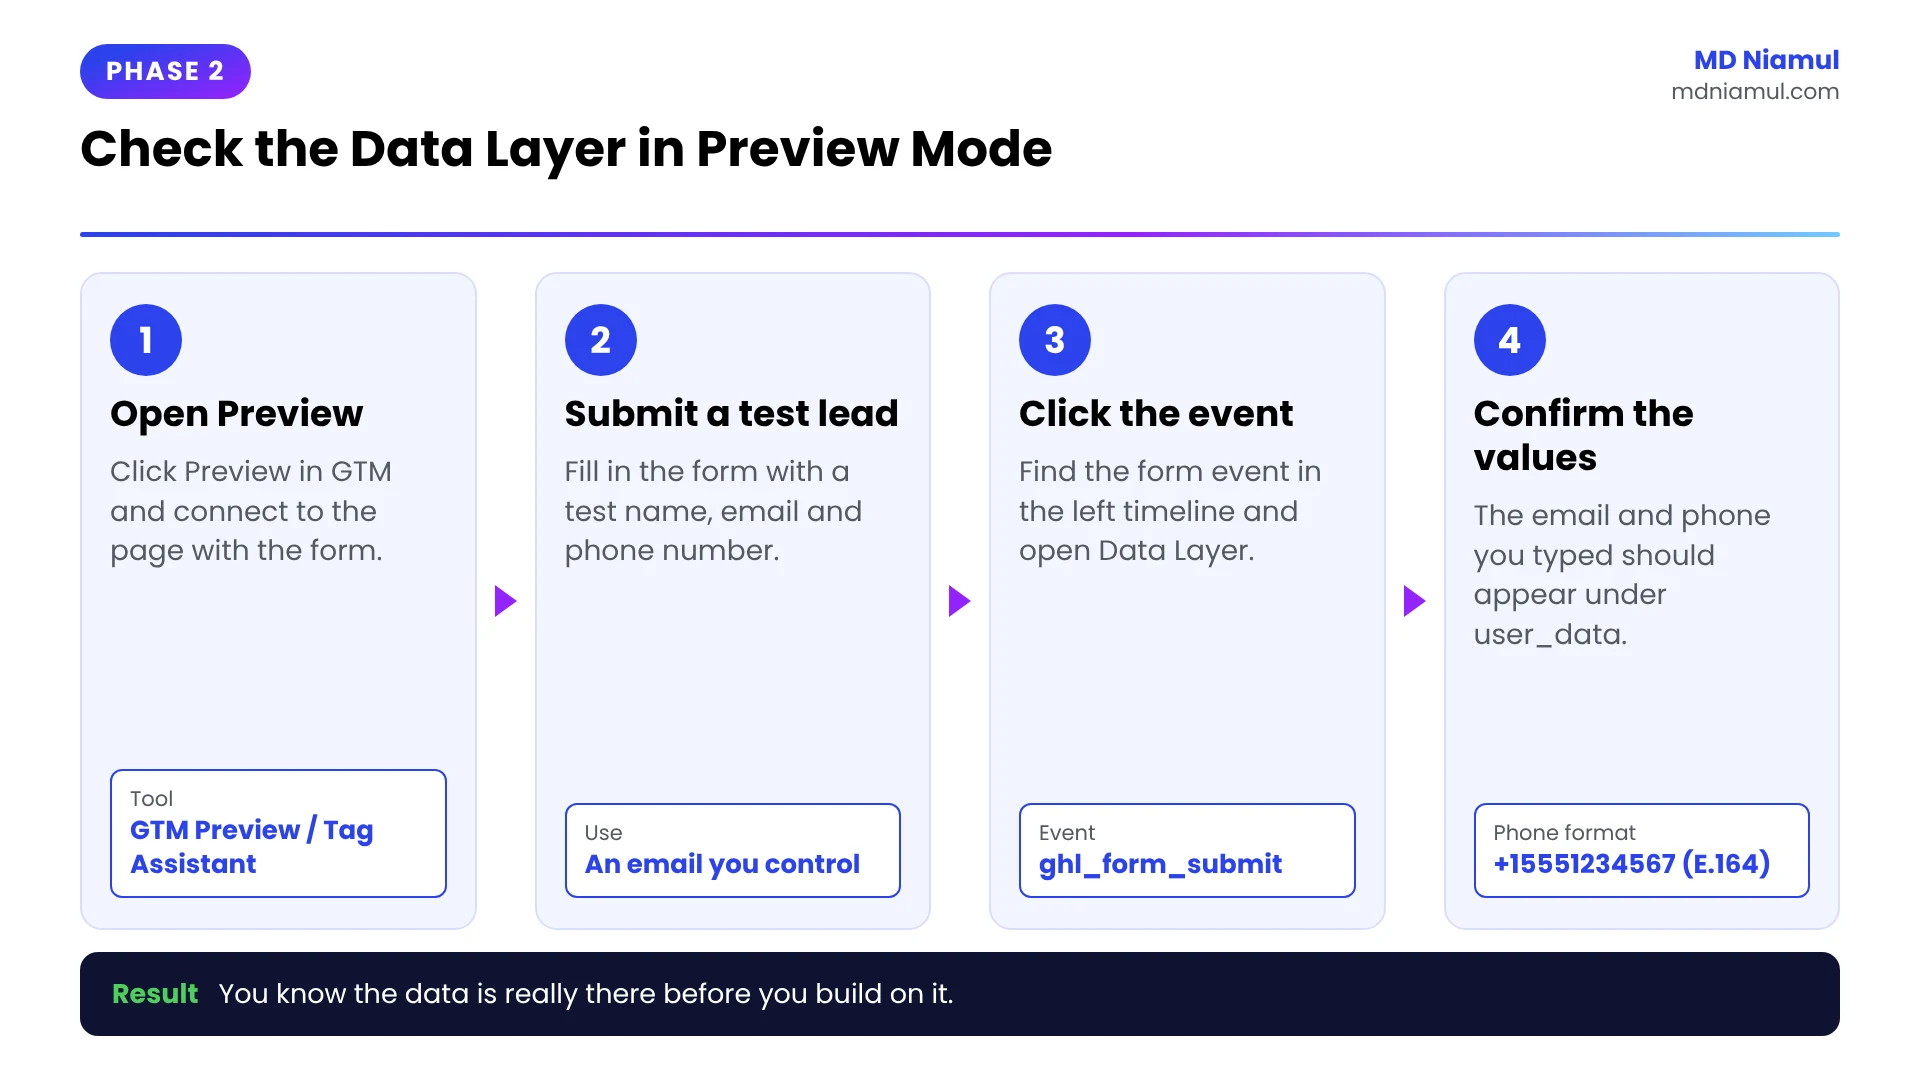
GTM cannot use a data layer value until you create a variable for it. A variable is a label that tells GTM which drawer of the filing cabinet to open.
Step 1: Create one variable per field
- In GTM, click Variables in the left menu.
- Scroll to User-Defined Variables and click New.
- Click Variable Configuration and choose Data Layer Variable.
- In Data Layer Variable Name, type the key exactly as it appears in Preview mode.
- Name the variable and click Save.
- Repeat for each field your form collects.
| Variable name in GTM | Data Layer Variable Name |
|---|---|
dlv – user_data.email |
user_data.email |
dlv – user_data.phone_number |
user_data.phone_number |
dlv – user_data.first_name |
user_data.first_name |
dlv – user_data.last_name |
user_data.last_name |
Critical step: the names are case sensitive. user_data.Email and user_data.email are two different keys, and the wrong one returns nothing.
Should you hash the values yourself? You do not have to. When you send plain values, the Google tag normalizes and hashes them for you before they leave the browser. If your data layer already holds SHA-256 values, you can send those instead, and my free hashing code generator creates the GTM variables for that. Pick one way and use it for every field.
Phase 4: Turn On Enhanced Conversions in Google Ads
Google Ads ignores user-provided data until you switch the feature on and accept the customer data terms. If you skip this phase, the tag still sends the data and Google simply drops it.
Step 1: Turn on the account setting
- In Google Ads, click the Goals icon in the left menu.
- Open Conversions and click Settings.
- Expand Enhanced conversions. Some accounts still show a separate Enhanced conversions for leads section. Google has been merging the two into one setting during 2026.
- Tick the box to turn it on.
- Choose Google Tag Manager as the method.
- Open the customer data terms, read them, and accept.
- Click Save.
Step 2: Check the conversion action
- Go to Goals, then Summary.
- Click the lead conversion action you created for the GoHighLevel form.
- Open its settings. If you see an Enhanced conversions section there, turn it on and choose Google Tag Manager.
- Save the conversion action.
Google’s own steps for this screen are in the enhanced conversions setup guide for Google Tag Manager.

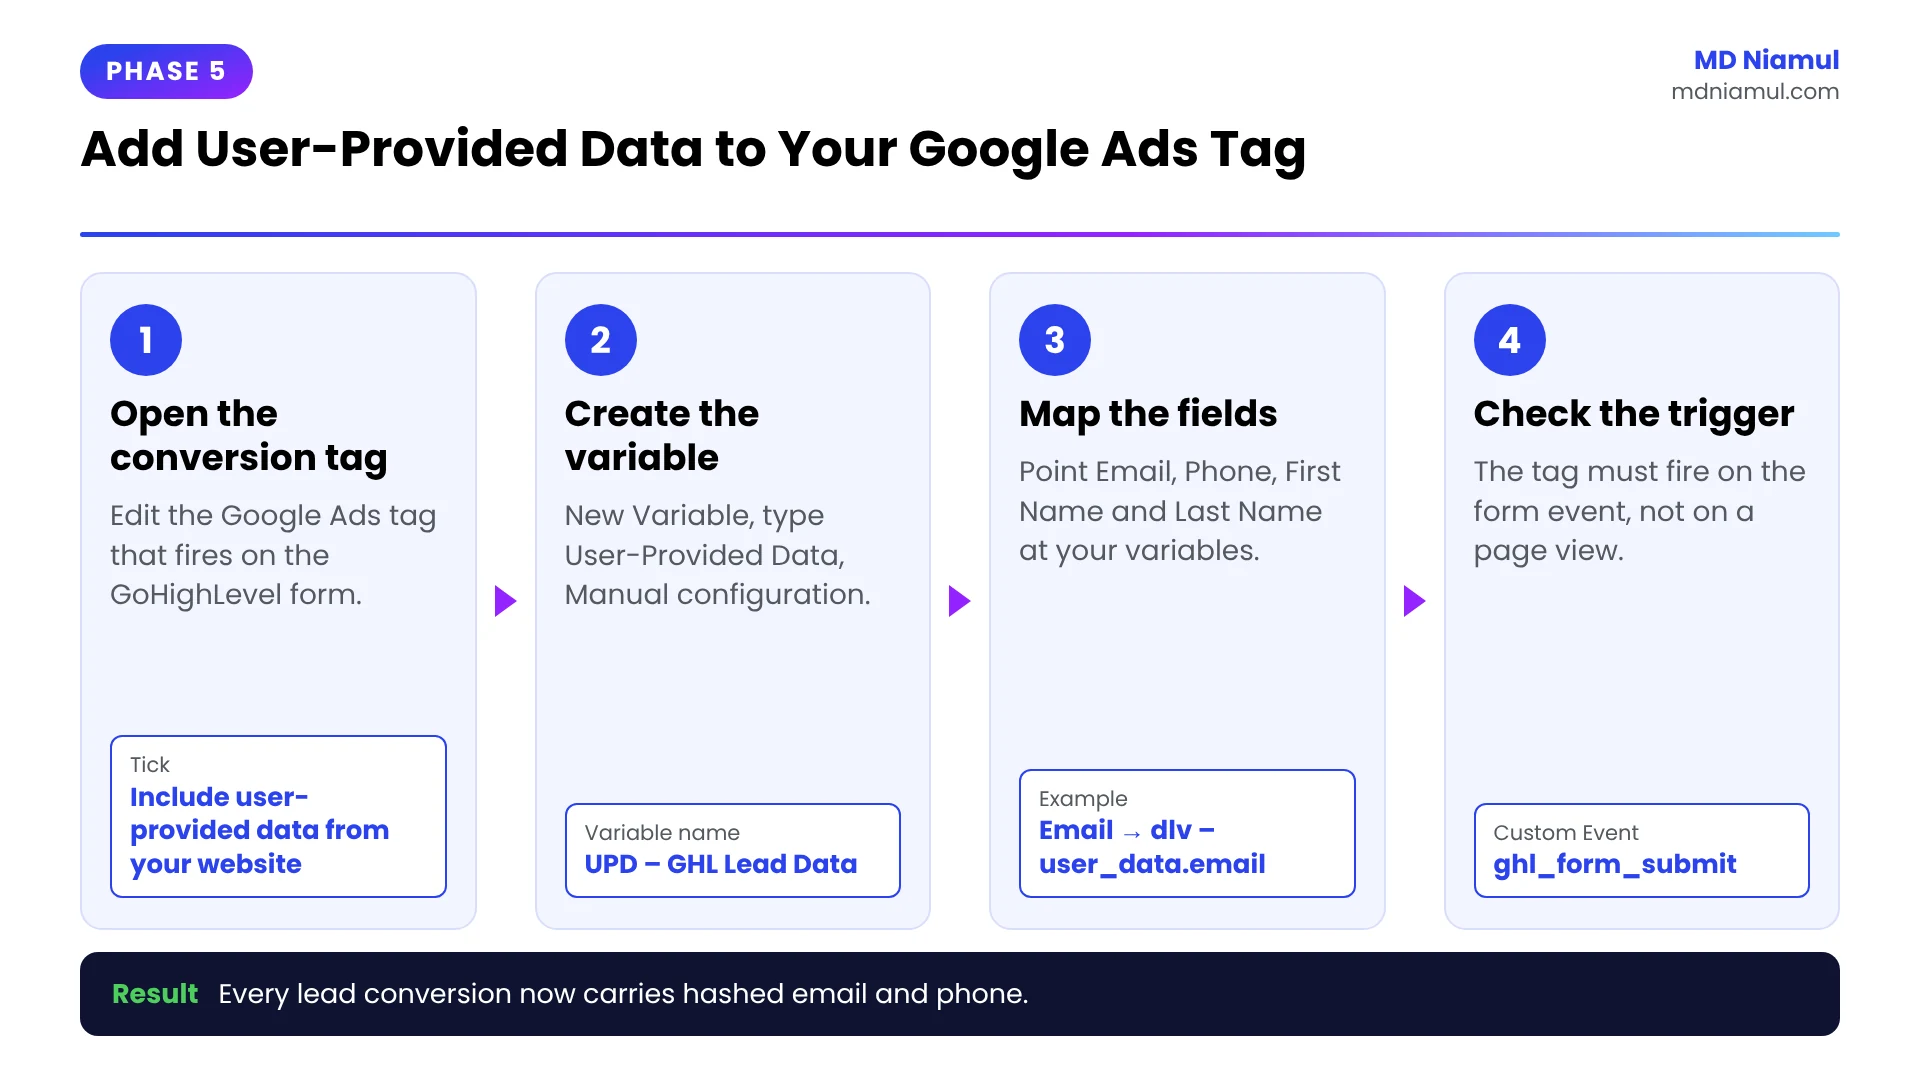
Phase 5: Add the User-Provided Data to Your Google Ads Tag
Now we connect the two sides. The variables from Phase 3 go into one User-Provided Data variable, and that variable goes onto the conversion tag you already have.
Step 1: Open your conversion tag
- In GTM, click Tags.
- Open the Google Ads conversion tag that fires on the GoHighLevel form, for example
Google Ads – GHL Lead Form. - Click inside Tag Configuration to edit it.
- Tick Include user-provided data from your website.
Step 2: Create the User-Provided Data variable
- In the dropdown that appears, choose New Variable.
- For the type, choose User-Provided Data.
- Select Manual configuration.
- Map each field to the matching variable from Phase 3.
- Name the variable
UPD – GHL Lead Dataand click Save.
| Field in the variable | GTM variable to select |
|---|---|
{{dlv – user_data.email}} |
|
| Phone | {{dlv – user_data.phone_number}} |
| First Name | {{dlv – user_data.first_name}} |
| Last Name | {{dlv – user_data.last_name}} |
| Street, City, Region, Postal Code, Country | Leave empty unless your form collects a full address |
Step 3: Check the trigger and save
- Under Triggering, make sure the tag fires on a Custom Event trigger where the event name is
ghl_form_submit. - Click Save.
Why the trigger matters: the user data only exists in the data layer at the moment of the ghl_form_submit event. If the tag fires on a page view or a thank-you page instead, the variables are empty and nothing is sent.
Good to know: Google also offers a separate tag type called Google Ads User-Provided Data Event. Use that one when your conversion is recorded later, for example from your CRM. When the conversion tag fires at the moment of the form submit, as it does here, the checkbox on the conversion tag is all you need.
Phase 6: Respect Consent with Google Consent Mode V2
Enhanced Conversions sends personal details, so consent matters. Consent Mode works like a traffic light for your tags. Green means they may send the data. Red means they must hold back.
- Make sure your consent banner’s tag fires on Consent Initialization – All Pages, before every other tag.
- For regions that require consent, the default state of
ad_storage,ad_user_dataandad_personalizationshould be denied until the visitor chooses. - Google tags read these signals on their own. When
ad_user_datais denied, the tag does not send user-provided data for advertising.
You can test your banner with my free Consent Mode v2 checker.
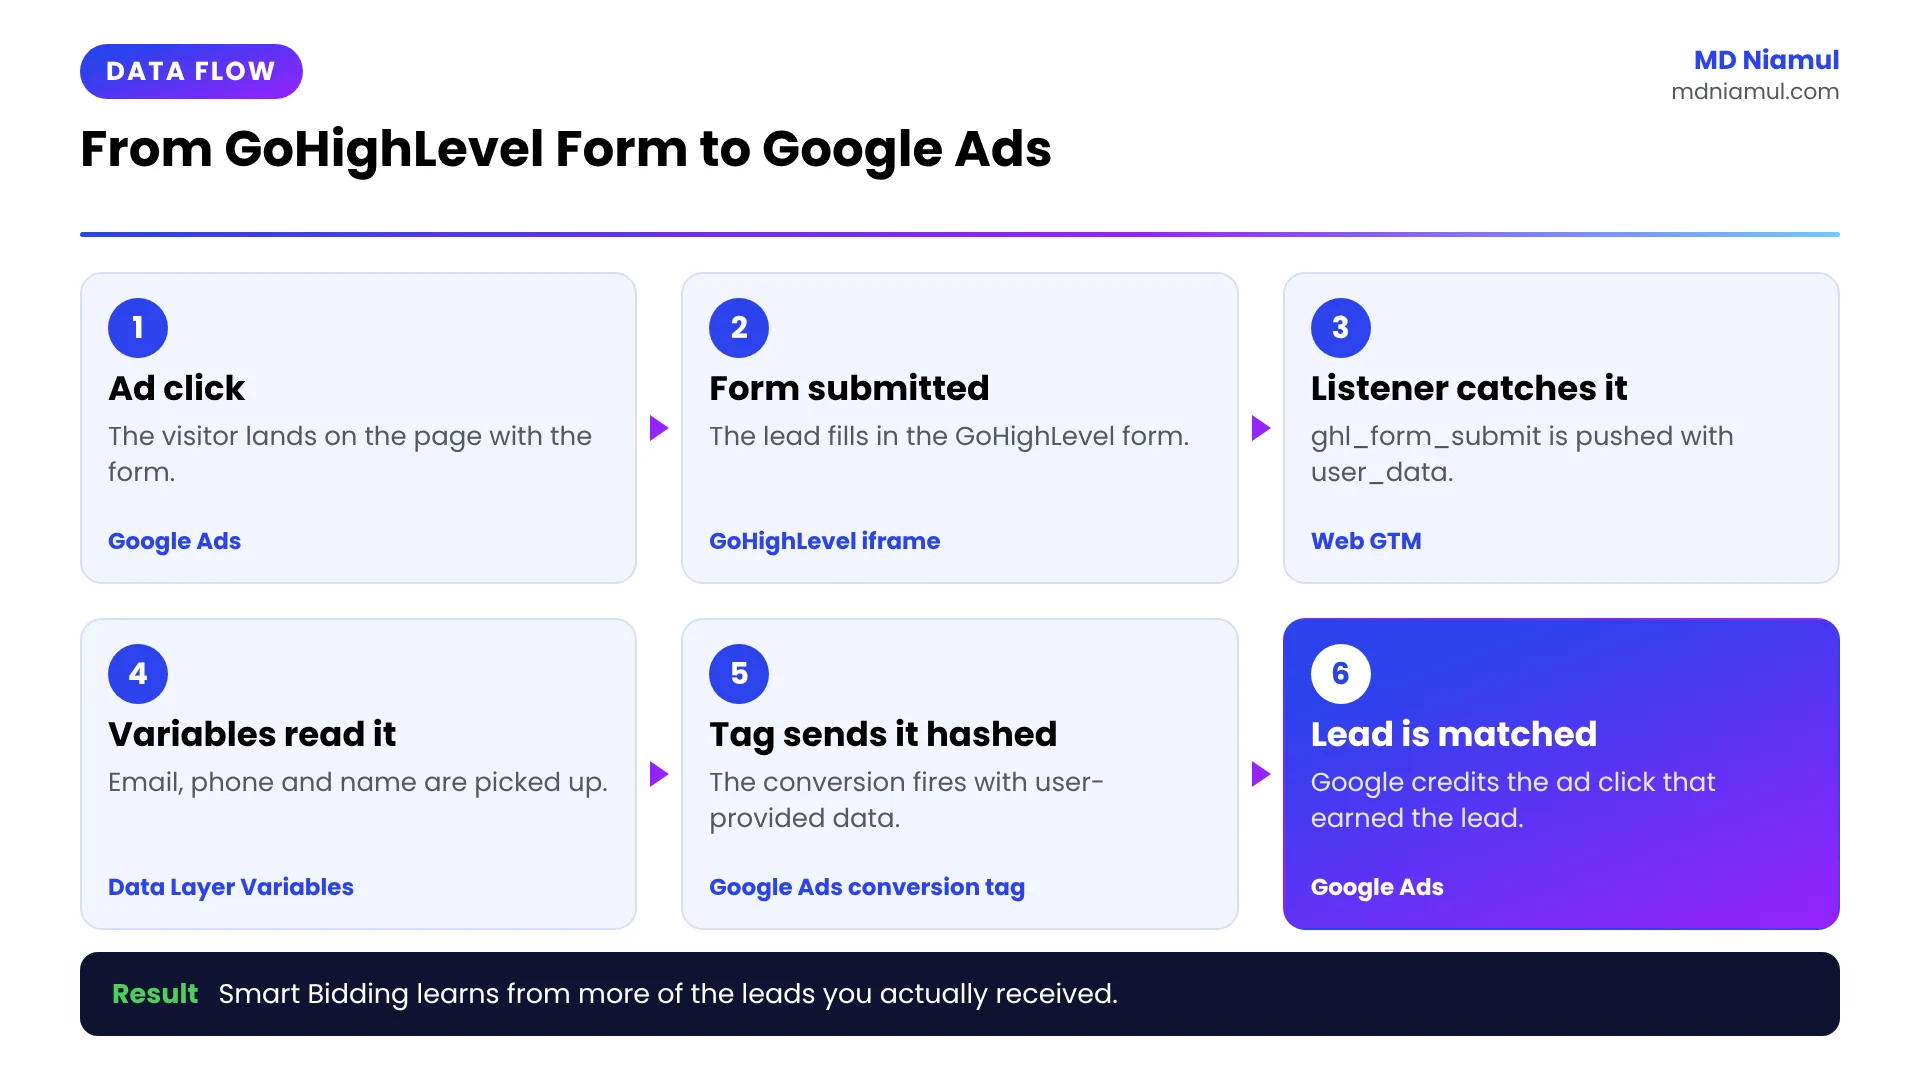
The Full Data Flow at a Glance
| # | What happens | Where |
|---|---|---|
| 1 | A visitor clicks your ad and lands on the page with the form | Google Ads |
| 2 | The visitor submits the GoHighLevel form | GoHighLevel iframe |
| 3 | The listener catches the form’s message and pushes ghl_form_submit with user_data |
Web GTM |
| 4 | The Data Layer Variables read the email, phone and name | Web GTM |
| 5 | The conversion tag fires and the Google tag hashes the details | Web GTM |
| 6 | Google Ads matches the hashed details to a signed-in user and credits the ad click | Google Ads |
Testing & Validation Workflow
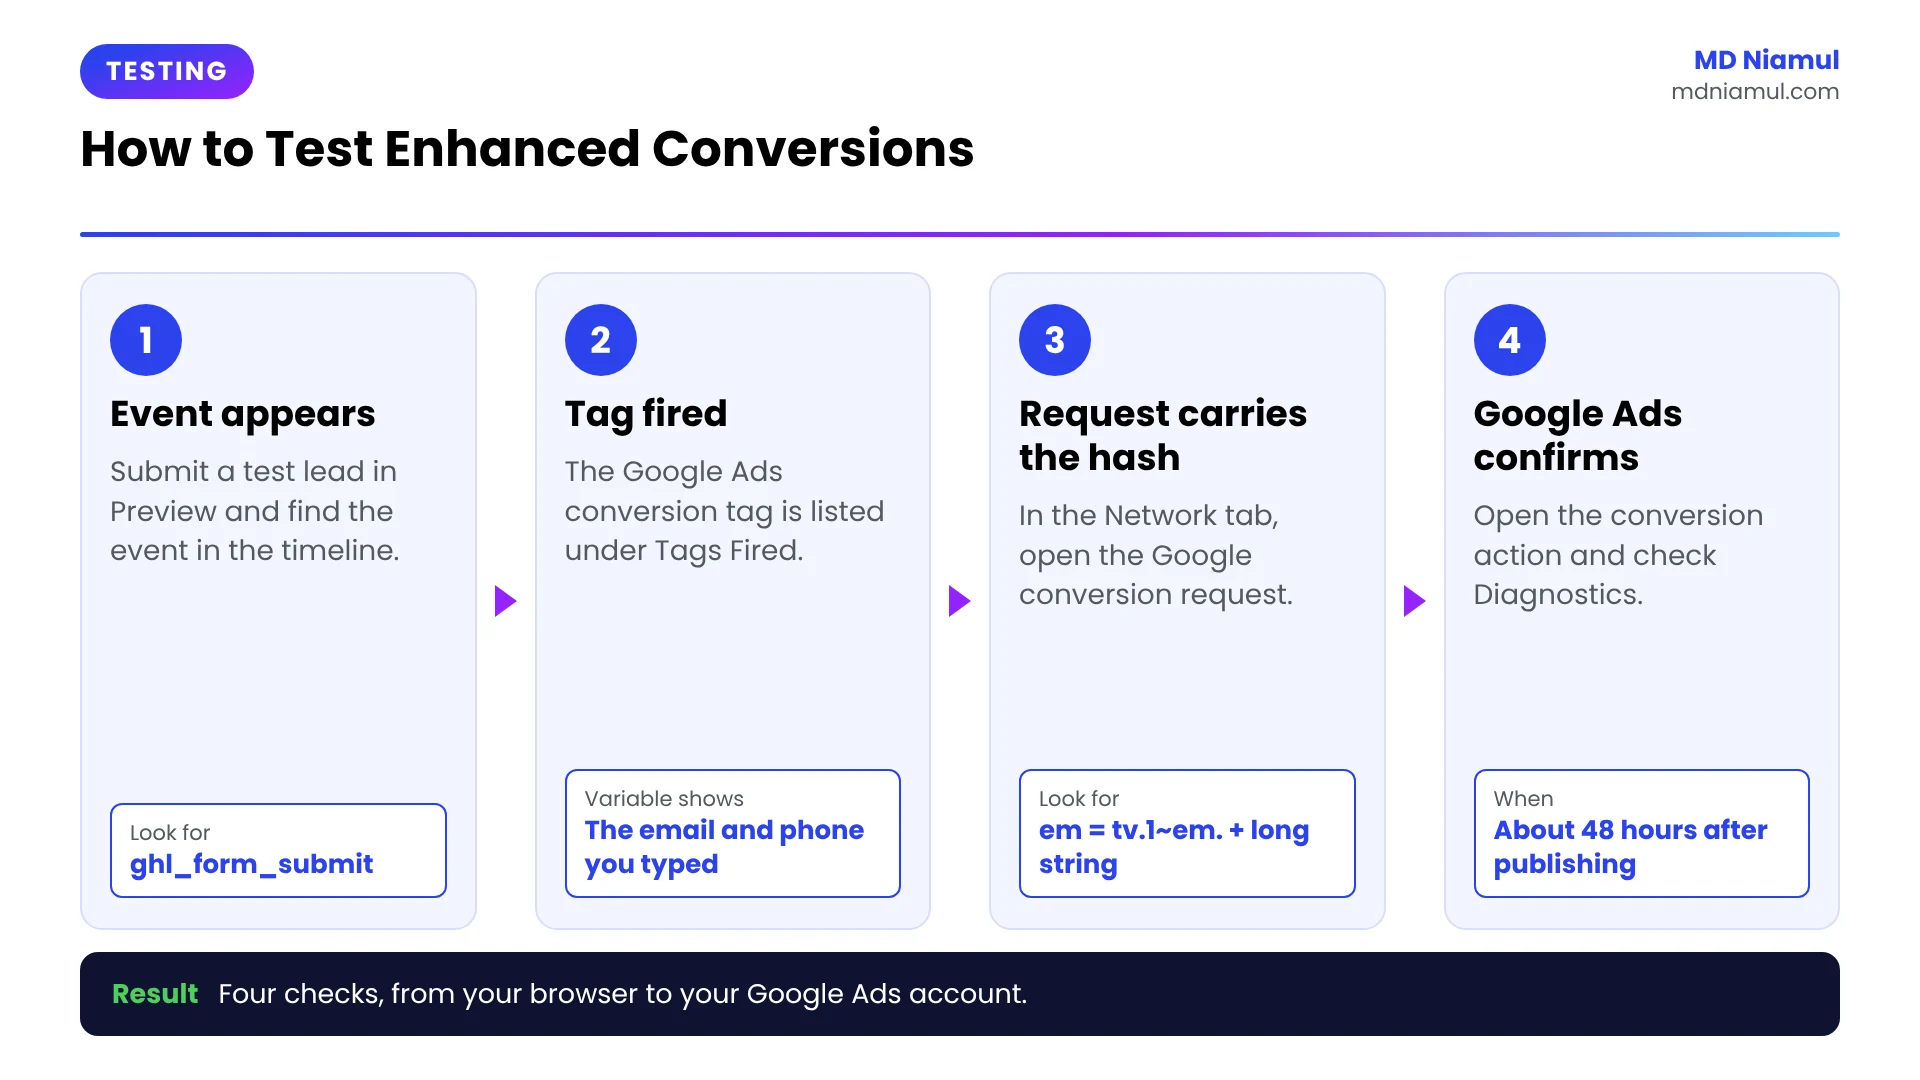
- Open Preview mode. Click Preview in GTM and connect to the page with the form.
- Submit a test lead. Use an email address you control.
- Check the event. In the timeline, click
ghl_form_submit. On the Tags tab, your Google Ads conversion tag should be listed under Tags Fired. - Check the variables. On the Variables tab,
UPD – GHL Lead Datashould show the email and phone you typed. - Check the request. Open Chrome Developer Tools, go to the Network tab, and filter for
google. Find the conversion request and look for anemvalue that starts withtv.1~em.followed by a long string. That long string is the hashed email. Anemwith nothing after it means the data was empty. - Publish. Click Submit in GTM to make the changes live.
- Check Google Ads. About 48 hours later, open Goals, then Summary, click the conversion action and open Diagnostics. Give it around 30 days before you judge the effect on reported conversions.
Troubleshooting Common Mistakes
Mistake 1: The ghl_form_submit event never appears
The Problem: you submit the form and nothing new shows in the Preview timeline.
The Cause: the listener tag is not firing on that page, or the form opens on its own GoHighLevel page instead of inside your page, so there is no message for your page to catch.
The Solution: confirm cHTML – GoHighLevel Form Listener fired on page load. If the form lives on a GoHighLevel funnel page, install the same GTM container on that funnel page so the listener runs next to the form.
Mistake 2: The tag fires but the user data is empty
The Problem: the conversion tag fires, but UPD – GHL Lead Data shows undefined.
The Cause: a Data Layer Variable name does not match the key, or the tag fires on a different event than ghl_form_submit.
The Solution: copy each key from the Data Layer tab in Preview mode and paste it into the variable. Then make the Custom Event trigger use the exact event name.
Mistake 3: Diagnostics says the phone number is not formatted correctly
The Problem: Google Ads accepts the email but flags the phone number.
The Cause: the number arrives without a country code, or with spaces, brackets or dashes.
The Solution: set the GoHighLevel phone field to store the country code, so the value looks like +15551234567.
Mistake 4: Leads are counted twice
The Problem: Google Ads shows two conversions for one form fill.
The Cause: two listeners are installed, or one conversion tag fires on the form event and a second one fires on the thank-you page.
The Solution: keep one listener and one conversion tag per conversion action. Pause the extra one.
Mistake 5: Enhanced Conversions shows no data in Google Ads
The Problem: everything looks right in Preview mode, but Google Ads reports nothing.
The Cause: the account setting from Phase 4 is still off, the customer data terms were not accepted, or the container was never published.
The Solution: go back to Goals, Conversions, Settings and confirm the feature is on. Then publish the GTM container and wait about 48 hours.
What to Set Up Next
Enhanced Conversions improves how many leads Google can match. It does not tell Google which leads were any good. These guides cover the next steps:
- Send closed deals back. My guide on Google Ads offline conversion tracking with GoHighLevel CRM shows how to report qualified leads and sales.
- Understand the bigger picture. See why server-side tracking and offline conversion tracking matter for lead gen campaigns.
- Track the same form in GA4. Follow tracking GoHighLevel lead forms in GA4 with GTM.
If you would like this built and tested for you, see my GoHighLevel form conversion tracking service or my work as a GoHighLevel conversion tracking specialist.
Conclusion
You now have Enhanced Conversions running on your GoHighLevel form. The listener catches the lead, the data layer holds the details, and your Google Ads tag sends them hashed with every conversion.
Three things to do from here. First, publish the container and submit one real test lead. Second, check Diagnostics in Google Ads after 48 hours. Third, leave the setup alone for about 30 days so Smart Bidding can learn from the fuller data.
After that, your bids are based on more of the leads you actually received.
Summary by MD Niamul
Google Ads Enhanced Conversions for GoHighLevel forms sends the lead’s hashed email and phone number with the conversion, so Google can match the lead to an ad click even when the click cookie is missing. Because the GoHighLevel form sits in an iframe, a Google Tag Manager listener catches the form’s message and pushes the event ghl_form_submit with a user_data object to the data layer. Data Layer Variables read those values, a User-Provided Data variable maps them, and the Google Ads conversion tag sends them with “Include user-provided data from your website” turned on. Enhanced Conversions must be enabled in Google Ads under Goals, Conversions, Settings. Test in GTM Preview mode and confirm in Diagnostics after about 48 hours.
Frequently Asked Questions (FAQ)
1. What are Google Ads Enhanced Conversions?
Enhanced Conversions is a Google Ads feature that sends first-party customer details, such as email and phone number, together with your conversion. The details are hashed with SHA-256 before they leave the browser, so Google never receives the readable value. Google compares the hashed details with its signed-in users to connect the conversion to an ad click. This helps when the click cookie is missing, for example after a device switch or when a browser limits cookies.
2. Why do GoHighLevel leads go missing in Google Ads?
Usually the lead is real and the tag fired, but Google could not link the conversion to an ad click. A standard conversion depends on a click ID stored in a cookie. If the visitor changed device, used a browser that shortens cookie life, or declined cookies, that link is lost. Tracking problems can also play a part, such as a tag that fires on the wrong event. Enhanced Conversions gives Google a second way to make the match.
3. Can GTM read GoHighLevel form fields directly?
No. An embedded GoHighLevel form loads inside an iframe from a different domain, and the browser blocks your page from reading fields inside it. Standard GTM form triggers and DOM variables therefore return nothing. The reliable method is a listener script in a Custom HTML tag. It waits for the message the GoHighLevel form sends after a successful submit, reads the contact details from that message, and pushes them to the data layer for GTM.
4. Which data does a lead form need to send?
For a lead form, email and phone number are enough, and email is the most useful field. First name and last name are optional extras that can help matching. Address fields only help when first name, last name, postal code and country are all present, so most lead forms should leave them out. Send only details the person typed into your form. Leave a field out completely when it has no value instead of sending it blank.
5. Do I need to hash the data myself?
No. When you map plain values in the User-Provided Data variable, the Google tag normalizes and hashes them with SHA-256 in the browser before sending. This is the simplest and safest route. If your data layer already contains SHA-256 values, you can send those instead using the pre-hashed key names. Do not mix the two methods for the same field, and never hash a value twice, because a double-hashed email will not match anything.
6. What phone format does Google Ads need?
Google expects phone numbers in E.164 format. That means a plus sign, the country code and the full number, with no spaces, brackets or dashes. For example, a United States number looks like +15551234567. If your GoHighLevel form stores numbers in a local format without the country code, Google may not match them and Diagnostics can flag a formatting issue. Set the phone field in GoHighLevel to include the country code so the value arrives ready to use.
7. Where do I turn on Enhanced Conversions?
In Google Ads, click the Goals icon, open Conversions and click Settings. Expand the Enhanced conversions section, tick the box to turn it on, choose Google Tag Manager as the method, and accept the customer data terms. Some accounts still show a separate section for leads, because Google has been merging the web and leads settings during 2026. Then check your lead conversion action and enable the feature there if the option is shown.
8. How do I test Enhanced Conversions in GTM?
Open GTM Preview mode, connect to the page with the form and submit a test lead. Click the ghl_form_submit event and confirm your Google Ads conversion tag fired. On the Variables tab, the User-Provided Data variable should show the email and phone you entered. For a deeper check, open the browser’s Network tab, find the Google conversion request and look for an em value that starts with tv.1~em. followed by a long string.
9. How long until Google Ads shows the result?
Google Ads needs time to process the data. The Diagnostics tab for the conversion action is usually ready about 48 hours after you publish the setup and real conversions start coming in. It tells you whether Enhanced Conversions is recording and whether any field has a formatting problem. To judge the effect on reported conversions, give it around 30 days, because Google needs enough conversions over time to show a reliable comparison.
10. Is Enhanced Conversions allowed under GDPR?
Enhanced Conversions can be used in a compliant way, but it does send personal data for advertising, so you need a lawful basis and valid consent where the law requires it. Use a consent banner with Google Consent Mode V2 and set ad_user_data to denied by default in regions that require consent. Google tags then hold back user-provided data until the visitor agrees. This is general information, so confirm your own obligations with a privacy professional.
 Need Help Advanced GHL Automation & Tracking Setup?